Anyone can make beats with a MIDI keyboard – here’s how:
To make beats with a MIDI keyboard, you need to download a DAW like Logic Pro X, Ableton, or FL Studio. Choose your virtual software instrument, and then draw a basic 3-chord pattern in the piano roll. By recording several digital instruments, you can layer melodies and rhythms on top of each other.
What You Need to Make A Beat (With A MIDI Keyboard)
1) A DAW
![GarageBand, FL Studio, Logic Pro X, Ableton Live, SoundLab - How To Make Beats With A MIDI Keyboard [EASY]](https://producersociety.com/wp-content/uploads/2022/06/GarageBand-FL-Studio-Logic-Pro-X-Ableton-Live-SoundLab-How-To-Make-Beats-With-A-MIDI-Keyboard-EASY.jpg)
There’s a wide selection of DAWs to choose from, any of which can be used to make a beat. Here’s a brief summary of the most popular ones, and one cool feature that sets each one apart from the rest.
GarageBand
Garageband is a great place for beginner producers to start their beat-making journey – I have a tutorial on how to start here. A unique feature that’s friendly for beginner producers, is Apple’s recently introduced Remix Sessions.
These are video tutorials from the pros that can help you start your production journey, however, as I’ve explained here, GarageBand has a lot more features than that. I’ve also written a whole other article on how to make beats with GarageBand.
BandLab
In this new era, the ability to collaborate virtually is more important than ever. BandLab sets itself apart from other DAWs with its live session features.
These allow you the opportunity to simultaneously work on the same session with your fellow collaborators – and it’s all live. Many people describe BandLab as GarageBand for Linux and Windows users. Before BandLab came out, there wasn’t a comparable, free, DAW for beginner music producers on Windows/Linux.
Ableton
Ableton Live has a unique feature that makes it arguably the most popular DAW among EDM producers – and that’s “Session View”. It’s the first DAW to create this live looping environment which makes for amazing opportunities to improvise MIDI and audio clips on the fly.
Logic Pro X
My favorite feature in Logic Pro X is dynamic plugin loading. This is an advantage when it comes to being able to open your project and play your track faster. According to Apple’s support website, dynamic plugin loading only activates the tracks/plugins needed for playback.
FL Studio
What makes FL Studio special is its workflow. It seems as though FL Studio is the DAW of choice for hip-hop producers – I recommend the Producer’s Editon. All you have to do is take one look at the sheer number of tutorials on YouTube, and you’ll see what I mean.
2) An Online MIDI Editor or DAW
![Soundtrap/MIDI Editor - How To Make Beats With A MIDI Keyboard [EASY]](https://producersociety.com/wp-content/uploads/2022/06/SoundtrapMIDI-Editor-How-To-Make-Beats-With-A-MIDI-Keyboard-EASY.jpg)
Soundtrap
Simply put, this is an online DAW or in other words, a browser-based DAW, instead of an application-based software that you have to download. Made by Spotify, Soundtrap’s unique feature is the ability to edit and upload audio transcripts to Spotify.
MIDI Editor
If you’re on the go, and you need a quick way to edit existing MIDI data, this site is a free tool that allows you to import and edit MIDI data. You can also connect any MIDI instrument to record your own data.
I’ve talked about this tool a few times including in my guide on how to make midi, but what I’ll say briefly here is that it’s a nifty tool that allows you to work on things on the fly, assuming you have an internet connection, at least.
How to Connect Your MIDI Keyboard to Your Computer
While this part is pretty straightforward, it’s worthwhile to get it right so that you can get straight to making the beats instead of being marred by not setting up the hardware correctly.
For the most part, though, setting up a MIDI keyboard with your computer is dead simple. My video here will help you.
1) Connect the MIDI Keyboard with a USB A or USB-C Cable
![USB-A and USB-C - How To Make Beats With A MIDI Keyboard [EASY]](https://producersociety.com/wp-content/uploads/2022/06/USB-A-and-USB-C-How-To-Make-Beats-With-A-MIDI-Keyboard-EASY.jpg)
USB A
Some keyboards will connect directly to your computer using a USB A cable. This is the old USB technology that’s being phased out, but it looks the same as your flash drive and this is the end that gets plugged into the computer.
USB-C
Newer keyboards will have a USB-C connection. This is the newer USB technology – and it resembles the charger for your new Android device/iPhone. The benefit of having this kind of connection is that you can carry one cable in your backpack for use across multiple devices.
Electric Keyboard With Audio Interface With MIDI IN/OUT
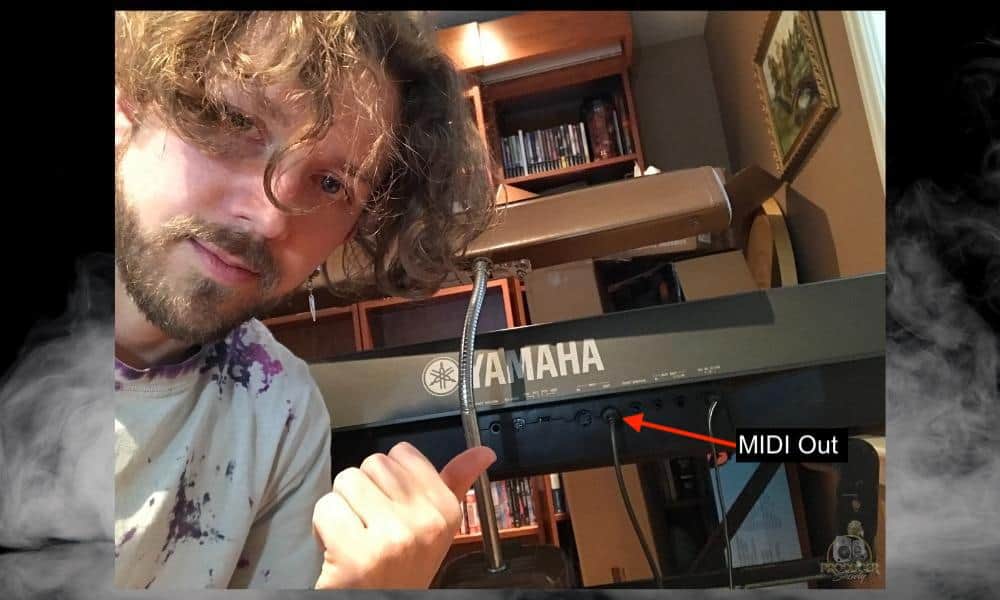
If you’ve got an older MIDI keyboard, synth, or electric keyboard without a USB connection, you would be dealing with the classic five-pin MIDI in/out connection. For these types of keyboards, you would need to plug the keyboard into the MIDI port of your audio interface.
You would connect the MIDI OUT port of your keyboard to the MIDI IN port of your audio interface. This allows your computer to receive the MIDI data from the keyboard, and it can also be set up in the opposite way (data sent from the computer to the keyboard).
Some people like to use a USB-MIDI adapter instead because it’s cheaper. This device will take the MIDI protocol and convert it to USB so that you can plug the USB into your PC.
![MIDI In/OUT On Old Devices - Pros and Cons of MIDI [What You Need to Know]](https://producersociety.com/wp-content/uploads/2022/03/MIDI-INOUT-On-Old-Devices-Pros-and-Cons-of-MIDI-What-You-Need-to-Know.jpg)
That said, considering you’re getting into music production, a much better solution would be to buy an audio interface that has MIDI ports on the back. You can get the Sapphire 6USB that I mentioned a minute ago, but Focusrite no longer makes them.
Instead, a good option would be the PreSonus AudioBox 96. This audio interface is dirt-cheap and it works well, however, the Scarlett 18i8 (on my Product Page) is a better device. This is a significant step up from the regular Scarlett 2i2 and the AudioBox 96 and it also has the MIDI IN/OUT on the back.
2) Configure the Settings on Your Computer
Most modern MIDI keyboards are configured from the factory in such a way that using them in your DAW is as easy as plug and play. With others, you might have to go through a few extra configuration steps on your computer.
If you connect your MIDI keyboard directly to your computer through a USB connection, then it will show up as the name of the keyboard on your computer. If you connect it through MIDI on your interface, it will show up as the connection point name that’s on your interface.
In some cases, you’ll have to install drivers on your computer to get a MIDI device to work, but many keyboards now are plug-and-play. This is super important if you plan on using a MIDI device for something like an iPad or iPhone, for example, which you usually can’t download drivers on.
3) Set Up the MIDI Keyboard With the DAW
Ableton Live
Setting up on Live is as simple as making sure that your input and output signals are being allowed to pass through the DAW. Go to your Options menu, navigate to the preferences section and look for the tab labeled “Link MIDI”. Click on it.
If your keyboard is connected via USB, it should show up in the “MIDI” section of this page. Under the “Control Surface” label, click on the first channel and look through the list to find your MIDI keyboard (or the one that’s most similar to it).
Make sure that under the Input and Output labels, the MIDI channel of your MIDI keyboard has been selected. Do not send it through your audio interface if your keyboard is plugged directly into your computer.
If your keyboard is connected to your audio interface via its MIDI ports, then in the “MIDI Ports” section of this page, locate your keyboard there. Make sure that the “Track” box has been selected for both input and output. Your setup should be complete.
Soundtrap
To make sure you are getting MIDI data in Soundtrap, you have to first check that your MIDI keyboard is being recognized in the DAW. There are a few simple steps to do this.
First, click on the Settings button in the top bar, and click through to MIDI settings. When you click this, there will be a pop-up menu where you will be able to select your keyboard (provided that it’s connected properly). Once selected, click refresh, and Soundtrap will tell you that your device is working. Click OK and exit this menu.
GarageBand and Logic Pro X
Setting up a MIDI device, whether a keyboard or a drum pad, is fairly similar in both GarageBand and Logic Pro X. As I said before, most MIDI keyboards now don’t necessitate you install any drivers, so the moment you plug them in, GarageBand and Logic Pro X will recognize them, and you don’t have to do a thing.
If you do run into issues though, you just have to go into the Settings/Preferences, and then choose Audio/MIDI. You’ll see whether your keyboard has been connected or not. If It hasn’t, try resetting the MIDI drivers.
FL Studio
With FL Studio open and your MIDI keyboard connected, click on “Options” in the top toolbar and then select “MIDI Settings.” You’ll be taken to a window showing you the most common MIDI keyboards that are used.
You can either find the one you own or just choose “generic controller” if yours isn’t in there. Make sure it’s listed in the “Input” window, moreover, you’ll want to ensure you’ve selected the “Enable” option as well, which turns a bright green color when it has been switched on.
Guide to Making A Beat With A MIDI Keyboard
Now that you’re set up correctly, here’s where we get to make the beats. We’ll cover all the different components required to make your first beat in your DAW. These steps will be generalized and transferable across all DAWs.
1) Choose A Virtual Instrument (VST)
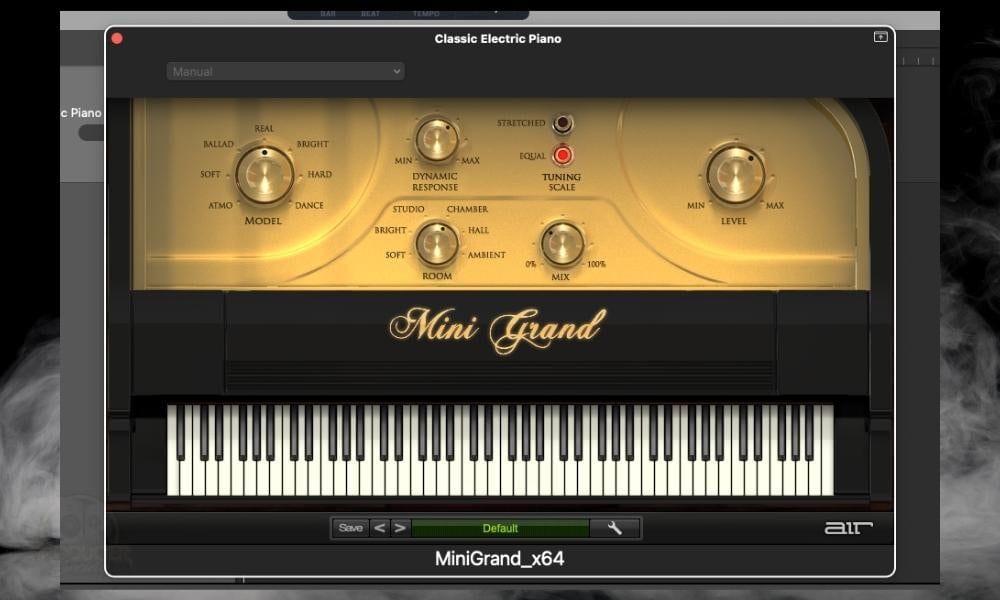
Depending on the type of beat I’m creating, I often like to start by laying down some chords with a piano virtual studio technology (VST) plugin. One of the best piano VSTs I’ve found is Air Music Tech’s Mini-Grand Piano. Having good chords as a foundation helps my creative process.
You don’t have to spend money to start your process though, as almost every DAW comes with a free library of virtual instruments for you to choose from. Pick a sound that you feel would go well with the beat you’d like to make.
It doesn’t have to be a piano. You can start with a bassline, a guitar track, a synth, a flute, or any other instrument that you feel would be a good driving force in terms of inspiration for the rest of your song. Here’s what to do if your instrument sounds out of tune once you begin using it.
2) Record The Melody/Chords
| The Name of the Mode | The Note of the Major Scale It Starts On | The Modal Chords (From most important to least) |
Notes Starting on C | Chords in C |
|---|---|---|---|---|
| Ionian | 1st Note | I, IV, V ii, iii, vi viiº |
C, D, E, F, G, A, B, | C, F, G Dm, Em, Am Bdim |
| Dorian | 2nd Note | i, ii, v VII, III, IV viº |
C, D, Eb, F, G, A, Bb, | Cm, Dm, Gm, Bb, Eb, F Adim |
| Phrygian | 3rd Note | i, iv, vii II, III, VI vº |
C, Db, Eb, F, G, Ab, Bb, C | Cm, Fm, Bbm Db, Eb, Ab Gdim |
| Lydian | 4th Note | I, II, V iii, vi, vii ivº |
C, D, E, F#, G, A, B, | C, D, G Em, Am, Bm F#dim |
| Mixolydian | 5th Note | I, IV, VII ii, v, vi iiiº |
C, D, E, F, G, A, Bb, | C, F, Bb Dm, Gm, Am Edim |
| Aeolian | 6th Note | i, iv, v III, VI, VII iiº |
C, D, Eb, F, G, Ab, Bb | Cm, Fm, Gm Eb, Ab, Bb Ddim |
| Locrian | 7th Note | iº iii, iv, vii II, V, VI |
C, Db, Eb, F, Gb, Ab, Bb, | Cdim Ebm, Bbm, Fm Db, Gb, Ab |
The chart pictured above – which first appeared in my article on the happiest chord progression – is a great way to get started. Particularly the chords on the right-hand side, which are very easy to play on your keyboard.
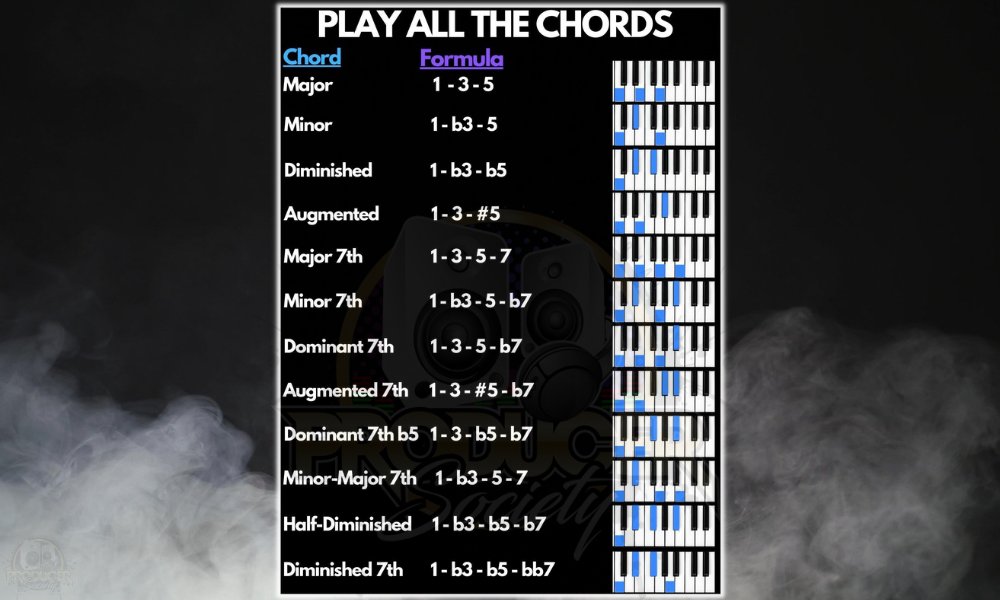
MIDI keyboards are the most popular controllers for music producers. The intuitive layout and ease of understanding that comes with the piano format mean that anyone can get started with creating almost right away.
In terms of chords, there is a bit of musical knowledge required to add that to your song(although chord packs make that much easier nowadays). But when it comes to the single-note melodies that characterize many hit songs, anyone can lay one down by ear.
Tip:
For more chord progressions, check out my songwriting tips article.
Depending on the keyboard and virtual instrument you’ve selected, you might have to take velocity into account when it comes to your playing. This means that varying levels of force in your playing can result in different sounds when it comes to the instrument.
Most mid-range keyboards are velocity-sensitive. If you play them harder, they will send a corresponding velocity signal to your DAW. These velocity signals can be adjusted after the fact, but it’s worth noting that even the intensity with which you play will matter in the final result.
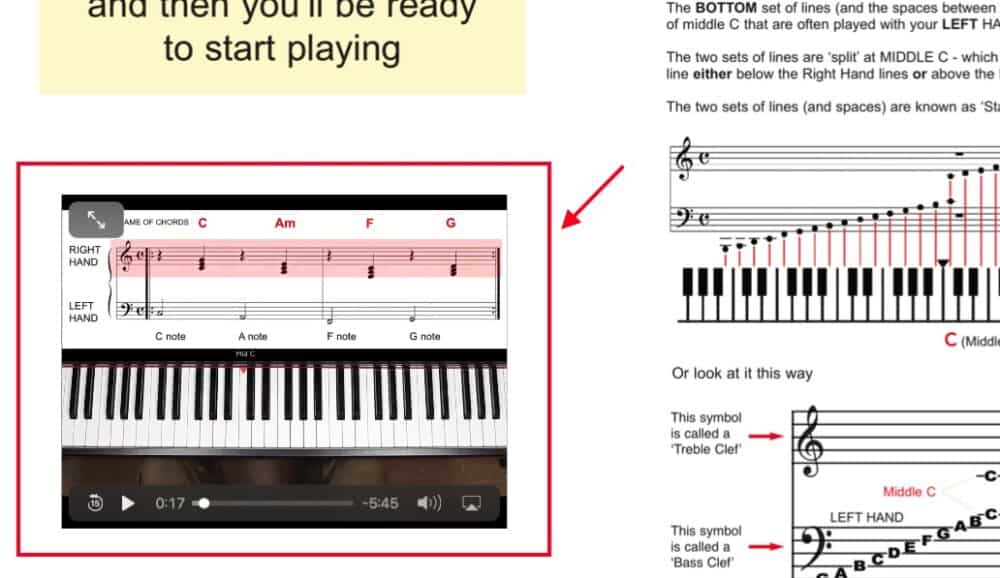
3) Lay Down the Beat
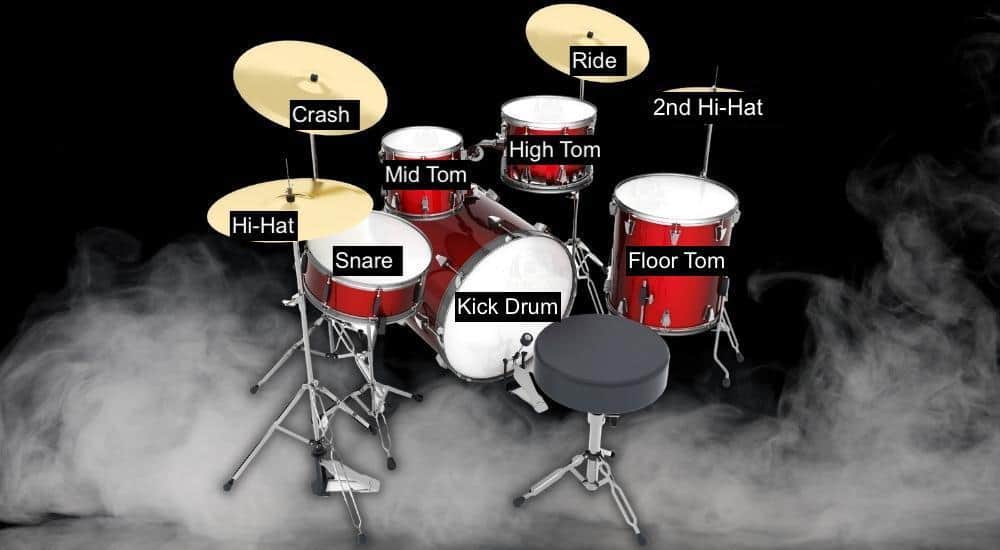
Now it’s time to program some percussion into your track. There are two different approaches to this, depending on your preference. You can either select an entire drum rack, or you can build your beat up on different tracks using individual sounds or samples.
Each DAW has its own way of approaching the so-called “drum rack”. In Ableton, you’ve got the drum rack, in Logic, you’ve got the Drum Machine Designer, and in FL Studio, you could use FPC. Here’s how to get your percussion going with each of these methods.
Using The MIDI Keyboard to Make A Beat
There are many MIDI keyboards, nowadays, which come with drum pads for you to percussively play your grooves on the keyboard. The M-Audio Oxygen Pro 61 (on my Page) is an example of a keyboard with velocity-sensitive pads that can be assigned to any sound that you choose.
For a more affordable option, the AKAI MPK Mini 25 key MIDI keyboard (on my Page as well) also comes equipped with velocity-sensitive pads which can be customized and reassigned. Now, if you don’t have a keyboard with pads, you can just use the keys on your keyboard. We’ll get into that shortly.
If you’ve chosen to use a drum rack (I’ll use Ableton as an example here), you’ll be able to play multiple components of your kit on one track. For example, pad 1 (or your keyboard keys) would be assigned to your kit, pad 2 would be assigned to your snare, and pad three to your hi-hats.
After you’ve picked your desired sounds (kick, snare, etc) for each field in the drum rack, you can press record. Now, you’ll be able to play a groove in the same way a drummer would. This method definitely requires some practice and skill to get it right.
If you are loading a sample onto individual tracks, then all the pads and all the keys will be assigned towards playing that one sound. Whether it be the kick, snare or clap, any input from your keyboard will result in that one sound that you have loaded onto your track.
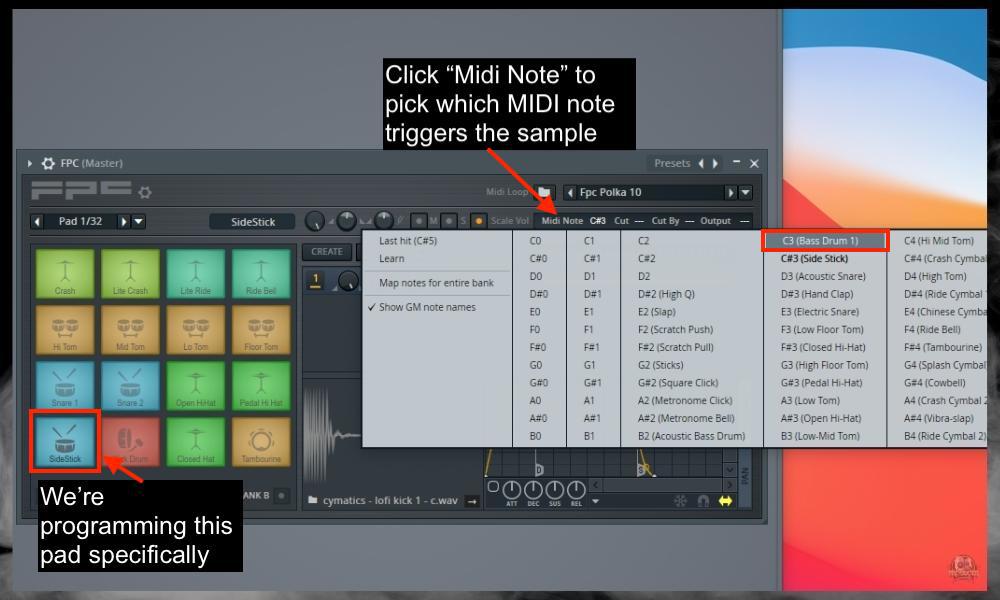
Once you have recorded your kick, for example, you can load the snare onto the next track and record that with the kick playing already in the background. When recording drums, it’s recommended to use a metronome to help with your timing.
Now, regarding the different components of the drum groove, it’s not always obvious how to structure it if you’re building a drum pattern from scratch. Here’s an explanation of how each of the instruments fits into your pattern.
Additionally, I’ll include a section at the end of some of the common drum patterns which first appeared in my article on how to create drums.
Kick
Now the kick drum is typically the first place to start when it comes to your drum loop. Go through your sample packs and look for a kick drum that you think sounds good with the chord progression or melody that you’ve already recorded. This kick will be on its own track.
Set up your metronome, decide which counts your kick drum will occupy, and use your drum pads to play your rhythm for your kick. Typically, pure hip-hop beats revolve around a pretty consistent library of patterns.
For example, in a song in 4/4 timing with a two-bar drum loop, the kick can be on each beat of the bar. Listen to your favorite rap songs and pay attention to how they’ve constructed the kick drums – see if you can replicate that.
808s
If you don’t understand what an 808 is, the easiest way to think about it is that it’s a low-end bass sound that originated from percussion, but now works with the kick drum to produce a punchy effect.
808s are commonly used in hip hop, pop, and a lot of electronic music. They’re typically tuned to different pitches depending on your track, and can really fill out the low-end. It’s important to make sure that your 808 is not out of tune.
One way to make sure that your 808 notes are correct, is by playing them an octave up to be sure that your notes match the chord progression for your track (more tips on how to make 808s here). Once you’re certain that the 808s are tuned correctly, you can pitch them down a whole octave to get that bass.
Another important note for 808s is that they work well with your kick drum. You can think about this in two ways. Firstly, there are some beats where your 808 would work nicely hitting in unison with your 808.
Then, there are certain moments where you can use your 808 as a lead-up to the kick drum. Since you can use the 808 melodically as a bass, you can create more energy in your track by playing the 808 on different beats to your kick – especially in the few beats before the kick.
Snare
In a hip-hop beat, the snare has to work in synchronicity with the kick drum. It can be used to fill gaps in the beat but also just to give the beat its forward motion.
In our example with the kick on each beat of the bar, the snare drum would hit on the 2nd and 4th beats. In trap music, however, you can experiment with having your snare hit on the “and” beat of the second bar.
Hi-Hats
The hi-hats are typically the simplest part of hip-hop beat-making. You’ll find that most songs will have the hats playing repeated eighth notes or sixteenth notes all throughout the beat.
This is complemented with some variation, perhaps on the 4th beat, to add a bit of life to the pattern. Play around with the variability in your hi-hats to see where you’d like it to be. Alternate between open and closed hats at certain points as well to add more variety.
One more way to vary the hi-hats is to intersperse segments of 16th notes or 24th notes amidst your 8th notes. This is commonly found in trap and hip-hop.
Claps
You’ll find that the claps are often layered with the snare drum. This is one sound where you can even experiment with recording your own sample if you have a mic.
Using the Drum Pads
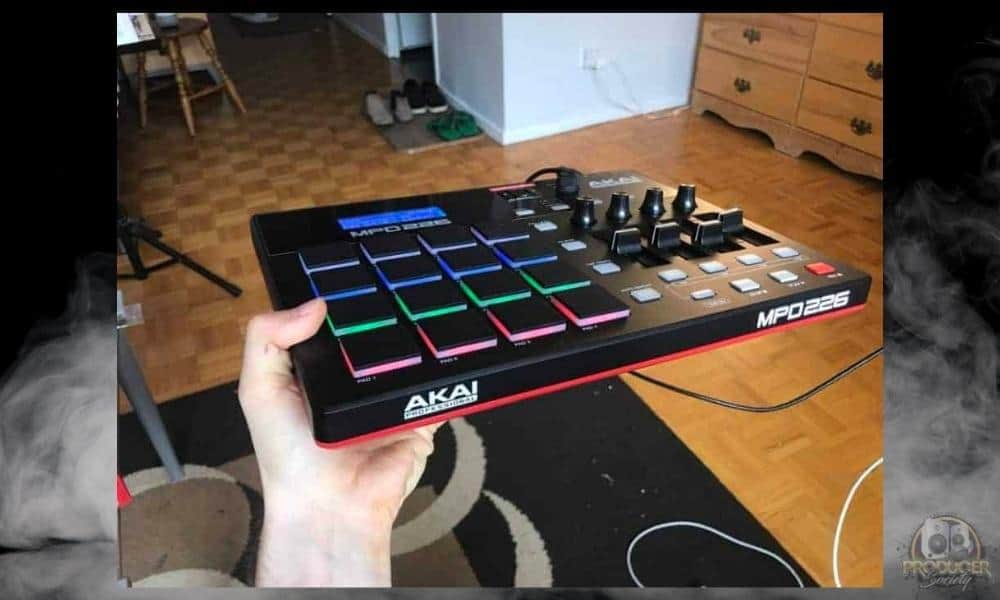
There are two different ways to use the drum pads: You can play different instruments simultaneously and record your beat onto one track, or you can play one drum instrument at a time and record onto separate tracks.
Depending on your keyboard and DAW, each drum might be automatically synced to a different instrument on your drum rack. Or you might have to manually configure the pads to be synced to your different drum sounds.
To assign drum pads in Logic Pro X, I found this great tutorial by MusicTechHelpGuy, and to set up in Ableton, here’s a handy video by Brady Reid. Now, as for actually playing the beat, you can use your preferred method of finger-drumming to achieve your result.
Using A Drum Loop
The advantage of the era we live in is the accessibility of music creation tools. Some producers don’t even draw their own beats – rather, they use existing drum loops. These are patterns that someone else has made, which might fit into your song.
Drawing In the Piano Roll
Besides actually recording your beat using your drum pads – a common method for creating a drum pattern is to actually draw it in on the piano roll (my guide on the piano roll here). This is a much more mathematical method, in my opinion, as you purely look at the beats and your instruments visually.
Of course, you can select and move things around – but this method involves a lot less actual “playing” of the drums (if you consider a drum pad an instrument that you play – I know I do).
7 Different Drum Patterns for You to Use
1) Eighth-Note Pattern
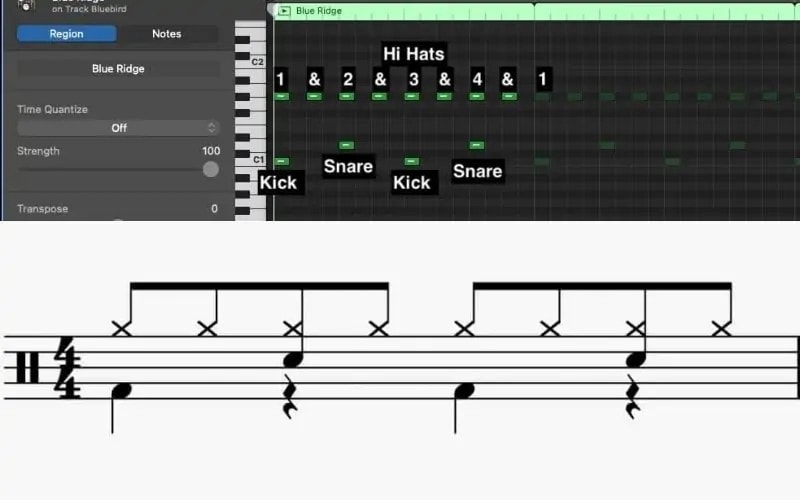
2) Sixteenth Note Pattern

3) Shuffle Pattern

4) Half-Time Pattern
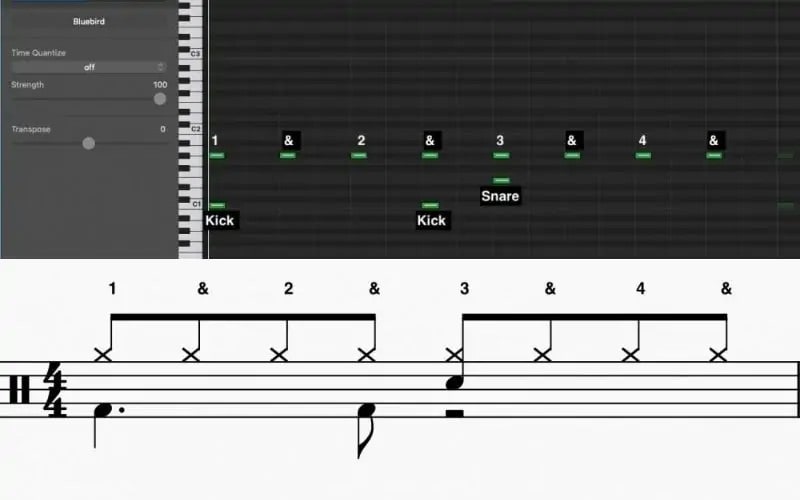
5) Syncopated Rock Pattern

6) Syncopated Pattern With A Fill

7) Basic R & B Pattern

As I said earlier, all of these patterns previously appeared in my article on how to create drums in GarageBand, and there are a lot more tips in there on rhythm section creation that apply to not just GarageBand, but other DAWs too.
4) Use Quantization to Fix the Melody and Drum Pattern

Quantization started off as a mildly contentious topic in some music production circles. The way it generally works is that it takes the notes that you have played, and snaps them to a grid that has perfect timing.
Some say that, especially for drum patterns, quantization can ruin the soul of the music. However, it’s often necessary to quantize your patterns so that the music doesn’t sound out of sync and messy. Quantization, when done right (using my guide), is a great tool.
The argument that many producers make, is that there’s no human being who can play a note perfectly on time every single time. A grid can make the music sound too “soulless” and “stiff.”
One way to stop your song from sounding too rigid and robotic is to take some of those quantized notes and move them very slightly before or after the grid. You can do it randomly across your whole arrangement, to bring back that human feel into the song.
5) Use Arrangement Techniques and Fill the Song Out With Other Instruments

In the context of making your beat, it’s important to remember that it’s so much more than just the instrument selection that goes into making a great track. From an arrangement perspective, you have to think about other things like variability, sound design, flow, feel, etc.
To add some variation and life to the chords you play on your synth, you can randomize the velocities. Ableton has a handy feature where you can highlight all the notes and randomize the velocity at which they were played. Some will be slightly lower, and others will be slightly higher.
Another method for creating variability is to add in some arpeggios in certain sections of your song as opposed to just straight chords. Or even adding breaks before certain sections – like a big hook. It’s also important to consider transition sounds like risers, or drum fills between certain sections.
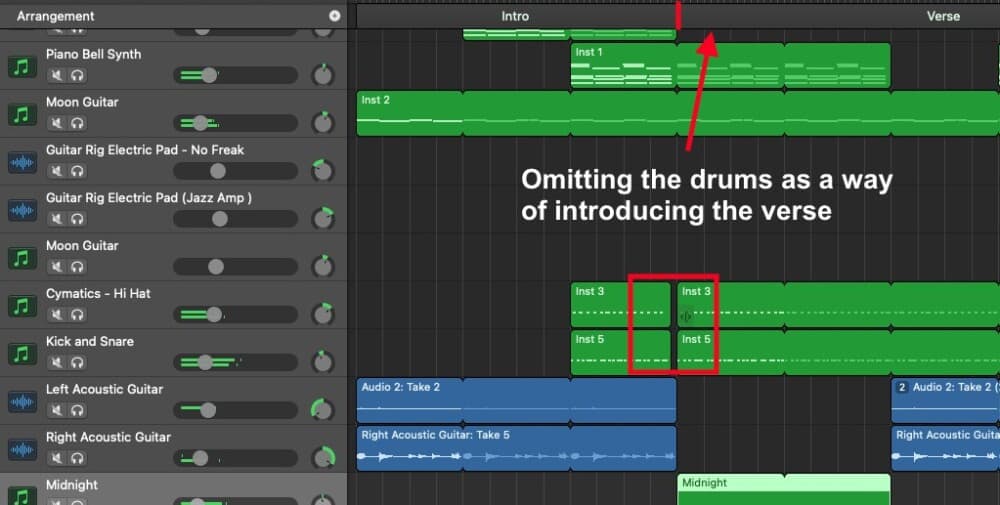
A track can really be elevated by a producer who thinks about creating a full-bodied aural experience for the listener. This involves thinking about the soundscape, creating unpredictability, and taking risks.
Try to take one of your instruments and ping pong it from left to right. This means that it rapidly pans from left to right in the speakers. Play around with echo effects. Automate EQ filters to create different textures with your instruments. The possibilities are endless.
6) Mix the Beat, Export It, and Then Master It
The way I think about mixing, is that it’s the art of blending the song into one wholesome, tasty work of art. It’s like taking all the individual ingredients in a recipe and making sure that they are used in the right amounts to create a great dish.
You eat a cake, not its individual components. Now, this won’t be a mixing tutorial (that’s a whole separate article), but here are some of the fundamentals to think about when it comes to mixing.
Headroom
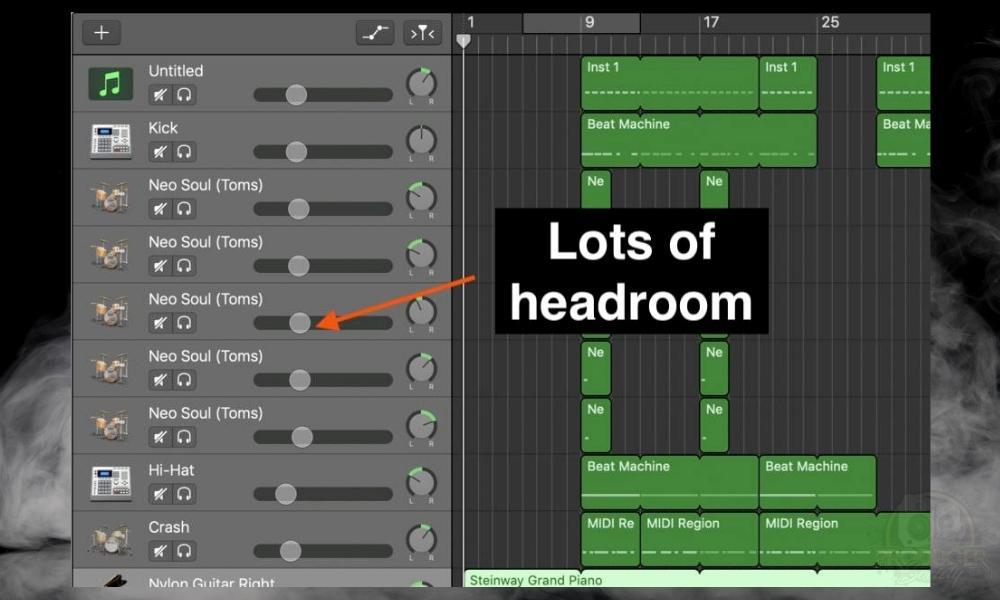
You’ve got to think about creating enough headroom for the mastering process. Make sure that the levels are balanced and that none of your tracks are clipping either. Every DAW has an indicator that will show you when a track is clipping, or when the whole mix is clipping.
EQ
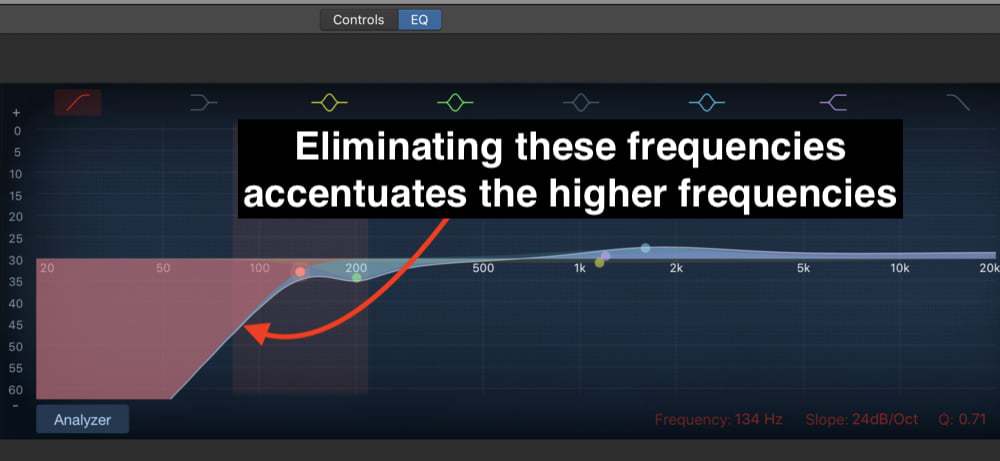
The way that I think about EQ, is as a tool for creating space for each sound on the track (more on EQ in my guide). I think in terms of reduction before I even try to boost any frequencies.
For example, the kick drum typically has its most important information on the low-end of the frequency spectrum. Thus, I’d use an EQ to cut out the high-mids and highs. You can think this way for a variety of instruments.
Panning

As I explained in my guide to panning, think about which part of your mix needs to be front and center. Which parts can be moved off to the side and thus creating room for the right instruments.
Use panning strategically to give the very sound a place in your track. For mixing tips, check out this article here, and also my mastering tutorial.
Important Things to Note About Making Beats With A Keyboard
1) Some People Prefer to Draw Their Melodies and Drum Patterns
As we touched on before, there are other approaches for creating drums and recording instruments than just using a MIDI keyboard. In fact, some producers work exclusively in the piano roll and with chord samples. So, play around with the approach you feel works best for you.
Gear Mentioned
1) FL Studio Producer’s Edition
2) PreSonus AudioBox 96
3) Scarlett 18i8
4) Air Music Tech’s Mini-Grand Piano
5) M-Audio Oxygen Pro 61
6) AKAI MPK Mini 25 key MIDI keyboard
7) AKAI MPD 226
8) PianoForAll

 Written By :