 Written By :

As a general rule in life, the simplest solution is usually the correct one. Over sophistication and over-analysis is a big problem for many. Not only in terms of making a mountain out of a molehill but also for scaring beginners away from taking their first step in the door.
Less is often more, in my ever-so-humble opinion, and the least complicated, the better.
Similar to mastering which I’ve written about at length before, usually the more you mess around with the song, the worse it gets due to overanalyzing and getting tripped up on minute details, which may be important to audiophiles, but are not at all to the average listener.
This is the same reason why I recommend using simple learning aids like PianoForAll for the piano, which will help you take control over the main tool for music producers: the MIDI keyboard, in a way that isn’t bogged down by needless sophistication.
It doesn’t matter how you got it done, as long as it sounds good and the same thing goes for mixing (usually).
Adjusting the volume of a track by 0.01dB is really not going to make that much of a difference. However, +1-2dB may be the difference between guitars that sound too loud or too quiet.
I’ve collected a useful depository of tips and tricks over the last couple of years messing around with DAWs, watching YouTube videos, and reading books on audio engineering and mixing.
Here are just a few mixing tips before we really dive in:
The most important tips for mixing in Garageband:
1) Make Sure Your Tracks Aren’t Clipping
2) There Are 15 Possible Plug-ins For Each Track
3) Change the Order of Your Plug-Ins in the Signal Chain
4) Use Good Monitors
5) Turn Off “Export Projects At Full Volume” in the Preferences
Without further ado, here are some basic mixing tips for Garageband:
Make Sure Your Tracks Aren’t Clipping
One can’t stress enough the importance of avoiding clipping audio in your DAW. The reasoning for this is simple: you don’t want your music to crackle and sound terrible.
Many users when they first start out, including me, had no idea why my tracks always sounded awful whenever I uploaded them to SoundCloud as well as iTunes (my guide). It turns out, output meters matter and they matter a lot.
I struggled with this for a while, because I didn’t know precisely what was meant by “clipping,” or output meters.
In layman’s terms, clipping means that the audio signal is too strong, and the regular cycling process of the audio signal is being disrupted due to the amplifier reaching its limit.

Garageband – and probably every digital audio workstation – comes with output meters that show a user that the signal is too hot. In Garageband, when the signal is clipping, the volume meter will be in the red, rather than the green and yellow.

It’s imperative that your tracks are going only into the yellow (or green), during the loudest parts of your song, and never into the red.
It’s fine if your tracks are hovering in the lower end of the green throughout the entire track.

*Usually, if your volume output meters are at -6.0dB and below, there won’t be any clipping.
It’s Ok If The Master Volume Output Is Clipping (A Little Bit)
In my experience, it doesn’t matter a lot if the master volume is clipping a tiny bit when you’re getting ready to export your track for mastering.
I usually have the master volume set at 0+ dB or -0.5dB when I export it through an AIFF File and resubmit it back into Garageband for the final process.
The master volume meter is on the top-right-hand side of Garageband above the workspace. Whenever I’m working on new music, I usually have it cranked, but later turn it down when I’m getting ready to mix/master.

Make Sure Your Tracks Are Named Properly
In my other article, 16 Editing Tips In Garageband (That Are Actually Useful), I spoke about the importance of naming your tracks and MIDI Regions, and I’m going to mention it again here.
Essentially, if you want to name your tracks, it’s as simple as secondary clicking (two-finger click or right-click), the track region and then a list of options will show up where it clearly says, “rename track.”
It’s the same thing for the actual MIDI Regions as well – “Rename Regions.”

This is quite useful for the mixing process because what good is having a bunch of different tracks when you don’t even know what each one is?
For beginners, this may not be a super important tip, but after one has used Garageband and other DAW’s for about a year, you’ll notice that the number of your tracks will likely increase by a lot, simply because there is so much potential variation in the creative process.
One example: you can use up to 15 different plug-ins on each “Software Instrument” and “Audio” track, so there are endless ways to modify your music, including with flangers, compressors, phasers, and so on and so forth.
Which brings me to the next tip:
There Are 15 Possible Plug-ins For Each Track (Channel) in GarageBand
A lot of users are surprised to find out we can actually use up to 15 plug-ins in Garageband. Finding and setting them up is not quite as intuitive as you would think; for that reason, I’m sure a lot of people miss out on this treat.
If you want to set up more plug-ins, you have to hover your cursor beneath the four standard plug-ins that come as default with each Software Instrument and Audio Track. You’ll see a little white line show up. Click on the very bottom of the Audio Effect Slot.

Once you’ve clicked on the white line, it’ll give you the option to open up a plug-in, however, it’s misleading because it looks like you’re just setting up a plug-in for an already-existing audio-slot.
But, once you choose a plug-in, you’ll notice that Garageband just created a whole new Audio Effects Slot and plug-in for you. Be careful though, because the order of them matters.
Changing The Order Of Your Plug-Ins In The Signal Chain
The order of your plug-ins in the signal chain actually matter for the overall tone and shape of your mix’s sound. It’s a lot like using effects pedals for guitar. The order of guitar pedals actually makes a difference due to basic input-output processing.

In layman’s terms, the signal is transferred in a chain through each plug-in.
For example, let’s say you’ve just completed a new song without plug-ins on the master track.
You add a Channel EQ, and then the signal runs through the Channel EQ, and into the Compressor, which compresses the sound and then sends it through a bit of Reverb, and then that signal is finally put through the Limiter.
It’s literally a signal chain, so it makes perfect sense as to why the order of plug-ins matter.
For the sake of experimentation, you can see what I mean when you reorder the Channel EQ and Distortion plug-ins. If you put the Channel EQ after the Distortion, you’ll notice how much stronger the distortion is, which is good or bad, depending on your intention.
As a general rule, start with the Channel EQ plug-in, and use compression after that. There’s a theory in the world of mixing: “cut before compression and boost after,” and apparently it’s a good rule to follow.
For instance, when I’m mixing the 808 – I actually use Initial Audio’s 808 Studio II – I’ll make the Channel EQ the first plug-in, then a bit of distortion follows, and maybe the Compressor after that.
Frankly, there is no right way of doing this. It’s all up to you and your ears.
Cut first, smooth it out, soften, and then add a limiter to make sure nothing gets out of control. That’s how I think of it.
Turn Off “Export Projects At Full Volume” Within The Garageband Preferences
This is a simple one, but also one of crucial importance. You’re not going to be able to export music at a competitive level if you have this option selected. Frankly, like I said in my article on normalization, I’m not entirely sure why Garageband has this option, to begin with.

1) Just go into Garageband’s preferences.
2) Click on Advanced.
3) And then un-check the box beside the word, “Auto-Normalize.”
It says “Export At Full Volume,” yet when this option is selected, tracks are exported at such a low volume that they’re almost entirely useless.
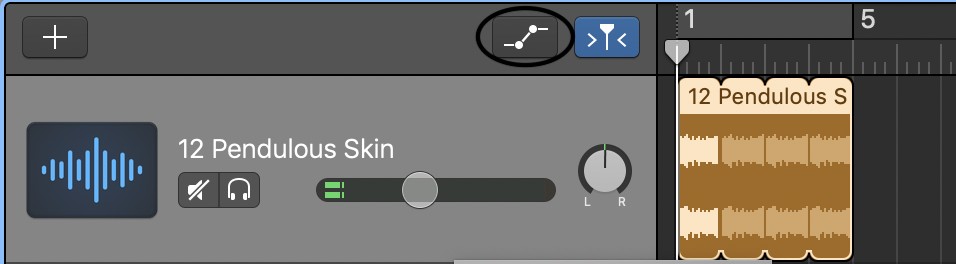
Use The “Cycle Area” Function to Repeat Phrases For Mixing
When listening to your track, it’s worth hitting the “Cycle Area” option on top of the ruler and listening to each part of your arrangement on its own, individually, while adjusting the volume sliders to your choosing.

Now, this isn’t something I do personally, but I know a lot of others do this. It’s a good way of analyzing each part individually. It’s sort of like compartmentalizing the mixing process.
Hit the ‘C’ button on your keyboard, and that should begin the “Cycle Area” which you can then adjust to your choosing. Or, hit the top of the ruler with your cursor to set it up manually.
How To Fade Out in Garageband
There are two ways of fading out your audio in Garageband.
Option Number 1:
Fading out in Garageband is as simple as going into the “Mix” setting in Garageband’s tool settings, and then selecting the option, “Create Volume Fade Out On Main Output.”

This will automatically lower the volume gradually on the entire track. This setting works really well. There’s no reason, really, for creating a different automation fade-out.
However, let’s say, for whatever reason, you’re not happy with the automatic fade-out offered by Garageband.
Option Number 2:
1) You can, instead, create your own automation track by hitting the ‘A’ key, on your keyboard. You can also hit the “Show-Hide Automation” button on the top-right-hand side of the track-header. It’s a lot easier, however, to just hit the ‘A’ on your keyboard.
This’ll bring up all of the automation settings in your workspace.
2) Click on the Automation Line. It’s yellow.

3) Now, click on the yellow line as many times as you want. This will create little yellow dots permitting the user to create very specific and adaptable automation.
4) Drag the lines according to how you want your volume levels.
Setting up automation like this is incredibly use useful for individual tracks, as well as on the Master Track.
*Select “Show Master Track” in “Track” setting In the top toolbar – Also, (Command + M)
*You can also delete the little yellow dots by double-clicking with your track-pad or hitting the delete button.
How To Fade In
Like the method shown above, it’s as simple as hitting the ‘A’ on your keyboard, then clicking on the yellow automation line, and dragging the line according to how you want to fade the volume.

* You can also establish automation tracks for “reverb” and other settings, not just volume.
How To Reverse Playback
This is a dope feature I figured out while I was researching all the possible things I may have missed when looking for special mixing tips.
Just double-click on the recording as you normally would, and it’ll bring up the details in the Smart Controls below.

With the exception of “Software Instrument” tracks, you can hit the “Reverse Playback” checkbox where the plug-ins usually are, and this will literally play your recording backward.
An amazing feature if you’re trying to break out of a creative slump. If you’ve sampled something cool and need a quick new sound in the same key signature, hit the “Reverse Playback” button.
Lowering the Volume Of Tracks By 1/10ths Rather Than 1/2ths and 1/5ths
Sounds a bit confusing, so let me explain.
When adjusting the volume, you’ll notice that as soon as you get below -6.0dB, the numbers start decreasing by 0.2 rather than by 0.1, and then once you’re down to -18.0, the numbers decrease by -0.5dB instead of -0.2dB.

There’s actually a way of getting around this, and it’s through the “Automation” section in the workspace.
1) Hit ‘A’ for Automation on your keyboard, and Garageband will bring up the yellow volume bar.
2) Drop two automation points on the yellow line (there are three in the image above because I made a mistake).
3) Now select both of the points by clicking and dragging a box around them.
4) You can start pulling down the line by the two points, and you’ll notice the movement in volume is more precise.
This may not seem important in the beginning stages of mixing, but it will come in handy later on when more precision is needed.
Listen to Your Mixes on Both Quality and Terrible Headphones – Also In A Car
This is self-explanatory but crucial. While it’s a great idea to use quality headphones to mixes, it’s also useful to listen to your mix with bad headphones/speakers.
The truth is, most people won’t listen to your music on the best gear in the world, because most people aren’t audiophiles or audio engineers.
When browsing around on internet forums and the like, I’ve seen producers/musicians say things like, “If the listener doesn’t respect my music enough to listen to it on a good pair of headphones, then they’re beyond helping anyway.”
Obviously, a mentality like the aforementioned is absurd. You want your music to sound as good as possible using every medium which is one reason why I use multiple sound systems for listening including Etymotic ER4SRs on my Product Page for when I’m on the road.
Use Subtractive EQ First And Then Additive EQ After
When you first open your Channel EQ, typically the very first thing a mixer does is they drop the lowest of the lows and the highest of the highs. The human ear can’t really pick up those super high frequencies anyway, so nothing’s lost.
The first thing that I normally do, is I go over to the part around +200hz and I drop that frequency out just a tiny bit, because that is the point most audible to humans, and thus, it’s usually the “problem area,” so to speak.

It can get a little “muddy” if you have too much signal coming from this area.
Then, I’ll give a nice little boost to the part starting from +300hz all the way until +10,000khz. I like it when my mixes sound bright and clean, so that’s why I give a boost of about +2.5dB.
After that, I’ll boost the +100hz area by +3.0dB, but I’ll also have the ‘Q’ set to around 0.50.

Use Compressor Pre-Sets
The presets that come with Garageband are actually quite good. It’s rare that I’ll use a compressor and actually make custom settings for each track. I usually employ the “Platinum Analog Tape” setting, and that’s all the compression I’ll use on the entire mix.
In my opinion, it isn’t worth messing with when you’re first starting out as a music producer/audio engineer. Compression is one of those tools in a mixer’s toolbox, that, for whatever reason, people tend to use and abuse.

There are other pre-sets worth checking out including “Tight Snare” and “Modern Kick,” and so on and so forth.
If you’re serious about becoming a producer/engineer, it’s worth researching the compressor and all of its parameters, including ratio, attack, gain, threshold, and release. A great place to start is Timothy Dittmar’s book, Audio Engineering 101.
Don’t Be Afraid Of Reverb But Don’t Use it Too Much – Use Delay As Well
Using too much reverb is a common mistake for beginning music producers. Let’s be honest, reverb is a great feature, and it adds so much.
However, the mistake is that people will, for instance, record 5-7 different tracks, each one with reverb on it, and then when all of those tracks are mixed together, the sum total of all the reverb on each individual track makes the amount of it gargantuan and awful sounding.
I use reverb on guitar, but I rarely douse my music in it. It’s great to use it sparingly, otherwise, you’ll pay for this mistake later on when it’s time to master.
With that said, reverb is useful, and it sounds great. There’s no question about that, and the same thing could be said for delay as well.
Make Sure There Aren’t Any Effects Running On Your Output Master Track
This is crucial. There should never be any effects, EQ, compressors, limiters, or any tools on your output master track for a simple reason. All of that stuff should be empty and unused until it’s ready for mastering.

If you try and mix and master your track later with all of these effects, you’ll find that everything has become muddied and almost impossible to mix and master correctly.
Use Noise Gate On Recorded Audio
This one’s a no-brainer for all of the guitar players out there – if you’re into metal, anyway. Noise gates are very useful for people who play metal because there is so much distortion involved, so whenever you stop playing the guitar, there tends to be buzzing and hissing from the amp.

However, when you employ a Noise Gate on your guitar parts or vocal tracks, the tool eliminates all of those annoying sounds that would later become a problem in the mix.
The Noise Gate is an option down in the Smart Controls’ plug-in area under the “Dynamics” sub-heading.
It’s important not to use the Noise Gate too much, however, because it’ll end up destroying the dynamics of your recording. For instance, if you’re playing a guitar solo and need a note to ring out, a Noise Gate will limit the sustain.
Understand Signal To Noise Ratio
Often abbreviated as S/N or SNR, Signal-To-Noise-Ratio is an important concept for mixers and music producers. In layman’s terms, it’s the comparison between the desired signal’s power to the background noise.
In other words, let’s say you’re recording guitar and using a lot of distortion for a guitar solo. If the S/N is too low, that means the hissing signal of the amp, people talking in the background, the sound of the air conditioner, and so on and so forth, is too close to the signal of the actual guitar playing.
Many products come with an S/N ratio, but not all of them.

Measured in dB, a higher specification means for every dB of the desired signal, there is ‘x’ many dB of undesired signal. For instance, if an S/N ratio is 100dB, that means that the signal is 100dB stronger than the noise.
Using the example of a refrigeration, if you’ve recorded a conversation between two people in a kitchen, in which a fridge is running and humming at 30dB, the pair’s conversation better not whisper, because the fridge might actually be much louder than the sound of the conversation.
Later on, this problem is amplified in the mixing and mastering process, especially in the case of compression, which will accentuate the loudness of the refrigeration and bring down the volume of the conversation.
It’s all pretty intuitive. Make sure that your signal is much, much, much stronger than the surrounding noise. It’s essential as well to make sure recordings are executed at similar volume levels, otherwise, the audio engineer will never bring balance to the mix later on.
Let Your Instruments Ring Out – (Fade Out)
It’s always a good idea to let your instrument ring out, that way the entirety of the part is recorded and there aren’t poorly executed fades at the end of each track, and thus, your final recording.
For instance, let’s say you’ve recorded a guitar solo. If you didn’t let the final note ring out and the solo suddenly just stops in the middle of a note playing, it’s going to sound abrupt and unnatural.
The same thing can be said for in-between sections of your arrangement. For example, if you’ve recorded a bass line, then let the final note ring out, or even use the volume Automation to fade the one section into the other. It adds a bit of cohesiveness and naturality to the music.
Get Your Hands On A Good Pair Of Headphones
Even though studio headphones and monitors are never truly “neutral,” they attempt to offer a balance of low and high frequencies.
When listening to mixes, you want the most accurate reflection of the music, without being colored by the headphones. The Dre Beats, for example, are absolutely not meant for the studio, due to their increased low frequencies.
The same is true for most casual headphones. Almost all of them have boosted the bass and low frequencies because that’s what consumers want.

However, in the studio, engineers want “neutral” headphones that give the most accurate representation, that way when they’ve mixed and mastered the music, it won’t come out with too much bass or too much low-end due to increased low frequencies of most listening systems.
For further explanation, if you’ve mixed and mastered using Dr. Beats, you’ll likely think there’s enough bass and low-end in the mix, only to later discover when listening in a car or on another pair of headphones that there’s hardly any bass at all.
The headphones just made it seem like there was a lot of low frequencies, even though there wasn’t.
I recommend grabbing a pair of Audio-Technica ATH-M50xBT Headphones for mixing. They’re noise canceling studio headphones that are great for mixing and mastering tracks.
Emphasis on “noise-canceling” because you don’t want the acoustics of the room affecting your listening ability.
The link above will take you to the Amazon page for the headphones I always use for recording, tracking, mixing, and mastering. The cable on them is very long which is pretty convenient for using in the studio, and the sound is super clear and balanced.
However, if they cost too much money, there are other models of the same brand to try out on Amazon. Can’t go wrong with the ATHM50X headphones though.
Using Auto-Tune And Pitch Correction On Your Recordings

This is give-in that most people consider when thinking about the magic of recording studios. Everyone thinks auto-tune is this magic feature that everyone uses on their vocals to sound great, and truthfully, it is.
Every major singer does use it.
Trippie Redd said recently that he uses it on all of his vocals, as does everybody else in the scene. It’s pretty much an imperative for most.
In Garageband, you can use “Pitch-Correction” in the bottom portion of the Smart Controls. I haven’t written an article on how to use Auto-Tune yet (update: now I have), but I will in the future.
Not only is there a default Pitch Correction in Garageband, but there are also external plug-ins that you can buy, including Antares Auto-Tune Pro which is easily the best vocal tuning tool you can get for Garageband.
Use Volume Automation To Turn The Volume And Signal Down During Silent Parts
During the quiet parts of a track, I turn it right down with the Automation option, and then up again once the instruments start back up. I do this whether it’s MIDI or a standard Audio recording.
It cuts out any unwanted signals and frequencies, that way there is plenty of room for frequency later on in the mixing and mastering process.
*This is more useful for Audio recordings and less so for MIDI.

There is only so much room in a particular frequency. For instance, Jason Newstead, the bass player for Metallica, claimed he didn’t know about how bass and rhythm guitar shared the same frequency when he recorded bass on …And Justice For All.
For that reason, Lars and the mixing engineer decided to lower the volume on his bass guitar because they didn’t want to take anything away from James Hetfield’s guitar playing.
Cut Out The Low-End On Your Vocal Tracks To Bring Your Singing “Out Front”
This is a bit difficult to describe in words, but if you’re having trouble mixing vocals in your track, notably, if the singing doesn’t appear front and center, sometimes just cutting out the low-end of the vocals can make the singing sound like it’s more “in front” of the rest of the instruments.

You Don’t Have To Use Compression
You don’t actually have to use compression. A lot of people are hung up on this tool and use it for everything, thus, over-compressing their music like crazy.
In one of my tracks on SoundCloud titled, “Romania” I didn’t use any compression at all, with the exception of a multipressor on the final Master track. You can check it out here:
I tried putting a regular compressor on it like I normally do, but it sounded terrible so I just left it off. A multipressor essentially separates the signals into 3-5 different signal frequencies and compresses each one individually.
A regular compressor compresses the entire file as one signal.
Bonus Tips
Mixing In Mono

This is one of the most commonly suggested tips for mixing for music producers and engineers.
To mix in mono (my guide on how to do it) means that we’re monitoring the sound through just one channel, rather than through stereo, where the signal is being spread across more than one channel, usually two, left and right.
Simply put, if you want to convert your music over to Mono, you just go into the “Utility” plug-ins on your master channel, and then choose “Gain,” and go into its drop-down menu and select “Convert to Mono.”
Use Premium Mixing Plugins

Eventually, there will come a point where you realize that there are better audio processing tools available and Fab Filter’s mastering bundle on Plugin Boutique is one of them. You have the ability to solo frequency ranges to see how they sound in isolation which made a huge difference in the way that my music sounded.
Another thing that I like to do is take some of Garageband’s presets and apply them to the Fab Filter plugins. I find I’m able to modify and tweak them a lot more to get everything to sound amazing and 100% suited to my production.
Other Articles You May Be Interested In
- The Last Reference Track Mixing Tutorial You’ll Ever Need
- How To Mix Using Garageband
- How To Mix Vocals In Garageband
- How To Mix A Beat In Garageband
- How to Mix Drums in Garageband – (A FULL Guide)