Understanding a few core principles and tips can save you a lot of time. A couple of them apply to all instruments, but some of them are specific to drums. Before we get to it though, here’s a brief summary of one way to approach drum mixing in Garageband:
To mix drums in Garageband
1) Properly label and organize every part of the kit
2) Adjust volume and panning after
3) Add compression where needed for dynamics
4) Set up low and high-pass filters to make space for other frequencies
5) Shape dynamics and transients with MIDI, noise gates & velocity
Mixing Drums in Garageband – A Step-By-Step Guide
Acoustic (Live) vs Sampled Drums and VSTs
Although not many people know it, many drum parts are programmed these days. They’re not recorded live in the studio as they once were, and if you think about it, it only makes sense.
The drums are huge. They’re loud. They take up a ton of space and require a lot of microphones like the AT Pro 37 to actually record them. All of this takes time to set up as well.
What I’ve noticed about most of the information about mixing drums online is that much of it concerns mixing programmed and/or sampled drums and not ones recorded live. This tutorial is no different because frankly, I don’t have much experience with live drums either.
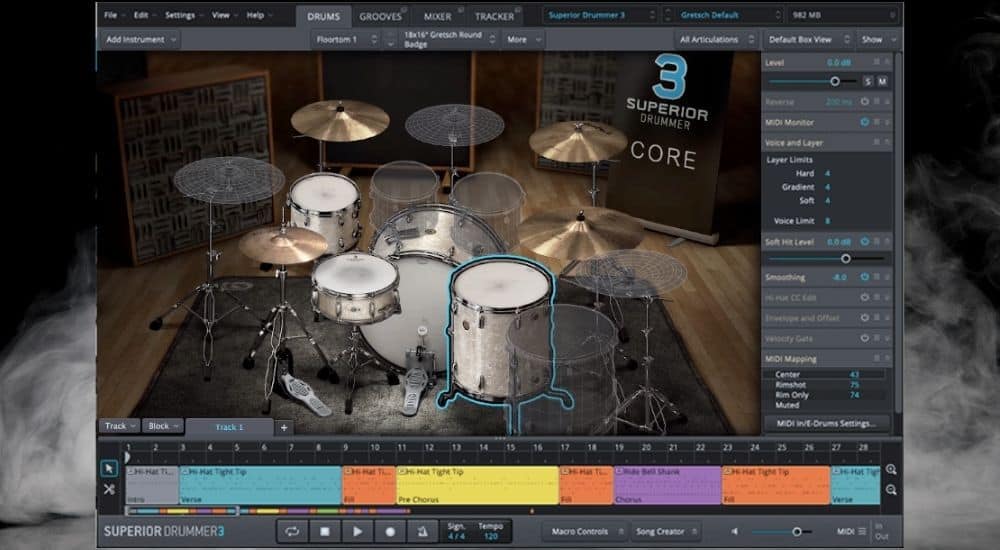
The fact of the matter is that it’s just a lot easier to use VSTs and sample libraries like Toon Track’s Superior Drummer.
Garageband’s drummer track (which I have a tutorial on here by the way), is also a great way to quickly and easily get some drums made. If you don’t like the way they sound, you can always swap out the instruments after the fact too.
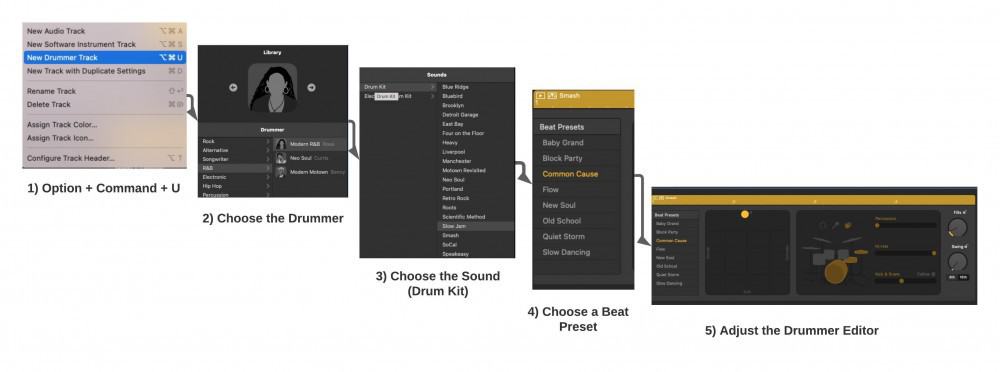
But anyway, what we’re going to do now is walk through a brief tutorial on how to mix drums in Garageband. A lot of the principles spoken of in this article can be applied to other DAWs too, so take note of that. When it comes to the DAW, it’s only the controls that are different, not so much what you’re doing with it.
For further reading, check out David Gibson’s The Art of Mixing and Bobby Owsinski’s book, The Mixing Engineer’s Handbook. These are the best books I’ve read on the topic. Both books were incredibly helpful to me, so I reached out to both authors, although, I couldn’t get ahold of Gibson.
One Tip from Bobby Owsinski
Here’s what Bobby Owsinski had to say when I asked him what he thought was one of the best tips for beginners to drum mixing:
“Probably the biggest thing that’s overlooked when mixing drums is not checking for any phase problems. If the drums sound smaller than you think they should be, then phase could be the culprit.
It’s easy to check and fix though. Bring the kick up to a reasonable level and then bring the snare up to exactly the same level (watch the meters).
Flip the phase selection either on a channel strip or by using a plugin that has that feature. Choose the position that has the most bottom end, then either mute the snare or just lower the fader to 0.
Do that on every drum channel, always comparing to the kick, then continue on balancing the drum kit as you normally would. You’ll be surprised how much of a difference this little trick can make.”
Phase cancelation is something I rarely considered when mixing drums, so that’s something I’ll explore in the future. I’m glad he pointed that out to me because I only ever considered it when mixing guitars. But I digress.
Let’s start mixing a drum track in Garageband. It doesn’t really matter whether you’ve received them via email from a client or made them on your own. The first step is making sure you’ve organized and labeled them properly.
1) Properly Label and Organize Every Part of the Drum Kit
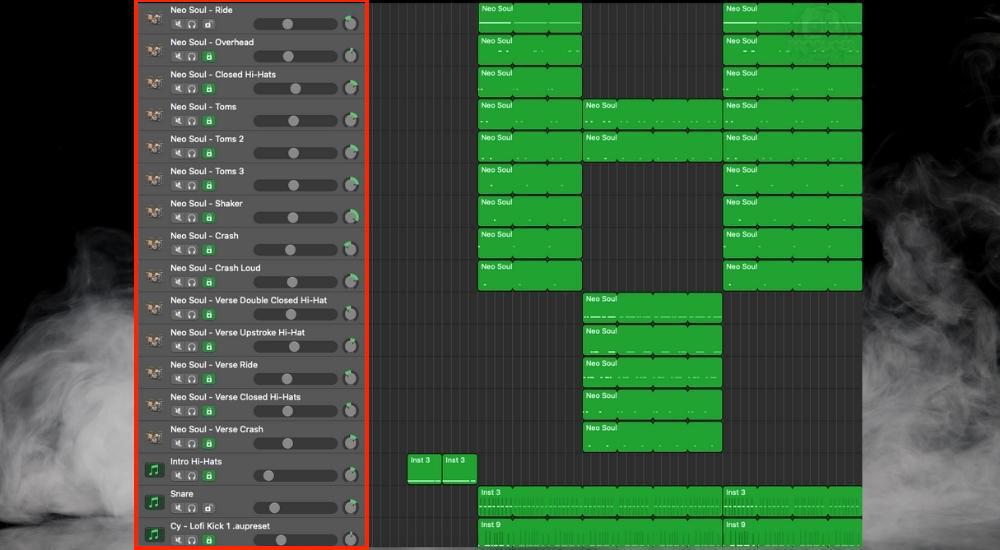
The very first thing I do after I’ve programmed drums is that I ensure everything is named precisely and accordingly. They should be clearly named so that other people also know what drums they are. Don’t just name them so you understand them.
To re-name tracks in Garageband, use the keyboard shortcut, (Shift + Return), and then you can type in whatever you want. You can also use the right-click option to name them that way (more keyboard shortcuts here in my guide).
As for how to name them, I usually state what kit is being used, and also I designate which part of the kit is used too. In some cases, I may even indicate what part of the song the drum is playing in. I do this if the kit is mixed differently in different sections.

After everything is appropriately named and clear, I’ll usually re-organize them so associated instruments are together. For instance, overheads will usually go together, as well as the kick, snare, and then the bass instrument. The same thing goes for the toms.
To move track regions around, all you have to do is click on it, and then drag it wherever it needs to go. Make sure you grab the track header and not just the MIDI region. You can see what that looks like in the image below.
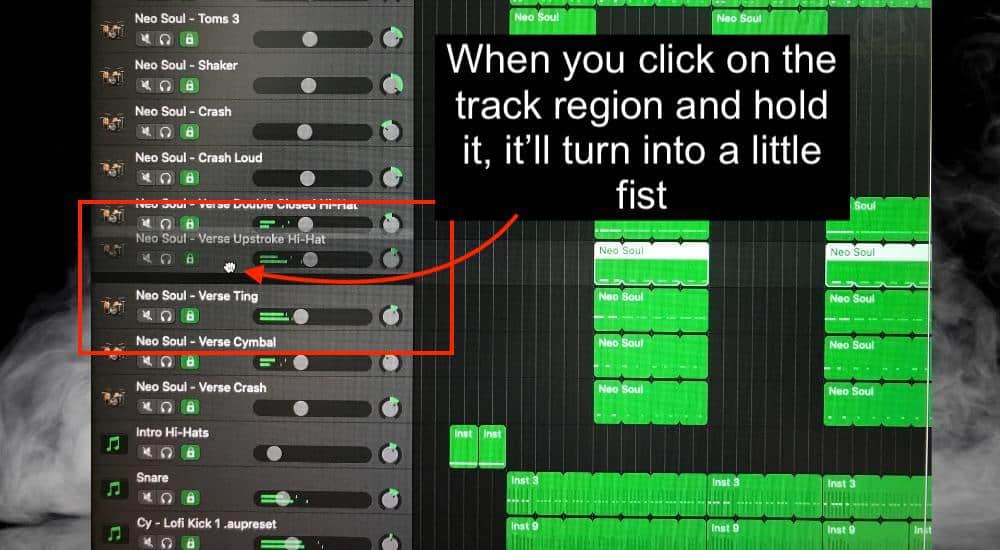
As the image suggests, you have to make sure you’ve clicked on the track header and held it. It’ll let you know it’s grabbing onto the track header by showing you a small fist. Drag the header wherever you want it to go.
2) Get the Volume and Panning Right
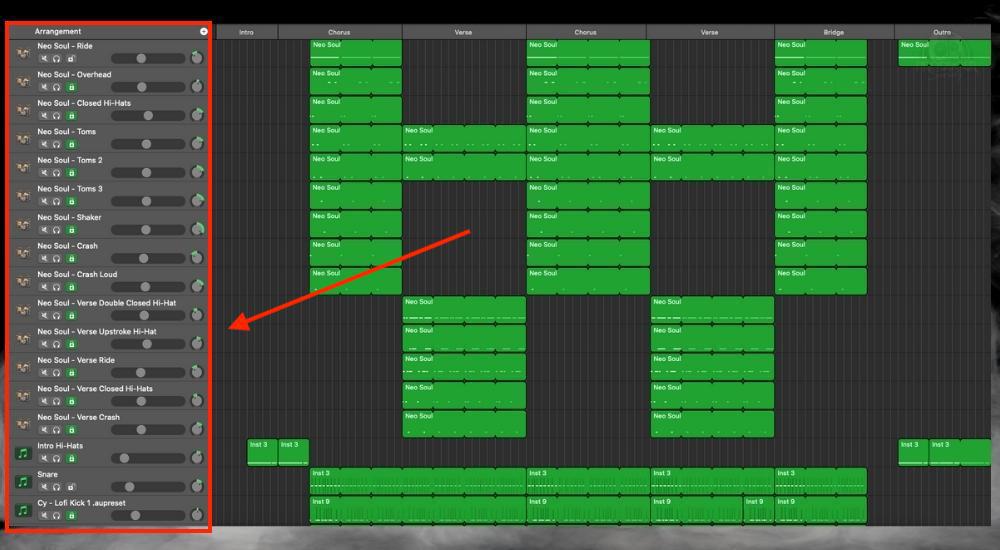
After labeling every part of your drum kit in the mix, drag the VU meters all the way down to -15dB, or even more too -20dB. This will give you enough headroom to make any kind of change you want, without the risk of clipping, distortion, or other undesirables.
The same thing goes for the rest of your song. Having a lot of headroom is rarely a bad idea – also the reason it’s in my 24 mixing tips article.
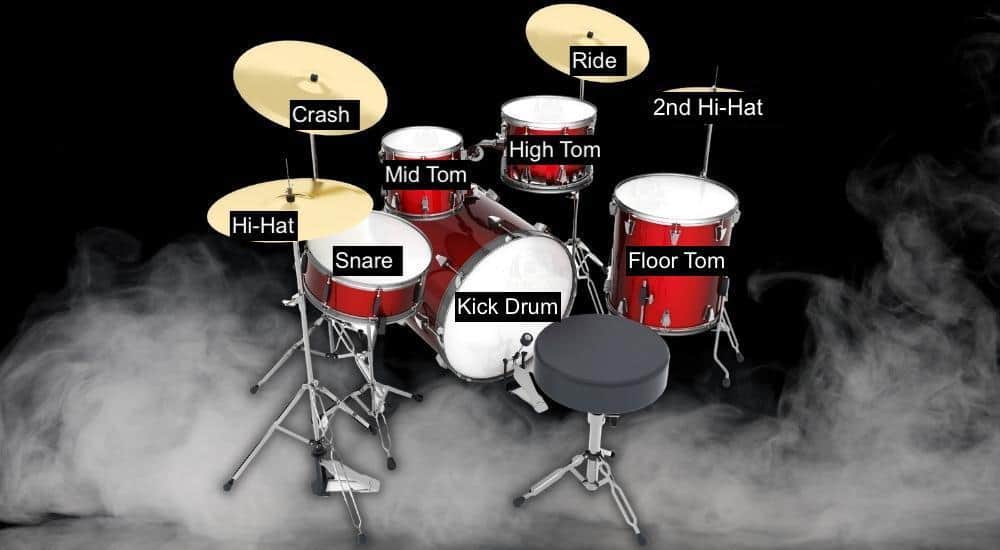
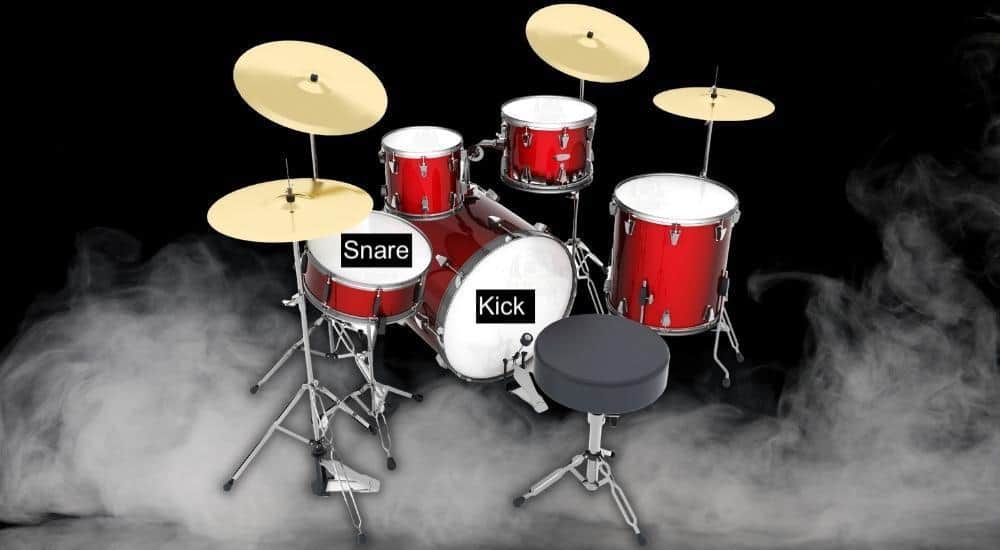
Another thing I’d like to give you before we really dive in is a diagram of how a drum kit typically looks. This should give you an idea of how things could be panned (if you need more help, I have a panning guide too).
A Standard Drum Kit Diagram
- Kick
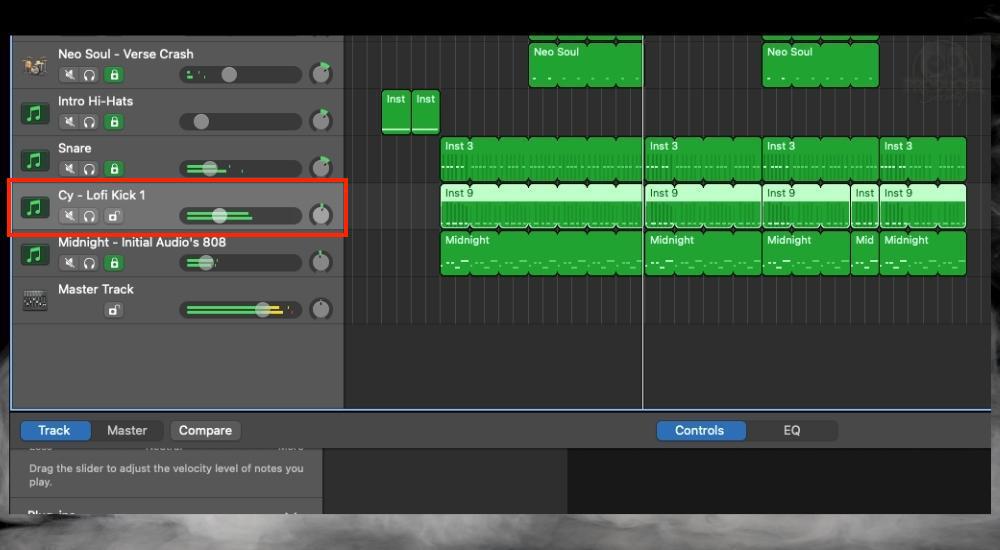
I’ll usually attack the kick and the snare first because these are the backbone of how I approach rhythm. It’s not uncommon for me to start with them first when I’m programming the drum as well.
I’ve got the kick panned to the right at +5 and then the volume is set at -14.4dB. Adjust the kick according to what you need. Because I have an 808 instrument alongside the kick, I don’t have a particularly loud kick.
- Snare
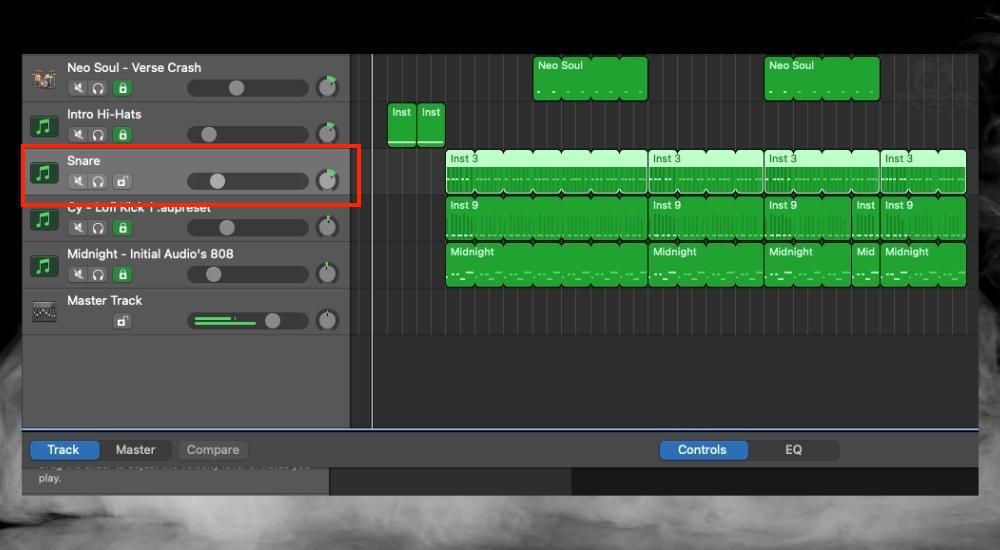
For the snare, I’ve got it pushed over to +20 and then the volume is set at -19dB. The snare almost always has to be turned down a bit because it occupies a frequency range that is much easier for a human ear to hear.
Additionally, I almost always put the snare to the opposite side as the kick because this is closer to the way a real kick and snare looks on a drum set.
The next cymbal I went for was the ride. The reason for that is that the pattern I came up with was very heavy on the ride. It was crucial for it to be approached next.
- Ride Cymbal

Commonly, the ride is one part of the kit where the drummer plays a consistent pattern which is one reason why it’s called a “ride.” The ride was important for this rhythm section. Not only does it keep time but it gives it a nice flow.
I have set it at -10dB approximately and it’s panned to the left at 10:00. On a real drum kit, the ride is usually to the right of the drummer from their perspective so I made it that way in the mix as if I’m sitting in front of the drummer and they’re playing toward me.
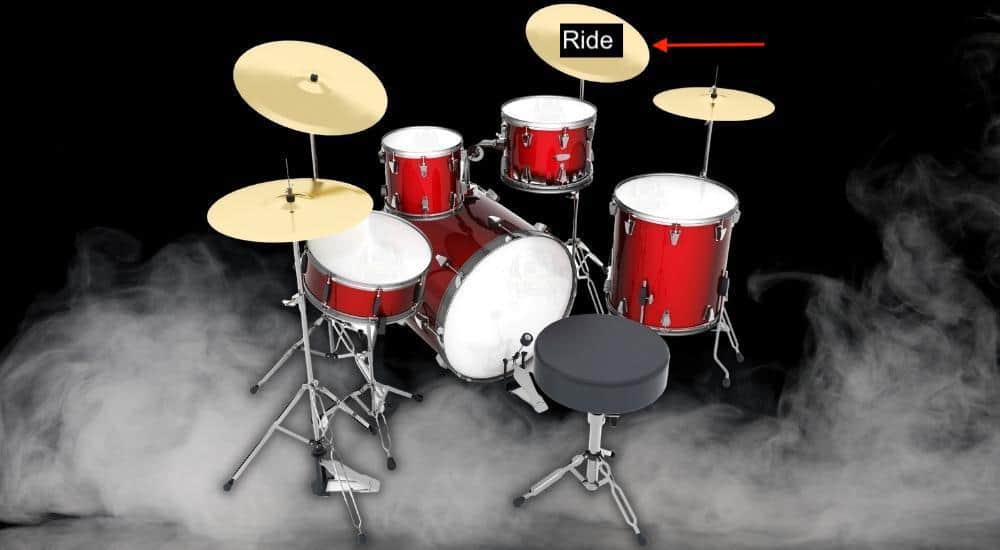
Originally, I had the ride cymbal panned only slightly to the left (11:45) but I changed my mind. Ultimately, my goal when mixing drums is to have everything spread apart and equal so there are no blank spots in the stereo image nor are there clusters of instruments.
- Crash Cymbal
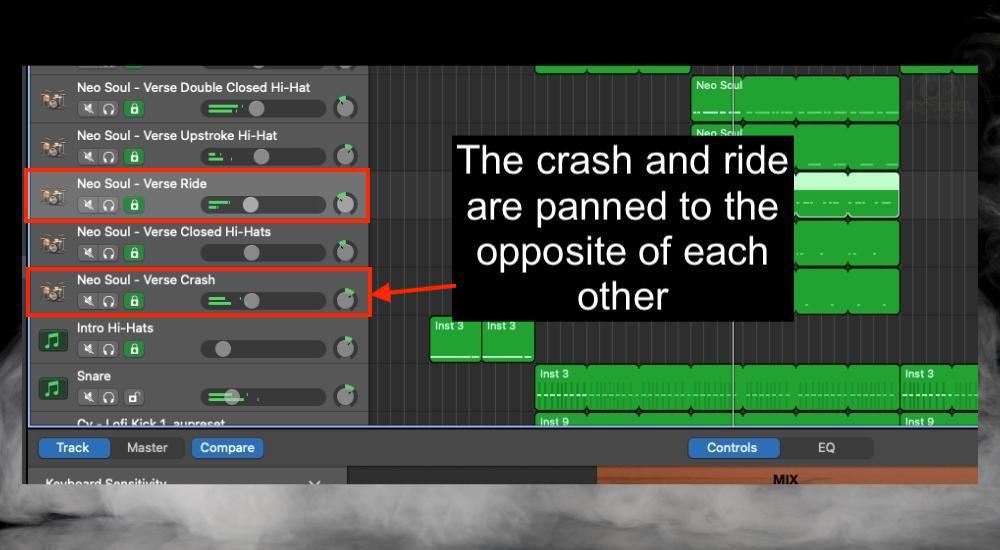
Interestingly, I actually panned the ride and the crash opposite each other intuitively, not because I knew how a standard drum kit is set up. You can try the same thing when you’re panning drums.

Also, notice how they are a similar volume. Unsurprisingly, the crash tends to be a bit louder than the ride so you can accommodate for that with the volume.
- Toms
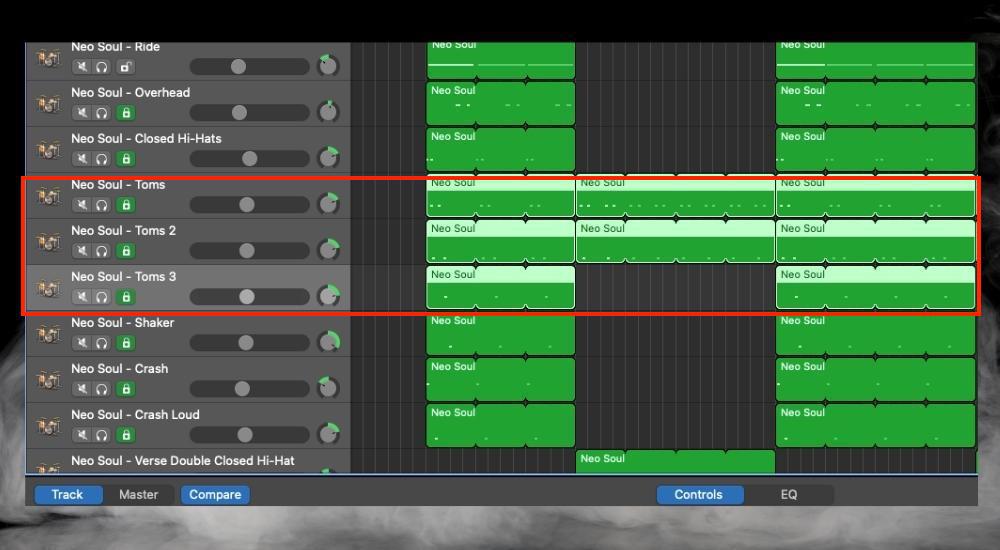
Finally, we get to the toms, which are commonly the most cumbersome part of the kit to mix properly, at least for me. The reason being is that my drum patterns rarely feature many tom hits.

I also don’t have much of a frame of reference because I know that toms can be positioned all over the kit, depending on how many of them there are. That said, toms tend to sound nice in the mix when they’re panned relatively close together and just loud enough so they can be heard. In this case, that’s -6dB approximately.
- Hi-Hats (Open and Closed)

The closed and open hi-hat pattern in my song is pretty cool and rhythmically interesting. It’s a big part of what makes the verses in my song sound the way they do. For that reason, they’re panned to the left and right like the way you can see in the image.
If we were trying to get even closer to the way a real kit looks, it would’ve been panned much wider. I found that they sound better when panned closer to the center though. Notice how the volume is increased relative to the other drums too.
- Niche Drums (Shakers, Extra Crashes and Rides, African Drums, Cowbells, etc)
As for more niche instruments like shakers, extra crashes, rides, African congas, bongos, or things like cowbell, I’ll position them wherever they’re the least intrusive and also most conducive to the primary rhythm of the song. Like the toms, I like to have them loud enough so they’re heard and contributory, but no louder.
Beginner Mixing Shortcut:
One of the better ways to first start out mixing is to rely on presets when using processors like compression and EQ. They’re kind of like training wheels in the sense that you can get used to the controls, how everything works, and how the changes sound in real time.
To this day, I still use presets when I mix my tracks, although, I’ll often adjust them a bit to make them sound more to my liking. I recommend you do the same if you find mixing overwhelming.
The fact of the matter is that you just want your music to sound good. Presets are often a nice shortcut for someone who’s just starting out.
3) Add Compression For Punchiness, Attack, Aggression, Pumping, and Volume
As I’ll say in a minute, be sparing where you apply compression to your drums because you can over-compress everything quickly. You definitely don’t want to compress every single part of the kit (my guide to compression).
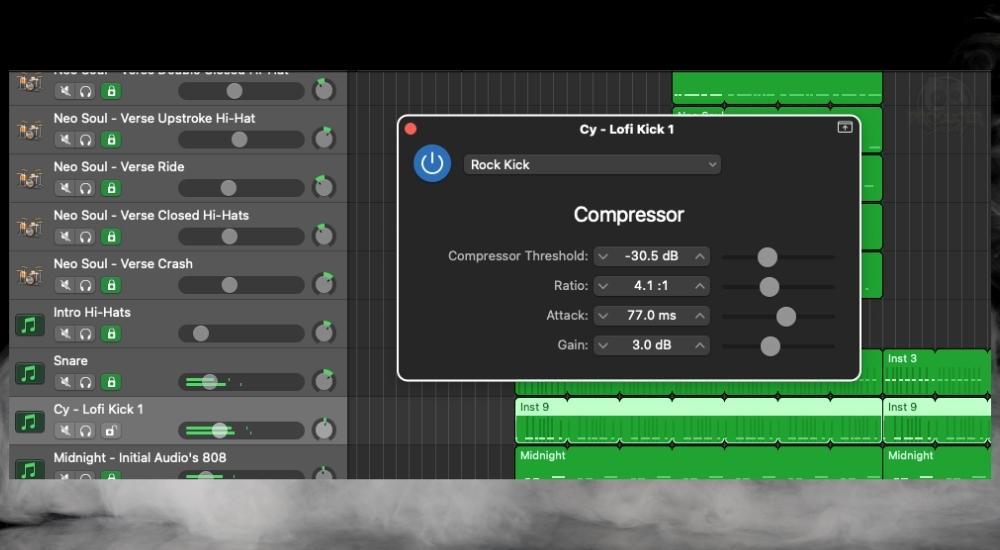
When I mix drums, I almost never add compression to the overheads because I feel like there is no need, but I will add compression to the kick and the snare. Compression can be used to make a punchy kick or it can balance the highs and lows of the snare.
Start with a preset that matches what you’re doing, and then work with it until it sounds more like what you want from it. Here are the kick compression parameters:
Kick Compression
Snare Compression
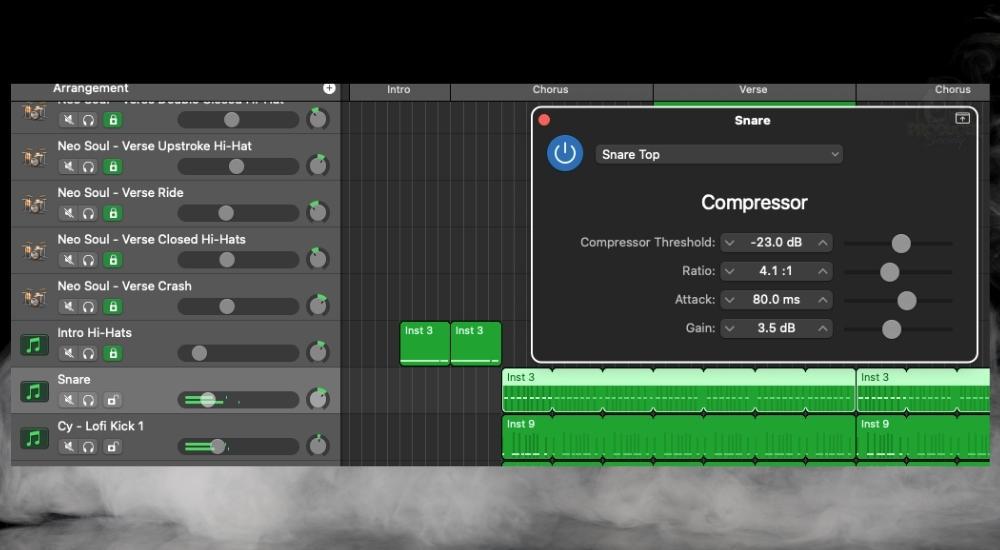
I started out with a “Snare Top” preset, but it was kind of overwhelming, so I turned down the gain and the ratio. This wound up giving me a slightly punchier snare without having to increase the volume.
Another Point on Compression
If you’re like me and you’re using a lot of sample libraries, stock instruments, and VSTs, there’s a good chance that the sounds you’re working with don’t even need compression. So keep that in mind.
Ask yourself if you honestly even need to use it on your tracks. Ask yourself that all the time in regard to many instruments and sounds.
4) Add EQ to Accentuate What You Want & Eliminate What You Don’t
I find myself tinkering around with the EQ more on the drums than with the compressor. The reason for that is that it’s probably more intuitive. I can think of three easy ways to approach the EQ right now.
Use an EQ Sweep: To use the EQ drums, find the frequency range you want to eliminate or accentuate, and then decrease or increase it. This is also called an EQ sweep.

Start Out With A Preset: As I said earlier, start with a preset that sounds like it’s something you’d need, and then make small tweaks until you hear what you want.

Garageband, in particular, has a lot of great presets to play around with on the drums. Go through the list and apply the one that matches with the part of the kit you’re working on.
Use Low-Cuts and Hi-Cuts Regularly: Another nice thing to do with the EQ on the drum kit is to set up high and low pass filters where appropriate. The ride, for instance, has a low-cut set (high-pass) on it because there are no frequencies there anyway. I’ve explained this before in my EQ guide.
I do this all over the place on my track, especially on the drums. I’ve also boosted the high-end just a bit to give them a bit more sparkle and clarity.
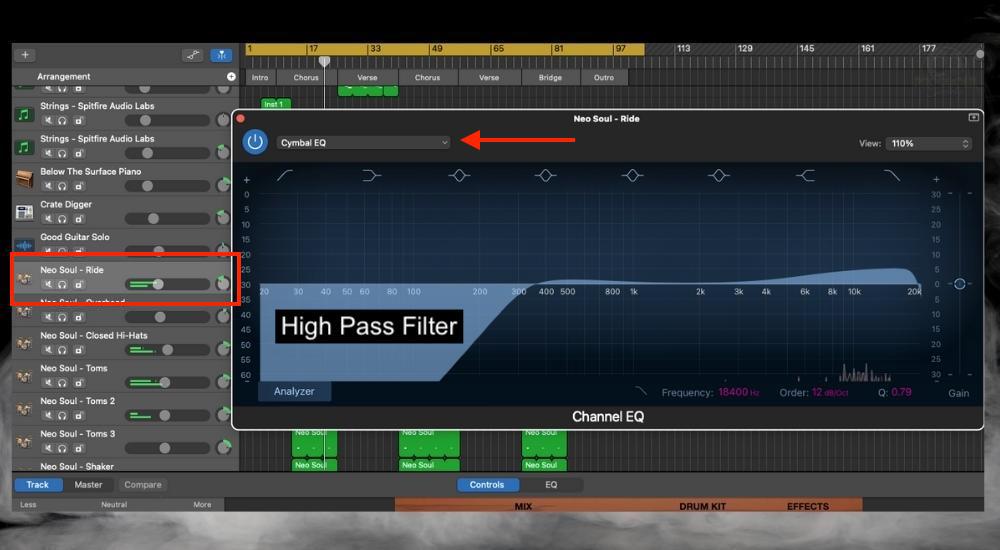
And again, it’s worth stating that I set these up regularly on instruments that have one dominant frequency range. Try the same thing out for yourself and see how it sounds.
5) Shape Dynamics & Transients With MIDI, Noise Gates & Velocity
Using the Noise Gate to Shape Dynamics
You can use a noise gate to shape dynamics, which is something that I learned from Izotope’s blog on Noise Gates. So how would we go about doing something like this?

Garageband’s default noise gate works fine. Put the noise gate at the end of the signal chain. Adjust the threshold until you’ve eliminated the transients you don’t want to hear. Be careful, because an adjustment of 1dB is often enough to make a big difference.
Using MIDI To Shape Dynamics
Shaping dynamics and transients can also be done, without plugins, just by adjusting the MIDI. In other words, elongating or shortening a MIDI note can have a large effect on the dynamics. I always do this. Here’s an example:

Using Velocity to Shape Dynamics
Another way to shape dynamics is to make the velocity of every single drum hit different from the last. You could consider this drum programming or mixing, but either way, it’s important. I did this with the ride pattern, and it made a tremendous difference. Check out the video here to hear it.
6) Adding Effects Like Reverb, Delay, and Flangers
At this stage, 90% of the drum mix is almost done. Of course, there are many other things you can do if you want to make more changes or be even more precise. But once you’ve got the volume, panning, compression, EQ, and transient shaping done, you’ll notice how much better your drums sound better already.
However, adding things like reverb, delay, and flangers are also a great way to get drums to sound a lot cooler. Reverb and delay, for me, are the ones I turn to the most. I’ll be focusing on only these in this section.
First, ask yourself whether your kit needs effects. Does the snare sound dry? Is the kick impotent? Do the hi-hats need something to make them sound a little more interesting? From there, you can decide what you want to do, although, the best way to proceed is via experimentation. Start making changes.
I’m usually fairly conservative when it comes to adding effects to drums. But as I said earlier, reverb, delay, distortion/overdrive, and sometimes flangers are common for me to use.
Reverb on the Snare
You can either use the stock reverb in the Smart controls, or you can use a better reverb plugin like Eventide’s SP2016. PlatinumVerb, a stock Garageband reverb, is a great one if you don’t want to spend any money. I’ll use the preset-then-tweak method to find a good sound.
As I’ve explained in my guide all about reverb and drums, keep the “Wet” parameter low to avoid washing out your snare. Also, the Reverb Time plays a huge role in how washed out it can sound.
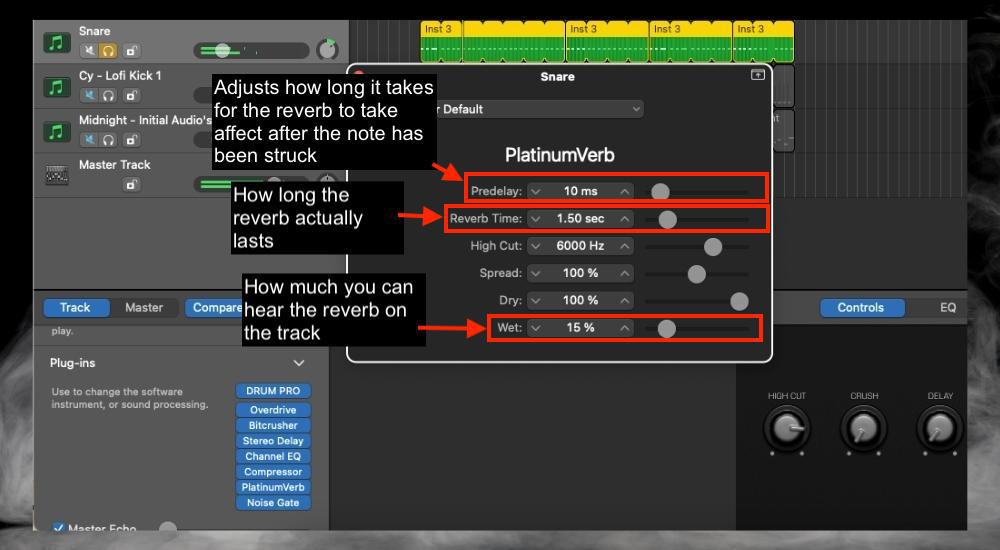
The three settings highlighted above are the most important, I would say, of the 6. When it comes to adding reverb to a snare, less is more. The smallest amount of reverb can make a big difference in how dry or wet it sounds in the context of the mix.
Delay on the Snare
Add a faster snare delay if your song is faster, or a slow snare attack if it’s slower. Use the Stereo Delay and adjust the left note and right note parameters by note duration to change the time.
The next most important setting to use on the Stereo Delay is the left and right mix. They control how much of the delay can be heard in the mix. Here’s the setting that I used on it and also how to use it:

Distortion/Overdrive on the Kick

When using distortion or overdrive on the kit, use conservative adjustments because a little goes a long way. Also, increasing the drive and decreasing the output level proportionally will help keep the volume level.
Saturation on the Kick
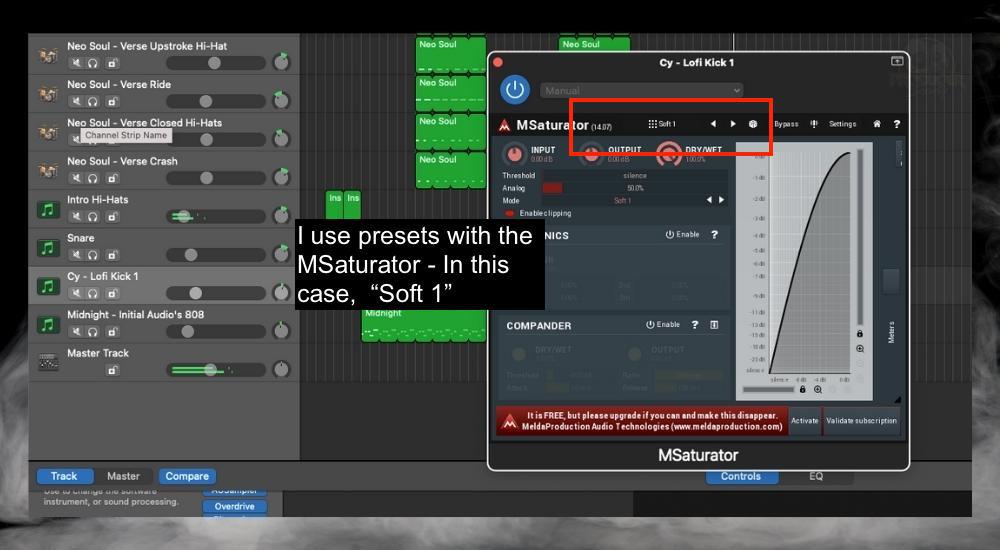
Use presets from the MSaturator to see how they sound on the kick. Soft saturation is often enough to give the instrument just what it needs (the MSaturator comes with Melda’s free bundle which I’ve written about here).
7) Pre-Evaluate Master Track Processing Before Exporting
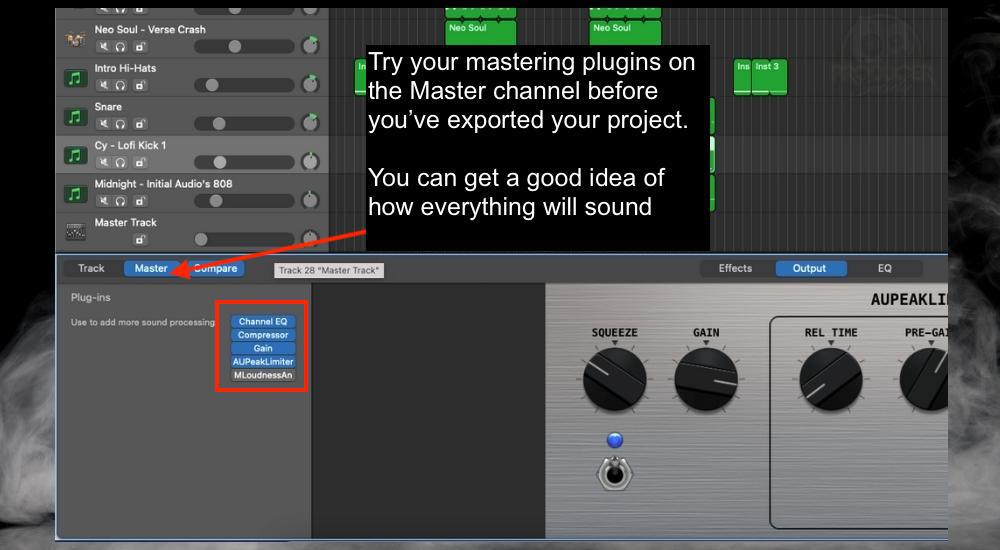
And finally, after you’ve done all of this, put your mastering plugins on the Master Track to see how everything sounds. Do this before you’ve exported your audio file because you want to ensure any Master processing hasn’t caused distortion or clipping.
Also, check to see if anything sounds overcompressed. You’ll know something sounds bad because it’ll sound “warbly” – or as if something is cutting in and out. Another way things can sound bad is via clipping (radio static sound).
And that’s it. You should have your own idea of how to mix drums in Garageband after having read this. Let’s take a look at how my drums actually sound after all of this. I’m not the best mixer out there, but I think my drums wound up sounding great on this track.
The Finished Drum Mix
Can You Tune Drums in Garageband?
In the case that your drums don’t sound quite right, it could be due to them being out of tune. This probably won’t be the case if you’re using Garageband stock instruments, but it could be if you’ve downloaded some off the internet, or if you’re using a 3rd party plugin.
I’ve written a guide on how to tune 808s before, and the principles apply whether it’s drums or an 808. But I’ll explain it here again for simplicity’s sake.
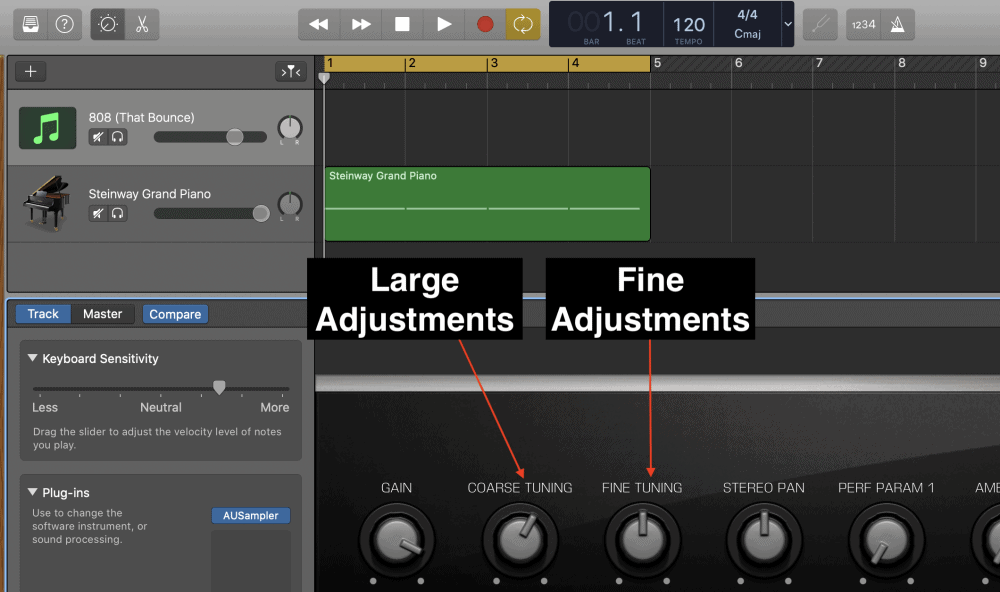
To tune drums in Garageband, compare and contrast a default instrument track, like the Steinway Grand Piano, to your drum that needs tuning. Use a pitch correction plugin to adjust the tuning by semi-tones.
If you’ve downloaded a drum and it needs to be tuning, you’ll probably be using the AUSampler. In that case, adjust the Coarse and Fine Tuning down in the Smart Controls until the drum is totally in sync with your reference instrument.
Important Things to Note About Mixing Drums in Garageband
1) Volume and Panning Are 90% of the Battle
In my opinion, volume and panning are the two most important factors in how a mix will sound. After both of these factors have been handled, the little changes you make here and there will be the last 10%, so to speak.
2) There Are Many Methods for Mixing Drums
What I’ve shown here in this article is only an introduction to the topic. As I said earlier, you’ll probably have to do more work (or maybe less) if the drums are real and not programmed. Follow this guide and use it as your training wheels if you need to.

 Written By :