 Written By :

Garageband comes stock with a default compressor and it’s fairly straightforward, which I think is perfect for the beginner. So what is the compressor in Garageband?
The GarageBand compressor is a plug-in that lowers the volume of the loudest sounds and increases the volume of the quietest sounds in an audio file, depending on how you’ve set the threshold, ratio, & attack. The result is a dynamically balanced track which you can increase with the make-up gain.
A compressed signal brings balance and cohesiveness to an audio recording, and a by-product of this process is the capability for increased total volume on the track afterward. It helps to illustrate what I’m talking about, so I’ve created a few images and diagrams.
What Is Compression? (Explained In Visual & Audio Form)

The image below is an uncompressed file in Garageband.
The quiet part of the recording, between 41 and 47, is much smaller than the louder part of the track, between 47 and 54.
*The strength in signal usually corresponds to its size.

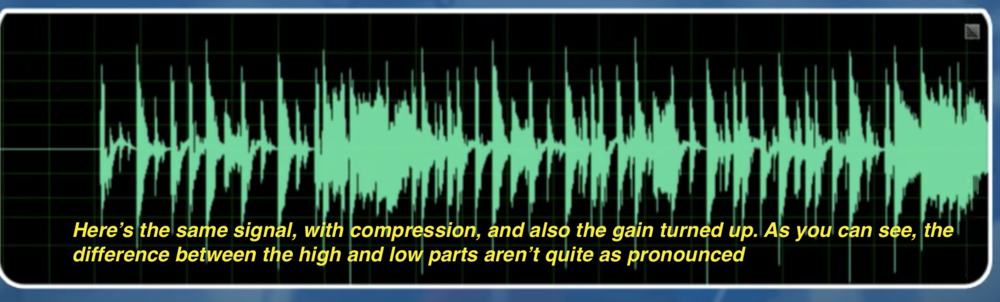
Now, the next image below is a compressed file in Garageband. You’ll notice that the part between 41 and 47 has accentuated a little, compared to the part between 47 and 54.
The difference is no longer as large between the quietest and loudest part. That’s essentially what the compressor does. It brings balance and consistency across the music.

But don’t get overly used to differentiating between sounds visually. Try and grow accustomed to how they sound rather than how they look.
With that said, however, compressors that come with a visual interface are so much easier to use than the numbers-and-dials option like what comes as a stock plug-in in Garageband. An actual visual reference is quite helpful, and there’s nothing wrong with using it.
Explained in another way, compression functions by decreasing the loudest sounds/increasing the quietest sounds so they fit within a much smaller range. The result is more consistency, and thus the quieter musical sections can shine.
For instance, if we increase the total volume of a track to bring up the quiet sections, an unintended consequence may be too much volume in the following loud parts, therefore, clipping and distortion.
A compressor gets around this problem, and because of the decreased size of the overall signal, we can turn up the overall volume by a few dB (make-up gain).
It’s for this reason that compression is typically associated with the increased overall volume in music, however, what the compressor is actually doing is balancing the harshest and softest parts of the song; the louder volume is just a consequence.
As I explained in my tutorial on compressing vocals, a compressor may bring up quieter words and even small breaths for the listener to hear, while at the same time, bringing the volume down on easier-to-hear words.
Another example: increased compression can bring more attention to the sound of the piano keys bottoming out, rather than the vibrating strings (by the way, PianoForAll (from their site) is one of the best ways to learn the keyboard).
The subtle dynamic changes created by compression can be the difference between a great mix and a bad one. Because of that, there are a lot of terms associated with its function.
Regarding the mastering process, people associate the compressor’s effects with terms like, “pumping,” “gluing,” “punching,” “gelling,” and “sticking.” Moving on to its parts……..
The Basic Controls of the GarageBand Compressor
Compressors typically have the same parameters: Ratio, Attack Time, Release Time, Threshold, and Gain, although Garageband’s stock compressor has only four, omitting ‘Release Time.’
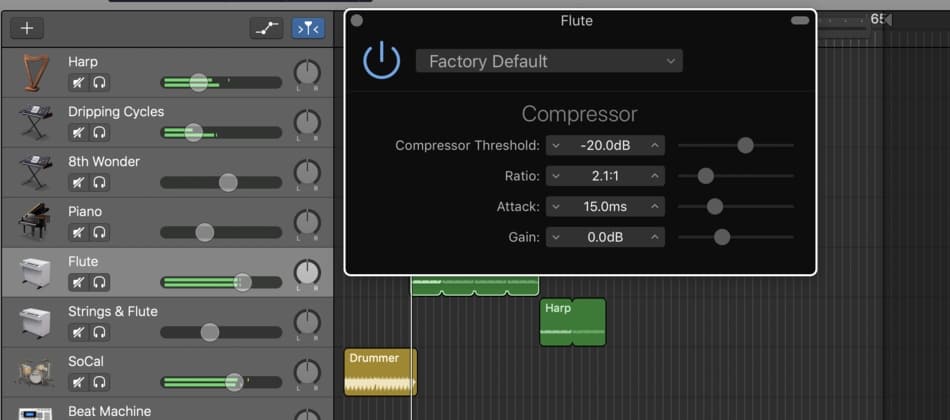

The compressor in Garageband has four parameters in this order: Compressor Threshold, Ratio, Attack, and the Gain. Each parameter does something different.
*It’s worth noting that the Compressor settings are a bit different from how the rest of the internet specifies the numbers.
When looking up compressor information online, you’ll find that ratio settings are only expressed in two numbers: “5:1,” or “20:1.”
Garageband’s compressor ratio has three numbers, so the settings look more like “5:1:1.”
The middle number is for people who want to adjust the compression by 0.1 instead of entire numbers, ie, 4:1 to 5:1 versus 4:1:1 to 4:5:1.
4:5:1 is basically half-way to 5:1:1
1) Threshold
The threshold is how loud the signal has to be for the compression to start. It’s the point, in dB, where the compressor actually turns on.
Explained in another way, if we were to imagine the audio signal pictured below as modeling clay, a compressor is like squeezing the highest and lowest points of the audio signal with one’s fingers to round it out better.
The threshold, essentially, is the point on the modeling clay where you start squeezing it down to balance it out with the rest.
For instance, let’s say that you’ve set your threshold to -5dB – a high threshold – any signal louder than -5dB will be compressed.
As you can see from the image below, setting the threshold to -5dB will only compress a very small portion of the signal.
A threshold of -30dB will cover almost half of the recording.


If you only want to compress the loudest parts of the signal, the threshold will be a larger number (closer to 0 dB and above)
To compress more of the signal, a smaller number is better, so -20 or even -40.


It’s fairly intuitive when you think about it.
If the threshold is set to -40dB, much of the track’s signal will be compressed. The lower the signal, the closer the threshold is to the center of the audio signal.
2) Ratio
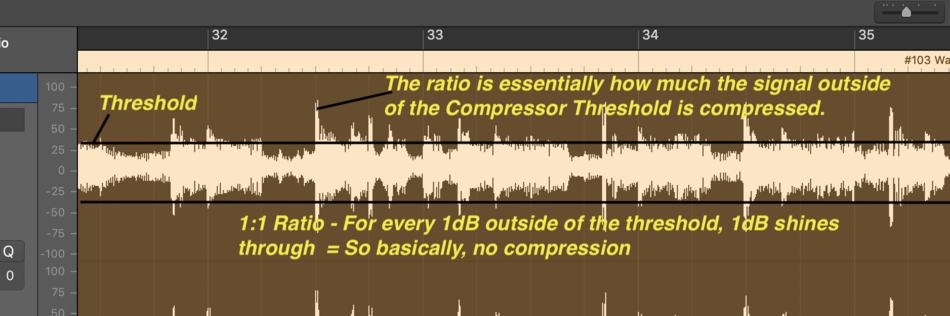
Essentially, how much compression is actually being used; it’s the strength of the compression. We measure the ratio using the comparison between the input and output signal.
In other words, the ratio is by how much we’re weakening the strongest signal outside the threshold.

It’s calculated with fractions.
A 5:1 ratio means, for example, that whenever the signal exceeds the threshold by 5dB, the compressor will drop the signal down to 1dB outside of the threshold.
5:1:1 ratio is medium strength compression
Another example: a ratio of 2:1:1, means that when the signal exceeds the signal threshold by 2 dB, the compressor will decrease it to 1 dB above the threshold.


A ration of 3:1:1 is considered as moderate compression, 5:1:1 is medium compression, 8:1:1 is strong compression, and when it gets up to 20:1:1, it technically means it’s “limiting” rather than just compressing, because it’s stopping the signal from exceeding the threshold completely (more on limiting in my tutorial).
*Fun fact: A limiter is basically just a compressor with its ratio set super high, 10:1:1 and above.
3) Attack
The attack is how fast the compressor kicks in or grabs on to the signal. It is how long it takes for the compressor to fully compress the sound once it has crossed the threshold level.
A fast attack time is typically between 20 and 800us (microseconds) and slower times are in between 10 to 100 milliseconds.
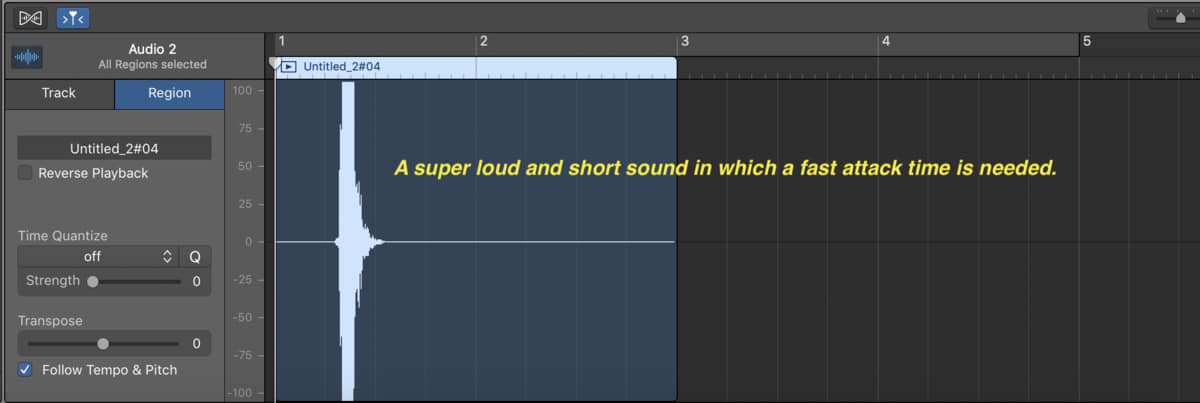
It really depends on what you’re using the compressor for. Most parts of a drum kit utilize a fast attack time, like the kick and snare, and some kinds of singing, like rapping.


Engineers need a fast attack time for compressing things like snare and kick drums because those instruments are 1) loud, and 2) the soundwaves are essentially like short bursts.
Whenever the drummer hits the snare, it’s quite loud and fast, so the compressor needs to be fast enough to quickly latch on to that sound and bring the volume down.

Instruments and singing tend to be the areas where more dynamics are wanted. Piano playing, singing, and the guitar, for instance, are all cases where a slower attack speed is sufficient.
Using the example of singing, a fast attack time and the high threshold will cause the compressor to grab on to the signal quickly, decreasing the highest point of the signal and increasing the lowest part of the signal, creating somewhat of a “flattening” effect.
A really fast attack time can actually cause distortion by disrupting the signal flow.
Let’s say a sound wave is slow moving, like a bass sound.
As I mentioned in my article on compressing bass, if the attack is too fast, it means that the compressor thwarts the signal’s vibration right away, and so if the signal’s slow, it’ll literally stop its flow, thus creating distortion.
4) Gain
Gain, in other words, is the strength of the overall signal. Due to the compressor bringing the low’s up and highs down, the compressor is actually decreasing the total power of the signal.
Thus, engineers make up for this by increasing the output gain, which is essentially turning up the total volume on the signal, after we’ve pushed the highs down and the lows up.
More advanced compressors like Fab Filter’s Pro C-2 offer meters showing precisely how much the compressor has decreased the signal in dB, therefore, allowing the engineer to “make-up” for this loss of volume by increasing according to the proportionate amount of output gain.
In other words, the ‘gain’ portion of the compressor is a tool for compensation.


The more you’ve compressed the signal, the more gain needed to match previous volumes.

How to Compress Guitar, Vocals, and Drums in GarageBand
It’s very abstract and hard to put into words, but a fast attack time or over compression can literally squeeze the life out of the music, whether its vocals, guitar, drums, or bass. Here’s what that will sound and look like in audio/visual form.
Video – Overcompressed Sound
Video – Too Much Attack Sound
The part of the signal that normally is compressed due to a high threshold, strong ratio, and fast attack time is the same portion where the personality of the recording lies.
Explained in another way, eliminating the higher dB parts of the music will eliminate its individuality, making the drums or female vocals sound like everybody else’s.
When a person sings, it’s worth hearing those very small breaths and the shuffling in the studio, but we don’t want to hear too much of it.
Overcompressed vocals, however, will accentuate the breaths too much and then bring down the singing. Most people don’t have this effect in mind when they start using a compressor.
Compression isn’t a panacea to one’s recording and mixing problems. Chances are, if the first take isn’t good, slapping on a compressor won’t fix that problem.
You may have to just go back over and re-record whichever part is problematic. Overcompressing a bad part will only make it sound flat, dull, and squashed.
As I mentioned earlier in the article, how much compression one uses depends on for what instrument or audio recording you need it for, and in what genre it is.
In popular music, there is quite a bit compression due to the fact dynamic music isn’t the norm in the mainstream music scene. Hit songs typically aren’t very dynamic, because they’re mostly played in big clubs, bars, and on people’s car stereos.
Jazz music, on the other hand, is a genre where the listener takes subtle differences and dynamics more seriously.
1) How to Compress Guitar in GarageBand
- Needs a step-by-step process as well, look to GarageBand Guide if you need to
If you’re mixing a lead guitar part, enough compression means that it’s just maintaining a relatively consistent volume across all of the notes as I explored in my tutorial dedicated to compressing guitars.
A compressed guitar part allows for the much quieter notes to be heard, while the loudest ones are brought down just a little bit.
Increasing the volume of a guitar part may help the desired notes get louder, but it’ll also bring up the volume of the loudest parts as well.
Typically at the beginning of the effects chain, compressors are supposed to hold a signal within a set volume range, so it’s important not to use it following a reverb or a delay (unless you like the way it sounds).
Distortion and overdrive – like what I use in BlueCat Audio’s Axiom from Plugin Boutique – are already very high-gain, so using a compressor on this sort of sound won’t sound great.
We’ll usually use a compressor on clean tones, to accentuate the softly-picked notes and decrease the loudness of the loudest ones.
Looking at a non-compressed clean guitar signal, versus a compressed one, accentuates the way the two differ.
A compressed lead guitar part will increase the sound of one’s fingers hitting and scraping against the strings.
It may also accentuate small mistakes in the audio, but one could argue that those small mistakes are part of what makes it unique music.
2) How to Compress Drums in GarageBand
- Needs a step-by-step process as well, look to GarageBand Guide if you need to
Drums are more sophisticated than guitar parts because mixing engineers will compress and EQ each drum part differently.
The snare will be increased to sound “punchier,” as will the kick, while the cymbals won’t face as much compression.
In hip-hop/rap music, for instance, EQing the snare correctly to one’s choosing is a crucial part of the mixing process. So is mixing the bassline and boutique 808’s, although, if you use Initial Audio’s 808 Studio II from Plugin Boutique (my favorite) you don’t need to mix as much.
Both the kick and snare will usually have some form of compression on them, whereas cymbals will almost never be compressed, simply because you need the symbol to ring out in the higher frequencies.
3) How to Compress Vocals in GarageBand
Needs a step-by-step process as well, look to GarageBand Guide if you need to
Regarding a vocal track, a little bit of compression can do quite a bit for singing.
However, it’s very easy to abuse. For instance, as I mentioned earlier, too much compression will likely increase the volume of less desirable parts of the singing, like the sound of the person taking a breath. Or the shoes shuffling in the background.
Usually, vocals are considered to be one of the more important parts of the mix, and for that reason, they’re mixed so as to sit at the “front and center” of the mix. Backing vocals, on the other hand, are usually compressed a lot more.
How Do I Use The Compressor in GarageBand?
GIF
GIF – Caption To use the compressor in Garageband, hit ‘B’ on your keyboard to bring up the Smart Controls after selecting the audio or software instrument track. Click one of the plug-in slots, choose Dynamics > Compressor, and then choose the preset that matches your instrument from the drop-down menu.
Before using it, ask yourself what you need it for and whether it’s even necessary. It isn’t a necessity to always use compression, believe it or not. Sometimes, you may like the way things sound as they are.
Personally, I think the best way to go about using the compressor as a beginner to audio engineering, is to simply use the presets that come stock in Garageband. So how do you do this?
1) The EASY Way to Use A Compressor
A) Hit B On Your Keyboard
B) Select A Plugin Slot
C) Choose Dynamics > Compressor
D) Choose A Preset That Matches Your Instrument, Sound, or Genre
E) Change the Preset A Little If It Doesn’t Totally Match What You Want
After choosing a setting from the pre-sets, just go through each parameter one by one and figure out how to change it.
I find they work great, and they’re quick and easy to use. You can customize each parameter one-by-one to your choosing.
Usually, the main thing I use compression for is to increase the overall volume at the end of the process. However, in recent months, I’ve become a little more sophisticated in my use of compression.
On my last song, “Romania,” I only used a multi-pressor at the end; I never even bothered to compress any of the tracks. I didn’t want to mitigate the dynamism of my kick, snare, shaker, and hi-hat combo.
I thought it sounded great the way that it was, so I only used a multi-pressor instead: the setting, “Final Hip Hop Compressor.”
2) How to Use the Compressor Manually
A) Open the Compressor Like Before
B) Turn All the Dials to Zero
C) Increase the Attack to 20.0ms
D) Set the Threshold Until It Stars Compressing
E) Slowly Increase the Ratio To Lower the Peaks and Increase the Valleys
F) Increase the Gain to Make Up for the Loss in Volume
6 Important Tips for Using A Compressor
1) Ask Yourself What You Need to Do Before Using the Compressor
Before even bothering to touch the knobs, ask yourself for what purpose you’re using the plug-in in the first place?
The last time I used it, it was for a lead clean guitar part. I wanted to hear more of the subtleties, like my fingers moving around on the strings, and those little soft and quiet sounds.
Knowing that was my purpose for the plug-in, I turned the compressor’s threshold up high, around -25dB Threshold, Ratio of 4:1:1, attack to around 10ms, and the Output gain to +2 dB.
The aforementioned settings are similar to the pre-set, “Classic Guitar,” within the Compressor’s smart controls.
2) Be Careful to Avoid Overcompression in the Mix and on the Master
Because of the way in which a compressor can increase the volume of an audio recording, a lot of beginning engineers think of a compressor as something that just makes the recording louder.
And due to the relationship between the compressor and volume, in hip-hop production at least, music producers misuse the compressor as just a volume tool.
To be fair, however, pop music in the modern era uses a ton of compression and the majority of songs aren’t meant to be the most dynamic.
Compression is used in nearly everything in pop music because engineers are trying to get their music as loud as possible while still sounding good in what’s been called the “loudness wars” which Bobby Owsinski talks about a lot in his book, The Mixing Engineer’s Handbook.
A compressor is a tool for dynamics. It literally squeezes the signal. It’s not just about volume. And how one uses the compressor depends on the instrument or recording. Using the compressor on a guitar solo will be for a different purpose than for the kick or the snare.
Putting aside its uses, the compressor can be abused horribly. It has the ability to literally squeeze the life and dynamism out of one’s music, effectively eliminating the music’s magic.
That might seem like pedantic nonsense, but it’s the truth. An over-compressed song doesn’t sound that great because it no longer has the natural vibe and flow of music.
3) Not All Compressors Are Created Equal
4) You Can Use More Than Compression Plugin for Nuanced Purposes
5) Understand What Transients Are
Those subtleties that I just described, those are called “transients,” a common term used by audio engineers. Transients, essentially, are short, abrupt, and subtle sounds that one either wants or doesn’t want to shine through the mix.
The ‘ringing out’ sound heard after smashing a cymbal on the drum kit is a “transient” sound. It’s abrupt; it doesn’t last a long time.
6) Try Using the AU Dynamics Processor
Other Articles You May Be Interested In
- How to Use Parallel Compression in Garageband
- Using Compression On A Bass Guitar (A Step-By-Step Guide)
- Using Compression On Vocals In Garageband (A Step-By-Step Guide)
- Compressing Guitars In Garageband (Acoustic Clean Distorted)
- What Is A Limiter And How Do I Use It In Garageband?
where is mixing for rap vocals? all I see is how to sound like Travis Scott, Mixing vocals to song, Guitar, Piano etc mixing. where is the break down for mixing just hiphop rap songs? along with the beat that is being imported into GarageBand. Ive been on this site since Monday and the only thing I took away from this was ‘Studio Vocal’ thats it.
I haven’t written one yet. Thanks for the idea.