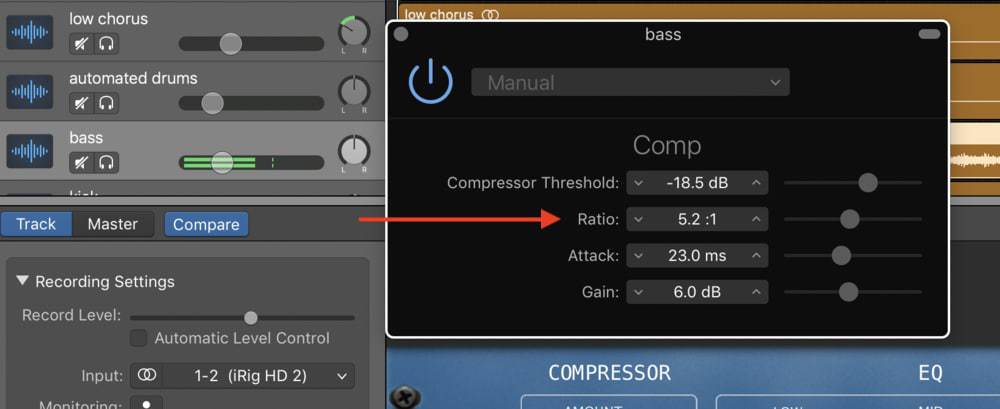
To compress a bass guitar, set the attack to 25ms, the ratio to 4:1, and the makeup gain to +2 or +3dB. Drop the threshold to between -15dB and -25dB, or to the point where the compressor starts to increase the total volume while decreasing the difference between the loudest and quietest parts.

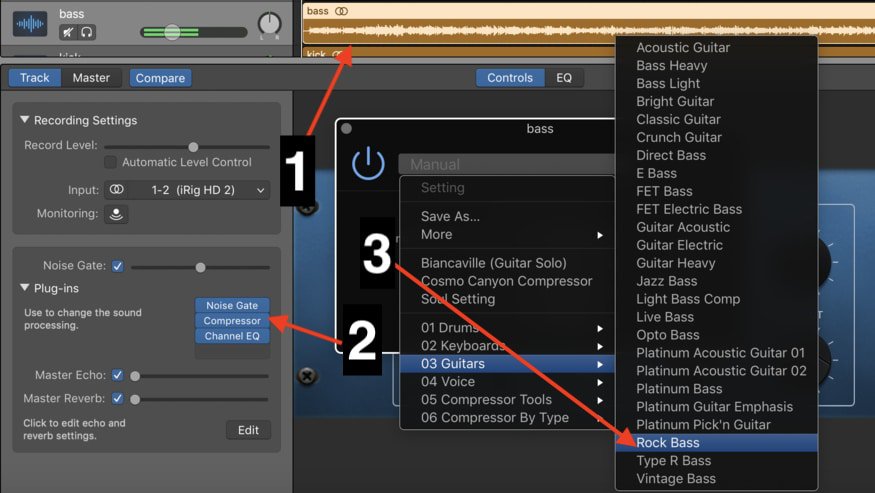
Another thing that you can do is actually use the presets like what’s shown in the image down below.
In Garageband specifically: 1) Highlight the bass guitar track region 2) Go down into the plug-ins in the Smart controls and select “Compressor” from the drop-down menu, and 3) Go into the pre-sets, and choose one of the following options, “Jazz Bass,” or “Rock Bass.”
There are actually way more options to choose from when it comes to the available pre-sets in Garageband, however, I find that the following two options are most suited to my viewers. It’s really up to you to go through each pre-set and see which one sounds the best in the context of the rest of the mix.
Some of the other options are “Bass Heavy,” “Bass Light,” “Direct Bass,” “E Bass,” “FET Bass,” “FET Electric Bass,” “Live Bass,” “Opto Bass,” and so on and so forth. There are many of them.
With that said, using the pre-sets that I just mentioned provides a solid jumping-off point from which to work. They aren’t meant to be a crutch that you ultimately rely on for the rest of your mixing/producing career.
Once you’ve experimented with the aforementioned pre-sets for quite some time, it would be wise to actually figure out how to apply a compressor to a bass guitar on your own, manually, adjusting each parameter to your choosing.
Before you do this, it would be wise to at least be somewhat familiar with the parameters (my guide on compression).
With that said, I will re-illuminate the parameters in this article for the sake of clarity. Before we begin, let’s actually talk about the bass guitar first, and why the compressor is applied to it and for what reason.
Compressing The Bass Guitar
Ultimately, the compressor is used for the same purposes almost across the board, which is to even out the notes so everything has an equal quality to it.
The same thing can be said for the bass guitar.
We want to equalize the sound so that the quietest notes are played to a similar dynamic range as the louder notes.
This combats the phenomenon where the bass guitar player might play some notes louder than the other or quieter than the other, and you need to bring some of these notes forward in the mix a little bit more or push the louder ones back.
Furthermore, we can also adjust the parameter to eliminate or reduce transients like the way they pick hits the strings, assuming the bass player is using a pick, of course.
Additionally, a compressor can increase the volume of the notes played by a finger-style bassist, who may have miscalibrated a few different notes.
With all that being said, it’s not always 100% necessary to compress the bass guitar, because, at times, you may run into a bass player who can actually play everything at a consistent dynamic range.
In other words, you should honestly ask yourself if a compressor is really even necessary.
If you increase the bass guitar in the mix, and some of the notes sound like they’re fading in the distance a bit, then perhaps it’s time for some compression.
On the other hand, if everything sounds pretty equal, you can just leave it alone, which is great, because it’s not always a good thing to dozens of compressors set up on all your instruments because you might end up with an overly compressed sound.
Setting the Compressor’s Attack
The attack is how long it takes for the compressor to actually latch on to the signal.
Like I mentioned in another article on how to use the compressor on vocals, setting the attack and release is quite important. In Garageband, however, there isn’t actually a release option on the compressor, there is only an attack option.
Use one of Garageband’s pre-sets that I mentioned earlier in the article, and then make adjustments.
When setting the attack, you want to start at the lowest possible range, at 200ms, and then slowly increase it until you notice that the compressor starts latching onto the signal.
People have different ways of going about this.
Some people say it’s a bad idea to have the bass signal pumping and breathing along with the song, while others say it’s great. I actually prefer to have the bass set up so it does pump just a bit along with the tempo of the song.
Typically, the attack of a bass guitar will be set around 10ms to 25ms, so keep that in mind. It also depends on the genre.

For instance, a bass player in the metal sub-genre may have a faster attack because there are more notes being played faster, compared to jazz, where this won’t be the case as much.
In general, if you want the bass to be more aggressive and punching, you’ll likely want to slow down the attack (toward 200ms).
If you want a much smoother sound, you’ll increase the attack, (toward 0ms). Too much attack and you’ll squeeze all the life out of the bass-playing, and too little attack, and you won’t do much at all to the signal.
Setting the Compressor’s Release (Optional)
The release is how long it takes for the compressor to let go of the note after it’s been compressed.
Hypothetically, if you are using a third-party plug-in that includes a release parameter, you want to start with the slowest attack, 200ms, and then the fastest release.
After you’ve set the attack to the desired range, go to the release, set it to the absolute fastest, and then adjust it so that the note goes back to 90%-100% normal volume until the next note hits.
Typically, most engineers are adjusting the release so it’s as fast as possible.
Setting the Compressor’s Threshold
The threshold is the point at which the compressor starts compressing the audio signal.
When it comes to setting the compressor’s threshold, I commonly have it set between -15dB to -25dB.

This is a good range for the compressor to actually do its job and make everything sound equal, solid, and clearly defined.
In general, as you decrease the threshold, for instance, toward -50dB, you’ll be increasing the amount of signal that’s actually compressed.

The more you increase it toward +0.0dB, the less signal you’re compressing. It’s kind of counter-intuitive, but that’s how it works.
Setting The Ratio
After setting the threshold, which will determine how much of the signal you’re compressing, the ratio adjusts the strength of the compression.
Explained in another way, the threshold controls how much of the signal is being treated, and the ratio controls how much compression is being applied to the signal that’s affected.
Commonly, you’ll want the compressor set between 4:1 to 7:1.

I would say this is a nice little range to be in. Any more than 7:1 is probably too much, and anything below 4:1 is too little.
Setting the Make-Up Gain
The gain of the compressor is used to adjust the volume of the total compressed signal after the bass has been treated by the compressor.
Due to the compressor, the volume of the track will actually decrease, so the make-up gain is used to literally “make-up” for that loss in volume. It really depends on how you want to use it.
For instance, I like to increase the make-up gain by a few dB to increase the volume of the signal after the fact, rather than just using the make-up gain to make it the same volume as it was before the compressor was applied.
One shouldn’t go overboard with this, however.
It’s not uncommon for me to push the make-up gain to around +5dB, or, if a lot of compression has been applied, it might sit at around -1dB.

This is one of those things where you have to listen for yourself to determine how much volume you want.
Other Things To Consider When Using A Compressor
1) Avoid Multiplicative Compression
From what I understand, the compressor has what’s called a multiplicative effect, which means that if you use too much compression on your tracks, you’ll wind up with a track that’s overly compressed and terrible-sounding in the mastering stage.
While compression is awesome at controlling the dynamics of the music, you don’t want to go overboard with it.
2) As Always, Use Studio Headphones
Studio headphones, such as the Audio Technica ATH-M50x, we’ll help you make a more informed decision in the mixing process.
This is doubly important when it comes to bass signals because it’s lower on the frequency spectrum, and thus, harder to hear. Too much or too little bass happens often, especially if you’re not using proper gear.
3) Don’t Solo Too Much
These last two tips apply to almost every aspect of the mixing process. I always use “solo” and “in-context,” in other words, listening to the track with the rest of the instruments, interchangeably.
The idea behind this is to ensure that it actually sounds good with the rest of the mix, but it’s also easier to hear what changes are being made when you use the “solo” button.
4) Mix in Mono
Similar to “solo” and “in-context,” I almost always switch between mono and stereo on a regular basis as shown in my guide. However, the vast majority of the mixing and listening is done in mono, with occasional switches to Stereo to make sure things are sounding the way that I want.
5) Signal Chain (Plug-In Order) Is Important
Typically, you want your compressor to be after the noise-gate plug-in, and before the EQ plug-ins.

Some people will even use a compressor before the Channel EQ, and then another one after the Channel EQ.
At this stage, using two different compressors on the same track is a bit beyond me, but I imagine there’s a good reason for it.
Other Bass Compression Tips
1) Try setting a compressor’s ratio to the maximum, in other words, the highest ratio possible, and then set the threshold so there is around 3-4dB in gain reduction.
The idea behind this is making the bass solid in the context of the rest of the mix.
Using Other Compressors
At some point, you’re going to want to move away from Garageband’s stock compressor, because you’ll want more options and parameters. Some of the best plug-ins in that vein are Fab Filter’s Mastering Suite which includes a bunch.
As I mentioned earlier in the article, Garageband’s stock compressor doesn’t come with a release option, among other more sophisticated parameters, so you may want to start using a different one at some point in the future.
YouTube Video Tutorial
Conclusion
I hope this article was at least helpful to you in your mixing and music-producing journey. Setting up some of these dynamics plugins can be a bit daunting at first.
However, if you follow the simple process that I laid out at the beginning of the article, you’ll have a quick and easy way to start. At some point, you can start adjusting the parameters on your own manually.


 Written By :