Using compression on vocals, essentially, is going to balance the singer’s voice so everything sounds nice and equal. It’s amazing what it can do. And presets make setting it up easy.
To compress your vocals
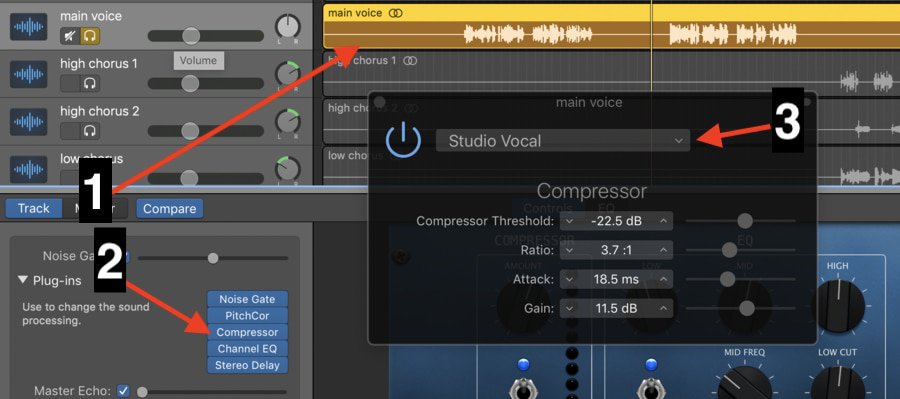
1) With your vocal track highlighted, go into Garageband’s smart controls and select “Compressor” from the plug-ins menu.
2) Bring up the Compressor.
3) Then, go into the pre-sets and choose “Studio Vocal.” Make sure it’s turned on.
This is the simplest way to quickly add compression to your vocals, and you’ll notice right away how much a difference this is going to make on your vocal track.
As I’ve explained before in my compression guide, it’s going to bring everything forward in the mix, equalize the volume of the track, and also increase the total gain (volume), by the way, the guide I just linked to really dives into all of the parameters, however, we’ll give a brief synopsis here as well.
4 Main Parameters of the Compressor
Ultimately, you have four different parameters of the compressor.
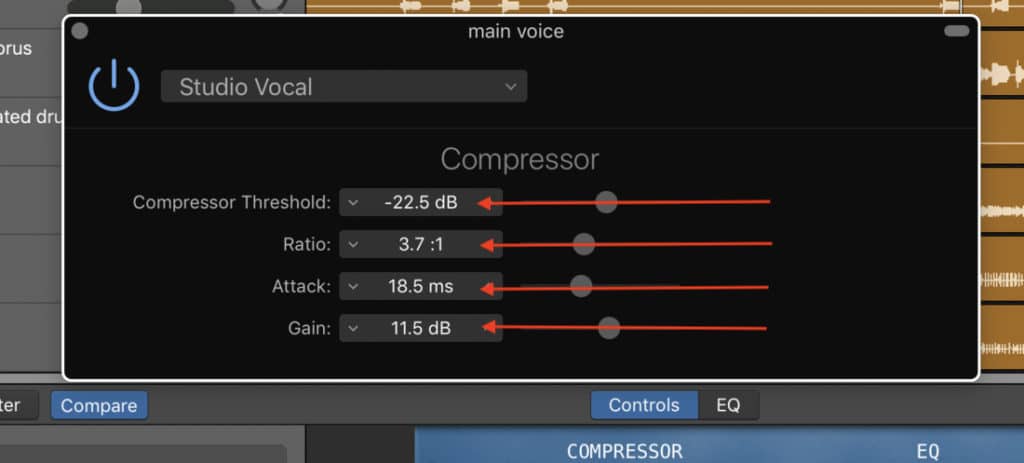
Threshold: Controls the point at which the compressor kicks in
Ratio: The strength of the compressor, or in other words, how much compression is actually added to the signal.
Attack: How quickly the compressor is attaching itself to the signal
Gain: The makeup gain. This parameter increases the total output gain of the signal after it’s been compressed. It’s used to compensate for any volume reduction in the signal.
Frankly, the step-by-step process I laid out for you above is likely enough to get you started on your compression journey, but if you need more information, I have a tutorial on compressing guitars as well.
However, I digress, because just by using the “Studio Vocal” setting, you’re going to see immediately how great the compressor is for increasing the quality of the sound.
With that said, I’m going to show you right now how to actually use the compressor without any pre-sets.
The Compressor in Contemporary Music
Compression is almost always used to make the sound of a particular instrument or recording sound more aggressive, “pumping,” and upfront.
The best way to add some “punchiness” to your recordings is to emphasize the attack of the signal and then add the appropriate amount of release to actually let the signal pass through.
In other words, the attack is going to control the “punchiness” of the sound, and the release is the parameter that controls whether or not the sound/signal is extended.
Setting the release appropriately means that the compressor quickly latches on to the sound, brings it forward and makes it punchy, but also lets go of the signal at the right speed, that way it sounds natural.
An appropriately set release time will ease off on the compression once the audio signal has fallen below the threshold.
In other words, an extended-release will hold onto the signal and make it sound smoother. A much shorter release will make it sound a bit choppy.
How To Set The Attack of Garageband’s Compressor
I would argue that the best way to go about setting the attack and release, is to start with the slowest attack and then the fastest release.
In other words, you want to set the Attack to around 200.0ms at first just to see how that sounds.
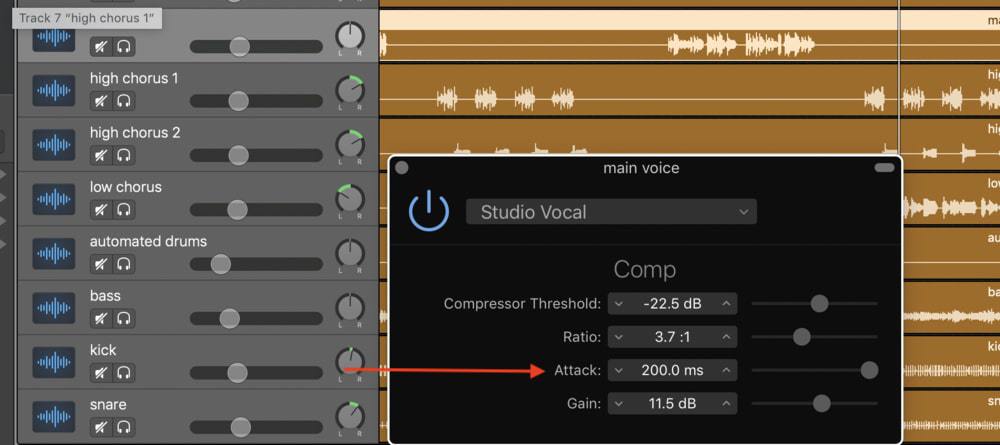
Hit ‘Play’ on your recording, and slowly increase the speed of the attack until you can hear that the instrument is starting to have the appropriate amount of punch, depending on your ear.
You’ll notice that it actually sounds bad when it’s set at the fastest attack, 0.0ms, but it’s ultimately doing nothing with the attack set at its fastest.
However, once you’ve brought up the attack to around 10ms, it’ll start to sound a lot more punchy and interesting.
Typically, the area between 15ms and 20ms is going to sound the best, in my personal opinion, but it really depends on the style of vocals and what you’re going for. With that said, this is a good guideline to follow.
The idea behind setting the attack is to have it breathe in and out at the same time as the tempo of the song.
How To Set The Release of the Compressor
This section is, of course, optional because Garageband’s compressor doesn’t actually come with the release option.
We’ll explore the release parameter in the case that you’ve actually downloaded a plug-in that uses the Release option, or if you’re using the AUCompressor.
As I mentioned above, you want to start with the fastest attack setting, and then slowly increase it until it starts to sound “punchy,” and then when you have that setup, you can go ahead and start with the 0.1ms release setting in the AUDynamicsProcessor, assuming that’s the one you’re using.
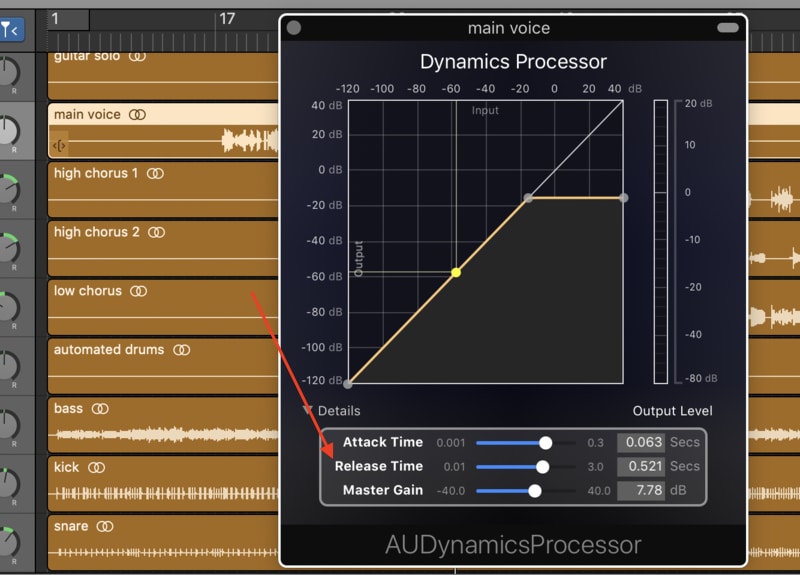
The idea behind setting the release is to make it so that the moment the singer stops singing, the compressor lets off and starts off the next note at the same volume and at the same “punchiness.”
Start at 0.01ms, and then slowly increase it until you get it at this desired point.
For many engineers, they try and set the attack so it’s as slow as possible, but the release so it’s as fast as possible.
The idea behind this is to allow all the transients to pass through, that way there is sustain and dynamics, but also enough punch so everything is cutting through the mix and sounding good.
Setting The Ratio of the Compressor
Around a 4:1 ratio is a standard amount of compression to have on your vocals.
A good rule of thumb is a medium attack, a 4:1 ratio, and around 4-6dB of gain reduction.
In other words, they’re referring to 10-12dB of the threshold on the compressor.
It’s not uncommon to use a 4:1 to 8:1 compressor ratio, which is a low to moderate amount of compression. Setting the compressor’s ratio between these two numbers is going to be a good rule of thumb.

2:1 is arguably too little, and 10:1 is probably too much, so 4:1 to 8:1 is a good place to start from.
How To Set the Gain (Total Gain Output Level)
This is probably the easiest parameter to set because it’s the easiest to hear. The gain is making up for what’s been lost in the compression process. Of course, the more you increase the total output gain of the compressed signal, the louder it’s going to be.
Commonly, I’ll set it to around +8dB, or around that area. I like to always increase the gain of the compressor because I feel like the difference is more audible.
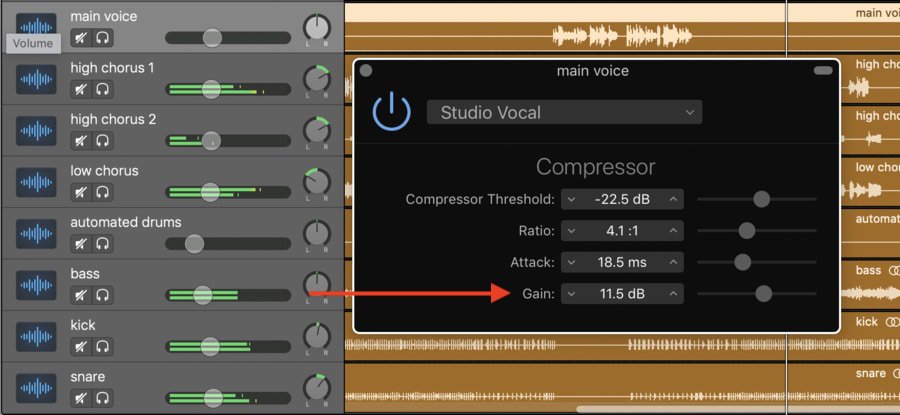
It’s probably not the “correct” way of going about it, but it’s what I like doing, at least.
Order Of Dynamics Plug-Ins (Signal Chain)
What I normally do when I’m using the compressor, is I add the compressor before the Channel EQ. I compress the signal to the point where I want it to be, and then I make the EQ adjustments afterward.
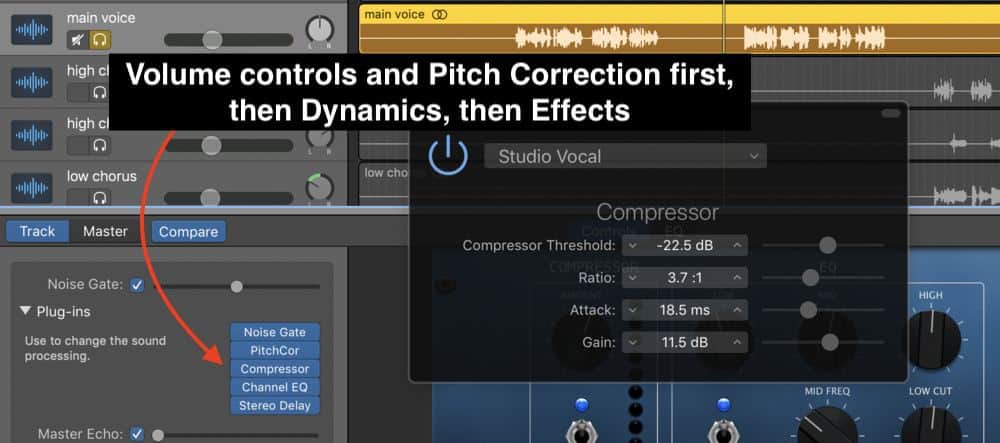
Some people use an alternative method, which is where you use a compressor before the Channel EQ adjustments to shape the tone of the sound, and then you add another compressor after the Channel EQ for the sake of dynamics, in other words, as a volume control.
I normally don’t do this. I find that using one Compressor is usually enough, but it’s up to you to decide what you want to do.
Figure Out Your Purpose Before Using Compression
Before you add a compressor to your vocals, ask yourself for what purpose you’re using it. Are you using it as a volume control or do you want to add parallel compression? (my guide). Vocals will almost always need some compression added to them, however, it helps to actually listen to the vocals first to inform your decisions.
Vocals will almost always sound a bit unequal because a human being is applying an inconsistent amount of energy to each vocal part. Think about it.
When you first start singing (ideally with the aid of the coaching platform, Singorama, from their website), you have more air in your lungs and diaphragm, and then when you finish the part and start singing the next, you’ve taken a breath and are now starting the next part of the section with more air in your lungs/diaphragm (more energy).
For that reason, there’s going to be dynamic inconsistency.
To combat this, the “Studio Vocal” pre-set is going to be more than sufficient and getting the vocals to sound louder, punchier, more upfront, and more equal, moreover, premium plugins like Fab Filter’s mastering suite come with many presets that really simplify things for you (while delivering additional functionality in case you need it).
YouTube Video Tutorial
Conclusion
And that’s it for compressing vocals in Garageband. If you use the presets as a way to start, that’ll be more than enough.
However, at some point, you want to move away from using pre-sets that way you actually understand what changes are being made when adjusting each parameter and for what purpose.

 Written By :