In this tutorial, I’m going to show you how I use EQ in Garageband, both in the mixing phase, as well as in the final mastering stage at the end, but first, what is it? And what’s the quickest way of going about it?
EQ, or equalization, is the act of adjusting low, middle, and high-end frequencies to improve the sound of an audio recording. To use the EQ in Garageband:
1) Select the Channel EQ plug-in in the Smart Controls
2) Choose a preset from the drop-down menu like “Acoustic Guitar,” or “Natural Vocal.”
How To EQ Bass, Guitar, Drums, And Synths
1) So, I have my song created in Garageband, which includes several software instruments, including an electronic drum kit, a guitar, cymbals, and hi-hats from an actual drum kit, a bass guitar, and violins.
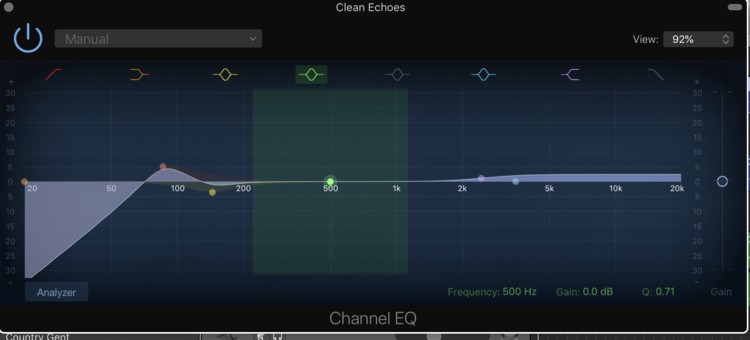
The very first part of the song that plays before everything else has had it’s EQ adjusted like what is shown in the image below.
It’s a guitar part that I created by playing it back through the Laptop speakers and recording that very sound from my computer with the built-in microphone:
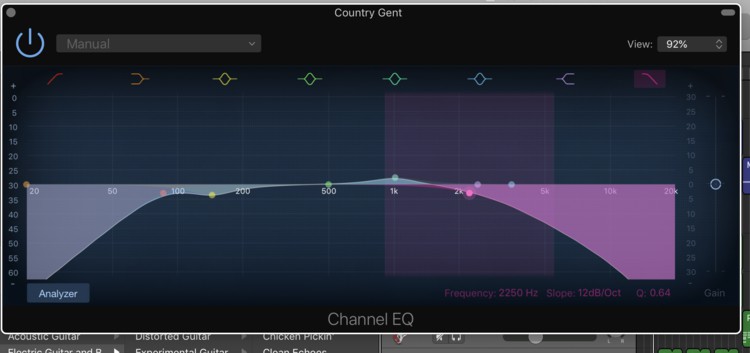
You’ll notice that I’ve scooped out the highs as well as the lows, which has a sort of lo-fi effect. It’s a good way to introduce a song, and you’ll notice it sounds quite similar to the way a flanger works, moreover, you can get even more creative if you automate your EQ like I’ve shown in my other tutorial.
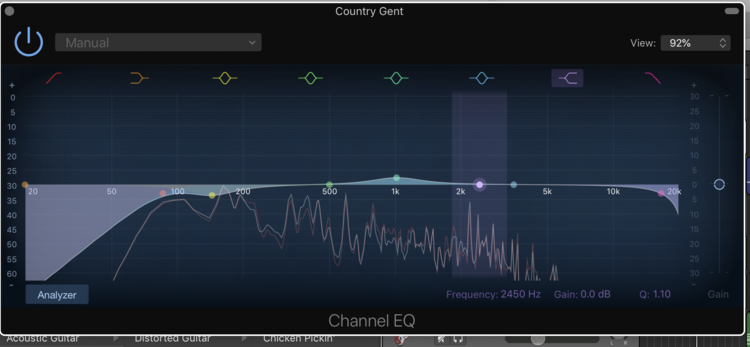
2) For the next guitar, which serves as the main riff for the song, I’ve scooped out the low and sub-bass frequencies, because there is no need for them to be there. The same thing goes for nylon string guitars which I stated in my other guide.
This not only makes room for other frequencies in this area but also has the effect of bringing the guitar part “forward.”
3) I left the snare alone because I like the way it sounds on the default setting. If you spend a lot of time on the producer section of Instagram, you’ll notice other producers talking about how they obsess over EQing the snare.
You don’t have to put a ton of work into something if you think it already sounds good as it is.
4) The next instrument track is the kick, and for it, I boosted the frequencies at 74Hz by +5dB. This has the effect of making the kick much fatter and thicker.

5) Moving on to the Boutique 808s, you’ll notice that I scooped out the sub frequencies starting at around 30Hz, and I also scooped out the frequencies from 1000kHz all the way until 20,000 kHz.
That’s because there is no reason for those frequencies to be there. It’s worth mentioning that if you use my favorite 808 plugin, Initial Audio’s 808 Studio II from Plugin Boutique, you won’t even need to change the EQ that much.
Because I used Garageband’s stock 808 plugin instead of 808 Studio II at the time that I had made this article (in fact, I didn’t even know about it at that time), I had to boost the frequencies from 50Hz all the way until 300Hz, by around +1.5dB to +3dB.
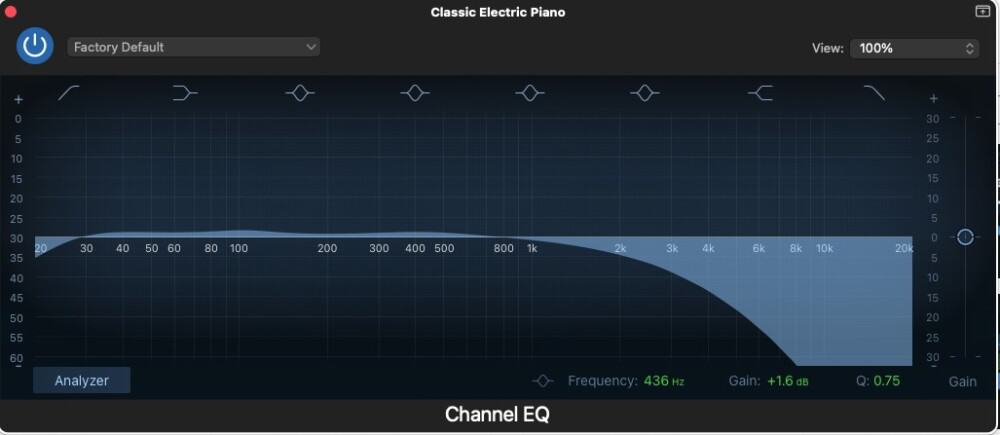
6) For the guitar solo at the end, which lasts for the majority of the ending of the song, I scooped out the sub frequencies, as the image shows below.
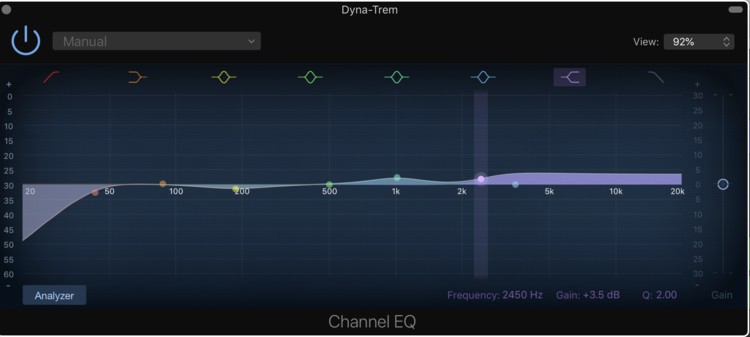
Then I gave a boost of around +2B at 1000kHz, and then another boost from around 2000kHz all the way until the end. This gives it clarity and a higher-end so the guitar part can cut through the rest of the mix without having the volume turned up.
At this stage, the song has enough of the EQ adjusted. Now, I also use things like compressors and distortion on the software instrument tracks, however, this tutorial isn’t about that so won’t get into it. That’s for another tutorial.
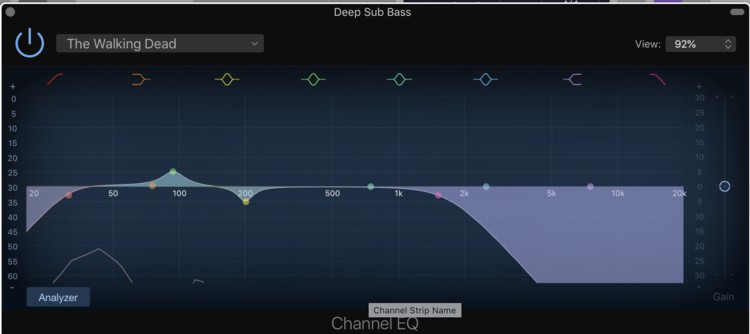
7) Following the EQ for the guitar solo, is the EQ for the bass, which you can see in the image below.

For this instrument, I subtracted all of the higher frequencies, pretty much all of them past 2000kHz. This allows more room for the other frequencies in this area to shine, and it has the effect of having a much thicker bass sound in the song, without being too overpowering.
We’ll move on to the final stage. The final mastering stage.
Mastering EQ Stage
This stage comes after I’ve exported the song to my desktop, then started a new project, and then dragged and dropped the AIFF file into a new project. The EQ as shown below is on the master channel which I explored more in my mastering tutorial.
Truth be told, EQ is one of those things where you want to approach it piece-by-piece. In other words, you make a lot of small changes, which end up making a big difference combined together when the track is finished.
In the image you can see below, you can see that I haven’t changed that much about it.
I just dropped out the sub frequencies a little bit between 20Hz and 40Hz, gave a tiny boost around 90Hz to fatten up the kick one more time, dropped out a few low-mids at 200Hz, boosted at 500Hz by a bit, and then gave a small boost of about +1.5dB to the frequencies between 1000kHz and 18000kHz.

It’s a personal preference of mine to increase the higher frequencies because I like my music to have a very bright sound to it, and that’s the effect that increasing high frequencies creates.
And for a track like this one, it’s perfect because it’s a happy sounding tune in G Major.
And frankly, that’s all for the EQ.
What Is EQ And What Are Some Of The Best Practices?
Now, we’re going to talk about EQ as a general concept.
While it may not seem like that, you’ve probably actually EQ’d a sound before without even knowing, like turning down the bass in your car stereo system.
This action, technically, is equalization, because you’re making the sound more palatable by turning down the bass frequencies. You’re literally “equalizing it.”
It’s probably not probably far reaching to assume that most musicians don’t ask for specific adjustments to their music, for instance, “boost the frequency at 200Hz by +1dB.”
They may have a different way of saying it, like asking for the kick to sound more “aggressive.”
It’s up to us as music producers and engineers, to understand what’s meant by the client’s words.
Over time, especially after working with more and more people, you’ll come to realize that a lot of people will use different, albeit similar, terminology, to describe the same frequencies.
For example, if some want to make the song sound more “treble-y,” that means they want a boost in the higher frequency range, like 1000kHz and up. Increasing this frequency range, as the image below shows, will bring more clarity and more “air” to the song.
Low and High frequencies are described in different ways.
The low-frequency range, from 10 to 200 Hz, will frequently be referred to as “Bass-y” or “Big.”
The higher frequency range, from 5 to 20,000kHz, will be referred to as “Treble,” “Meek,” or “Thin.”
Boosting and Cutting
Boosting a frequency, as the name suggests, means we’re increasing the volume of that frequency. The more proper terminology would say we’re increasing the amplitude of that signal, which is more accurate to what’s actually happening.
Cutting a frequency, as the name suggests, means we’re subtracting that frequency range, so it has the effect of lowering the volume, but really, we’re just decreasing the strength of that frequency.
1) Use Subtractive EQ
The term most commonly used when talking about mixing is subtractive EQ.
Essentially, this means that, rather than boosting frequencies in the desired range, you subtract EQs from another part of the track, which in turn, creates the impression of a boost in the desired EQ range.
Taking the example of the Boutique 808, the vast majority of the sonic frequencies will fall between 50hz and 1000khz, and anything after 1000 kHz will typically be subtracted.
This is also called a Low-Pass filter because we’re letting the low frequencies pass, and the high frequencies are being stopped.
We’ll get into Low and High Pass filters in the next step.
In the image you can see below, for instance, you can see that I’ve subtracted all of the frequencies after 1000kHz, which “creates room” so to speak, for other instruments to shine through.

Moreover, how subtractive EQ takes form in the mixing process, is also similar to volume.
So If I want to increase the volume of the kick, I may actually choose to turn down the bass a little bit, or even the snare and other accompanying instruments that typically fall in that same EQ range.
Now, obviously, you can also boost desired frequencies if you want, as I’ve done in the image above, at 100 and 200Hz. From what I understand, subtractive EQ is how most mixing engineers will tell you to approach EQ, although some likely disagree.
From what I’ve read, Subtractive EQ is a way of carving out different sounds and frequencies so everything can shine together, cohesively.
When I first started using EQ, I found that my mixes sounded terrible and muddy, because I was boosting the frequency of every sound I wanted to be amplified, but the end result was a muddied mix in which all of the instruments were competing for the same frequency, or the “sonic space,” so to speak.
Using the example of Jason Newstead, the bassist from Metallica, he said in an interview once that the reason why his bass guitar wasn’t heard on …And Justice For All is that much of his playing directly followed the root notes of the guitar, so there was too much competition for the same frequencies, which causes muddiness.
Instruments will end up competing for the same frequency, and subtractive EQ is a way of remedying this dilemma.
Using another example, a beginner mixer would probably just add the frequencies he wants, like I mentioned I used to do above, with the most common being the bass, especially in hip-hop.
Rather than thinking about what you can “add,” think about what can be eliminated, and how this would bring attention to the more desired frequencies.
Having said all of that, this doesn’t mean that you have to completely avoid adding frequencies, it’s just the order in which you do so. It’s best to employ subtractive EQ first and then additive EQ after.
2) Use Low and High Pass-Filters.
As I briefly mentioned in passing above, setting up low and high pass filters is a great move for adding clarity and allowing your tracks to breathe.
A Low Pass filter, is when you block higher frequencies and allow low frequencies to shine, and a high pass filter is the opposite, to block low frequencies for the sake of emphasizing higher frequencies.
It’s important to note, however, when employing low and high-pass filters, you may eliminate some of the frequencies that are making the music sound authentic and real, so it’s a good idea to listen closely when setting them, and determining whether your low-pass or high-pass is too strong.
Explained in another way, make sure you’re subtracting unneeded frequencies and not frequencies that are actually making small but ultimately important contributions to the way the instrument actually sounds.
In the image you can see below, I’ve set up a high-pass filter, where the lowest frequencies have been eliminated because the instrument in question is the “tinging” sound of a cymbal, which is a fairly high frequency.

To create as much sonic space as possible, it’s not a bad idea to subtract unneeded frequencies from every instrument track, but as I said above, be careful.
3) Use Low-Cut and High-Cut Filters
A low-cut and a high-cut filter, are the same as the high pass and low-pass filters, they’re just explained in a different way.
For example, it’s not a bad idea to add a low-cut to the guitar, which has less low frequencies and than a high-cut to instruments that don’t have a lot of highs, such as the kick and snare.
Filters are great because they allow us to eliminate unwanted noises and unneeded sounds from our music, permitting the most desired sounds to shine through.
You may think to yourself, “Hey, what’s the difference between the low-cut and a high-pass?” They’re pretty much the same thing, however, the principle and the purpose of employing them is different.
4) Pay attention to the point between 100 and 200 Hz.
This is, by far, the area that has to be watched the most, because many instruments and sounds will have frequencies at this level, including the guitar, the piano, the bass, the kick, the snare, and so on and so forth.
It seems like all of the major instruments have a frequency in the 100 and 200 Hz range, so it’s important to pay attention to it and to make subtractions where it seems fit.
Now, let’s talk about different frequencies, sub frequencies, low frequencies, low to low-mid frequencies, mid to mid-high frequencies, and then high frequencies.
Frequency Ranges
Sub Frequencies are below 80Hz.
This is perhaps the most commonly discussed frequency in the general public, because of the term, “Subwoofer,” referring to a common speaker-type that people often put in their cars to make the bass as loud as possible.
These frequencies can be particularly destructive if used too much.
Crank the frequencies in your mix at 80Hz and below, and then play the track in your car and you’ll quickly find out why. The bass will be so overpowering that it’ll sound terrible.
Low Frequencies are between 50 to 200Hz
Frequencies between 20 and 200Hz have the tendency to make the sound of music sound a lot thicker and bassier. The human ear is not the greatest at hearing these frequencies, a common reason for why guys make beats and songs with bass-lines that are off key.
A quick way of getting around this, by the way, is by shifting the music up by one octave to see what it sounds like, or by changing the software instrument track to a piano or bass guitar to hear the notes better.
A track with a lot of low frequencies will always have a thick and bassy sound to it. It’s definitely easy to overdo it in this area, so pay close attention to what you’re doing.
Low-Mid Frequencies are between 200Hz to 300Hz
As I mentioned in passing above, this is the “muddiness” frequency, so it’s important to watch how many instruments and sounds are taking up this space.
For that reason, it’s not a bad idea to use subtractive EQ to eliminate any unwanted frequencies in this area, to create as much room as possible.
Freeing up space in this area will help clear the air for guitars, flutes, pianos, and vocals.
A technique people often use when dealing with this frequency is to subtract at 200Hz or so by around 2-3 dB, not a lot, but just enough to allow some space to breathe.
Mid Frequencies are between 300Hz to 700 Hz
This frequency range is a place where even more subtractive EQ is used because there is a fear of creating a “hollow” sound.
Apparently, this area is great for easily the most common and prominent instruments, like the saxophone, the cello, bass guitar, snare drums, bass drums, and male vocals. This the area where the depth comes from, and without it, the sound will have a “shallow” effect.
Male vocals, bass drum, snare drums, bass guitar, cello, saxophone, and some woodwind instruments exist here. This range forms the base of music and a lot of instruments have frequencies in this area, including the piano as well.
There is no depth in music without these instruments and the frequencies they produce, moreover, I find that if you use better quality instruments you won’t need to change as much.
Upper-Mid Frequencies are between 1.5 to 4 kHz (1000 – 4000 Hz)
This is a sensitive area, even more than most because it’s the one most easily heard by the human ear. To increase the frequencies in this area, will make it seem like the music is more “in your face.” This frequency range has an aggressive quality to it.
Taking the example of guitar tone to illustrate my point, increasing frequencies from 1000 to 4000kHz will have the effect of adding “crunchiness” or “bite” to the sound.
This is my favorite area to adjust when working on the guitar sound because it’s where you can get that solid cutting guitar tone. Too much frequency in this area, according to Timothy Dittmar, can cause ear fatigue.
Mid to High Frequencies are between 4 to 10 kHz (4000 to 10,000 Hz)
This is the frequency range most commonly attributed to the words, “Clarity” or “Presence,” and the “Presence” knob on a guitar amp, for instance, is the adjustment tool meant to increase the overall “breathiness” of the sound.
Vocals are usually within this area as well, and we can add a bit of a boost in this area to allow for the vocal track to sit nicely in the mix.
In other words, a frequency boost in this area will help the vocals cut through the rest of the track.
High Frequencies are anything above 10kHz (10,000 Hz)
The frequency most commonly used to increase the “brightness” of a track. An increase in this frequency range will allow instruments to cut through the mix as well.
Other words meant to describe it typically have to do with sunshine and other outdoorsy features, like “sparkly” or “sunny.” Lo-Fi, for instance, is completely devoid of these frequencies.
If you’ve ever heard Lo-Fi music, you’ll know that it has the quality of sounding like it doesn’t have much brightness.
It’s because there aren’t a lot of high frequencies in the music, and the vast majority of the sound is within the low-mid to mid-range.
For more on this subject, I recommend you check out Timothy Dittmar’s book, Audio Engineering 101. He does a good job of explaining things. You can check out his Twitter and his book here.
YouTube Video
Watch the tutorial on YouTube where I run through all of the concepts I just talked about here.
Conclusion
That’s all for my article on EQ. Do me a solid and share this on your social media to all your producer friends. Also, take a look at my recommended gear page for more products that are great for music production.

 Written By :
Hey,
Mixerman here. I appreciate the mention, but you suggest that I recommend subtractive EQ in my book Zen and the Art of Mixing and I don’t believe that’s true. Specifically you said that I “argue that subtractive EQ is the way to go.” I make no such argument. In general, I find that advice to be archaic at best. We don’t have noise floor to consider any longer.
I’d be interested to know the passage that caused you to walk away with this impression.
Thanks,
Mixerman
My mistake. I guess I mistakenly attributed that quote to you from another book I read. I’ll get rid of your name in that particular instance. Thanks for chiming in.