Reverb is probably one of the most popular effects used in mixing and music production, and for good reason: it sounds awesome. If vocals or an effect is too dry or boring, sometimes all it needs to sound better is reverb. Drums are no different, but not everyone knows how to add reverb to them.
To add reverb to drums in Garageband, double click on one of the audio slots in the smart controls. Click “Reverb” in the drop-down menu and then choose one of the four main types. Separate each part of the drum kit into separate track regions if you want to apply reverb differently to each part.
Separating the drums for mixing is a topic I’ve explored before in my drummer track tutorial, and it’s one of the most underrated ways of making a project sound probably around 10-20% better right off the bat. Additionally, this is going to allow you to apply reverb to different parts of the kit, on their own, rather than just applying it across the board.
How to Add Reverb to the Drumkit Using Reverb Plugins
It goes without saying that how you apply reverb to drums is going to vary widely on the genre, what you’re going for, and what part of the kit you’re modifying.
I’m going to show you how to actually apply reverb to sounds in Garageband first and then we’ll talk about a few parts of the kit, the most useful reverb plugins, their parameters, and then a couple of useful presets.
1) Adding Reverb to the Drumkit in the Smart Controls
With Garageband open, go down into the Smart Controls which is the bottom part of the interface. To do this, you can either hit the “B” on your keyboard to bring up your Smart Controls; you can click on the little button that looks like a dial, or you can double-click on a software instrument track.
Hitting the “B” on your keyboard is probably the easiest way.
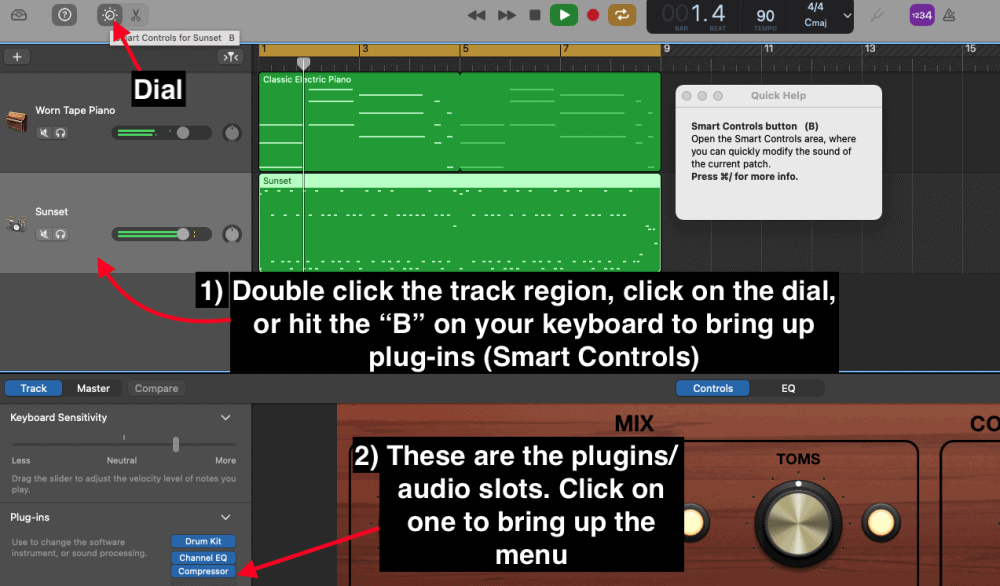
2) Double-Click on One of the Audio Slots, and then Choose Reverb
Once you’re down in the Smart Controls, you’ll notice there is a drop-down menu on which there is the main instrument slot on top, and then there are around 4-5 audio slots that are beneath it.
To bring up the reverb, you want to click on the audio slot, and then choose reverb. There will be four different kinds of reverb that you can experiment with, including Platinum Verb, EnVerb, SilverVerb, and Space Designer.

Adding Reverb to the Drum Kit Without Plugins
To do this, just hit “B” again to bring up the smart controls on your drumkit, either electronic drums or a real kit, and then you’ll see the interface in the bottom which looks like what’s shown in the image below:
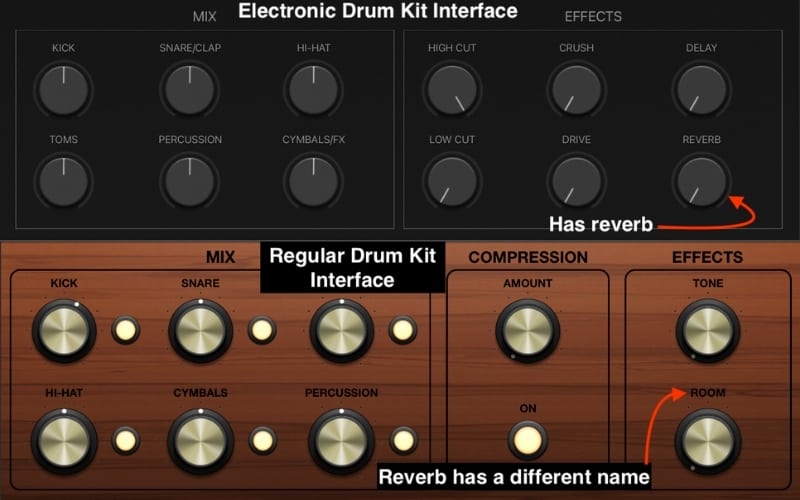
When you’re first starting out, I would say it’s wise to just use the main reverb, which is on the bottom right-hand corner of the Smart Controls. While using regular drums, the reverb will go by the name “Room,” instead of just “Reverb.” This is how you get reverb on drums in Garageband and this is definitely the easiest way of doing it.
I would argue that this is just for experimentation’s sake, however. Besides getting an actual reverb pedal like the Strymon Big Sky, if you want to get serious about adding reverbs, it’s best to familiarize yourself with some of the reverb types like platinum verb, enverb, etc.
First, however, we have to talk about separating the kit into different track regions.
Basically, to separate the drums into different tracks (a topic I have a whole tutorial on, by the way), you just have to copy and paste the yellow drummer track region into a software instrument track region, and that will automatically turn it into MIDI notes.
At that point, you can go ahead and copy and paste all of the notes into new track regions by clicking on the corresponding note on the piano roll. This will easily select all of them.
3rd Way: Using a Third Party Reverb
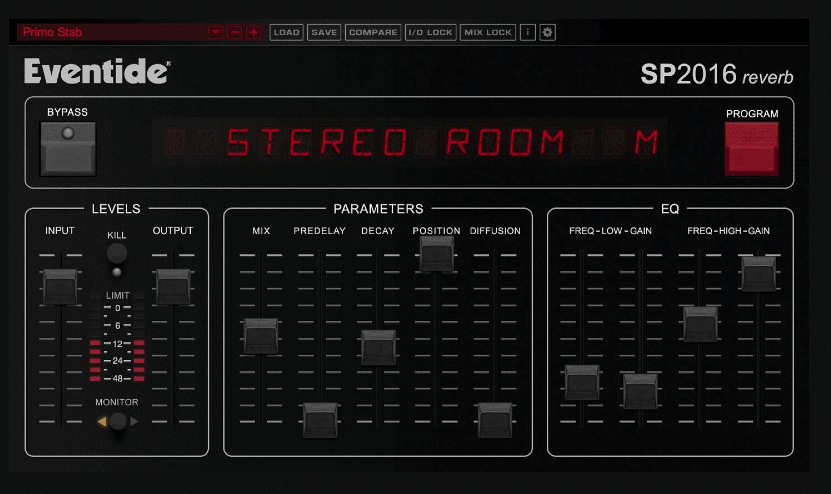
One of the highest-rated reverb plugins on the market is the Eventide SP2016 Reverb. This plug-in is based on a classic analog reverb from the 1980s and what makes it special is that the developers made it in a way that emulates the way reverb works in real life.
For instance, where you stand or sit in a room has an effect on how a reverb sounds to the listener, and this plugin emulates this effect via their “POSITION” fader.”
You can use the POSITION fader to make it seem as if you’re moving around in the room which is unlike other reverb plugins. Once you’ve downloaded this software, you can access it via the audio slots that I mentioned at the start of the article.
Another plug-in that’s worth talking about is the Voxengo OldSkoolVerb Plus which is less expensive but extremely useful. If you don’t believe me, make sure you try out the free version from VST4Free first. Ultimately, the paid version is going to serve you more.

Applying Reverb to Drums in Garageband – Snare, Kick, Overheads, and Toms
Adding Reverb to the Snare
Adding reverb to the snare is probably one of the best ways to make a drum kit sound much different. Adding reverb, ambiance, and maybe even a bit of delay to the snare makes a world of difference in terms of the vibe of the track. For instance, it can be what turns the song into a spacey track or a slightly sad hard-hitting beat.
Using the Default Reverb on the Snare

In this case, it’s just as simple as going down into the right-hand-side of the smart controls and turning on the reverb from there. To adjust the reverb, you just turn the dial to the right if you want more or left if you want less. It’s pretty straightforward, however, if you want to add reverb via plug-ins, then you have more options.
Using Reverb Plug-ins on the Snare – PlatinumVerb

To do this, you just have to do what I already laid out above and add the plug-in via the audio slot. Using the PlatinumVerb and its various presets is a great way to add reverb in a way that’s not super annoying or weird.
In the case of the song that I made specifically for this tutorial, I used the “Big Room” preset because the default setting had too much pre-delay and the reverb time was too long, making it sound washed out.

The default setting of Platinum Verb might actually sound pretty good on its own, depending on how often your snare hits. In fact, you may find that it’s not even necessary to mess around with the presets because the default setting is good enough.
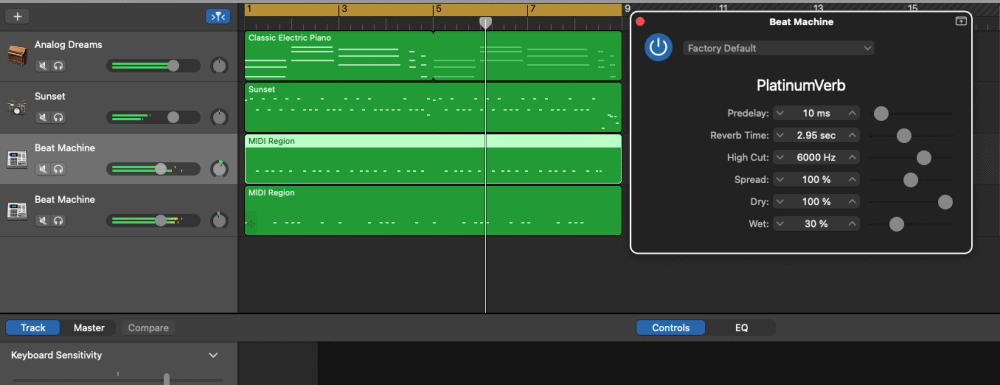
What I like about the Platinum Verb is that not only are the presets very useful and clearly labeled in a way that’s applicable to a project, but I find the parameters of it are fairly straightforward.
In the case of the snare drum, each parameter can be used for something slightly different. For instance, I find the High Cut and the Reverb Time to be especially useful.
“High Cut” – PlatinumVerb
The High Cut allows you to apply the reverb to only part of the frequency spectrum. Explained simply, if you set the High Cut to 1200kHz, that means the reverb will only apply up to that point on the frequency spectrum, so it will only affect the lowest point of the lower-highs of the snare.
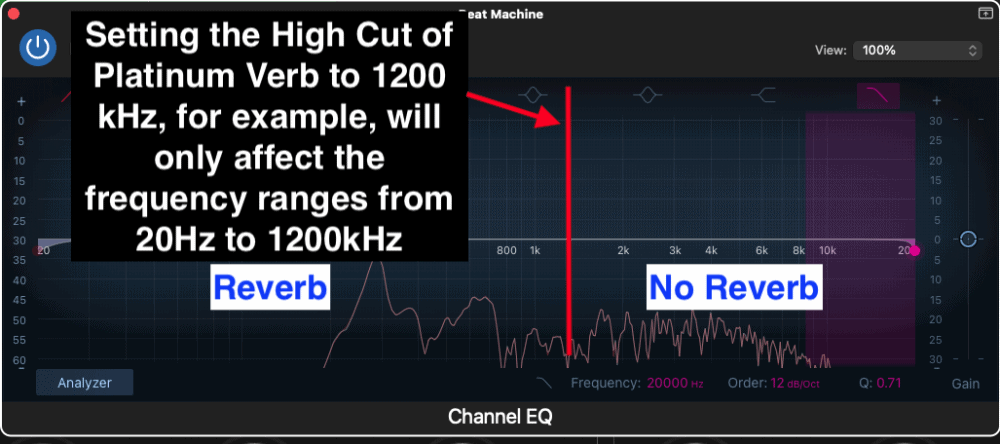
But if you set it to 12,000 kHz, that means the reverb will apply to nearly all of the frequency range up to 12,000 kHz, so the reverb is affecting the lowest part of the sound and also the highest sound.
This is going to have the “washed out” effect, which means there is simply too much reverb on the snare and it’ll ring out far too much. If you go ahead and drop that down to 1200 – 1500Hz, you’ll find it’s just the right amount of reverb for the snare drum.
“Reverb Time” – PlatinumVerb
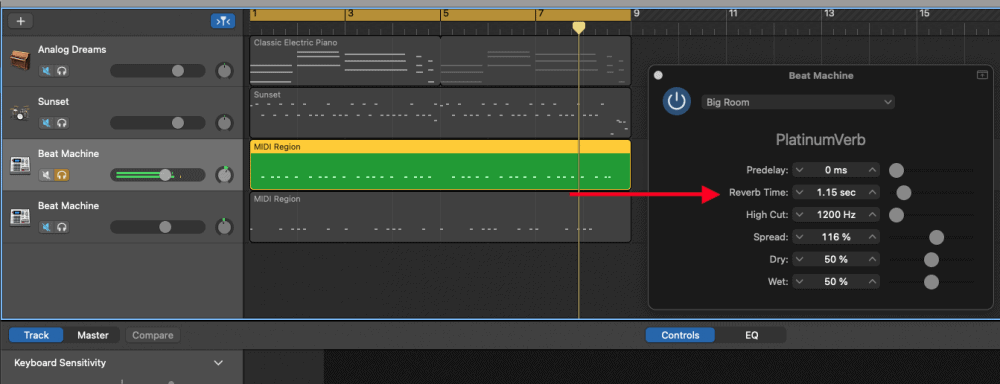
The next useful parameter of the Platinum Verb plug-in, in the case of the snare especially, is the Reverb Time, which adjusts for how long the sound of the snare is actually ringing out via the reverb effect.
In other words, if you set it to the maximum parameter (20.00 seconds), it’s going to ring out for what seems like forever. This, too, will also have the “washed out effect.”
Keep your Reverb Time relatively low, if you don’t want your snare to be too wet. There may be cases where you want this though. For instance, in the song “Break It” from Lotus Eater, there is a point in the track where there is simply one snare hit and it rings out perfectly as if it’s in a massive room.
Listen to this song at the 2:34 minute mark below, to see what I’m talking about. This song is probably one of my favorite mixes, by the way.
“Dry” and “Wet” – PlatinumVerb
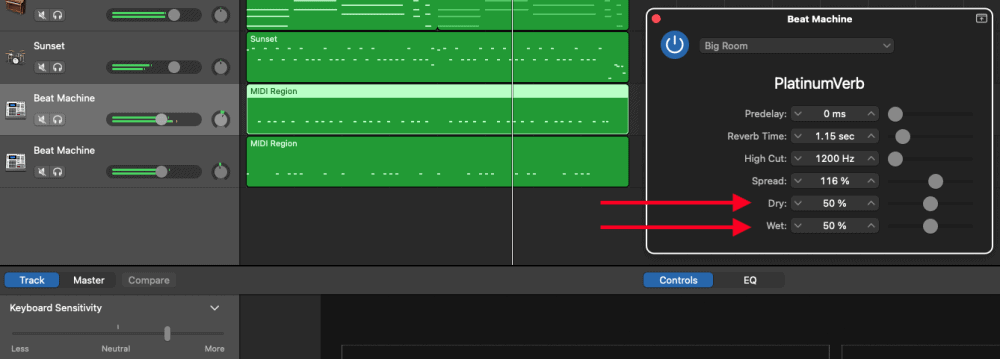
The Dry and Wet parameters can be helpful as well, although, I don’t touch them very often. What they do is determine how much of the signal, the unprocessed and the processed, are mixed in together.
The Dry and Wet settings adjust how much the reverb plugin is actually affecting the sound. The Dry signal is the signal that hasn’t been touched by the reverb, and the Wet signal, is the signal that has been touched by the reverb.
This means if you set the Dry and Wet to 100% each, there is going to be an equal amount of snare drum without reverb and with reverb. A good rule of thumb is to just leave it the way it is which is usually around 100% dry and 30% wet.
This means that you’re hearing 100% of the snare drum without reverb, but then you’re hearing 30% of the snare drum with reverb, and these two signals, one affected by it and one not affected by it, are mixed with each other.
It’s worth noting that some presets mix the wet and dry parameters differently. Experiment with them to see how they make things sound.
Adding Reverb to the Kick
Adding reverb to the drums, regardless of the part of the kit, is fairly similar but each one is different in subtle ways. For example, a lot of the same principles of applying reverb are the same for the kick as they are for the snare. One such principle is timing.
As a general rule – and frankly, this goes for setting the reverb for probably any instrument – the number of notes of the instrument correlates to how long the reverb time should be.
In other words, if your snare hits every second, you probably won’t want a long reverb time on it because it’ll sound too washed out. This is the same principle for the kick too.
Don’t Bother Using the Default Reverb on the Kick

Using the default reverb on the kick is something that I doubt you’ll want to do. I know that when I tried it, it sounded pretty bad. So I would just go ahead and avoid it altogether.
For the kick, I think it’s wise to try out some of the presets in the Space Designer, rather than in the Platinum Verb because there are many of them including different plate reverbs and reverbs based on room-types.
Use the Space Designer Reverb for the Kick
There are three parameters of the Space Designer
1) Length – Adjusts how long the reverb is in seconds. A reverb of 100 seconds literally means that if you hit the note once with a length set at 100 seconds, the note will gradually ring out for 1 minute and 40 seconds.
2) Dry Output – Another way of saying “Dry” signal. This adjusts how much of the unprocessed signal can be heard, “unprocessed,” meaning the kick without reverb on it.
3) Reverb Output – Another way of saying “Wet” signal. This adjusts how much of the processed signal can be heard, “processed,” meaning the kick with reverb on it.
Experiment with these parameters as well as the presets to see what kind of sounds you can come up with. I’ve included two sounds below that you could use for the kick including one that makes it sound like the kick is massive, and the other is just adding a bit of juice or tone to it, so to speak.
Making the Kick Sound Huge
Ask yourself what your goal is when it comes to adding reverb to your kick. Do you want to make the kick sound like it’s in a large room? In that case, It makes sense to go into the Space Designer and select “Large Spaces,” “Rooms,” and then, “Huge Rooms.”
Huge Rooms

Wetting the Kick with Reverb Just a Bit for Tone
For this, I found that using the Space Designer again was a good move. More specifically, the “Sustain Plate” that’s found in the “Large Spaces” section and then “Plate Reverbs.”
I found this preset to be good for adding just the right amount of reverb so it adds just a bit of tone, rather than washing it out completely with far too much. Make sure you try out some of the other ones to see what you can come up with.
Sustain Plate

Adding Reverb to the Cymbals
Because cymbals are often struck quite a lot and their frequencies are higher on the spectrum, I find it sounds good to have a small amount of reverb on them.
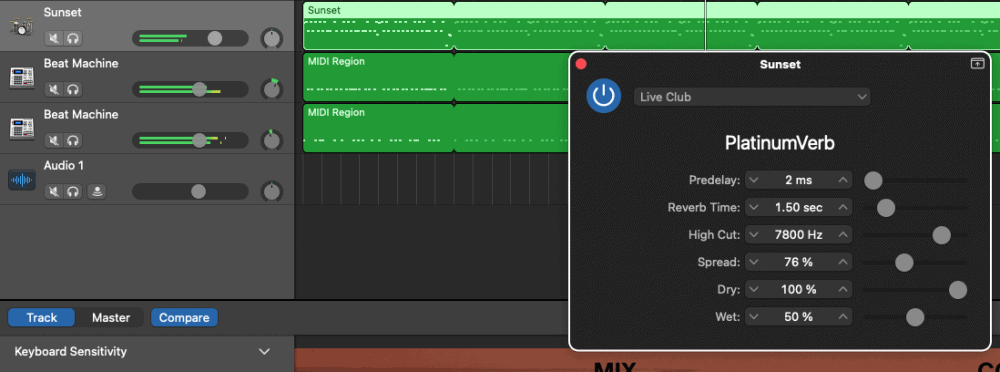
For example, I think that the “Live Club” preset in the Platinum Verb sounds pretty good on the cymbals, as well as the toms. It’s just enough reverb to make the cymbals ring out a little more, without making them shimmer to the point where they’re annoying.
Live Club
Adding Reverb to the Toms
Toms are more conducive than cymbals to reverb in my opinion. Like I said above, the “Live Club” preset within PlatinumVerb is a good move for the toms (refer to the image above).
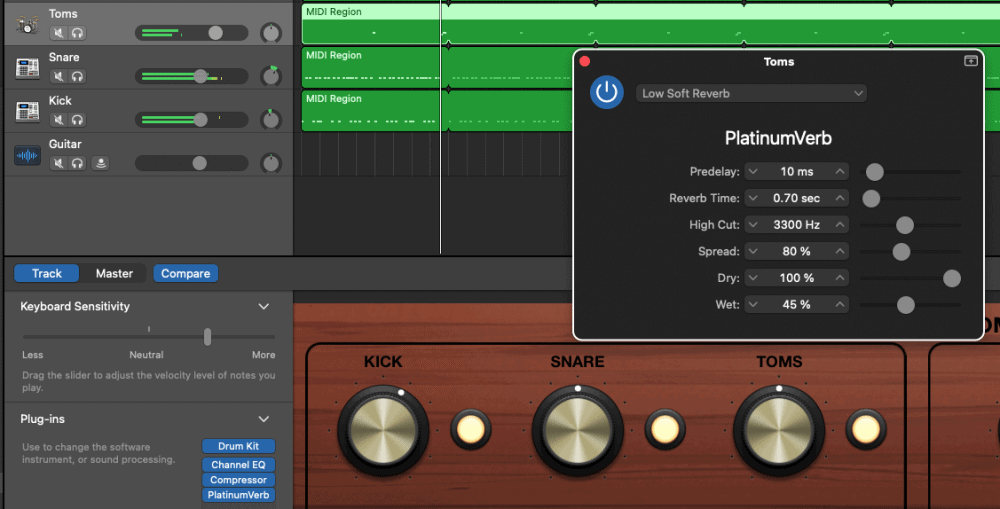
I think it makes the toms sound great without much modification, however, there is a lot more you can do with them as well. Another good preset to try on your toms is the Low Soft Reverb. You can see what that looks like here:
Low Soft Reverb
Important Things to Note About Adding Reverb to Drums
1) Less is More
This could probably be said about adding any effect to your mixes, but less is usually more, especially in the case of drums. The reason why drums are more susceptible to being washed out is that there are usually more notes being played.
If you put a reverb on the entire kit, it might be a mess. Separate your drums into different tracks like I mentioned earlier and try out some of the presets.

 Written By :