One of the greatest features of Garageband is the Drummer Track and all of its convenient, simple, useful parameters. Editing the notes individually isn’t difficult either.
To edit drums in Garageband, copy and paste the drummer track into a software instrument track to turn it into MIDI notes. Go down into the Piano Roll/Smart Controls after hitting “P” or “B” on your keyboard so you can edit the timing, velocity, type, and effect of each note individually.
Editing Drums in Garageband – Instrument Type, Velocity, and Timing
There are four reasons why you would want to separate your drums into different tracks. One is mixing and effects, the other is velocity, there’s timing, and then there is changing the actual instrument.
Mixing and adding effects are topics we’ll explore in another article, so we’re going to talk about just changing the velocity, timing, instrument type, and some general editing tips.
All of this will be explained via a step-by-step walk-through showing precisely how to separate the drums into different tracks.
Short of using one of the best drum plug-ins for Garageband like Toon Track’s Superior Drummer, there isn’t much else you would want to do with your drums unless you want to do something a lot more sophisticated.
Separating Each Part of the Drum Kit Into Different Track Regions
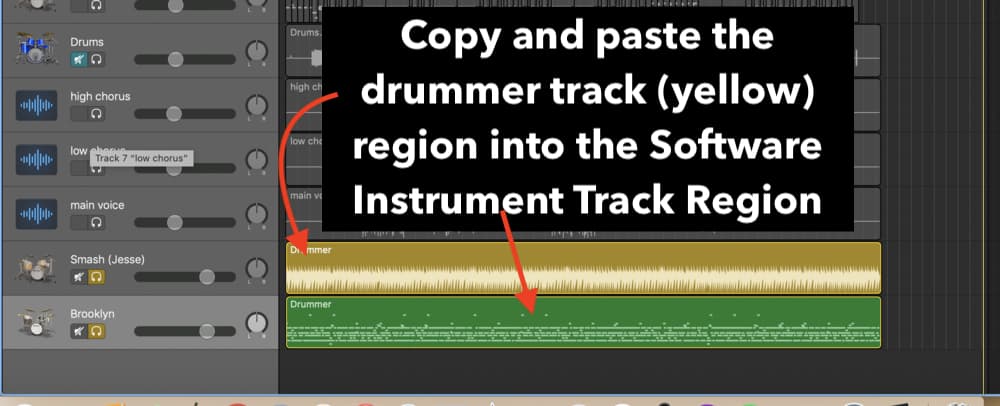
1) Copy and Paste the Drummer Track Into a Software Instrument Track
This is really self-explanatory. Either right-click on the drummer track region and select “copy” from the drop-down menu, or you can select it and then use (Command + C), and then open up a new software instrument track and paste it into the track region.
From here, you’ll be able to see that the drummer track has been turned into MIDI notes; it’s really amazing that Garageband can do this.
Pro Tip: As an aside, this is a great way to study drum programming, that way you can see how to make your own drums sometime in the future. You can see how certain kick patterns are created, how to use the snare, and also the importance of keeping the beat with at least one part of the kit. It doesn’t matter what’s going on, the drums always have at least one instrument that is keeping time.
2) Click on the Corresponding Key in the Piano Roll to Grab a Specific Part of the Kit
I was actually shown how to do this from a YouTube commenter, who noticed that I was going about it in the wrong way. Before, I used to select the notes with my cursor by dragging a selection box around them.
But you can do this simply by clicking on the corresponding note in the piano roll. Check out what I mean in this image here:
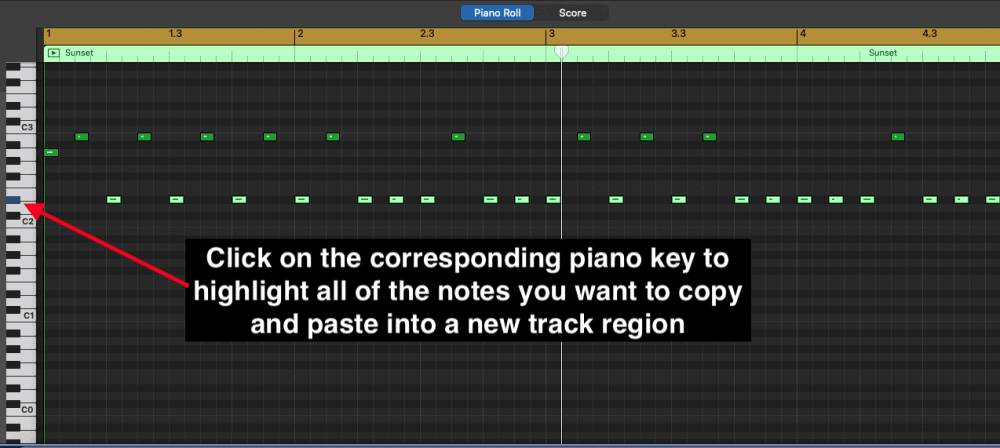
Click on the corresponding note, and then use the (Command + C) command to paste it (Command + V) into a new software instrument track. Check out my short YouTube video here if you want to see what I mean.
Another thing that’s important to mention is the playhead arrow, which is going to make copy/pasting the notes into a new region much simpler.
Put simply, here is what you have to do: after you’ve hit the corresponding note on the piano roll to copy every single note, grab the playhead arrow and put it at the start of where the very first note is played.
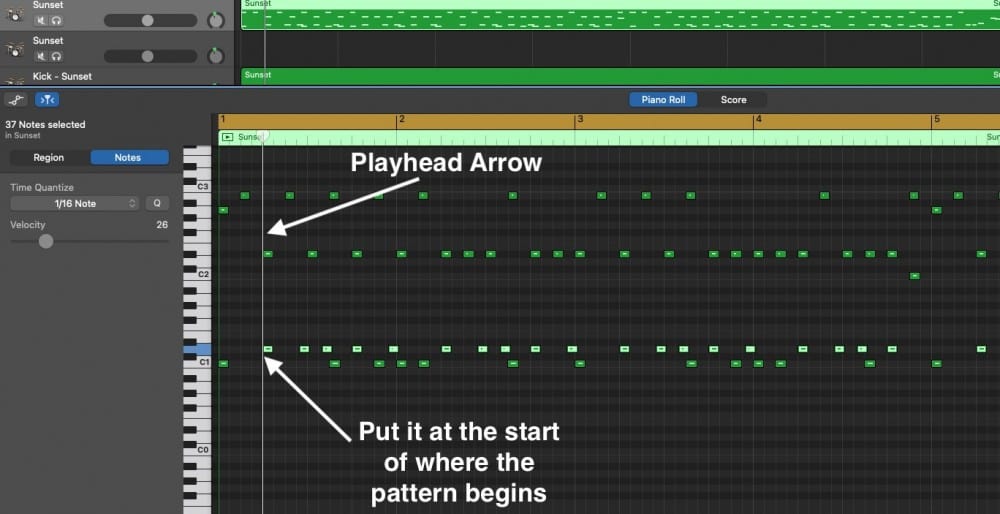
Then, when you go to copy and paste the notes into a new region, the playhead arrow will be sitting right where you need to paste the notes.
Make sure you pay careful attention to what you’re doing at this stage, because it can seem like notes get forgotten sometimes. Proper labeling is a must at all times, for pretty much every aspect of music production.
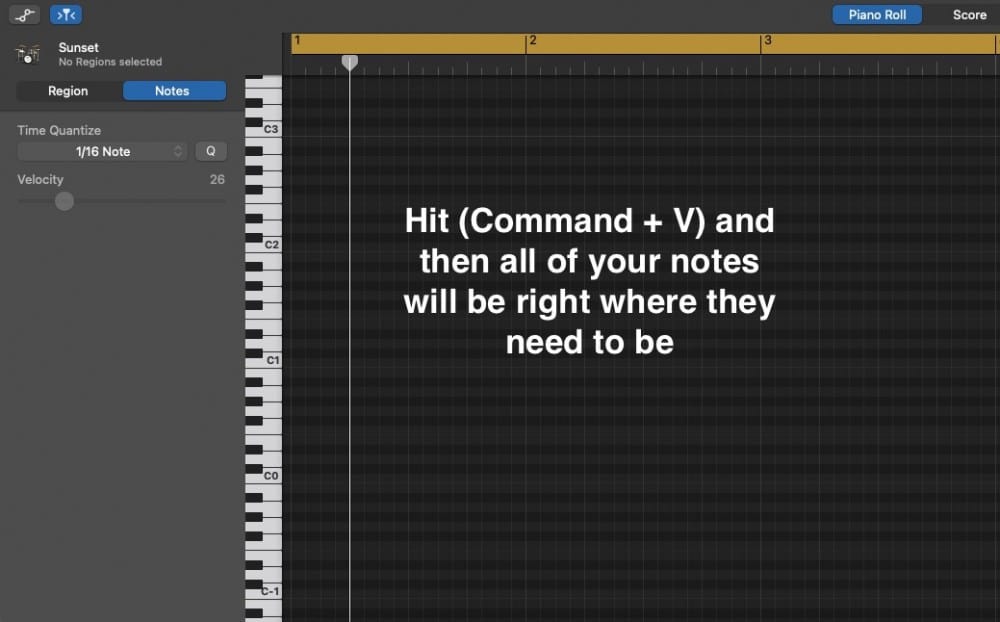
You can either use an entirely different type of drum to do this, or you can just use the same drum kit. It’s up to you.
I like to combine different drum kits together because sometimes the kick of one set will be better than the other. In some cases, for example, I find that it can sound cool when you combine an electronic drum kit with a regular one.
The kick from the Beat Machine and then the snare from the Drum Pro plug-in, particularly from Hip-Hop 8, sound great together underneath the cymbals, hi-hats, crashes, and rides, from real-life drum kits.
Additionally, I’m a big fan of the hi-hats and cymbals from the Neo-Soul kit, and then I’ll use those over top of the kick from Beat Machine and then the Snare from Drum Pro’s Hip-Hop 8 kit.
3) Repeat this Process Until You’ve Created the Entire Kit
Just go through each part of the kit, and then copy and paste the notes into a new software instrument region. At this point, you’ll have all of the kit in different regions, and then you can do whatever you want to each part of it.
Another thing that’s worth mentioning is that separating the drum kit like this is what’s going to allow you to pan each part of the kit so it’s much closer to a real mix.
If you don’t have your drum kit separated into different track regions and panned and mixed accordingly, it’ll just sound like everything is mushed together in the center.
Panning is one of the most underrated ways to get a mix to sound much closer to what you would hear in a professionally done recording, which is one reason why I recommend taking Mixxin Academy’s Music Production Course – they touch on all of this and more in a digestible way.
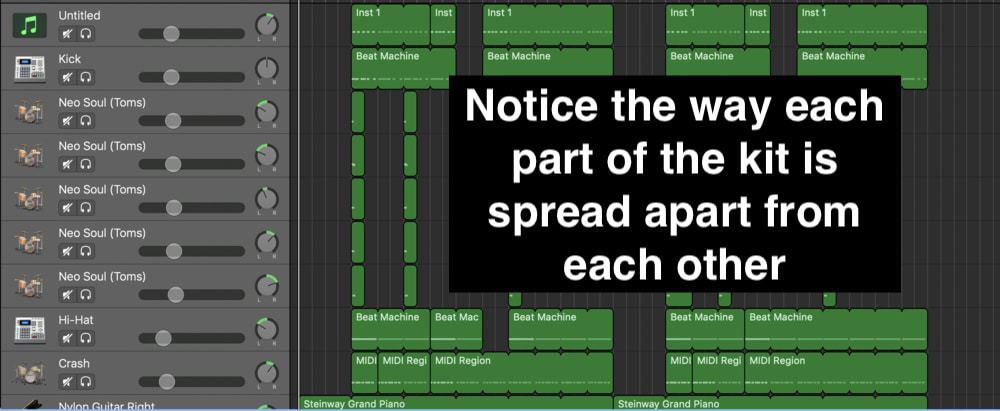
Moving the drums into separate tracks is also how you get different effects on each part of the kit.
For instance, you can add delay to the snare if you wanted, some reverb on the hi-hats, some distortion on the kick and snare drum, or you could add fuzz on the kick if you were going for distorted 808s and bass like Ghostmane or another modern hip-hop/rock artist.
Editing the Velocity (Strength) of the Drums
Now that you’ve successfully put each part of the kit into a new track region, now it’s time to actually make some changes to the kit. As I said at the start of the article, you can make changes via the velocity (which refers to how loud the note has been played), the effects, the instrument type, and the timing.
The velocity is one of those things that are very subtle yet important. To adjust the velocity of the notes, it’s really quite simple. You just click on the MIDI note that you want to change and then drag the “Velocity” bar over from the left to the right; toward 100 if you want them stronger or toward 0 if you want them weaker.
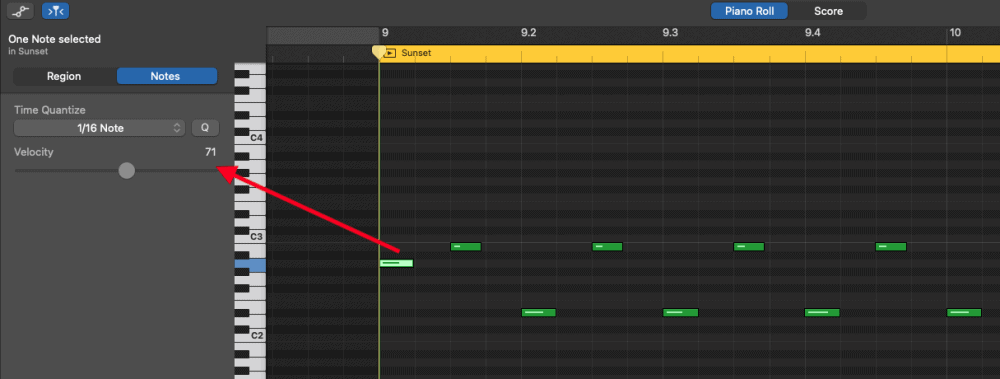
Changing it can serve a number of purposes. One, as I learned from Rick Beato in this video here, is that velocity can make it seem as though a real drummer played the parts.
In real life, how hard the drummer hits each part of the kit varies a lot, for instance, the cymbals when played with one hand might be much louder than the cymbals of another and so you would account for this via velocity.
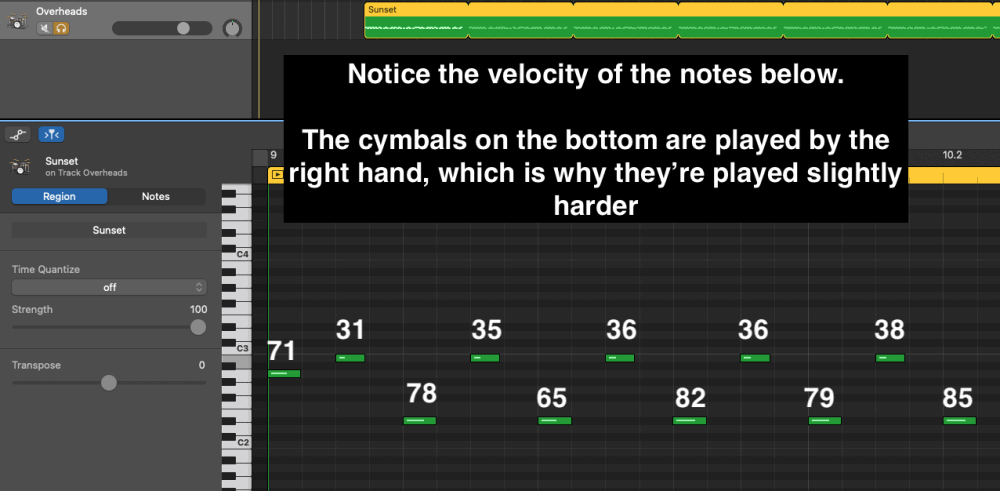
Interestingly, the velocity of the overheads that you can see in the image above was changed only slightly. They are from the drummer track after I copy and pasted them into a new software instrument region. If you were to equalize the velocity of all the notes, it would sound a lot more mechanical and not nearly as real.
Go ahead and try it for yourself, set the velocity of the notes to 100 equally, and you’ll notice that it sucks the life out of the drummer.
Another thing that’s worth adding to the caption of the image is that the notes on the bottom that are played with the right-hand are precisely on the beat rather than between the beat, which is another reason why they’re struck harder. Striking notes on the beat harder than off-time beats is just one way of solidifying the timing of the track.
Editing the Timing of the Drums
Editing the timing of the drums is probably even simpler than changing the velocity. You just have to drag and drop the notes to a different grid-line or move it slightly off-center if you’re going for a slightly off-tempo sound, like a syncopated rhythm section.
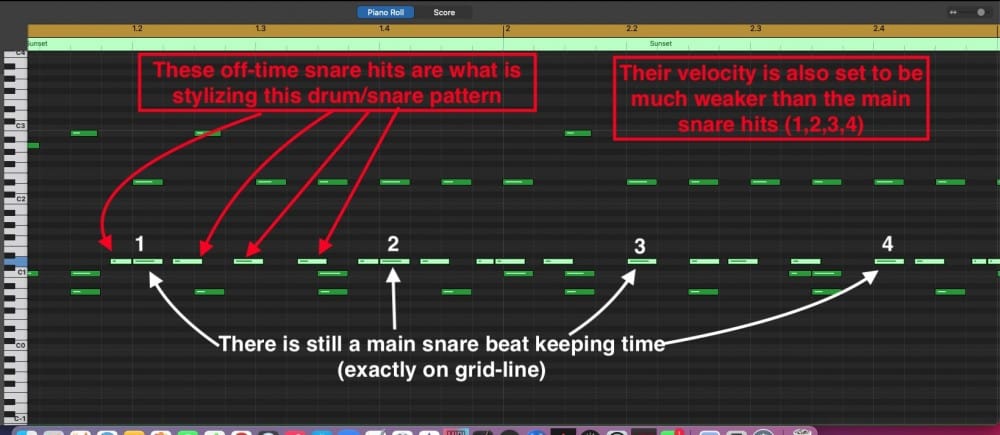
This is precisely how you can get interesting or funky rhythms from the drums. Take a look at this image here, for instance:
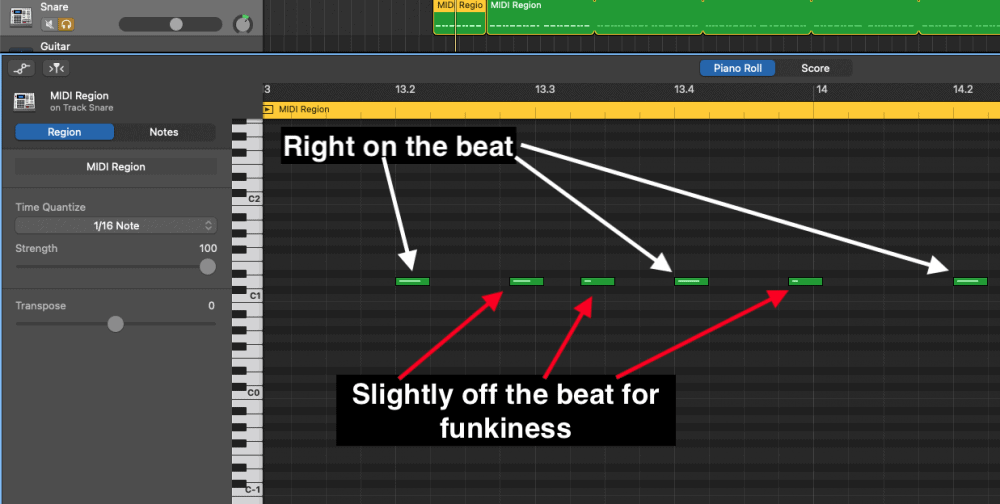
Notice the way part of the snare is exactly on the beat and then the other snare notes are slightly off the grid-line. This is how you get a cool rhythm section that sounds kind of funky and interesting.
Additionally, if you combine what you learned from velocity editing, you can make those slightly off-time notes and adjust the velocity so they’re a bit weaker.
For example, the last off-time MIDI note that’s in the same image has a velocity of around 27, and it’s right before the final snare beat hits.
The effect of that is a jumpiness/bounciness that couldn’t be created otherwise. One thing that’s worth mentioning is to be careful with quantizing because you can eliminate some of these rhythmic intricacies.
More importantly, however, is to understand what I mentioned in one of my Pro-Tips at the start of the article. And that is the importance of using at least one part of the kit to keep time at all times.
For instance, if you are going to get weird with your snare drums, make sure you always come back to the grid-line shortly after venturing from it, otherwise, you’re just going to have a kit that’s off-time.
Take a look at the image shown below to see what I’m talking about here. There is the main snare that hits on every beat, 1, 2, 3, 4 (white), and then there are the less important snare hits that are off-time, off the grid-line, and their velocity is adjusted to be different as well (red).
Editing Drums Using the Smart Controls
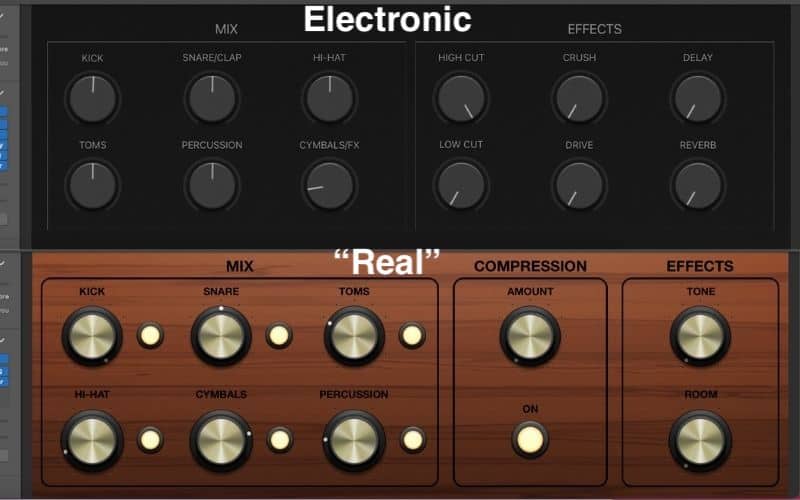
In the smart controls of the drums, you can adjust the volume of each part of the kit, like the snare, kick, hi-hat, or the cymbals, without changing the total volume with the VU meters.
This is something that’s definitely worth pointing out, in case you’re finding there isn’t enough volume. It also doesn’t matter which type of kit you use, electronic or “real.”
Editing Drums Using the Drummer Track
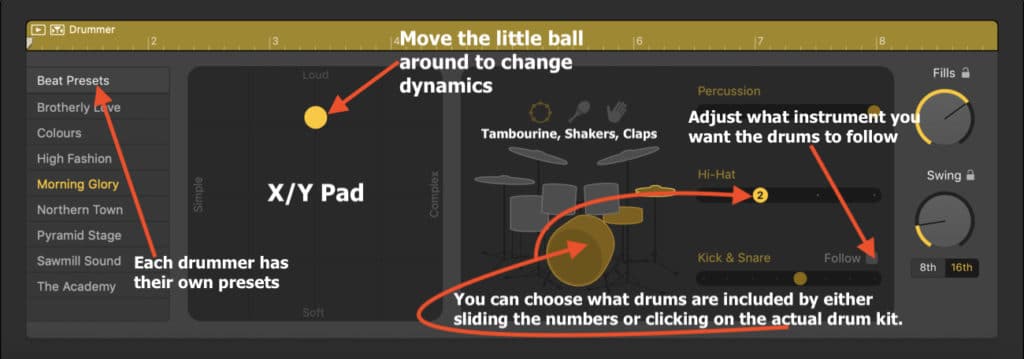
I’ve already talked all about the drummer track in my Drummer Track tutorial, so I won’t dive into the parameters of it and all of the cool ways you can adjust the AI. However, what I will do is impart upon you a diagram of what it looks like and some of the settings, that way you have a quick reference right here in this article.
Important Things to Note About Editing Drums
1) Use the Drummer Track to Study Drum Patterns
The way you can pull apart drum patterns in Garageband is probably one of its greatest features, in my opinion, because not only can you change the AI in a number of ways to accommodate your song, but you can also transform it into MIDI.
In other words, you have the ability to see how all of the many stock patterns look to learn how it’s done. The drummer track is precisely how I learned how to make my snares sound cool.

 Written By :