I learned a lot about how to program drums just by dissecting GarageBand’s Drummer Track. But if we’re going to be totally honest, sampled drums don’t always sound the best. Thankfully, there are a few key things we can do about it that are easy to understand and implement.
To make drums sound good in Garageband
1) Separate the drums for mixing
2) Mix up the velocity for more realism
3) Pan the drums according to a real kit
4) Use a drum kit that you actually like
5) Make an interesting pattern
6) Use time quantization (but not too much)
A Guide To Better Drums in Garageband (All You Need to Know)
1) Separate Your Drums for Mixing
The first thing you need to do, before anything else, is separate the drum kit so each part sits on its own instrument track. Duplicate the drum track a bunch of different times using (Command + D).
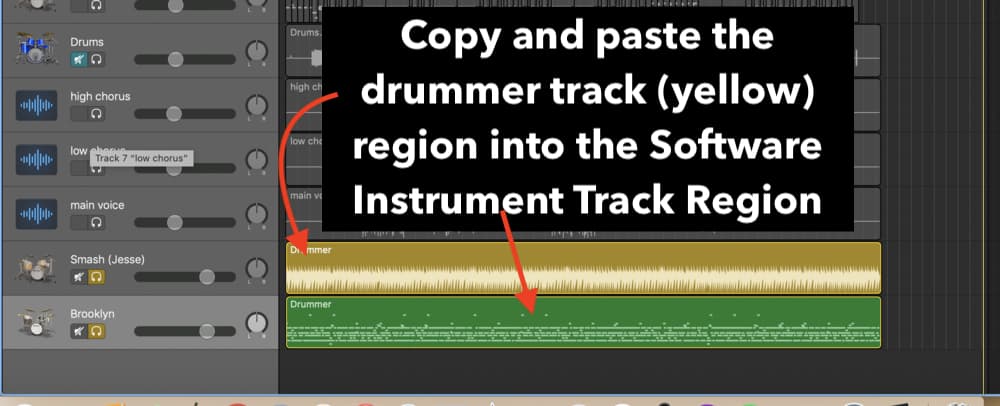
Next, copy and paste the yellow region into a software instrument track region like what’s shown in the image above. Hit the (P) on your keyboard to bring up the piano roll, and then you can begin dissecting the kit.
Keep a copy of the original drummer track region so you have a frame of reference later in case you did something wrong.
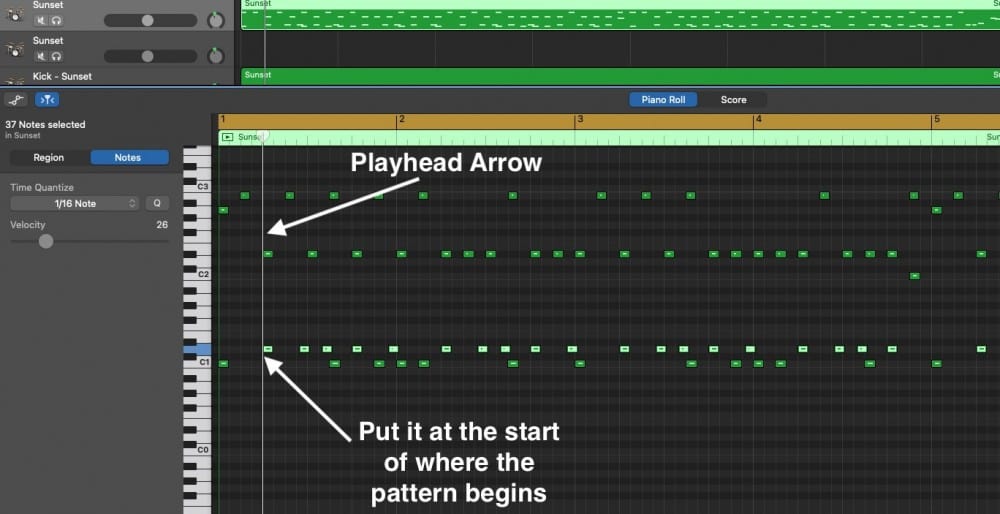
Click on the piano key that corresponds to the note you want to break off from the rest of the kit. Use the (Command + C) shortcut to copy all of them. And then use the play head arrow to designate where you want to paste the pattern.

The play-head arrow trick that I just mentioned looks like what you can see in the next image below. Drag the arrow where you want your pattern to begin, and then use the (Command + V) shortcut to paste it there.
Ensure you’ve figured out where on the MIDI keyboard the note must be pasted though. For instance, is it C1 or C4? Find the note, click on the grid-line there, and then paste it there with the play-head arrow.
The convenient thing about this feature is that you can continue using the Paste command and it’ll repeat it over and over as the play head moves along with it. In other words, you won’t have to adjust the play-head arrow again, unless you wanted to switch up the pattern.
After you’ve copy-and-pasted the MIDI notes onto a new track region, drag a selection box around the notes you want to delete. Select them, and then delete them.
Another way to do the same thing is by deleting every part of the kit except for the part you want to isolate. Repeat until you’ve done every part of the kit.
Additionally, it would be wise to ensure you’ve copied and pasted everything correctly by having a listen to the original drummer track.
2) Mix Up The Velocity On Your Snare, Kick, and Overheads
Mixing up the velocity on your drum kit is without question the best way to make a huge difference in terms of realism and quality. A couple of years ago I showed how to make snare rolls in Garageband and one of my commenters offered this tip.

If you’re trying to make your Garageband drums sound real, changing up the velocity is the best way to do it. I can’t think of a superior way to make your drums sound better, because it makes that much of a difference. And thankfully, it’s pretty easy to do.
The video above is a good demonstration of how to mix up the velocity on your drums. I chose the Ride cymbal because it was a dominant part of my drum pattern on my latest track. So how do you adjust the velocity of your drum kit?
Press (B} on your keyboard with the drum kit instrument region selected to bring up the Smart Controls. Make sure “Region” is selected, and then drag the Velocity slider to the right to increase it, and to the left to decrease it.
The velocity starts at 0 (the weakest) and goes all the way up to 127 (the strongest). I change up the velocity on every part of the kit, and I think you should too if you’re trying to make it as realistic as humanly possible.
In a similar vein, you can think to yourself how each piece of the drum kit is positioned to inform your choices. In other words, if the drummer has just struck one part of the drum kit really hard, they may find it difficult to switch back to the hi-hat or ride and hit it with the same velocity as they were before they changed the pattern.
I first got this idea from watching a Rick Beato video from a few years back. You can check it out on his YouTube channel.
3) Set Up An EQ To Emphasize Desirable Sounds and Minimize Undesirable Sounds
The terminology of the sub-heading above is vague for a reason. You can accentuate parts that you want to hear in a number of ways, including through boosts, or by subtractive EQ.
Cuts for Improvements and Boosts for Changes
If you’ll recall my guide to using the EQ on drums, I said there you should use subtractive (cuts) EQ to improve a sound and boosts to change it.
You may scoff at the idea because a lot of people recommend it on the internet. But the fact of the matter is that it does work and it’s something you should begin implementing right away. Bobby Owsinski says the same thing in his book, The Mixing Engineer’s Handbook.
Understand Where The Key Frequencies Lie on Each Part of the Drum Kit
| Drum Part | The Frequency and How It Sounds |
|---|---|
| Kick | 80Hz – Power/Thump 350 – 400Hz – Hollow/Boxy 3000Hz to 5000 Hz – Punch |
| Snare | 120Hz – Thick/Fat 1000Hz – 4000Hz – Snap, Crystal, Attack 10,000Hz+ – Sizzle |
| Cymbals and Hi-Hats | 100Hz to 200Hz – Clank, Ding, 8000Hz to 11,000Hz – Sparkle or Sizzle |
| Floor Tom | 80 to 100Hz – Boom/Power 500Hz to 800Hz – Boxy 8000 Hz to 10000Hz – Air |
| Mid and High Toms | 80 to 100Hz – Boom/Power 500Hz to 800Hz – Boxy 8000 Hz to 10000Hz – Air |
The most important part of the frequency of each drum piece changes depends on the style. It also changes depending on how the drummer has struck the drum too, although, they’re often in a very similar range.
However, the chart shown above gives you a rough idea of where you can find certain frequencies on the drum kit. If you wanted to give more power to the kick, for example, boost at 80Hz approximately. Do you want more attack on the snare? The 1000Hz to 4000Hz range is a good place to start.
FabFilter’s Pro-Q EQ for Hyper-Specific References
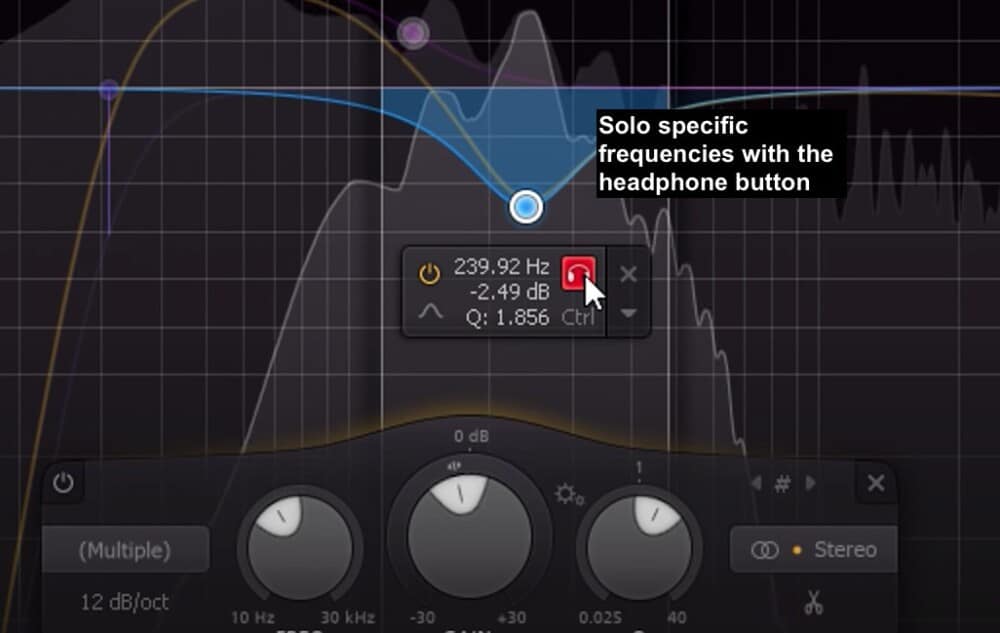
Fab Filter’s Pro-Q EQ (which you can find on Plugin Boutique) has the ability to solo a particular range in a frequency. If you’re serious about getting the most out of EQ, the Pro-Q EQ is a good way to start.
Use the solo button to figure out where the peskiest frequencies are. Or discover where the desirable sounds are coming from. This is a lot better than using an EQ sweep (although, they work too).

4) Use Effects Like Reverb, Distortion, and Delay To Make Them Less Dry
Reverb on the Snare
Reverb is one of the most used effects in music production and audio engineering – and for good reason. I use it primarily on my snare because it makes it sound way better. It won’t sound as dry, dull, and boring if there’s a bit of reverb on it. Here’s my video on it.
As for what reverb I like to use, Garageband’s PlatinumVerb is a great free option.
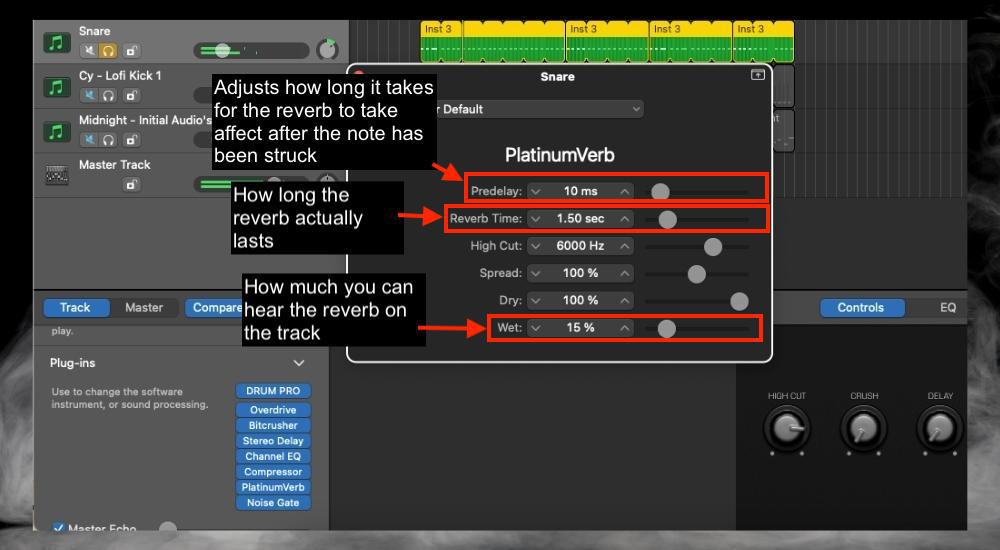
Add the PlatinumVerb plugin as the second last plugin on your signal chain, and use the Pre-delay, Reverb Time, and Wet, to adjust the primary parameters. The picture that I’ve provided is a good start.
Distortion on the Kick
If I were to use reverb on the kick, I would probably be pretty sparing with it. But when it comes to distortion, overdrive, gain, or fuzz, you can add a lot more.
If you’re trying to introduce more power, aggression, or ummphh to your kick, overdrive is a good way to do it. One tip I’ll share with you is that you want to lower the output or the volume on it as you increase the distortion effect.

This will ensure your kick’s volume doesn’t get out of control. The image above is a great way of demonstrating what I’m talking about.
5) Use Toon Track’s Superior Drums or EZ Drummer
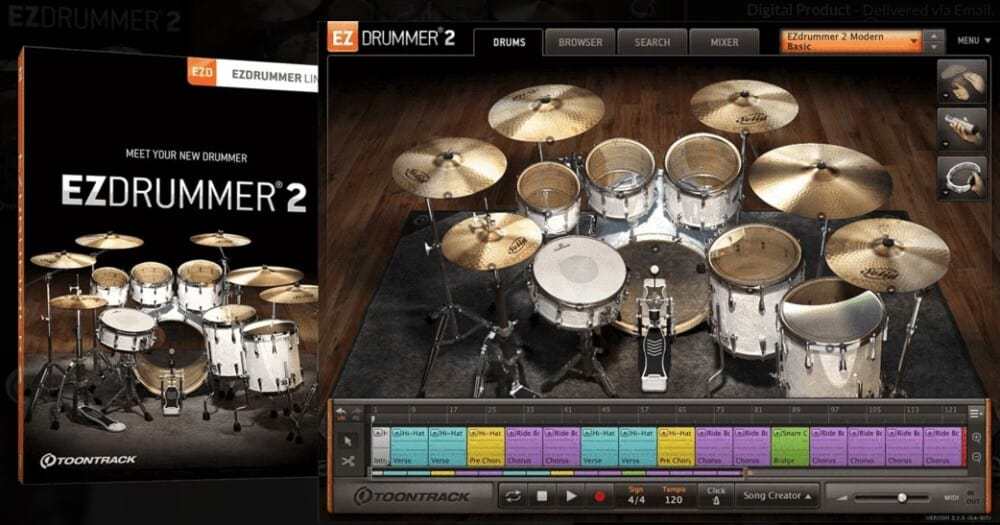
Another way to improve the quality of your drums in Garageband is to buy superior samples for it. Superior Drummer 3 is probably the best drum sample library available (on my Product Page). But I get it, not everyone has the money for that (or the disk drive space). EZ Drummer is a great alternative.
What’s great about Superior Drummer is its comprehensiveness. You can program whatever kind of drums you need with it. EZDrummer, on the other hand, is a budget-friendly songwriting tool. It’s great for creating rough drafts and demos, which can later be turned into something much greater.
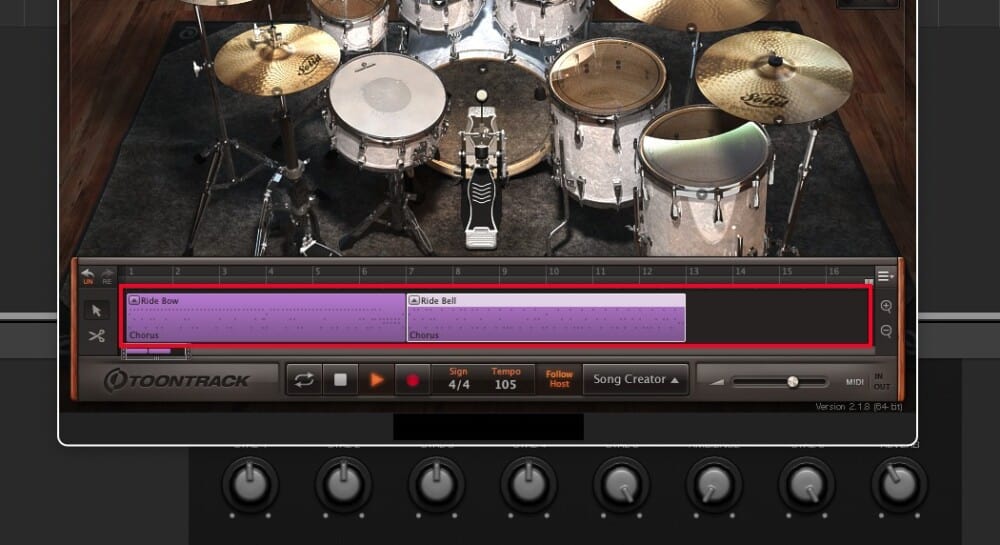
In other words, I would describe EZDrummer as like a level up from Garageband’s Drummer Track. You get more sounds and presets, more kits, in addition to better-sounding samples right out of the box.
But if you’re not interested in trying out third-party software, no worries, I’ve got plenty of other tips for you. The next one probably could’ve come first because it’s one of the most important.
6) Pan The Drums According To How A Real Kit Looks
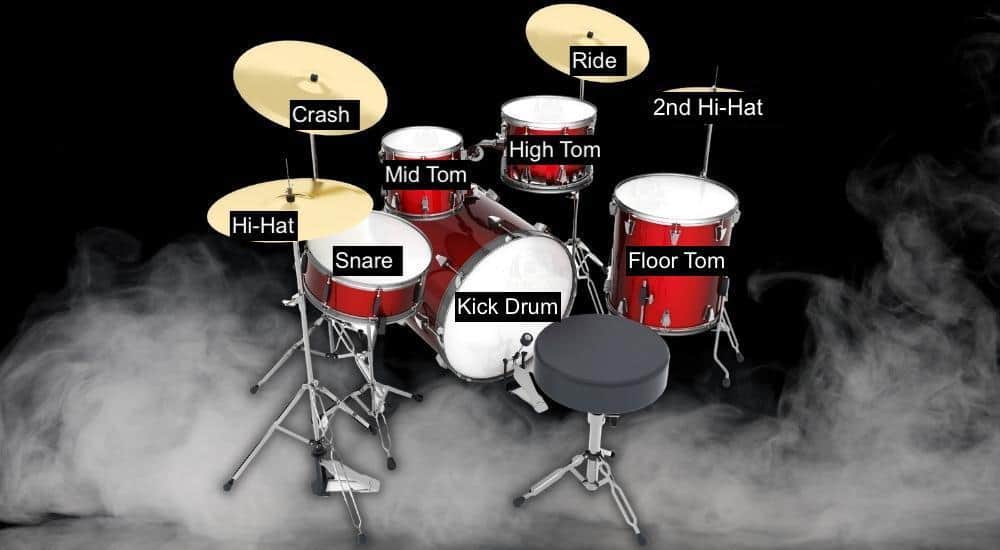
You don’t have to pan the drums exactly the way they appear in reality, but I think it’s a good jumping-off point for beginners. Not even beginners, actually, I still use the diagram all of the time.
With that in mind, I can’t harp on the importance of panning enough because it, along with volume, is really how you improve the sound of your drums.

If your drum kit is panned directly in the center along with your bass instrument and vocals, it’s going to sound awfully cluttered. Panning (which I have a guide on here) is a great way to ensure every part of the stereo image is being used tastefully.
Pan from the Drummer’s Perspective or the Audience’s Perspective?
One question you should ask yourself is from what perspective do you want the listener to listen? I mix it up because I’m usually kind of impatient when mixing, but I usually do it so the drums are facing the listener.
I don’t think we need to do a panning tutorial right now because it’s pretty easy to set up. Just turn the little dial to the right or left. You can also choose where the instrument sits based on numbers.
7) Use Compression Sparingly
Everyone loves compression because it always sounds great, but just be careful you don’t overdo it. If you don’t need to compress something, don’t do it. That’s my rule. It’s so easy to use too much. When I use compression, I focus primarily on:
The Snare
- To make the snare tighter and to tame some of the transients.
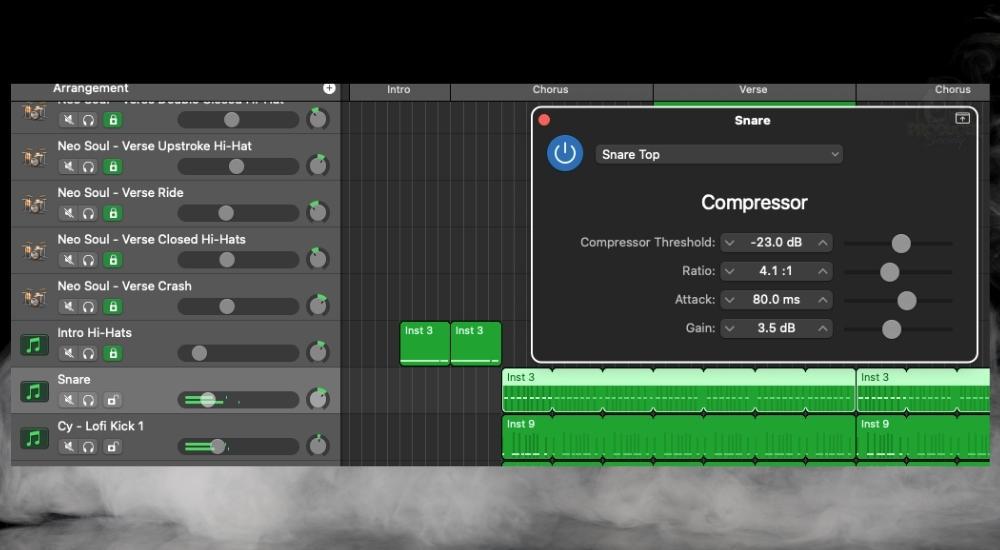
The Kick
- To make the kick even and punchy.
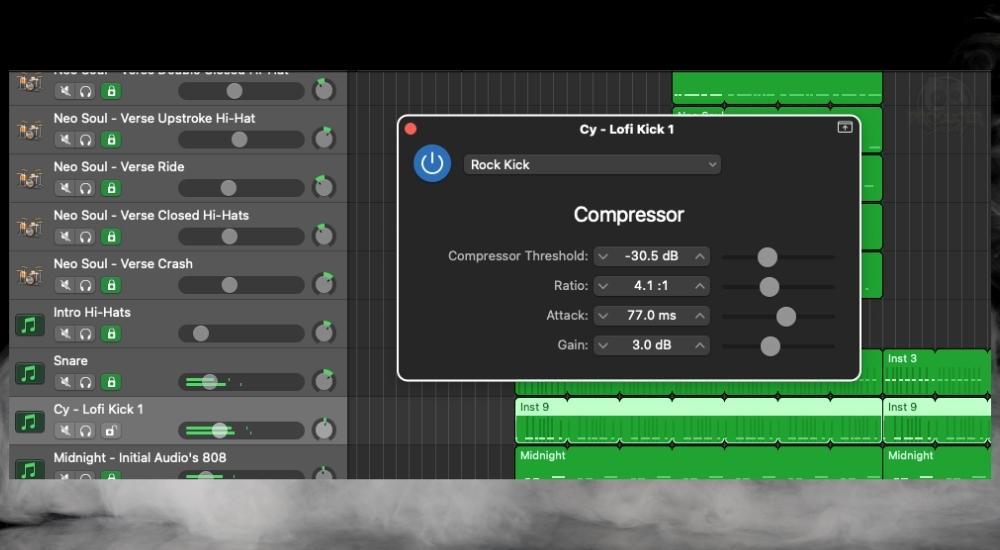
I won’t use compression on my cymbals including the ride, crash, or the hi-hats. I don’t think they need it (on sampled drums at least). Most sampled drums are already fixed up before you get your hands on them, however, you can improve them.
If you’re anything like me, you like to use a large drum kit. If that’s the case, compression on each part of the kit will have a multiplicative effect.
8) Ensure There Is Enough Space in the Stereo Image
Related to the point on panning, a good way to ensure your drums sound good is to avoid clustering all of them in one place. The stereo image is just a fancy way of describing how sounds appear positioned from left to right and from front to back relative to the listener.

With tools like reverb or high-cuts, for example, you can make it sound as if a drum is further away than it is. On the other hand, you can make it appear much closer by increasing the volume.
By far the best way of adjusting the perceived location of sounds is through volume. In simple terms, take the time to give space for each part of the kit because there are many parts to it.

Use things like volume, high and low cuts, reverb, automation, and panning to adjust the perceived location of each part of the drum kit. Ask yourself what other instruments are dominant in the recording?
Does the singer, guitarist, or bassist have enough sonic space to breathe and to be heard? David Gibson has the best book on this topic – it’s called The Art of Mixing (on my Product Page).
9) Don’t Exceed -5dB When Mixing
You always want to make sure you’ve got a lot of headroom in your mixes. This is doubly important if you intend on sending it off to a mastering engineer someday.
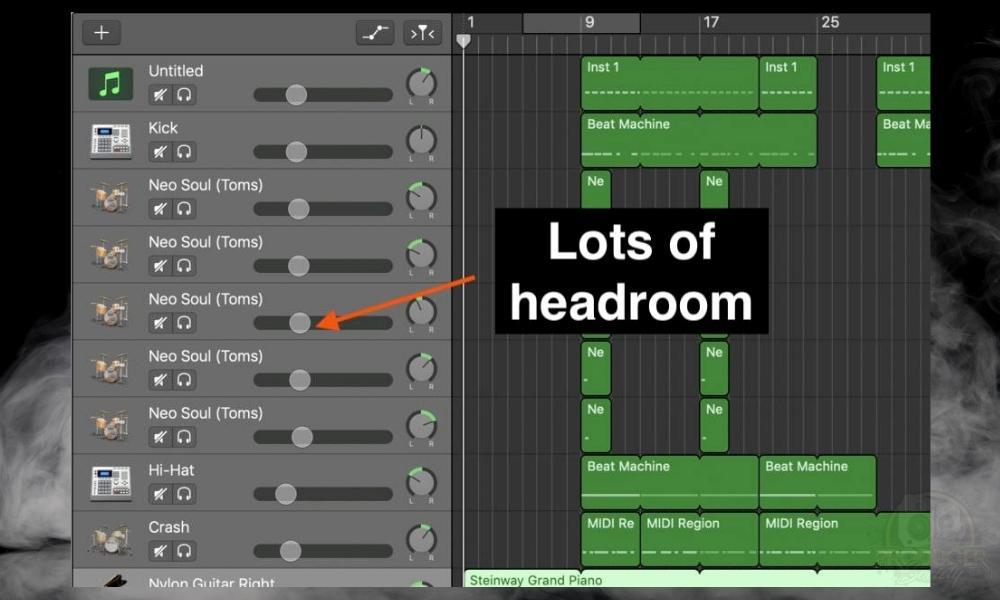
It’s very easy to overdo it in your mix, because as I’ve said, louder always seems better to our ears. I rarely take any of my instrument/audio tracks beyond -6dB or -7dB (with some very minor exceptions).
I might have a tom at that volume if it only rings once during the song. Either way, leaving a good amount of headroom in your mix always seems to work out favorably in the end.
10) Ensure You Actually Like Your Drum Pattern
If your drums don’t sound good, it’s not always because of how they’re mixed. Make sure you actually like the pattern you’ve made. Look to your favorite artists for inspiration, and pay attention to how drums are programmed, mixed, or recorded for a frame of reference.
Some of my favorite drummers to listen to are August Burns Red’s Matt Greiner, Matt Halpern from Periphery, Brann Dailor from Mastodon, Blink 182’s Travis Barker, Victoria’s drummer Matt Garstka, and Chris Turner from Ocean’s Ate Alaska.
My favorite hip-hop producers are J Dilla, Nujabes, and Metro Boomin’. Whenever I listen to great drumming, I always pay attention to how the kit is panned and how the pattern sounds.
11) Don’t Be Afraid To Go Off Grid When Programming Drums
I’ve got a couple of points to make on this, including how this rule applies to multiple parts of the kit. Part of what gives drum pattern life and movement is syncopation or notes between the beats.
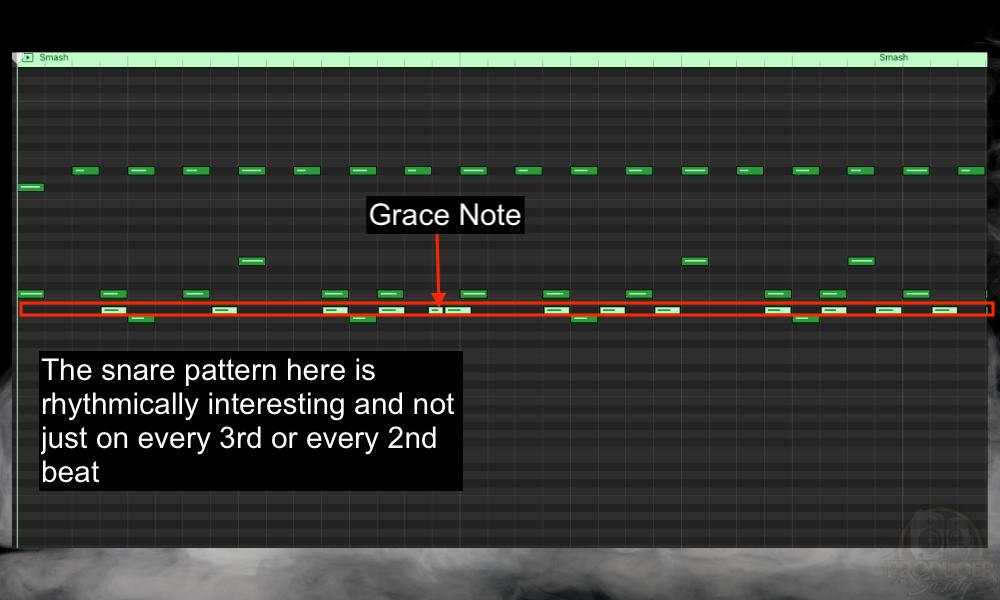
The example that sticks out to me most is the snare. I’m guilty of being too “on-the-nose” with the snare, in the sense that I’ll often put a snare hit on every other or every third beat exactly with no variation in between.

But some of my favorite patterns are not like that. It’s a habit I’m still trying to break because I have the tendency to follow the grid lines too closely. It’s like I’m scared of going off the grid.
12) Don’t Be Afraid of Dynamics Processing And Effects Presets
I still use presets all of the time when I’m mixing drums and other instruments. Whether it’s for the compressor, EQ, limiter, or for reverb and delay, I’ll usually try a preset first to see how it sounds.

It’s rare that I’ll use the preset right out of the box, however. I’ve said before that I use the presets as a jumping-off point. I recommend you do the same.
13) Use High & Low-Pass Filters (Carve Out Sonic Space)
High and low-pass filters (low and high-cut) are a great tool for making sonic space. I used this technique on my last song and it worked great. The drums (and my guitar solo) are the best part of “Inversions” which I already linked above.
In simple terms, high and low-cut filters are just a way of carving out space for different instruments and sounds to co-exist.
If you’ve got a ride cymbal like what’s shown below, carve out the lower frequencies that aren’t contributing much so the bass and kick have more space there.
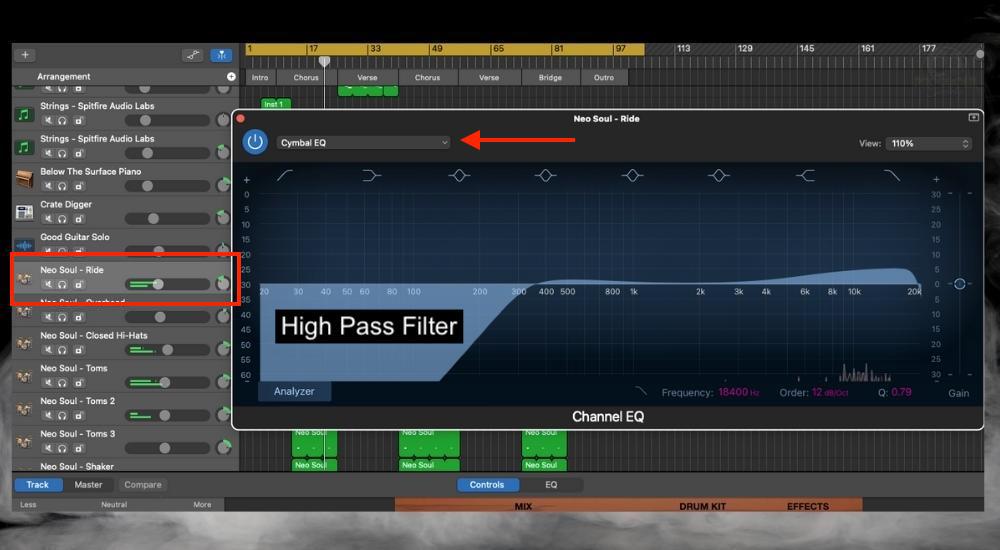
Use a low-pass filter to do the same thing for other sounds that are heavy in the low-end frequencies but light on the high-end.

This works the best for instruments and sounds that are recorded from scratch, rather than sampled. That said, I still find it makes a difference for samples.
14) Make Sure Your Drums Are In Tune
Third-party organizations aren’t uniform so how they’ve recorded samples varies. As a result, VSTs and samples can be out of tune relative to your project or your needs.

I’ve written a guide on how to tune 808s before, and the same method can be used for your drums. That said, this won’t be a problem if you’re using Garageband’s stock drums or the drummer track.
15) Make The Drums So They Don’t Sound Perfect (Be Sparing with Quantization)

Related to the point I made earlier, going overboard with quantization can really suck the life out of the drums. Rick Beato harps on this kind of thing all of the time, including in this video.
I’ve included this one near the end of the list because I’m aware of the danger of quantization abuse. However, most listeners aren’t paying close enough attention to notice whether the drums are perfect or not.
In other words, too much quantization isn’t usually the factor that’ll destroy your song. It may even be the case that listeners have grown accustomed to perfect drums and therefore expect nothing but.
16) Ensure Parts Of The Kit Aren’t Out Of Phase

Phase cancelation is when two or more signals aren’t moving at the same rate. When two signals are moving at the same rate as each other, the total sum of the signals will make it appear louder.
But if they’re not moving in the same way (out of phase), one will appear louder than the other. Phase cancelation can happen with any recorded sounds and not just drums. Check for phase cancelation on your guitars too.
Phase cancelation usually applies to drum tracks recorded from scratch and not sampled drums. Quality sampled drums won’t have this problem, but you could run into this if you’ve recorded your own.
Or maybe the person who made the samples didn’t check for it. I’ll make sure to do a demonstration of this tip sometime in the future because I understand that it can sound confusing.
17) Don’t Forget Master Track Compression
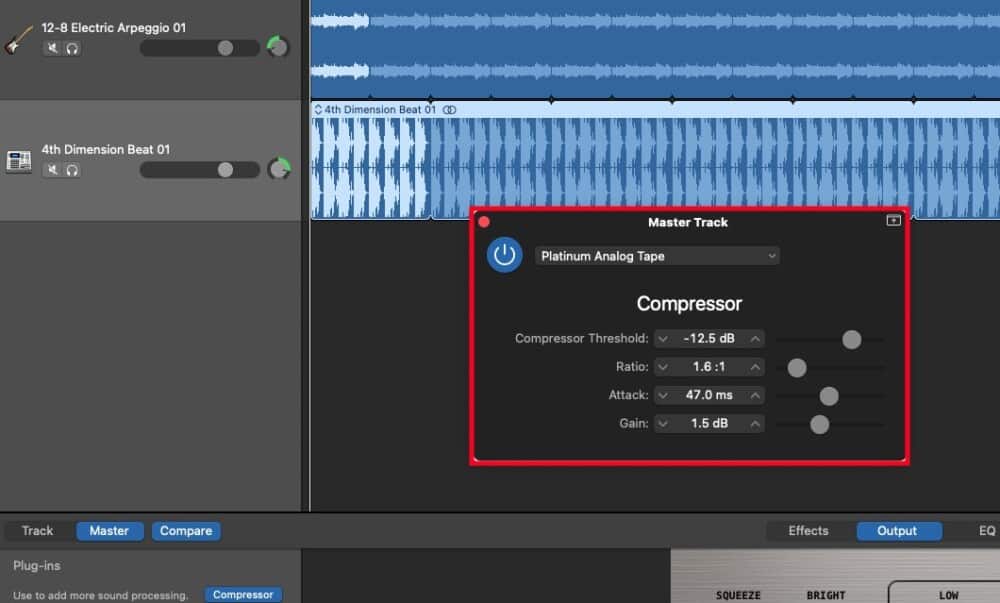
During the mastering phase (here’s my guide on that by the way), adding a compressor as the first processor in the signal chain is usually what I do. It makes the track much punchier, louder, and more aggressive.
It applies to the entire song, but I find this compressor preset really brings some life to the drums. The master track compressor is also the reason I recommend not overdoing compression on all of the individual drum tracks.
Adding compression on top of 15 other running compressors won’t sound great. I always go easy on the compressor because I know I’ll be adding some on the master track in the end.
Important Things to Note About Making Drums Sound Good
1) Choosing The Right Drum Kit Is 90% Of The Battle
I’ve made this point before in the context of 808s. Before Garageband’s last update, there weren’t many 808 instruments. It had the Deep Sub Bass Synth and the Boutique 808 instrument and that was pretty much it.
I spent a lot of time trying to make those instruments sound good when all I needed was a new VST. After buying Initial Audio’s 808 Studio II Synth (on Plugin Boutique), I didn’t have to spend a lot of time EQing and compressing my bass instrument anymore. The same thing goes for the drums.
If you find your drums suck and you can’t get them to sound good, just buy better drums like Superior Drummer or EZDrummer. High-quality samples are a sure-fire way to get a great sounding kit right out of the box. You won’t have to spend 2 hours EQing the snare if it already sounds good.
Gear Mentioned
1) The Mixing Engineer’s Handbook
2) Fab Filter’s Pro-Q EQ
3) Eventide’s SP2016
4) Superior Drummer 3
5) EZ Drummer
6) David Gibson’s The Art of Mixing
7) Initial Audio’s 808 Studio II Synth

 Written By :