To make hi-hat and snare rolls:
1) Select your drum kit
2) Using the Command and Pointer function, place a hi-hat or snare note on each grid line or every other grid line
3) Copy and paste the notes until the bar is filled out
4) Manually add/delete notes in the spaces between the grid lines.
Because of the MIDI keyboard and piano roll which are obviously based on the piano (one reason why I recommend learning the ins and outs of the piano through the e-book PianoForAll), making hi-hat rolls and snare rolls in GarageBand is really quite easy.
Using the (Command) and point functions, a music producer can easily draw whatever pattern they want.
In the case of creating the descending hi-hat and snare rolls, all you have to do is use samples, instead of a MIDI drum kit, that way the pitch can be adjusted accordingly.
Hi-hat and snare rolls have existed for a long time in a number of genres, however, they’ve increased in popularity on account of the modern rap and trap scene.
Considering I grew up listening to metal, I always compared them to the triplets that drummers and guitarists use such as at the beginning of “Hourglass” from Lamb of God, but rather than the guitarists and the kick drum playing the triplets, they’re played on the hi-hat and snare in trap and hip-hop music.
In the section below, I dive into each step of the process mentioned above for further clarity and explanation.
How to Make Hi-Hat and Snare Rolls in Garageband
What type of sound you get largely depends on the style of drum-kit you use.
My personal favorite is the Trap Kit within Drum Pro which I’ve mentioned before in my article on the best instruments for hip-hop. I find that it’s the closest thing to a solid trap kit that you can get, at least for free anyway. Grab the Drum Pro plug-in at this link here on VST4Free.
With that in mind, there is also Garageband’s Trap Door, which imitates the popular trap kit, although, I find that it’s not nearly as good as Drum Pro’s trap kit.
In the section down below, I’ve also recommended a sampled drum-kit for you to use for the creation of the descending rolls. So stay tuned for that.
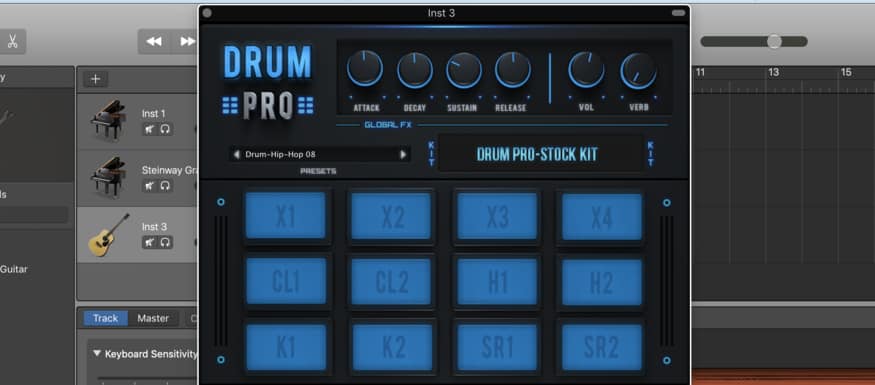
There are certain elements of the Trap Door that sound good, so it’s worthy to keep it in the back of your mind.
You could always take instruments of the Trap Door kit and leave the rest behind.
1) Selecting The Drum-kit, Creating the MIDI Region, and Getting Ready to Start
At this stage, what I like to do is I right-click on the track-pad, or double-click, whatever you want to call it, and I select the option, “Create Empty Region.”

I’ll extend the region to the fifth bar, which essentially makes the section four bars in the 4/4 time signature.

From here, you can go down into the Piano Roll and begin adding in the notes that you want using the (Command) and Point function (more on the piano roll in my guide).
Useful Tip: If you run the cursor alongside the left-hand side of the Piano Roll, the keys, you can quickly find the key that corresponds to the sound that you want, without actually going through the MIDI keyboard.
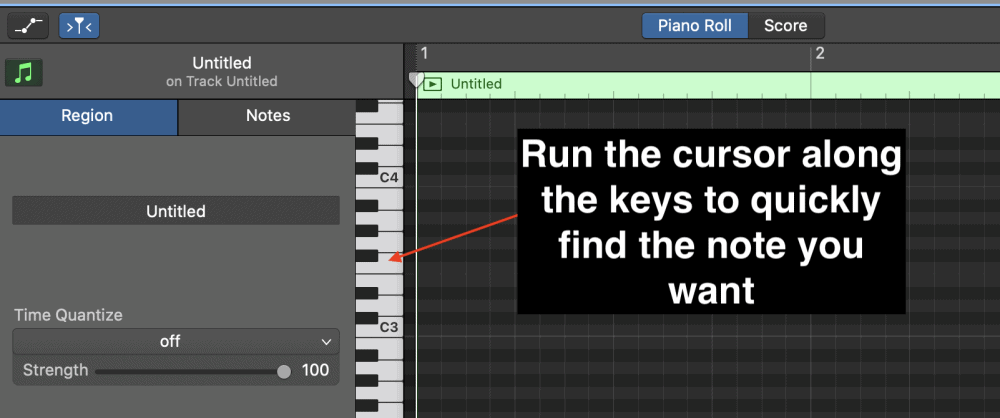
Once you find the Hi-Hat sound, which is F#3, one of the black keys of the Drum Pro plug-in, you can go ahead and start adding the hi-hats using the (Command) and Point function.
The moment you hit the (Command) function, you’ll notice that the pointer turns into what looks like a pen or a crayon.

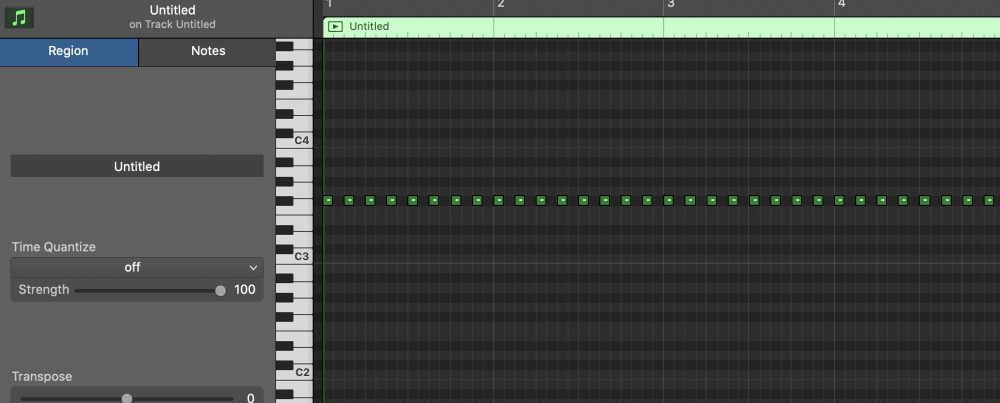
Typically, what I’ll do here is I’ll just add a hi-hat on almost every single grid-line, or perhaps, every other one, depending on how fast I want them to be.
This can also depend on the BPM of the song as well. A faster BPM means that fewer hi-hats are needed in order for them to sound fast, whereas a slower BPM means that more hi-hats are needed for them to sound faster.
2) Draw in The Hi-Hats
The moment you select the (Command) function in the piano-roll, you’ll notice that Garageband will turn the pointer into what appears to be a pen, as I’ve shown already above.
This means that it’s ready to go, and you can easily draw the notes in one at a time, but in a more efficient manner.
As I mentioned above, you want to draw in the hi-hats now.
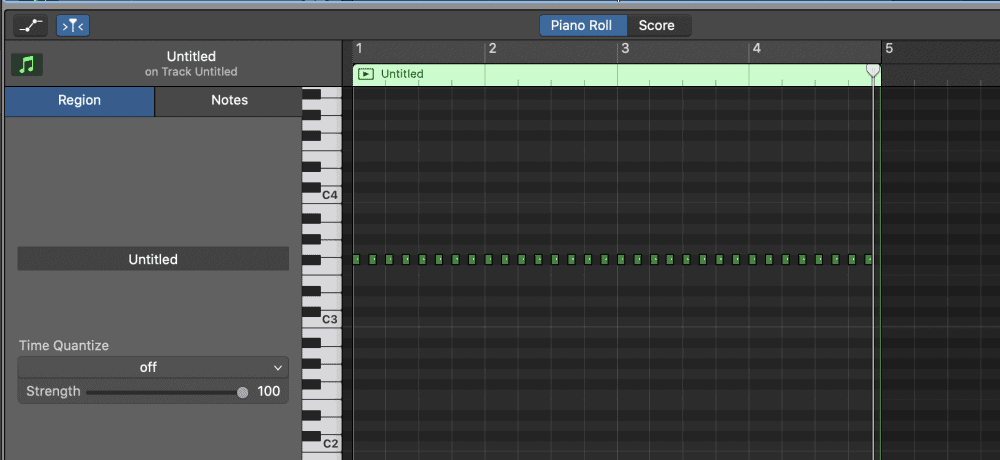
Once you’ve added several of them, maybe from around 4-8, you can go ahead and copy-and-paste them to fill out the rest of the bar.
3) Use the Playhead Arrow to Copy and Paste
From what I’ve seen thus far, using the Playhead Arrow is undoubtedly the fastest way to create hi-hat and snare rolls in Garageband.
Rather than creating each note individually until you’ve filled out the entire bar, and then looping it, you can instead use the Playhead Arrow to determine at which point the note-pasting will start.
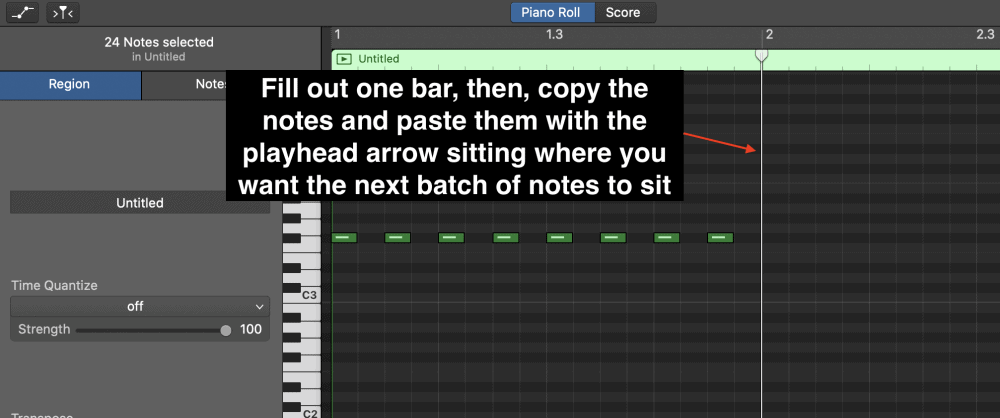
This is a bit hard to put into words, so make sure you check out the YouTube video below to see what I’m talking about.
Regardless, you can see the end result here:
4) Manually Add and Delete Notes to Style the Rolls
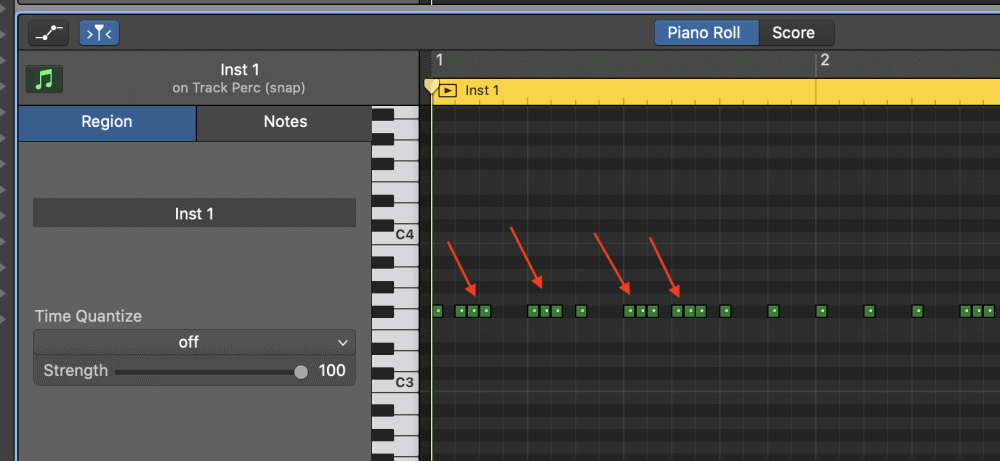
From here, you now have your hi-hat or snare rolls created in such a way where you can manually add notes in between other notes for the triplet effect.
For instance, the triplet effect looks like something you can see here:
Additionally, there are other patterns that one can create to make your hi-hats have that fire sound that exists in much of the trap scene today.
The way I’m showing you how to do this is the fastest and most effective way of creating hi-hat and snare rolls in Garageband.
When I create hi-hat and snare rolls, however, I might follow this guide for a moment, but when I want really interesting hi-hats and snare rolls, I might draw in each part of the pattern individually.
Styles of Rolls
In this section, I’m going to show you how to create some of the cooler sounds that exist in trap music, or in music more generally.
The Triplets
Really, the number of hi-hats or snares you create will tend to increase the speed of the rolls.
More importantly, if you want to create that triplet sound, you would create three notes quickly in succession, right beside each other.
This looks like what you can see here:

Fast 16th Notes
The same principle applies to other types of rolls as well.
We won’t dive into the music theory behind the difference between 8th, 16th, and 32nd notes, but know that the more notes you add, the faster they’ll become.
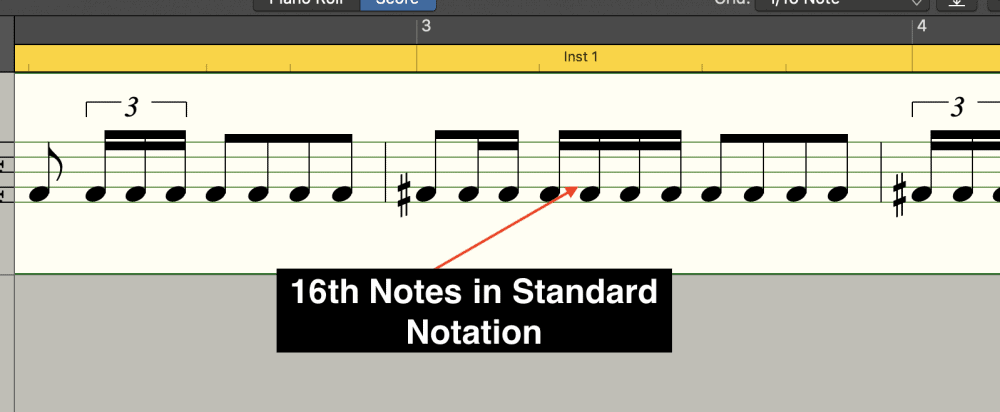
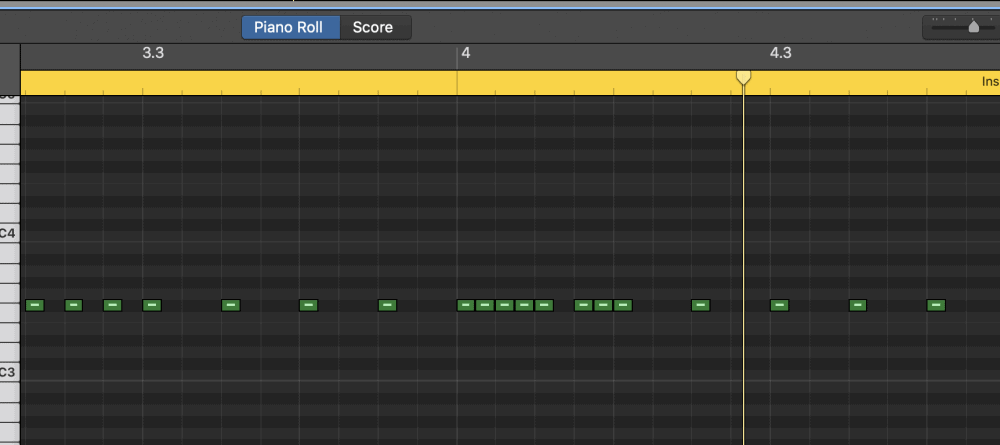
Rather than using just three in succession, which would create the triplet effect, you can add four, or even five.
This looks like this:

And really, this principle applies on and on. You can add as many as you would like, or you could even create a group of six, but then suddenly delete one of them in the center, to create a different effect.
Creating hi-hat and snare rolls can really become quite creative, and truthfully, it’s very mathematical.
As long as some part of the drums are keeping the beat in time, then it doesn’t really matter a whole lot how you go about constructing rolls and hi-hat and snare patterns, however, there is more to creating drum patterns than this which is why I have a full guide on it.
Other Tricks
Phaser
Of course, there is a lot one can do.
For instance, you could even throw up a flanger or a phaser on top of the hi-hats in the Smart Control’s plug-in section for a different effect.
To do this, make sure that you have your hi-hats in an entirely different MIDI region than the rest of the kit, otherwise, the effect will be heard on every single part of the kit, and that’s not what we want.

Setting Up The Effects
Go down into the Smart Controls of the MIDI region, and then select “Modulation.”
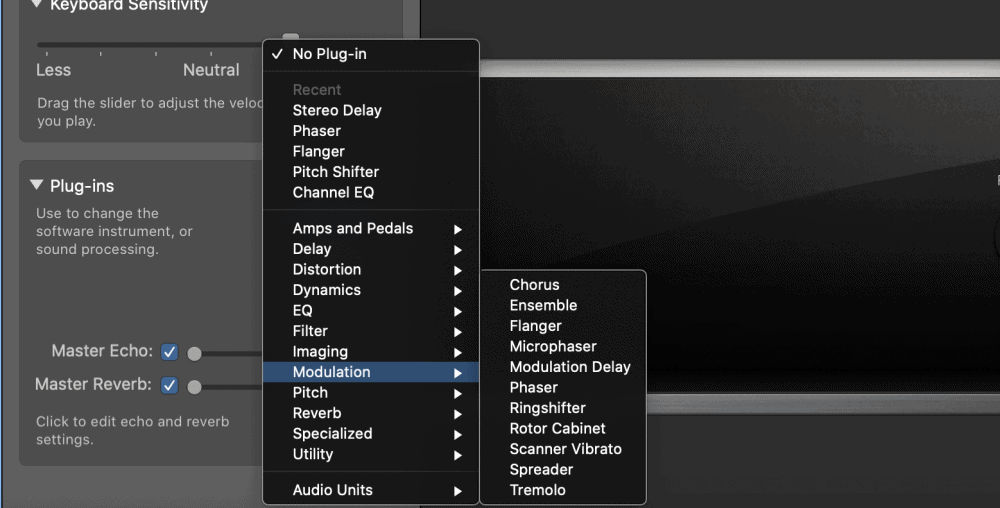
From here, you’ll see a list of the different effects that you can use, including a phaser, a flanger, a chorus, a pitch-shifter, etc.
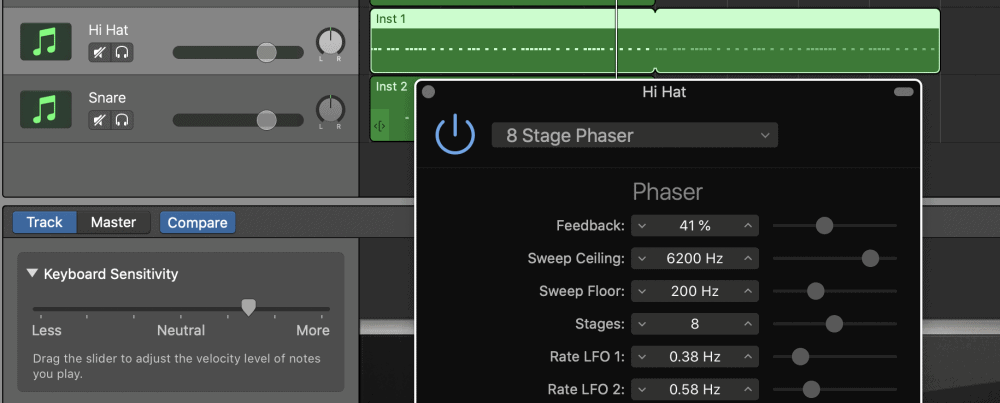
Once you’ve selected the effect you want, go into the pre-sets and see what you think sounds the best.
Personally, I find that the phaser is the best for creating an interesting sound on the hi-hats.
In the pre-sets, you can choose the 8-Stage phaser to see what I’m talking about.
Flanger
For the flanger, I find that the “Easy Flange” pre-set sounds the best.
The “Easy Flange” pre-set essentially scrolls through the frequency ranges in a very slow, controlled manner, without being too over-bearing.
With that in mind, you can adjust the intensity of the flange, and you do this with the “Intensity” and “Rate” parameters.
The “Mix,” on the other hand, controls by how much the plug-in is affecting the sound.

Reverb
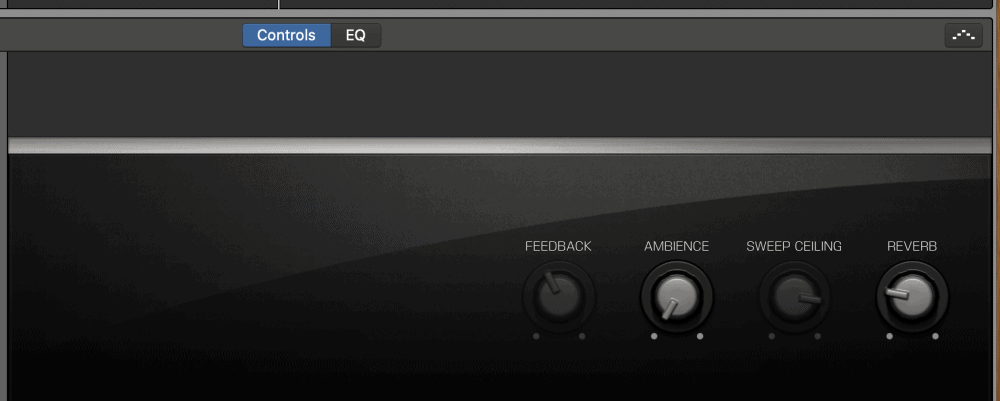
Another effect you can add to the hi-hats or snare is the Reverb, which is going to make them sound as if they’re much further away in the stereo image, and if you’ve chosen to use something more premium, the way you position the sound can change a lot.
Go ahead and crank the reverb down in the Smart Controls, and you can listen to the effect.
Delay
The delay is another feature that can be used amazingly, although, this won’t be the greatest for a standard hip-hop sound, this is more for something on the more experimental side.
Choose the Delay plug-in, “Stereo Delay,” and then once it brings up the settings, you can adjust the left and right-hand side of the mix to “1/8,” and then pay attention to the way in which it affects the sound of the hi-hats.

It’ll repeat some notes in a very interesting way. In conjunction with a phaser and some reverb, you can wind up with a hi-hat section that sounds completely different from what anyone else is doing right now.
Making the Triplet Before The Snare
The other notes of the drum-kit are also important.
For instance, if you have a snare drum on every third beat, then having a hi-hat triplet on every third beat as well isn’t going to sound good.
It’s going to sound muffled and messy.
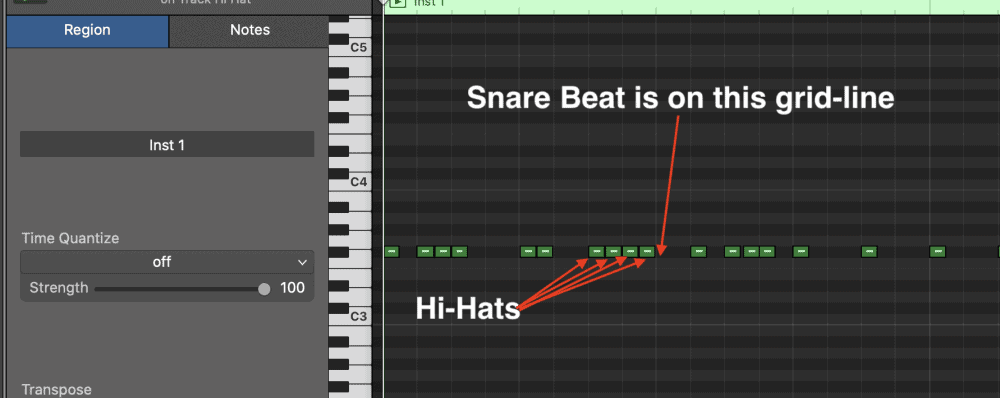
However, what you can do, is use the hi-hat as a way of building tension right before the snare hits.
For instance, if the snare is on the third beat, you can use fast 16th notes or a triplet literally right before to get the emphasis on the sound of the snare, or even the kick for that matter.
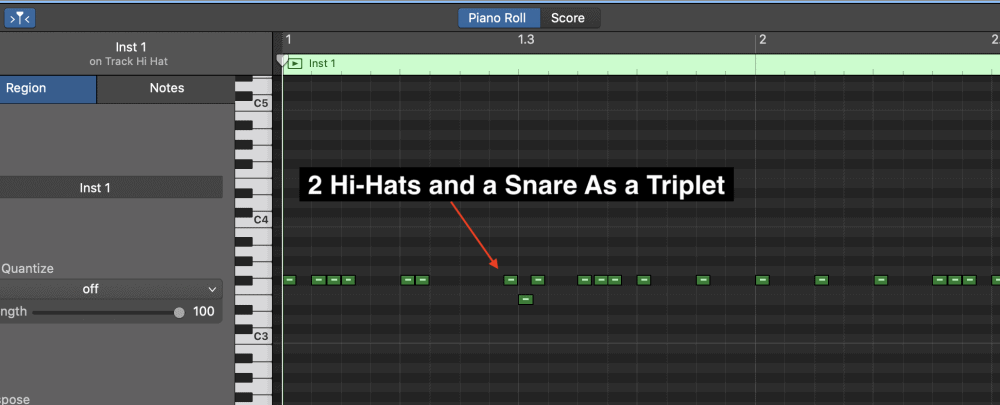
Including the Snare as the Triplet
Another thing that you can do, similar to what’s been mentioned above, is that you can actually include the snare itself, as the pattern of the triplet.
What this means is that you have 2 hi-hat notes literally right before and after the note of the snare, sharing the same grid-space.
This means that the two notes will play before and after the snare for a different effect.
This looks like what you can see here:
How To Create The Descending/Ascending Hi-Hats and Snare Rolls
1) Download the Drum Samples You Want
In order to get the descending/ascending hi-hat and snare rolls, it’s as simple as downloading a drum-kit that uses recorded audio samples, rather than a MIDI drum-kit, like I mentioned at the beginning of the article.
You can download a Trap Drum Kit with audio samples at this link here
A sample is an audio file instead of a MIDI file, so any pitch changes that you make to it won’t change the instrument itself, for example, from hi-hat to the cymbal, or to a kick.
If you use a sample for your hi-hats and snares, you can adjust the pitch using the transposition meter to change the actual pitch of that note by either a semitone or tone, and continue down the line.
Or, you can do it manually, and when done manually, that’s how you adjust only some notes and not others.
If you don’t know to load samples into your DAW, then I suggest you check out my article on How To Sample in Garageband here. For the sake of clarity, we’ll also discuss it here.
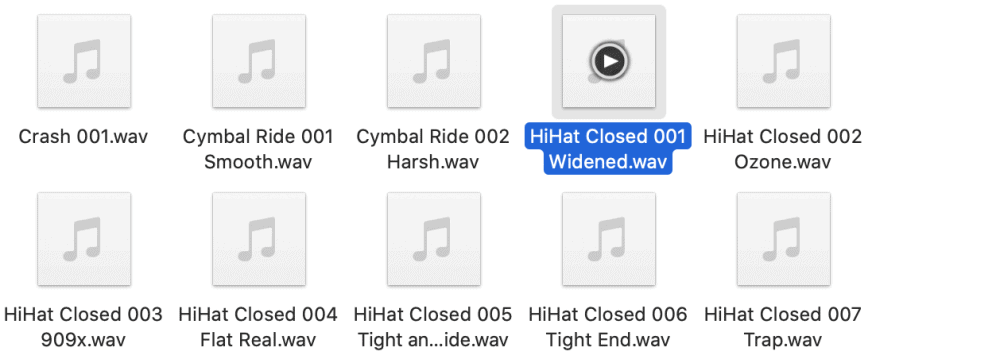
After you’ve downloaded the drum-sample from a zip-file or from Loopmasters and opened it on your desktop, go through and select the drum-parts that you actually want.
I chose the HiHats001 file.
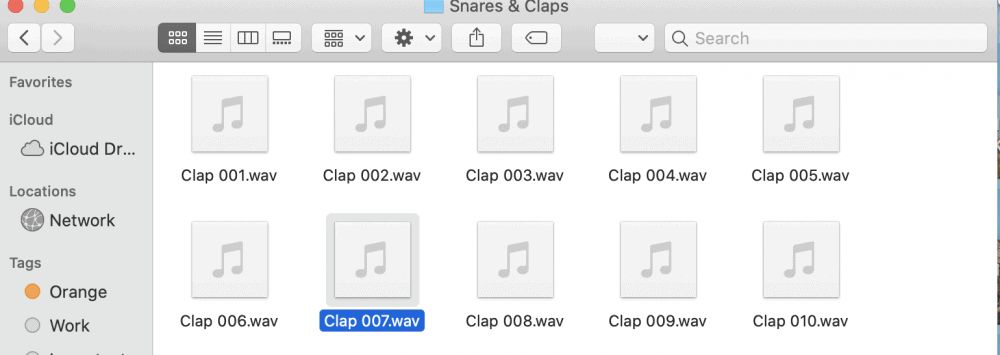
For the snare, I chose the Clap007 file.
Now that you’ve chosen the drum-kits that you want to sample, you just have to load them into your AUSampler.
2) Load Them Into Your AUSampler
Go into the top plug-in holder and select the AUSampler from the AUInstruments folder.

Go into Apple > AUSampler > Stereo, like what’s shown below:

After that, you just want to hit the little icon that looks like a gear, and then you load the sample into the AUSampler and then make sure you hit “Save As” at the top of the menu-bar.
As I’ve said already above, you can check out my article on how to sample which walks you through how to do this or you can take a look at this video here:
Once you have the samples loaded into your DAW. You now have hi-hat and snares available that shift in pitch, that way when you adjust the pitch, it doesn’t change the instrument entirely.
Put simply, when you create hi-hats or snare drums like what you can see in the image below, you’ll have a roll that descends and ascends in pitch according to the way you that you’ve created them.
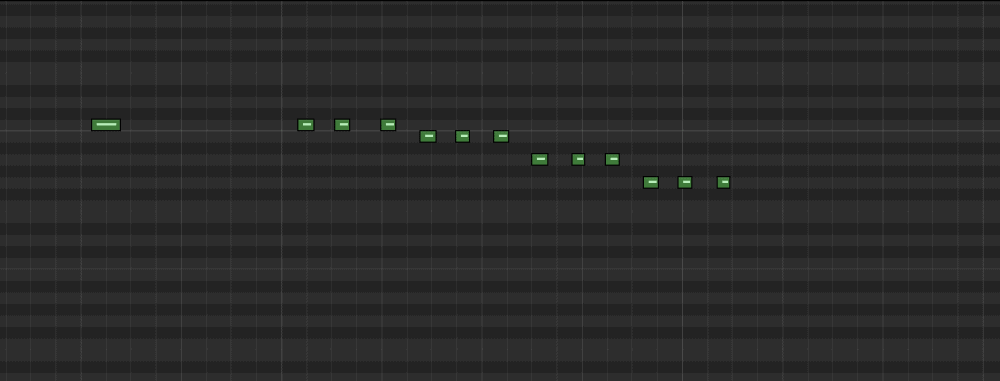
This same principle applies to the hi-hats.
You just have to use a sampled drum kit rather than a MIDI drum kit, and then the pitch of the snare and hi-hat will change according to the way you’ve organized them in the piano roll.
For example, one of the most common types of rolls is what is shown in the image above.
If you’ve used a sampled hi-hat, this is how you create those interesting hi-hat rolls that descend in pitch according to how you’ve placed them on the piano roll.
The image I’ve shown below is how you go about doing this. Of course, this pattern might not sound like what you want, but the point is to show you how to create that effect.
How you construct the rolls depends on your taste as well as the song, itself.

I’ll show you a few more examples, including ascending rolls and also some other triplet patterns that you can use.

You can really get creative with this technique. You can have a combination of ascending, descending, and a mixture of both, really. It depends on what you like.

YouTube Video Tutorial
Conclusion
In summary, that’s pretty much it for what I can teach you about making hi-hat and snare rolls using Garageband.
In the future, I’ll come back to this article and add some interesting patterns that I’ve discovered.

 Written By :