I’ll explain how to add samples to music in GarageBand with a brief summary and then a step-by-step walk-through. Fortunately for you, it’s a fairly simple process with just a few steps.
To sample in Garageband, drag an audio file into the Workspace and use the (⌘ + T) tool to isolate the desired part. Click Share > Export Song to Disk > Desktop > AIFF, and then import the new file into the AUSampler by clicking Sine 110 Built-In and then Choose File, to select your file.
For the most part, nearly every son stand-up routine, TV show, and movie that you could ever want is on YouTube. My favorite person to sample is George Carlin, so whenever I need content to sample, the first thing I do is I go into YouTube and select what part of his routine that I want.
How To Create Samples And Upload Them To Garageband
For this tutorial, I’m using the clip from Carlin’s routine, “Saving The Planet,” from his show in, I believe, 1999.
1) First things first, you want to find your clip, assuming that it’s on YouTube.

2) Grab the URL for the video.
3) Now take your link and copy and paste it into the input bar on YouTube to Mp3 converter at https://ytmp3.cc/

4) Download the Mp3 file. Depending on how long your file is, it could take a few seconds or a few minutes.
5) Open up Garageband, and select Software Instrument.
6) Drag and drop your Mp3 file into the DAW’s workspace.

7) Make sure that you turn off the metronome once it’s in your DAW, otherwise, when you go and try and use this clip later, the metronome will be playing in the background, and that’s no good.
8) Select the part of the clip you want to use. You can either use the (Command – T) function, to isolate the desired part, or you can shorten the track using the Resize Pointer.

9) Export the track as an AIFF or WAV file. I usually just keep it simple and export it as a WAV file to my desktop, that way I can see it in case of a problem later.

10) Open up Garageband and open up a software instrument track.
11) Go into your Plug-ins down in your smart controls.

12) Choose AU Instruments.
13) Then Choose Apple.
14) Then click on AUSampler.
15) Choose Stereo, and this should bring up the Sampler which looks like a regular old MIDI Keyboard in your DAW’s top-left-hand corner.

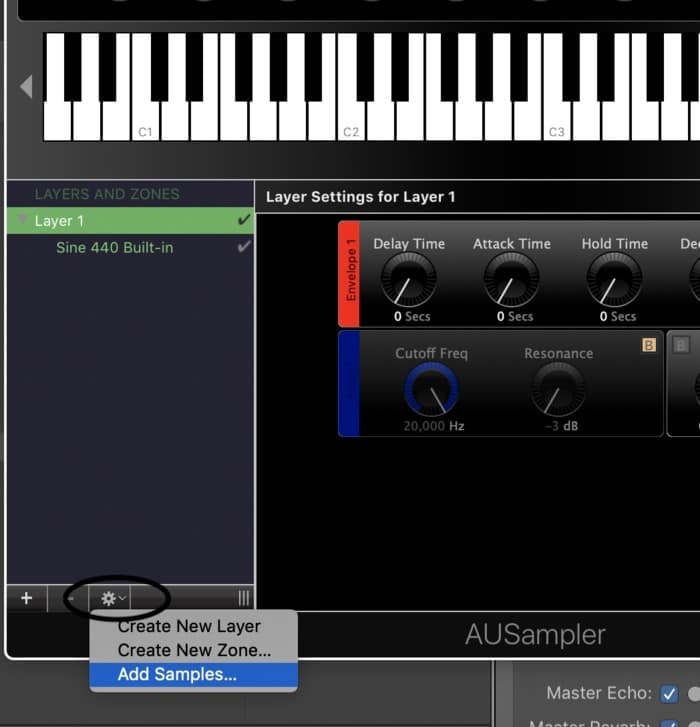
16) Click on the little gear icon on the bottom of the Sampler.
17) Click on Add Sample.

18) Upload your WAV file into the sampler, and voila! You can now play your sample at a different pitch and so on.

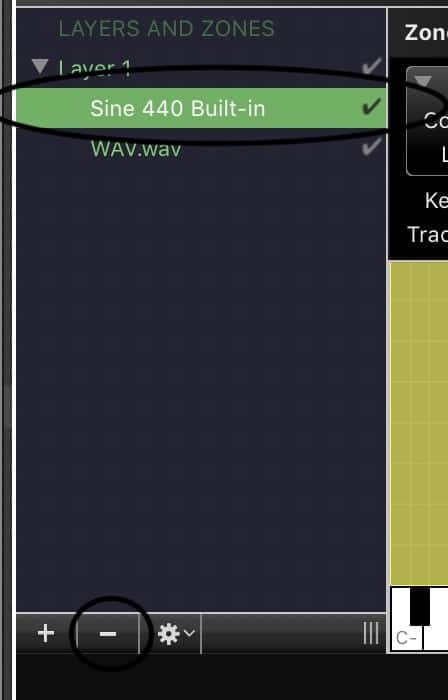
19) The last thing you need to do is click on the check-mark beside where it says “Sine 440 Built-In” because it’s going to play the sample as well as the keyboard at the same time and you don’t want that.

20) Another way of doing this is just highlighting “Sine 440 Built-in” and then hitting the “subtract” symbol below.
5 Tips for Sampling in GarageBand
1) Command + K to Bring Up Musical Typing
Bring up your MIDI keyboard using the (Command-K) option and make sure you can play your sample through your computer’s MIDI controller. Make sure the AUSampler is playing your sample through the use of the MIDI keyboard, otherwise, it won’t record when you try and make a track.
2) Learn the Piano with PianoForAll
Learning the keyboard via a guide like PianoForAll (on my Product Page) is also another helpful thing to do if you’re trying to melodically use samples, because understanding intervals, semi-tones, and tones, will give you a better idea of how to use them in a song.
3) You Have To Enable Audio Units
You need to “Enable Audio Units” within the Garageband preferences. They’re usually disabled by default for whatever reason.
4) Disable or Enable the Count-In Button or the Metronome
You may run into a few different hiccups on the way, including the fact that, if your “Count-In” button is selected, and you start recording the sample before the counter has reached 0.4, you’ll find that it won’t actually record. It has to be at beat 1.
Or similarly, you could just turn off the count-in button and start recording right away. However, I like to use the count-in for keeping the beat.
5) Understand the BPM or Tempo of the Track
When sampling music, it’s essential that you figure out the beats per minute of the track, that way you can create a drum track and other instruments for it later.
Like I explained in my 16 editing tips tutorial, you do this through counting along to the song by bobbing your head or hitting the table and then matching the metronome with the speed at which your moving your head or hand.
This will make creating accompanying music so much easier. As you know if you’ve read my guide, sampling in iOS Garageband isn’t much different.
How To Enable Audio Units in Garageband’s preferences.
1) Go into Garageband’s preferences.
2) Click on Audio/MIDI
3) Check the box, “Enable Audio Units.”

This should take care of this common problem that users run into.
How to Use The AUSampler
Whenever I use the AUSampler, typically, I’ll hit the (Command-K) function, bringing up Garageband’s MIDI Keyboard. I’m pretty sure that you have to use this keyboard if you want the DAW to actually record the sample.
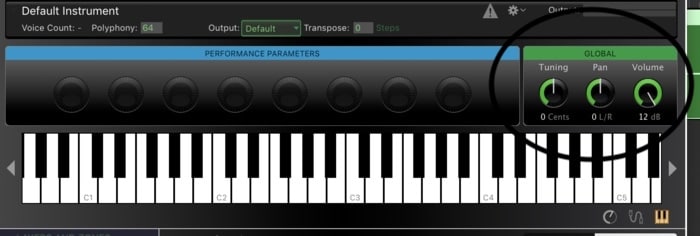
There are a few knobs in the AUSampler, like “Tuning,” “Pan,” and “Global.”

“Tuning” adjusts the pitch of the sample.
The “Pan” knob adjusts on which speaker the sample is heard through. If you pan it to the right, you’ll hear from your right speaker headphone, and through the left speaker and headphone if you pan it to the left.
And the “Global” volume adjusts the total volume of the sample. I usually just leave these knobs as they are, but you can adjust them and play with them at your will.
You can adjust the octave at which you’re playing through arrows on the left-hand and right-hand side of the keyboard.
Another popular feature that DAW users like to use the AUSampler for, is uploading other people’s drumkits and using them as your own.
For example, you’ll see online that a lot of producers sell their own drum kits, and in my experience, they usually just come in a Sample format, and you have to upload each one of them into your DAW and through the Sampler.
To do this, it’s essentially the same process as uploading the sample that I showed at the beginning of the article, except you don’t have to change the file format.
Tip: One of the cool things about using the AUSampler and loading drumkits into it, is that you can adjust the pitch of a hi-hat or a snare, creating an entirely different effect. You can really get creative with this method.
An important thing to remember is that if you accidentally delete these sample files, they’ll disappear from your DAW. You can’t upload them, save them into your DAW, and then delete the file. It doesn’t work that way.
If you want to assign samples to individual keys in Garageband, you have to designate which keyboard value you want the sample to be located with the AUSampler’s “Key Range” setting. For example, if you use C4 to C4 as the “Key Range,” the sample will only play on the C note in the 4th octave. The video above shows you how to do this in real time.
Where Do I Find Samples?
Sample packs, like the Cymatics.FM, are incredibly useful for beat-makers. You can find all kinds of sounds like bass drums, hi-hats, claps, snare drums, and other percussive instruments.
In many cases, they come with noise samples, like the sound of fire, rain, or the noises from out in the street; synth notes, piano chords, and old jazz and blues songs.
Through the combination of unique elements, you can create your own particular sound that no one else has. Producers who are just starting out can make plenty of use of samples, including drum loops and so on.
Online Websites
Like I mentioned above, there are other places you can find sample packs. You can also find sample packs within Garageband’s Apple Loops (more on those in my guide).
Try out the following websites: Music Radar, Splice, Bedroom Producer’s Blog, Loopmasters, Free Sound, Hip Hop Drum Samples, Cymatics.FM.
YouTube
Pretty much every song that you could ever want is available on YouTube, as well as movies, stand-up routines, and more. YouTube is definitely a great resource for people looking to find samples.
If you’re going to get samples from YouTube, you just have to use a standard converter website that turns YouTube videos into Mp3 files. It’s not difficult. A simple search in Google will likely bring a site up right away.
Old Music Collections
The very first producers in the hip-hop scene created samples through the use of vinyl records. This method laid the foundation for rap music sampling.
Although some people like to say that using samples is like “cheating,” some of rap’s most iconic producers would likely disagree, including Kanye West, for one.
One of my favorite producers, and perhaps one of the most underrated, Nujabes, used all kinds of super unique samples that I think sound amazing.
You can go to your local record store, ideally a thrift shop, and find an old-school house, jazz, metal, rock, or blues records. I wouldn’t recommend going to a formal record chain, because these places charge like $40 for a vinyl LP or $25 for a CD.
After listening to your new albums, you can rip them to your computer, cut and copy the parts you want, and organize all of the files into some kind of folder or library.
This takes a lot more time to do, but you’ll find some serious gems this way, rather than relying solely on sample packs created by others, who, in many cases, might even charge you money.
Many producers worry about the use of samples, but that’s not a big deal for the average producer or even professional producers.
According to DJPain, who I get most of my music industry advice from, clearing samples so they’re permissible for commercial purposes is the record label’s responsibility, not the producer’s.
Thus, in the case that you write a hit song that has a sample in it, the record label is actually responsible for getting the permission to use it, rather than the producer.
Admittedly, however, using samples will decrease potential earnings, in comparison to a 100% original song.
Field Recordings
Another great way of recording samples is to do it on your own with a Zoom H6 which has a great reputation for its size and the quality of sounds it can record.
There are producers out there who have created entire albums using just field recordings, whether it’s the sound of rain, the subway, or the sound of a combine taking corn off in the fields. You can make music out of almost anything through the use of a DAW and a recorder.
Through the use of the AUSampler in Garageband, you can adjust the pitch of the sample, thus, turning it into an entirely different and new sound.
For instance, you can record the sound of a car, drop it down a couple of octaves, and it sounds like a bizarre low-end sound that is practically impossible for someone to imitate.
Think about it, if you record the sound of something that’s unique, that no one else has recorded, a producer can have their own sounds that are completely different to what everybody else is doing.
Other Articles You May Be Interested In
- How To Assign Samples to A MIDI Keyboard in GarageBand
- Using the Garageband Sampler (What You Don’t Already Know)
- Sampling in Garageband Using iOS (A Step-By-Step Guide)
- How to Sample in FL Studio Mobile [Chop, Slice, & Reverse]
- How to Cut Audio Clips & MIDI Notes in FL Studio Mobile
- How to Import Your Own Audio & Samples to Logic Pro [iPad]
Important Things to Note About Sampling
1) It’s Best to Get Permission Before Using Other Material
Technically, you’re not allowed to use the copyrighted works of anyone else it applies under Fair Use, which means you’re using it for education, satire, or purposes of commentary.
For that reason, it’s best to get a subscription to Loopmasters or Splice, so you can use samples legally and without fear. Another thing you can do is just use some of the free resources that I showed you earlier.


 Written By :
GarageBand can help with iffy timing. Choose Track Configure Track Header (or hit Alt+T and tick the Groove Track box), mouse over the left edge of your drum track and click the yellow star to make it the groove master . All other tracks now have checkboxes in their headers – tick the dodgy ones and they should now follow the timing of the drums more closely.