One thing that I recently learned how to do was assign samples to individual keys. This tactic works for not only GarageBand’s Musical Typing feature but also for an external MIDI keyboard that’s connected to your computer. Simply put, you can assign a sample to every single key on the keyboard – each one different from the last.
To assign samples to a MIDI keyboard in GarageBand
1) Open the Sampler with AU Instruments > Apple > AUSampler
2) Press the gear icon, then “Add Sample”
3) Open the Sample
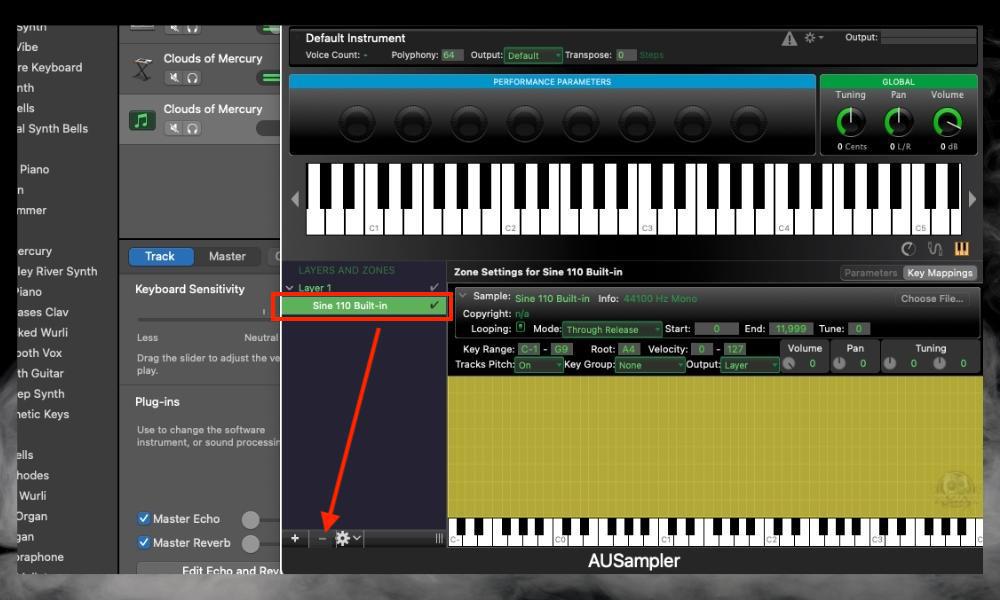
4) Eliminate the “Sine 110 Built-In” with the Subtract Button
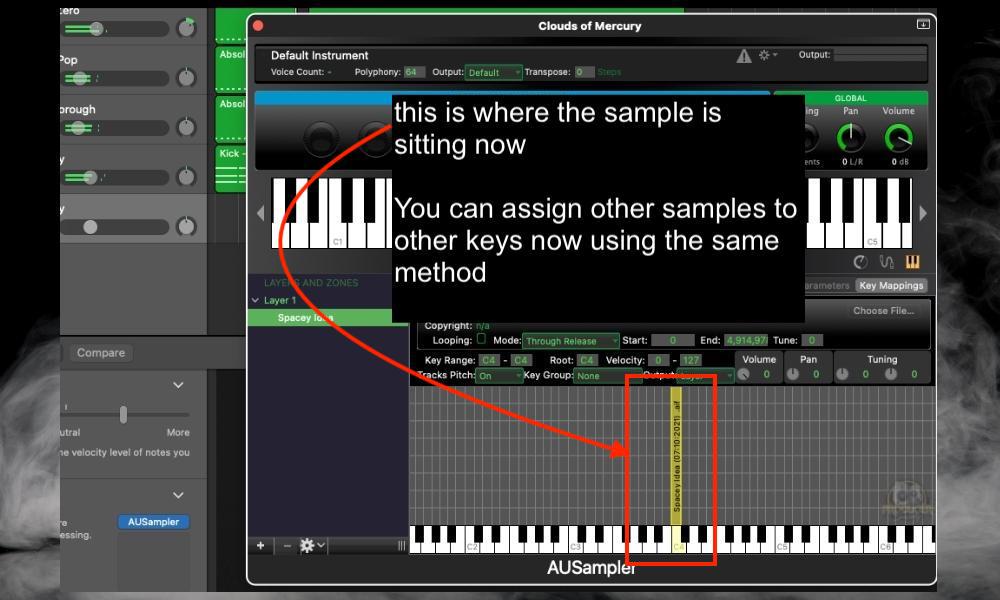
5) Choose the Key Range, ie, “C-4,” and then the key “C4”
How To Assign Samples To All Keyboards in GarageBand
What I showed a moment ago is the brunt of how you assign samples to the MIDI keyboard in GarageBand, and the great thing about this is that it will work with the Musical Typing keyboard, a MIDI keyboard connected with an audio interface, or via a more modern USB-C connection.
In case you haven’t already seen it before, I posted a brief video on how to do this in my guide on how to connect a MIDI keyboard to GarageBand. The whole article runs through how to set up a MIDI keyboard with GarageBand and it’s really quite thorough (the M-Audio Oxygen Pro 61 is the best one to get, by the way).
First, I’ll show you the video on assigning samples, and then I’ll show how it’s done with text and pictures the way I normally do:
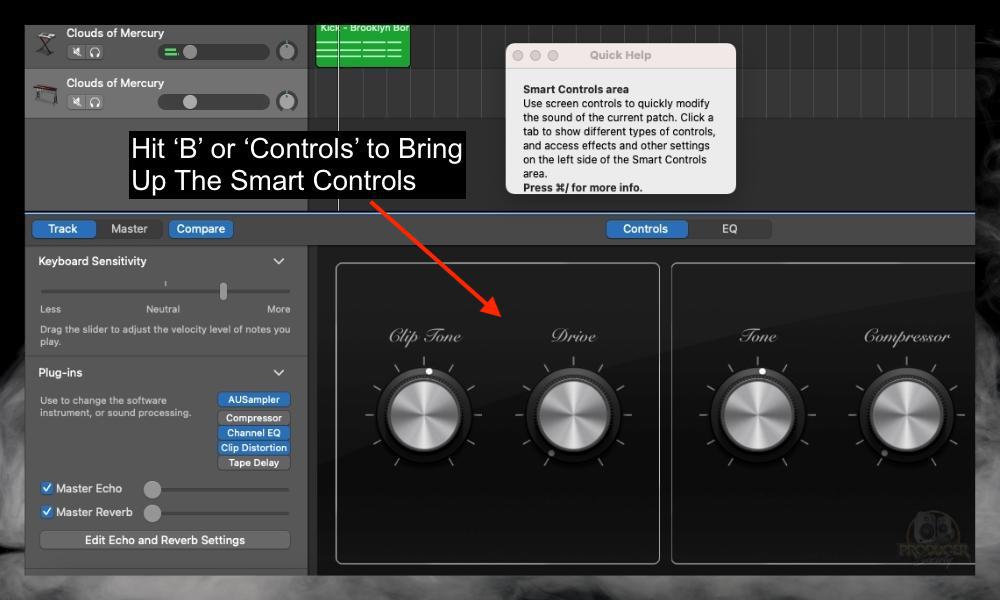
1) Hit ‘B’ On Your Keyboard to Bring Up the Smart Controls

Obviously, the first thing you want to do is bring up the Smart Controls by either pressing ‘B’ on your keyboard, or by clicking on the “Controls” tab that’s shown in the image above. The fastest way, no doubt, is to just use the keyboard shortcut (my comprehensive list of those).
2) Click A Plugin Slot and Then AUInstruments > Apple > AUSampler > Stereo

Bring up the AUSampler using the path I just showed you. You can choose Stereo or Mono, depending on your needs, but I almost never choose Mono.
I believe when you choose Mono, it puts the entire sound in mono (in the center), rather than stereo (left and right). There are other ways of putting sounds into Mono as well, including with the Gain plugin as I pointed out in my guide on mono mixing.
3) Press the Gear Icon and Then “Add Sample”

If you’ve read my GarageBand sampling tutorial, you’d know that it can be cumbersome at times. The reason is sometimes files are on the iCloud and you don’t know it. Or the file format isn’t suited for the AUSampler.
Sometimes it seems there is no rhyme or reason why the Sampler won’t import a file the way you want it to. That said, my way around this (which continues to work for me), is to have it either as a .aif file or a .wav file. Both of these file formats seem to work consistently.
Additionally, I have the sample sitting on my desktop and I usually make sure it’s not on my iCloud drive. Although, for this tutorial, I did use a file in the iCloud Drive and it worked.
4) Select the Sample and Then “Open”

After you’ve chosen your sample, you just want to click Open, and then it will load into the AUSampler. If you’re running all of your sounds, instruments, and GarageBand itself from an SSD like the one I use from Amazon, it may take a second for everything to go through (here’s my guide on how to set up the SSD, by the way).
I think it also took an extra second because I did what I just advised you not to do: load it from the iCloud Drive. Next, you want to eliminate the pesky Sine 110 Built-In instrument because it’ll play alongside your sample. It’ll sound terrible so make sure you get rid of it.
5) Click “Sine 110 Built-In” And Then the Subtract ‘-‘ Button

There are two ways of eliminating the Sine 110 Built-In instrument. One is to just click on it followed by the subtract symbol “-.” That should usually be enough for it to disappear, however, you can also click on the checkmark to bypass it.
When you bypass it, it doesn’t get rid of it. It temporarily bypasses it until you switch it back on. This may be something you prefer to do, actually.
6) Within the AUSampler, Choose the Key Range, “C-4,” and then the Key, “C4”

In essence, to assign samples to your MIDI keyboard in GarageBand, you have to use the “Key Range” parameter which is clearly outlined in the image above.
It can take a second to figure it out so be patient. The first thing you should know is that the first column, indicated by a dash “-” between the number, appears to show the octave range.
Whereas the second value – which does not have a dash between the letter and number – appears to represent the specific key. You have to designate within what octave range you want to assign the sample.
That’s kind of a mouthful, so here’s an example: within the octave C4 (which represents the notes from C4 all the way until the 5th C on the keyboard), I’ve assigned the sample at the first octave which is just “C4.”
If this confuses you, take a look at the video near the start of the article, because it shows you how it works in real-time.
7) Repeat the Process for Other Samples and Keys

And that’s pretty much it for assigning samples to the MIDI keyboard in GarageBand. I’m not entirely sure what the limit is for assigning samples, but I imagine you can do this for a while.
The question is why though? I’m not much for sampling and I never have been, although, that may change at some point in the future.
Important Things to Note About Assigning Samples in GarageBand
1) The Old Way No Longer Works
There was a YouTube video from ages ago that showed you how to assign samples the old way, but it no longer works. To be honest, I think the older way was better because I believe you could just load the samples right onto the keys of the Musical Typing feature. Pretty neat.

 Written By :