 Written By :

If you’ve read a lot of posts here, you know I’ve frequently complained about the lack of storage space on the average MacBook Pro. As a solution, I’m going to show you how to run Garageband and its massive sound library of instruments & loops from an external solid-state drive.
To run Garageband from an external drive
1) connect an SSD/HDD to your computer
2) Copy the Logic and GarageBand folders from Application Support to your external drive
3) Create SymLinks between the folders on your external drive and Macintosh HD
4) Delete the original GarageBand and Logic folders
What Gear You Need
- 1 Solid State Drive – 2TB minimum (Samsung SSD T5 2TB)
Guide to Running Garageband from an External Drive (HDD or SSD)

I’d like to start this tutorial off by saying that this has been a long time coming for me. I started having serious problems with music production software due to storage and RAM limitations in 2017 after having bought an insufficient MacBook Pro.
I’m currently running a 2017 i5 8GB RAM MacBook Pro with only 120 GB of storage. Suffice it to say that it’s simply not enough juice for what I’m trying to do which I already explained in my guide on what MacBook to get for production.
A MacBook Pro like this one is a much better idea, but I didn’t know that at the time. It’s worth stating that this won’t massively improve Garageband’s performance by a significant margin.
But it will make a slight difference, and it’ll also free up between 35GB and 60GB on your internal disk. But I digress, here’s a short video on how I do the first 5 steps in case you’re not into pictures and text.
1) Buy an External Solid State Drive And Connect It To Your Computer

I bought the Samsung Portable SSD T5 2TB and it works great. You could also get an external hard drive but the thing about an external HDD is they’re mostly used for file storage and not software.
It would be a much better move to get an SSD instead. Also, I’m not a computer expert, but it appears as though the move toward solid-state drives is what’s happening in the industry anyway.

For example, I understand that MacBook Pros now only come with a solid-state drive, and not an HDD. The reason is they’re just way faster, smaller, and better. They do cost a bit more money, but the performance improvement is worth the extra money.
One thing I appreciated about the Samsung SSD T5 2TB is there is no setup. You just plug it into your computer and it’s pretty much ready to go right out of the box, although, I did have to run through a quick installer package which took just a few seconds.
The T5 SSD also comes with the cable you need as well, so no worries there. If you want an external hard disk drive instead, I’d recommend the Seagate Backup Plus which I also talked about in my guide to the best 15 products for GarageBand.
2) Copy the Logic, GarageBand, and Apple Loops Folder To Your External SSD
A) Logic and Garageband
Use the File Path Go > Computer > Macintosh HD > Library > Application Support
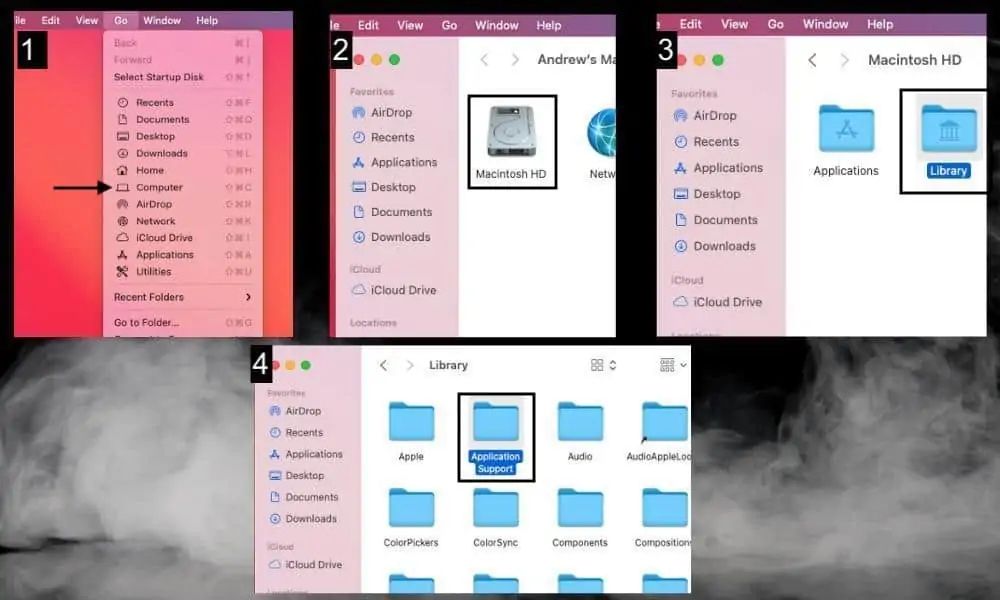
You need to copy the file folders Logic, GarageBand, and then the Apple Loops file folder as well. After arriving in the Application Support section, you should be able to find both very easily.

Create a folder in your SSD called Sound Library, that way you can easily find and then reference the files later.

Drag both of these folders to your Samsung SSD and wait for them to copy. Interestingly, the Logic file folder is the one that has all of the weight to it. Mine was 17GB and the GarageBand folder was only around 4-5GB.

The nice thing about using an SSD is that they’re quite fast so you won’t have to wait longer than 3-4 minutes to copy 20GB worth of data. It would take much longer for me to use my external hard drive. Now we’re going to do the same thing for the Apple Loops.
B) Apple Loops
Use the File Path Go > Computer > Macintosh HD > Library > Audio

Getting to the Apple Loops is practically the same as it is with the Logic and GarageBand folders. The only difference is you’ll navigate to the Audio folder instead of the Application Support folder.
Do the same thing. Copy the Apple Loops folder to your SSD. Also, do not copy the Apple Loops Index folder or any of the other ones. Just the Apple Loops folder will do.

By the way, I copied all of the file folders to a new one called “Sound Library” on my SSD, that way everything is easy to find and understand. This is also where I put other sound libraries like my Spitfire Audio LABS sample library.
3) Delete Your Logic, GarageBand, and Apple Loops Folders

Delete Logic, GarageBand, and your Apple Loops folders. It’ll take a moment for these to disappear because, as I’ve said, there are a lot of files there. Because you’ve copied all of these files to your SSD, you can always drag and drop them back to where you got them.
They’ll continue functioning as they normally did if you decide to drag them back. Although, you may have to turn your computer on and off for Garageband to re-scan everything and find the files that momentarily went missing.

That said, I wouldn’t empty your trash after deleting them quite yet. You may want to pull them out again just in case something doesn’t work.
4) Open Your Terminal By Finding It in Applications or By Using the Search Bar

Go to the Search Spotlight feature on your computer, which is the little magnifying glass on the top-right-hand side of your desktop. Type in “terminal” into the search bar and it’ll take you right to it.
This is where the brunt of the work is. You’ve copied your sounds, instruments, and loops to an external drive and you now have a ton of storage space available.
The difficult part is creating the symlinks with Terminal (although, this guide will make sure it’s not that hard for you). In case you don’t know, Terminal is the command-line system whereby you can order the computer to do things manually.
Essentially, you use what are called “sudo” commands to tell your computer what to do. An application is really just a bunch of code and software that tells your computer what to do. It’s almost like a middleman.
The terminal is speaking to the workforce directly, in effect, and not going through the manager. A person who really knows computers would probably think that’s a terrible analogy, but it’s how I think of it.
5) Use the Sudo Command “ln -s” to Create Symbolic Links for Each Folder

First things first, I want to shout out to imamusicmogul for showing how to do this in Logic in this youtube video here. The latest Logic Pro X version comes with a new feature whereby you can use the File menu to relocate your sound library.
However, Garageband does not share this feature. Another useful YouTube video I found on this topic (but it, unfortunately, didn’t work for me the way I hoped) was this one here from DanceTech.
We’re going to use sudo commands to create what are called “symbolic links.” These are a much cooler and more useful version of Alias links. What they do is they allow you to put files elsewhere, and then link to those files from another location without any hiccups.
The 25GB of sounds, instruments, and loops are going to sit on an external solid-state drive. But the computer will need those files in the Application Support and Audio folders for Garageband to find and then use them.
This is where the symbolic link comes into play. It will put a new folder in its place, but this new folder will point or link to the folder that sits on the solid-state drive.
What’s great about the terminal is that you don’t have to type in a bunch of convoluted commands and code. However, you will have to use a short command, followed by dragging and dropping the folders in question into the terminal.
This, in effect, will create a line of code that instructs the computer on where to find the missing folders that we deleted from the internal disk. Very cool stuff. So here’s how to do it with each folder:
6) How to Create A Symbolic Link for the GarageBand Folder
Here’s a short video on how to create symbolic links for all of the necessary folders. Text and careful illustration follow in the section below:
A) First, type in the command “sudo -s” into the Terminal. Type it exactly as it’s written here (but without quotes).
The Terminal will then ask you for the password to your computer. Type in your password and then you’ll have permission to command your operating systems to do what you want manually.

B) Type in the command “ln -s ” into the Terminal to start creating Symbolic Links – but don’t press enter yet.

Take note that there is a space after the ‘s’. Very important to get that right.
C) Drag the GarageBand Folder From Your External Drive Into the Terminal After the Line “ln – s “

You only have to drag two folders into the Terminal one after the other and then you’ll be done that part. At this stage, we’re using the Terminal to tell the operating system where to find the folders it needs to run GarageBand.
D) Navigate Back to ‘Application Support’ and Pull That Folder Into the Terminal After ‘GarageBand’

Dragging the ‘Application Support’ folder into the Terminal after ‘GarageBand’ tells the operating system where to find the ‘GarageBand’ folder for ‘Application Support’.
E) Hit Back-Space in The Terminal, Use A Forward-Slash, And Then Type in ‘GarageBand’

Your names may vary, but I would suggest using the exact same folder names and file paths as I have to minimize confusion.
F) Press Enter and The Terminal Will Get Ready For A New Command-Line

We’ve completed the command, and now it’s time to check our work. Refrain from opening GarageBand just yet though. We’ll do that after we’ve created symbolic links for all 3 folders.
7) Check Application Support And You’ll See Your GarageBand Symbolic Link Folder

The GarageBand symbolic link is now sitting in Application Support which is where GarageBand (the application, not the folder containing its instruments and sounds) needs it to be for it to find it.
If you were to click on the symbolic link, it would open just like normal, but it would be opening the folder that sits on your external solid-state drive, and not on your internal disk.
And there we have it. The next two folders function identically but with a few minor changes. Don’t worry though, because I’m not going to leave you high and dry. I’ll walk you through how to make symbolic links for the Logic and Apple Loops folders as well.
8) How to Create A Symbolic Link for the Logic Folder
So, as I said, this section will function almost identically. However, I’m going to illustrate each step as I did earlier because I’m doing it in real-time anyway. The first step, of course, is to open Terminal if you haven’t already.
A) Type in the command “sudo -s” into the Terminal. Type it exactly as it’s written here.
B) Type in the command “ln -s ” into the Terminal to start creating Symbolic Links – but don’t press enter yet.
C) Drag the Logic Folder From Your External Drive Into the Terminal After the Line “ln -s “

After you’ve typed in the “ln -s ” command which is the beginning of the symbolic link, drag the Logic file right after. Make sure not to press enter, because we have to do the same thing except with the ‘Application Support’ folder.
D) Navigate Back to ‘Application Support’ and Pull That Folder Into the Terminal After ‘Logic’

Now it’s time to name the Symbolic Link and the corresponding folder as we did before.
E) Hit Back-Space in The Terminal, Use A Forward-Slash, And Then Type in ‘Logic’

F) Press Enter and The Terminal Will Get Ready For A New Command-Line

At this point, your ‘Logic’ folder which contains approximately 17GB of instruments, samples, and sounds, should be sitting neatly in your Application Support folder.
G) Check Application Support And You’ll See Your ‘Logic’ Symbolic Link Folder

We’ve created the GarageBand and Logic symbolic links, so we’re almost done. The last part is the Apple Loops folder which follows the same pattern, although, we use ‘Audio’ instead of ‘Application Support.’
8) How to Create a Symbolic Link for the Apple Loops Folder
A) Type in the command “sudo -s” into the Terminal. Type it exactly as it’s written here.
B) Type in the command “ln -s ” into the Terminal to start creating Symbolic Links – but don’t press enter yet.
C) Drag the ‘Apple Loops’ Folder From Your External Drive Into the Terminal After the Line “ln -s “

D) Navigate Back to ‘Audio’ and Pull That Folder Into the Terminal After ‘Apple Loops’

To get to ‘Audio,’ remember the file path: Go > Computer > Macintosh HD > Library > Audio
E) Hit Back-Space in The Terminal, Use A Forward-Slash, And Then Type in ‘Apple\ Loops’

It appears as though the backslash, “\,” is a way to designate that there is a space between the words in Terminal. If you don’t want to use the back-slash, you could have it all as one word. But I would just follow what I’ve outlined here.
F) Press Enter and The Terminal Will Get Ready For A New Command-Line

For whatever reason, Terminal doesn’t let you know a function has been completed. It just moves on to the next command line like an eager soldier. I’m fine with it, but it’s an interesting thing to notice.
G) Check the ‘Audio’ Folder And You’ll See Your ‘Apple Loops’ Symbolic Link Folder

Once you’re all said and done, the Apple Loops folder with the little arrow on it will be in the ‘Audio’ folder. Open up Garageband and all of your instruments, sounds, and loops should be waiting for you. However, just a few things I’d like to point out.
i) You May Have To Restart Your Computer
ii) You May Have To Click ‘Re-Index Apple Loops’ For Garageband To Organize Them
iii) I Doubt You’ll Get It Right On the First Try
This may all look confusing, but it’s really not. I’ve done it about 5 times now for the sake of this article and it’s very easy once you figure it out.
I’ll admit that it took me a while to get through it the first time because small typos, spaces, or misspellings can totally throw you off. It’s similar to coding in that regard. On the other hand, this tutorial is incredibly thorough, so you may actually get it the first time you try.
Another thing I’d like to say is I understand the images are a bit grainy, but there are probably close to 30 here (and video). Have to keep the weight of the page down for it to load properly. Anyway, here are a few short-form Q&A in case you’re just looking for simple answers.
How Do I Install GarageBand Audio Library on External Drive?
To install the Garageband Audio Library on an external drive, first, install the library on the internal disk. Drag the “Logic” folder from Application Support to the SSD. Delete the “Logic” file. Open Terminal and use the “ln -s ” path to create a symbolic link between the new file and the old one.
How Do I Move My Instrument Library To An External Drive?
Moving Garageband’s Instrument Library to an external drive is dead simple. Navigate to Application Support by using the file path, Go > Computer > Macintosh HD > Library > Application Support, and then drag the files Logic and GarageBand to your external drive. Wait for them to duplicate.
The time it takes varies depending on whether you’re using a solid-state or hard disk drive. A solid-state drive will take considerably less time, assuming you’re using a quality drive. As I’ll say in a minute though, you only want to use a solid-state drive for this because your computer needs access to these files fast.
How Do I Move My Apple Loops to an External Drive?
Moving Apple Loops to an external drive is just as simple as copying the instrument library to an external drive. To move your Apple Loops to an external drive, use the file path Go > Computer > Macintosh HD > Library > Audio, and then drag the Apple Loops to your external solid-state or hard disk drive.
8 More Tips for Running GarageBand & Logic From an External Drive
1) You May Have To Re-Do the Process After Updates
In my experience, certain software updates and updates to GarageBand itself will make it so that you have to redo the symlinks on your laptop. Not all of them, but there will be times when you’ll have to do it.
2) ChatGPT or GPT4 Can Tell You What’s Wrong With Your Sudo Command
If you’re struggling with getting the sudo command right, copy it into ChatGPT and ask why the command is wrong. GPT should be able to tell you what’s wrong with your command as well as how to fix it.
3) The Garageband Application Itself Can Be Held On An External SSD
After having exported my sound library and the Apple Loops to an external drive, I initially kept the Garageband application on my desktop. However, I also exported it to my SSD and I found that it works just fine.
You just have to drag it to the SSD as you did with the other folders, and then delete the original on your desktop. Simply put, GarageBand, its sound library, and all of the loops can all be run off of a solid-state drive. You don’t have to even hold GarageBand on your MacBook Pro.
4) You Can Also Keep Your Garageband Projects on An External Drive
It’s also possible to hold all of your Garageband projects on an external drive as well. In essence, you can store and operate the Garageband application, the instrument/sound library, the Apple Loops, as well as all of your projects from an external device.
Pretty cool, huh? My external solid-state drive practically changed my life. Having all of these files stored on my tiny little internal disk caused a lot of problems for me. And we won’t even talk about how that went down when it was time to edit videos.
5) It’s Best to Use An External Solid State Drive for Software and A Hard Drive for File Storage
From what I understand about solid-state drives and regular hard disk drives, the former is used for software and the latter is used for file storage.
At the moment, I’m storing all of my project files on my SSD as well because it makes sense to have all of my music production applications, samples, instruments, and files in one place.
Explained another way, GarageBand needs to access samples, instruments, and other sounds very quickly. It can’t wait a long time otherwise you’ll get latency (which I’ve written about before, by the way). It’s best to just use an SSD.
6) It’s Possible To Run Plugins from An SSD As Well
I know it’s possible to also run VSTs and plugins from an external hard drive, however, I’m not doing this. Although, I do have sample Spitfire Audio sample libraries on my SSD as well.
The thing about virtual instruments is that it isn’t the instrument itself that takes up all of the space – it’s the sample library.
From what I can tell, the general consensus on the internet regarding SSDs and plugins is that sample libraries are best stored on an SSD, and the VST itself is most efficient on the internal disk.
Makes sense to me, because all my plugins are still in the usual spot and they hardly take up any space. There’s no reason for me to even move them (although my Native Instruments file is a bit large, ie, 1.5GB).
7) You’ll Need To Have Your SSD Connected At All Times
It is true that in order for you to run Garageband and all of your sounds, you’ll need to have your solid-state drive connected at all times. The nice thing is that the SSDs are quite small.
If you ask me, needing to have an SSD connected at all times is a small price to pay for what you get in value. The fact of the matter is that I always have some kind of adapter hanging off my computer at all times anyway.
8) Other Sample Libraries Can Also Be Stored On An SSD
As I said a moment ago, I currently have my Spitfire Audio LABS library on my SSD as well. Setting up the SymLinks for it was the same, except the file path was slightly different on account of the fact it sits in a different folder.
The nice thing about Terminal is that dragging the folder into it will automatically write out the file path for how it got there. Anyway, I hope this was helpful to you. I know it was for me.
Gear Mentioned
1) 2021 MacBook Pro
2) Samsung T5 SSD 2TB
One thing to note is that if you don’t have permission to write to either Library folder, you’ll get a “permission denied” error in Terminal. To fix it I found that doing a “Get Info” for the Application Support and Audio folders, then modifying the Sharing & Permissions section to “Read & Write” will fix it. For Application Support I only needed to change Admin. For Audio there is no Admin so I changed Wheel and Everyone.
There is also a way to use the “chmod 755” command to change permissions. I’m not sure how to make that work each time as it seemed like it worked for one folder, but not the other.
Great tip, thanks for sharing. I believe I had to do that one time a long time ago.