To sample in Garageband for iPhone
1) Drag and drop an audio file into your Music Library and then sync your iPhone
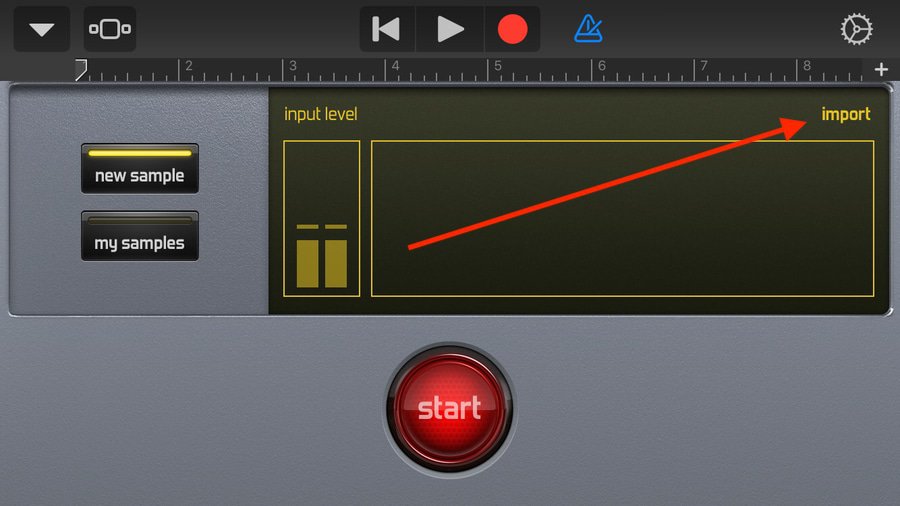
2) Open Garageband’s Sampler and then select the option: “Import”
3) Select the File > Import > and then Record
4) When you finish, hit stop to isolate the desired part
It’s necessary to have a solid understanding of how to sync your iPhone’s Music library, which has become somewhat of a pain in the last few years, due to Apple’s changes from iTunes to Music and their push of the iCloud.
Step-By-Step Guide To Using The Sampler in Garageband iOS
Sampling in Garageband iOS is actually pretty simple. In my honest opinion, the hardest part about sampling in iOS Garageband is not the software itself, but figuring out how to sync your Music library with your iPhone, which honestly took me several hours until I finally discovered how to do it.
There have been some updates to how it’s done as well, including the elimination of iTunes and a change to the sampling interface. Either way, that’s neither here nor there.
What you want to do, is either download the audio file onto your iPhone through the iCloud, or you can just import the audio clip from your local files. It’s up to you and your individual situation which depends on if you have the iCloud subscription or enough space.
As I’ve already explained in my article on the best device for Garageband, in some ways, using the Sampler in Garageband’s iOS is actually better than the Mac version in my opinion. Because of the relative ease of importing the files once you’ve figured out how to sync your Music library, as well as the easy-to-use Sampler interface.
1) Grab Audio/Video clip from iTunes, YouTube, etc, using a Youtube to mp3 converter
How you obtain the audio file depends on where you want to get your sample from. In other words, if you already have the audio file in your Music Library all you have to do is sync your phone to your library and you’ll have access to it.
On the other hand, if you want to sample a video which I’ve shown you how to do before in my sampling guide, you’ll have to use Youtube to Mp3 converter, which you find at the following website. I actually prefer to use this website.

It’s very easy to use, you just have to select the video you want to use by grabbing the link through copy and paste, and then you drop that link into the conversion bar of the aforementioned website.
From here, you just hit the Convert button, and then the process will begin, and you’ll soon have access to the audio file. What I usually do is I drag and drop the file onto my desktop, that way I can access it easily.
2) Drag and drop the audio file into your Music library and then sync your iPhone.
Once you have access to the audio file, make sure you label it appropriately, that way you can find it easily in Music library after you’ve dragged and dropped it into the interface.

At this stage, you’ll notice that the Music library will start automatically playing it back to you. Make sure that everything worked correctly before you move on to the next step.
b) It’s ready to go in your Music library, so grab your iPhone and then sync it to your computer. Wait the necessary amount of time, and then from here, open up Garageband on your iPhone.
3) Open up Garageband’s Sampler and then select “Import”
Once Garageband has been opened, go to the first page on the app, and select the “Sample” icon that goes along with a little symbol of two eighth-notes.

Select it, and open up the Sampler. From here, you have several options, including “New Sample,” and “My Samples,” as well as the other option, “Import.”

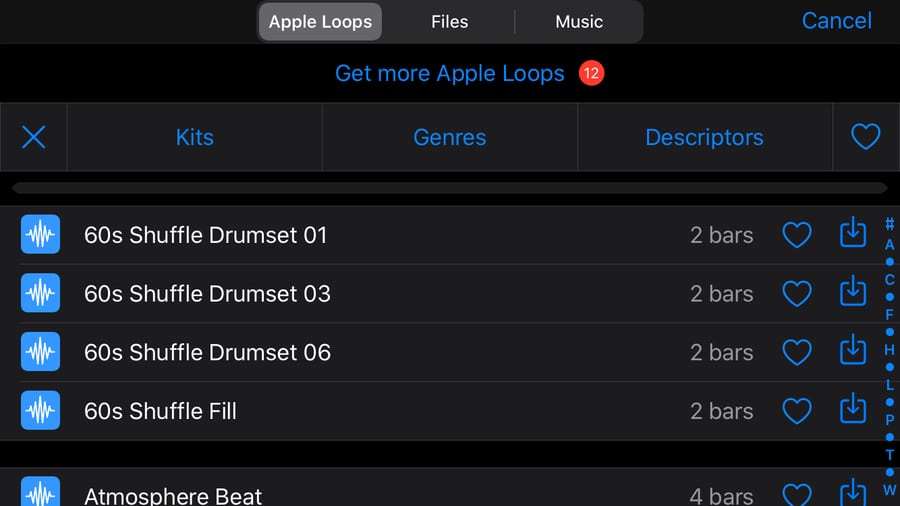
You want to select “Import,” and then choose the “Music” option.

Once you’ve brought up that specific interface, you can choose “Songs” or “Artist,” depending on how you labeled it, and then type in the name of the file into the search bar to find it.

Hit the little box with the arrow pointing down on the right-hand side of the screen, and then wait for Garageband to import the audio file. It typically takes just a few seconds.
4) Select the file, import the sample into Garageband, and then hit record
The next thing you want to do is remember to turn the metronome off because now you’re actually going to create the sample, and you don’t want the metronome playing in the background of the sample.
The sample is loaded into Garageband’s interface, and now you just want to hit the red Record button, and then record whatever part of the sample that you want after hitting a note on the MIDI Keyboard (how to set one up with iOS in my guide).

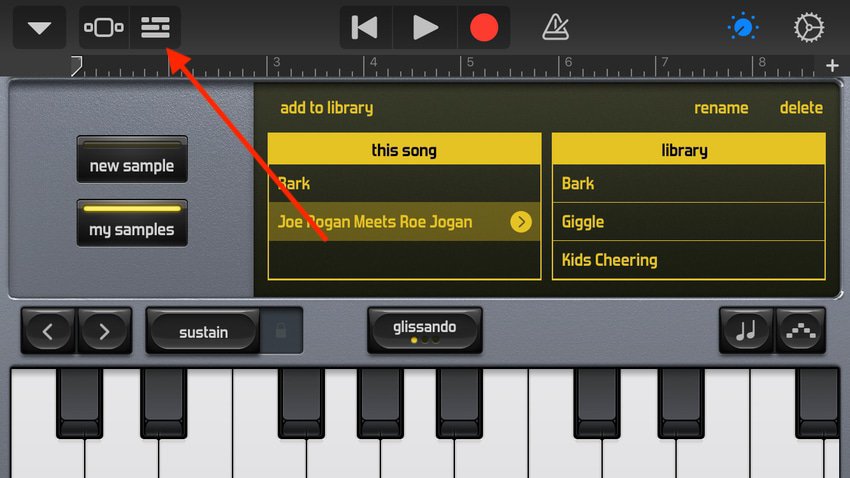
Moving on from that, once you’ve recorded the part of the sample that you want, you just have to click on the little icon on the top-left-hand side that looks like a bunch of bars on top of each other.

Clicking this small icon is going to send you to the Workspace where you can now see your Sample sitting in a track-header.

From here, it’s up to you for what you want to do with the sample. Moreover, as I mentioned above, you can adjust the tuning, play it at a different pitch, shape the sound of it, and so on and so forth. You can add effects and do all kinds of stuff with it.
Alternatively, you can, of course, record your own samples by just hitting on the “New Sample,” option, and then hit the big red “Start” button, to record yourself talking or whatever sound you want.
This makes recording your own sounds extremely easy and effective, especially considering how much the iPhone has improved its recording capabilities over the years.
Tips and Tricks for Using The Sampler in Garageband iOS
You can trim it manually before you’ve actually made the sample. You can “Tune” it differently, or use the “Shape” button.
The “Tune” Option
Obviously, the “Tune” option is going to give you the option to change the tuning of the sample, using two different parameters, the “coarse tune” and the “fine-tune.”

The titles are self-explanatory, in the sense that the one is going to adjust the sample by a semi-tone, whereas the other one seems to do it by a much smaller denomination.
Another thing that’s worth mentioning, is the fact that you want to hit the Middle C on the MIDI keyboard to play the sample at the regular pitch that it was imported as.
Arpeggiator
You can also use other functions like the “Eighth Note” icon which is going to give you access to different scales and key signatures, whereas the arpeggiator – which I’ve discussed at length before – is going to give access to all kinds of different pre-determined patterns.

I usually don’t use either of these, but maybe you want to.
Shape
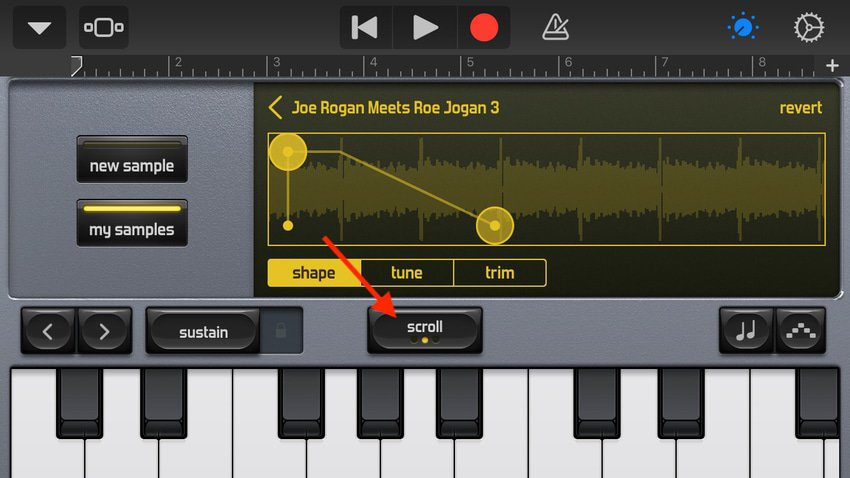
The “Shape” option is actually a volume control, which gives you the ability to adjust the volume of the track across time.

In other words, it’s kind of like the volume automation I’ve written about that comes with the Mac version of Garageband.
Glissando
The Glissando option allows you to slide from each note individually, kind of like the way you would slide your fingers across the fretboard of the guitar after plucking the string.

However, with the Glissando option turned on, every time you slide to a new note, the Sample will start playing from the beginning.
Scroll
The Scroll button, on the other hand, allows you to select a note on the MIDI keyboard while at the same time moving across the MIDI keyboard.
In other words, you’re playing the note while at the same time scrolling through the available keys as you’re playing the note which is even more useful if you’re using a MIDI keyboard like this AKAI MPKMini.

Frankly, I’m not entirely sure what the point of this feature is, but regardless, we have access to it. I imagine it’s just giving you access to more keys, which is obviously important considering most of us are using a MIDI keyboard of some kind.
The piano is a crucial instrument for music production even while using simple apps like iOS Garageband, because keyboards are based on it.
Having an understanding of the keyboard via PianoForAll – the best and cheapest guide on it – will have a big impact on your skills. Even just knowing what “Middle C” is will help, which brings me to the next part: the pitch.
Pitch
The Pitch button allows you to adjust the pitch of the sample gradually. In other words, you can actually hit the “Middle C,” for example, but then slide up to the next note if you want, and it’ll slowly adjust the pitch to the relative key on the keyboard.

This is in contrast to if you have the “pitch” selection turned off, which means that when you play another note on the keyboard, it’ll actually just play the sample starting from the beginning of the track again.
Sustain
The sustain option functions as it sounds (more on sustain in my tutorial). What it does is that it stops you from having the hold down the key on the keyboard in order for the sound to continue playing.

Importing from Apple Loops
Of course, it’s worth mentioning that you can add in a bunch of the Apple Loops that either came with Garageband or that you made yourself using my guide. It’s pretty self-explanatory, you just have to select the one that you want, and then Garageband will automatically drop it into the sampler.

Conclusion
And that’s it for this tutorial. I hope this was of use to you, if it was, make sure to share it on your social media with your producer friends. This is my first iOS tutorial. In the future, I’ll be doing way more of these. Also, subscribe to my mailing list and subscribe to my youtube channel if you want my newest articles and videos.

 Written By :