 Written By :
 Using the arpeggiator in Garageband is one of the easiest things to do.

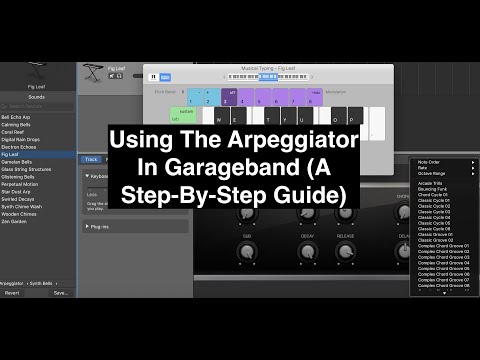
To use Garageband’s arpeggiator, follow this step-by-step process:
1) Create your MIDI melody using your instrument of choice, ie, Steinway Grand Piano.
2) Copy the MIDI notes using the (Command + C) function
3) Choose your favorite arpeggiator sound.
4) Copy and paste the MIDI notes into the arpeggiator’s track region.
The arpeggiator is basically an automated virtual studio technology instrument which utilizes MIDI notes in a pre-determined pattern, based upon how the individual instrument has been programmed, usually with a MIDI keyboard (the main reason why I recommend learning the keys with PianoForAll).
The fact that the arpeggiator uses a pre-determined pattern is what makes it sound so easy to use, and also what makes it sound so good, with minimal effort. It’s even easier if you’re using a MIDI keyboard.
Using the process above is a great way to fill out a track, that way the melody isn’t on its own.
In other words, it’s like a very quick and easy way to fill out a song so it sounds whole and complete.
If you want to see what this process looks like, make sure to check out the YouTube video down below.
Additional Arpeggiator Patterns
Additionally, there are actually more arpeggiator patterns that you can choose.
If you click on the arpeggiator icon that’s on the top-right hand side of the smart controls, you’ll gain access way more arpeggiator patterns, from Complex Chord Grooves to Classic Cycle. Go ahead and experiment with all of them and see what you can come up with.

3 Patterns of the Arpeggiator
Also, the arpeggiator patterns come with several different patterns to change as well, including the octave range, the type of notes, and the pitch.
You can change the following options:
Note Order – this controls how the notes are moving. You can make them go up, down, up and down, random, outside-in, or as played.
Rate – The type of note, whether it’s 1/8, 1/4, or a 1/32 note. Explained in another way, the rate controls how fast or slow the arpeggiator plays the MIDI notes.
Octave Range – The range of octaves (1-4 octaves) which means it covers the rate at which the notes bounce back and forth from each other at different octaves.
For instance, if you play a C Major chord, (C-E-G), the arpeggiator will play each note of the chord at different octaves, relative to the number of octaves you’ve selected.

Typically, I almost always leave the arpeggiator at the default setting.
The 5 Main Arpeggiator Categories
Garageband comes with 5 different sub-categories.

They are the following:
Synth Basics – These are meant to replicate what are some of the most common arpeggiator patterns out there. Many of these are melodic in nature, in other words, they’re great for creating the fundamental melody of the song.
Synth Bass – The Synth Bass arpeggiator features many different bass sounds.
Synth Bells – This is my favorite synth arpeggiator sub-category. Each instrument within this section has an ambient vibe to it, and are great for providing more of a musical background in which to create other melodies.
Synth Chords – A self-explanatory sub-category, including arpeggiator sounds that are chordal, in nature.
Synth Layers – This is my least favorite category, but there are some options in here that I imagine some people would like to use, including the Warm Arp Pad.
Truthfully, there isn’t a whole lot to say about the arpeggiator, because using it is as simple as following the steps that I laid out above. This is one of the reasons why I also talked about it in my guide on quickly making a song in iOS.
However, what I will do for you is offer up some of my favorite arpeggiators to use and how to go about customizing them so they sound amazing.
I don’t want to waste either your time and my time running through each different arpeggiator and its controls, so I’ll offer up just three different arpeggiators that I think are great to use, and you can experiment with them and apply the same principles and concepts to other arpeggiators.
Nevertheless, I’ll provide a nice jumping-off point for you to work with.
3 Great Arpeggiators
First things first, I chose the Dripping Cycles option because it has arguably the most amount of controls on it, and also, it’s one of my favorites to use. It’ll provide a nice guideline in terms of the available parameters on other arpeggiator sounds.
With that said, each arpeggiator does come with its own individual controls and settings, so it’s really up to you to comb through each one and decide which arpeggiators are your favorite, and how you want to change the parameters of each instrument.
The arpeggiator is a demonstration of how many options are available to the Garageband user. There’s simply no limit to all sounds you can use, however, it’s worth your time to ensure you have an understanding of the piano roll (with my guide) before you really dive in.
1) Dripping Cycles
Dripping cycles is arguably one of my favorite arpeggiators to use, simply because it has an airy and spacious vibe to it, that can not only fill out a track and act as a background instrument, but it also sounds good enough to act on its own, and serve as the primary melody in the mix.
In fact, I mentioned it in my hip-hop instruments tutorial as well.
As I mentioned above, each arpeggiator comes with its own built-in patterns and sounds.
The Dripping Cycles, instrument, for instance, comes with 12 different controls. They are the following:

Detune
Detune determines how on-key the instrument actually is. If you crank the de-tune option all the way to the max, it’ll shift the notes so they’re actually out of tune.
Frankly, I almost never use this option, because I would rather just work with an instrument that’s always on key. With that said, the detune option can be great for experimentation’s sake.
Vibrato
The vibrato option, like the title suggests, adjusts the amount of vibrato, but the style of vibrato is unlike a guitar or another stringed instrument. What it ends up doing to the sound is that it makes it resemble a “bubbling” sound.
Glide
The glide slides the notes to and from each other at a much slower pace, however, almost to the point of detriment.
In other words, when you press a note on the Musical Typing or your MIDI keyboard and then press the next note, the time that it takes to actually start playing the following note will be much larger, relative to how much you turn up the glide.
I typically leave the glide option alone, simply because I don’t like the way that it sounds.
Distortion
This one is self-explanatory. It increases the amount of distortion.
Cutoff
The cutoff chills out the sound a lot more and makes the Dripping Cycle instrument bounce around between notes a lot less. In other words, it simply relaxes the instrument to the point where it’s more constrained and controlled.
Filter FM
The Filter FM is a lot like additional distortion control, but it sounds slightly different from the regular distortion option.
Decay
The decay option is almost incomprehensible when trying to explain. It makes it sound like a space-ship is flying off into the distance.
Release
The release, on the other hand, is almost like a sustain control. What it does is that it controls how much you have to press on the MIDI keyboard to keep the note playing.
If you’ve cranked the release all the way until the maximum, it’ll actually make it so that you just have to press one note individually, and it’ll ring out for a few seconds, maybe even around 10 seconds.
If you’ve turned it completely off, the note will stop playing the moment you let off the MIDI keyboard.
Phaser
The phaser is just like the regular phaser, which means it’s oscillating between EQ boosts and cuts.
Ambience
The ambience controls the style of reverberation (my guide on it). You can read more about the reverb and delay in my article here.
Delay
Delay is when you press the note on the keyboard, and it plays itself back a certain number of times, relative to how much you’ve turned up the control.
Reverb
The reverb is simulating room and environment changes. The more you crank the reverb, the more it sounds like the music is coming from further away or in a much larger room.
2) Erratic Motion
Erratic motion is my next favorite arpeggiator to use because it really sounds like its title. It’s erratic and hard to pinpoint exactly. It also comes with a bunch of different parameters and settings to use.

Glide
The glide, like the glide option of the Dripping Cycle instrument, is controlling by how much the notes are transitioning into each other.
If you hold down on the key, you’ll notice that the notes continue playing and bouncing around in pitch, but the glide controls by how much the notes are sliding to and from each other.
Contour
The contour option, in my opinion, adjusts the “roughness” of the sound.
In other words, as you increase it more and more, it sounds like it’s just making the sound a lot less smooth. It makes it sound more jaded, aggressive, and jumpy. It’s anxiety-producing.
Cut Off
The Cut-Off option sounds like it’s literally chopping the note off as soon as it’s been played. It makes the sound more choppy, less smooth, and more abrupt.
Modulation
The modulation option sounds like it’s making the instrument wavier and thicker.
Definition
The definition is controlling the definition of the notes that are played. In other words, it makes the notes jump out a lot more, both in terms of the tonal quality as well as the actual pitch of the note.
Explained in another way, it’s as if the notes are more contrasted to each other, rather than being smoothed out if the definition control was turned all the way down.
Chorus
The chorus is a bit harder to define. The chorus, from what I understand, is almost like a very short-lived delay, in which the note is played at the same time repeatedly over and over again but in a short burst of time.
It’s like additional notes of the same pitch are being played shortly apart from each other.
This often has the effect of thickening up the notes and making the instruments sound more defined and interesting.
Delay
Delay, assuming you’re familiar with some of these terms by now, is how much the sound is echoing.
Reverb
The reverb is the same as the instrument explained above.
It’s determining by how far the sound is coming from, as well as how the sound actually travels around a room, or at least, it’s simulating a change in the sonic environment. For instance, how an instrument would sound in a church in comparison to a prison.
3) Zen Garden
This instrument is found in a separate sub-category within the arpeggiator section, the Synth Bells.
The Zen Garden is kind like a stringed instrument. It almost sounds like a harp as if it was on acid.
I really like the vibe of this one, and I often use it to fill out a track sonically so everything sounds a bit more cohesive and ambient.

Character
The character of the Zen Garden makes it sound more percussive. It’s one of my favorite parameters of the Zen Garden instrument because it’s almost like it makes it more hard-hitting and dynamic.
Timbre
The timbre controls the harmonics of the instrument, especially the much higher frequencies. As you increase the strength of the timbre, you’ll notice there are more bells and higher frequency instruments shining through.
Tone
The tone controls the other dynamic sounds, for instance, assuming that the instrument is stringed, it’s almost as if it’s increasing the sounds of the fingers hitting the strings or hitting the keys.
It’s also going to increase the sound of some of the other more extraneous noises and sounds.
Noise
The noise has a similar effect as the option above, in the sense that it’s going to highlight extraneous noises. It’s almost as if it’s increasing the sound of wind noises and other background effects.
Decay
The decay sounds like it’s palm-muting the instrument. At least when you have it turned all the way off. In effect, it kind of sounds like it’s actually increasing the release, at least when you crank it to the maximum.
Release
The release, like the other instruments, is controlling by how much you need to press on the keys of the Musical Typing or MIDI Keyboard for it to continue playing.
A cranked release means that just hitting the keyboard once is going to make it sound through the mix for what seems like an eternity.
If you’ve turned it right off, on the other hand, it’s going to cease playing immediately the moment you’ve taken your hands off the keys.
Delay
The delay and the reverb are the same as the other instrument controls.
Reverb
Regular reverb.
YouTube Video Tutorial
Conclusion
All-in-all, I hope this was at least somewhat helpful to you. As you can see from this article, there are a ton of options available at your disposal. There’s really no end.
It’s really up to you to decide on how you’re going to go about using the arpeggiator.