I think making a song the quick and dirty way to start is a great way to familiarize oneself with the many features of Garageband. In fact, there’s a way of going about it that’s even faster than using the Smart Instruments.
To make a song in Garageband iOS
1) Choose an Apple Loop by clicking on the Loops icon on the top-right of the workspace
2) Drag a drum sample like “60s Shuffle Drumset” into the workspace
3) Drag and drop similarly titled Loops like “Against Time Piano” and “Against Time Staccato Strings”

While it’s fairly simple to create a song this way using Apple Loops and some of the DAWs’ other very useful features, if you wanted to make something on your own from the ground up, you would have to be a little more creative.
Making a Song with Garageband iOS Loops and Smart Instruments
1) Open Up A New Project

The first thing you want to do when opening Garageband iOS is to start a new project.
Garageband iOS will show you a number of options that you can use to create a song, including things like the Sound Library, the Live Loops, the Smart Piano, Alchemy Synth, the Smart Drums, Acoustic Drums, Beat Sequencer, the Guitar Amp, Smart Strings, and more.
What you want to use ultimately depends on a couple of factors, including what kind of instrument you like the most, as well as how easy you want your first song to be.
The quickest and painless way of creating a song in Garageband iOS would be to use the Sound Library as well as the Apple Loops and quickly piece something together.
Contrary to what you may think, a lot can be accomplished with this. What I normally do, is I choose the Smart Piano to have Garageband open up the Workspace and the MIDI controls which can be seen in the second image here.
After you’ve been brought to the keys that are organized in chords/4ths, click on the workspace icon on the top-left.
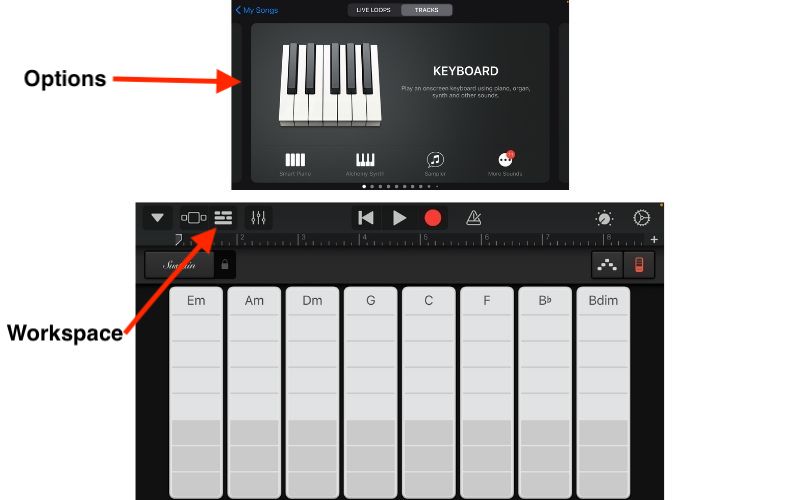
This is going to bring you to the workspace which is where all the software instrument tracks and audio recordings are held, including plug-ins, effects, and the vast majority of parameters and controls that you’ll use as part of Garageband.
2) Create Your Melody Using An Apple Loop
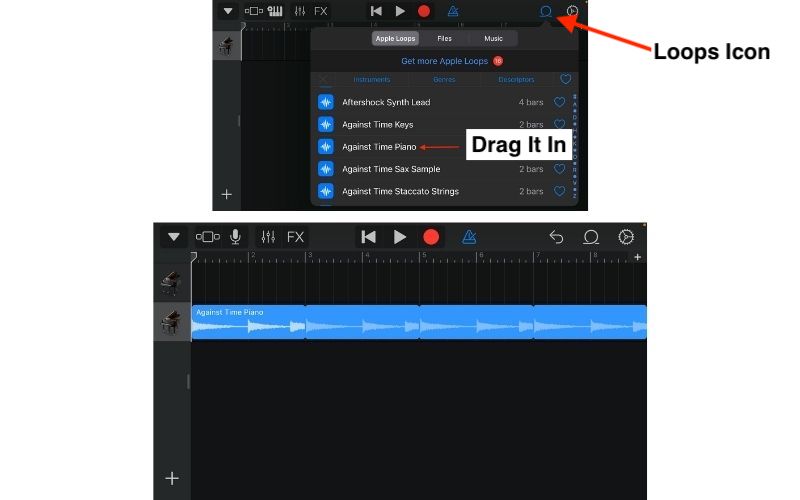
Select the ‘Loop’ icon, choose “Apple Loops,” and then scroll through the list while testing things out to find whatever sound you like. For this tutorial, I chose the “Against Time” piano riff, which is just 2 chords played over and over again in D Minor. Drag and drop your loop of choice into the workspace.
Many songwriters may actually start with a drum beat rather than a melody, but this is really up to personal preference. I like coming up with the melody first just because I find that trying to lay a melody over top of a drum beat is hard.
However, If I’m playing my guitar (connected via an iRig HD 2) or another “real” instrument, I will actually choose to play over a beat, metronome, a drummer, or a time-keeper of some kind.
3) Add Smart Drums or a Drum Loop

When it comes to using Garageband iOS or even the Mac version, adding the drummer track is almost always the easiest part – with the exception of using Apple Loops – because it’s as simple as just turning it on and ensuring that our melody is on-time.
You can either drag and drop a drum loop like the 60s Shuffle Drumset 01 into the workspace (the easiest way which I already showed you at the start), or you can use the Smart Drums.
To bring up the Smart Drums in Garageband iOS, click on the “+” sign on the bottom left hand of the project, and then select Smart Drums after swiping once to the right. This is going to allow you to quickly create a drumbeat that sounds good with the rest of your melody.
Setting up the Drummer in Garageband iOS than Mac, although, if you’ve read my guide on the Mac Drummer Track, you know it’s extremely intuitive as well.
What you want to do is just drag and drop the different parts of the kit into the X/Y pad and see how they sound. Drag the icons according to the parameters that are clearly indicated in the pad, including “Quiet,” “Complex,” “Simple,” and “Loud.”
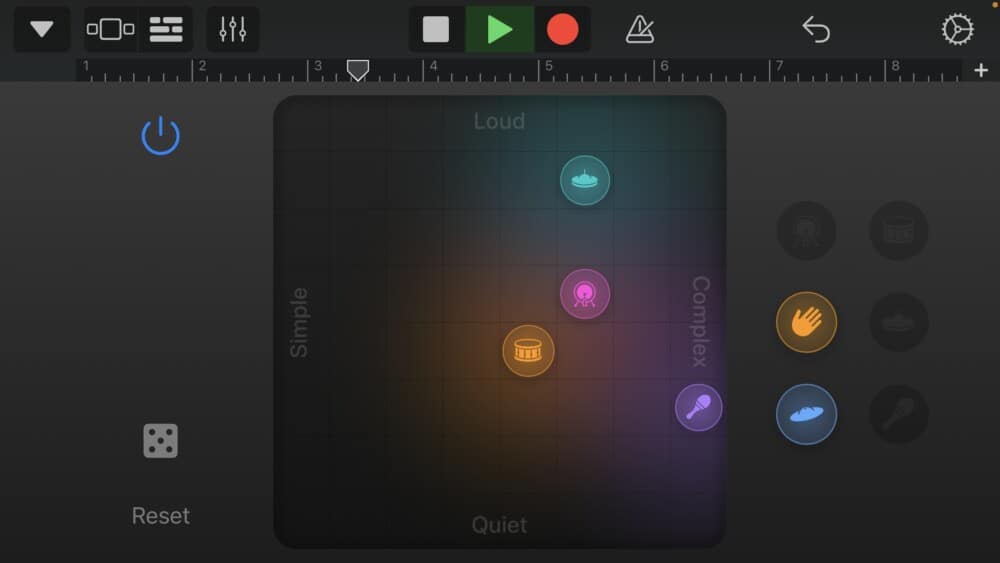
I prefer adding the clap first if I’m making a hip-hop beat or something similar, and then I’ll gradually throw in the snare and the kick, as well as the other accompanying parts of the kit like the shaker, cymbals, and hi-hats.
Once you’ve set the Smart Drums up in a way that sounds good with the loop you have chosen, hit the big red Record button at the top-center of the interface to actually lay it down into the workspace.
One could argue that the way the Smart Drums works in Garageband iOS is on par with Mac, because you can change the parameters however you want, hit record to add it to the song, and then continue adjusting the Smart Drums while it records the changes in real time.
I think another equally important point to mention here is that what instrument you choose for the Smart Drums is going to change the genre of the song completely.
For instance, if you use a hip-hop drummer for the backbone of the melody, the song will sound like a hip-hop song. But if you use a regular drummer, like a Rock Drummer and a rock preset, the song is going to sound more like a rock song.
4) Use Other Instruments to Fill Out Your Mix
When creating a song, there are just a few components that are incredibly important, and that’s the melody and the primary beat, which are usually made up of some type of instrument, like a guitar, piano, synth, and then a drum kit.
Once you’ve created your drum rhythm and your main melody, from there, it’s really just a matter of experimentation in terms of where you want to take it next.
For instance, I like to add things like Pads and Soundscape to create more of an ambient vibe. There are a lot of options for where to take it, including the addition of instruments like the Ehru, the Guzheng, maybe another guitar part, or a flute.
It’s really up to you, but just remember that creating the main melody and the drum section are the most important aspects of building the foundation of the song.
In this particular case, I used the Apple Loops for the bass instrument as well. I used the preset Diesel Power Sub Bass because it gives the track that much needed low-end and power.

Moving on, this is the foundation of how to make a song in the simplest way imaginable, however, you’ll probably want to create another melody from here because most songs have a chorus or some other kind of interlude.
Although, in mainstream hip-hop and pop songs nowadays, it’s not uncommon for the track to only feature a couple of chords.
5) Adding a Chorus
For this section, it’s essentially the same as what’s been shown above but with a few minor variations. Ultimately, if you want to keep things simple, you would want to use another Apple Loop that’s in the same key signature in order to keep the foundation of the track the same.
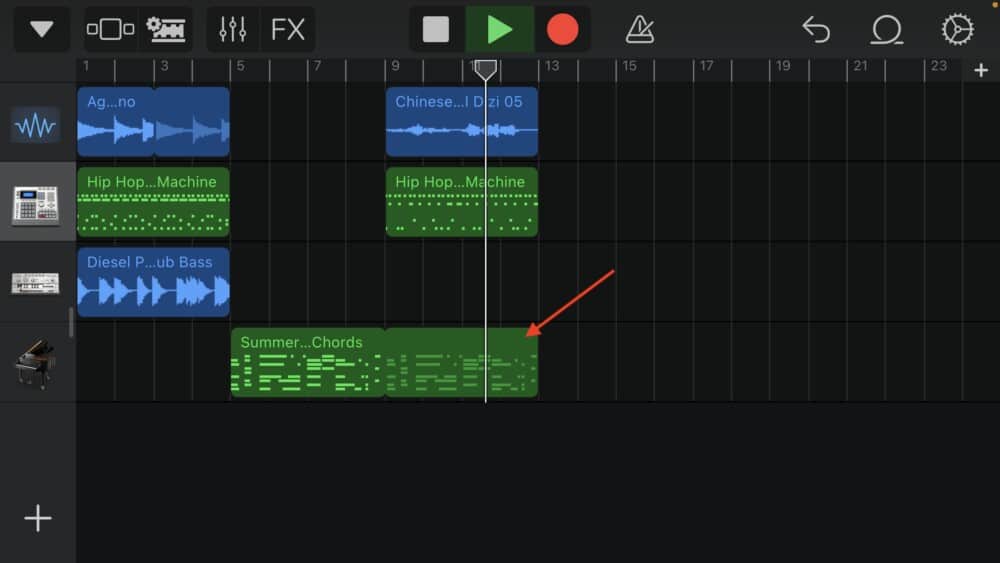
This is going to be the easiest way of keeping all of the melodies cohesive and fluid. In this case, I used the “Summer Vibes Piano Chords,” shortly after the “Against Time” piano track stops playing.
These two chord progressions work fine together, but the vibe of the track definitely changes, going from being a relatively somber track with a Dorian vibe, to more of a happy song.
6) Adding Transitions
Transitional phrases, essentially, are when you change up the patterns on the instruments just a little bit to spice the song up and add a few dynamics to it for the sake of not only smoothness but also just to be more entertaining.
A common way of doing this is to temporarily halt the Drums from playing which will then lead to the next part of the song.
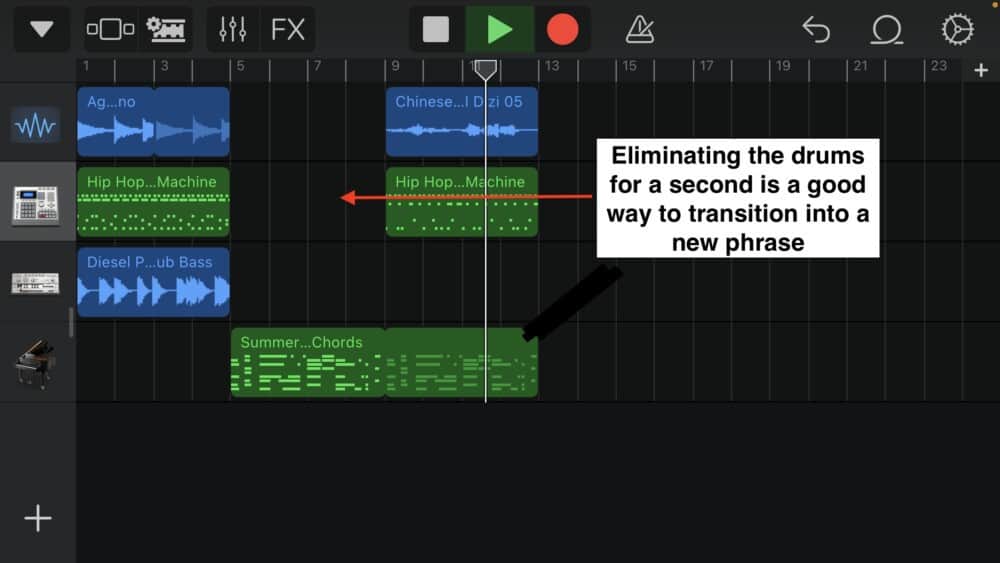
Another way of adding a transitional phrase to a song is to use the drum trick which I just mentioned above, and then once the chorus starts playing, you can throw in the new instrument, which, in this case, is the Chinese Traditional instrument.
At this point, we’ve created 90% of the song. From here, you’ll want to adjust the levels on your mix, add plug-ins and other effects, and then get ready to export it to your desktop, assuming you have a Mac computer and you can load it into Garageband Mac for a better mix.
If you don’t have Garageband on your Mac or you don’t even own a Mac computer (get this one if you’re in the market for a MacBook Pro), it’s not a big deal because you can actually mix your tracks directly in Garageband iOS, although, it’s certainly not the best way to go about it.
7) Mix the Final Track
In simplest terms, the purpose of mixing a track is to make everything sound a lot better. It’s amazing what a compressor and EQ can do.
Mixing, which includes adjusting the volume, effects, automation, and dynamics processors, definitely makes an extraordinary contribution to the overall quality of your song, in fact, it’s one of the reasons why I recommend reading Bobby Owsinski’s The Mixing Engineer’s Handbook.
This tutorial won’t dive into how to do this 100%, mostly because mixing is a whole other art form. To start the mixing process, you want to use your finger and find the little grey tab left-hand side of the software instrument track icons.
This is going to bring up the VU meters as well as the mute and isolate icons so you can hear how things sound by themselves or when eliminated from the rest of the mix.

Additionally, if you want to bring up the mixing menu for the individual tracks, you can just press on the little icon that looks like a bunch of icons on the top-left hand side of the Garageband iOS interface.
The most important part of mixing, without a doubt, are the volume levels. This is around 80% of the mixing battle, and it’s where the vast majority of the changes are made to make everything sound better.
A) Adjusting the Volume
There are two things to keep in mind when adjusting the volume. One is that you want to listen to your project with solid headphones.
Because you’re using Garageband iOS, I assume portability and convenience are important to you, which is one of the reasons why I recommend getting the Etymotic ER4SE studio monitors.
In addition to the fact these aim for a flat neutral response, there is one specific reason why these are one of the best pairs of headphones you can get for the money.
The other is that you want to make sure that none of your software instrument tracks or audio recordings go into the red, which means they’re clipping and will end up distorting on the final project.

To bring the volume on your tracks down, you just have to drag the fader over to the left to the point where the signal is no longer clipping. Listen and pay attention to the way that everything sounds, and get your levels to sound good without having your instrument tracks going into the red.
B) Changing the Panning
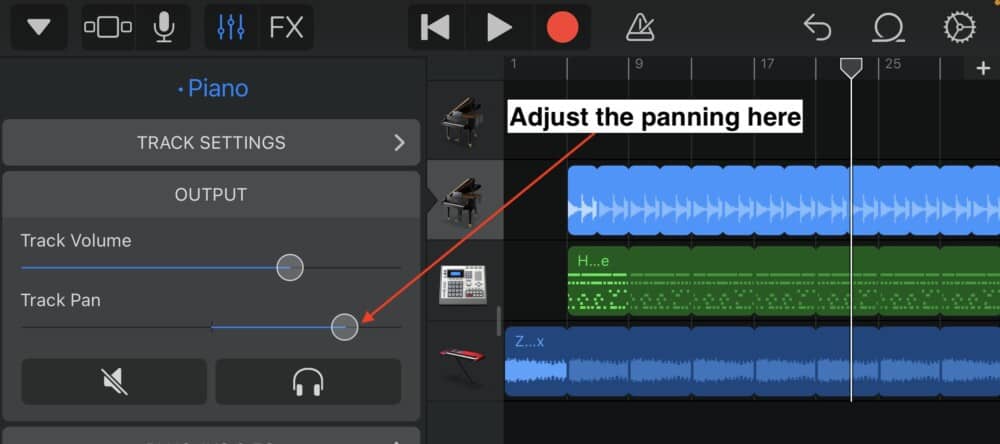
After you’ve adjusted the volume, the next thing I would approach is the panning. It’s important to note that the volume changes you made before may appear to change once you’ve panned all of the instruments to where you want them to be using my guide as a frame of reference.
A general panning rule is to keep your bass and other low-end instruments in the center or slightly to the right or the left, although, this certainly isn’t a rule, it’s more of a guideline.
Because we’ve used things like Loops and the Drummer track, there isn’t a lot that can be done with panning, because all of the parts of the drummer track are in one channel, and thus, the different sections of the kit can’t be panned to other areas.
However, panning will become a lot more useful when you’ve created something from scratch. As I’ve already mentioned, mixing is a thorough process, but there are some year-saving tips that I’ve written about before.
C) Adding Compressors, EQs, and Other Effects
When it comes to adding compression, EQ, and other effects, the same thing that was said for panning can be said here as well, which is that if you’re using things like the drummer track and loops, there won’t need to be many changes.
Using EQ, compression, and other dynamics processors are more useful when it comes to adjusting the sounds of actual recordings, but it’s still useful on software instrument tracks, or for changing the vibe slightly on your loops.
To bring up the effects, it’s the same process for adding panning and adjusting the volume, which is to hit the little button that looks like a bunch of faders.
After this, you want to click on the “Plug-Ins and EQ” menu to bring up the processors, and then you click on “Edit” to add the plug-ins that you want. Also, make sure you actually turn them on by clicking on the little power button which turns blue if it’s on and grey if it’s off.

Admittedly, Garageband iOS doesn’t come with a very good EQ, however, there are free and other inexpensive options available which I’ve discussed before. For this song, it makes sense to add EQ and compression to things like the piano, the flute, and the bass, but for everything else, I’ll just leave it as default.
Channel EQ
For the channel EQ, I attenuated (decreased) some of the lower frequencies to make room for the Diesel Power Sub Bass, then I turned up the middle-highs a bit by +1-2dB, and then I attenuated the highest frequencies because there isn’t much there anyway. Using Garageband Mac’s presets is a great way to approach this as well.

Compressor
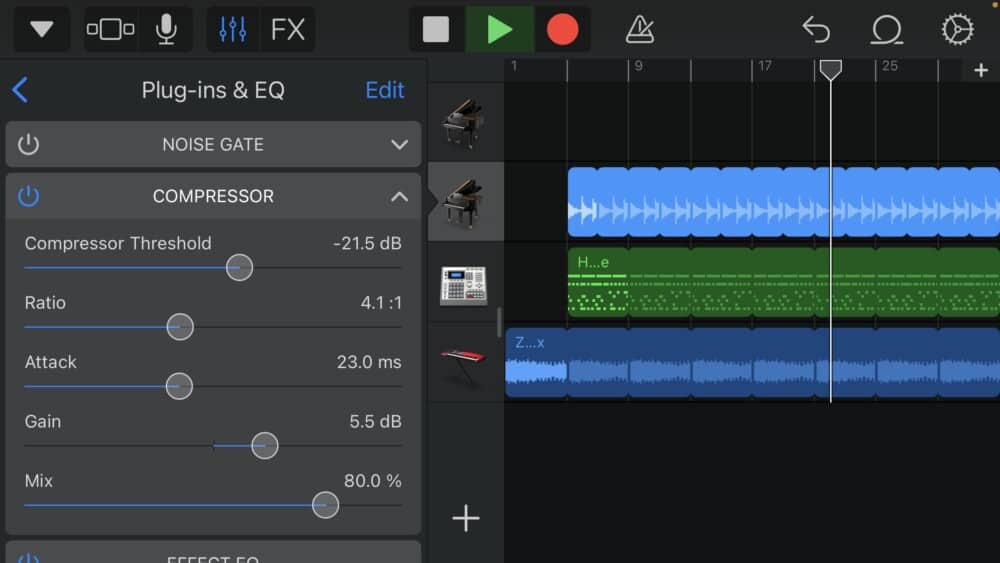
For the compressor, I didn’t make a lot of changes to the default preset, other than increasing the threshold so it actually effects the signal, and then I turned up the ratio and attack.
Compression is a little more complicated than the Channel EQ, however, there are just a few things you have to consider and understand when using it which I’ve explained before.
The bottom line on compression is that it reduces the volume of the loudest peaks and brings up the volume of the quietest parts. By using the “Gain” feature, you can increase the total volume of the processed signal which is usually brought down by using a compressor.
Adding Effects like Delay, Reverb, and More
For this song, I didn’t think it was necessary to add much effects, however, in the case that you do want to add some effects, I would say that delay, reverb, chorus, and phasers are among the most useful to use.
To bring up the effects, it’s essentially the same thing as bringing up the dynamics processors, which is to click on the “fader” icon and then click edit to bring up the individual plug-ins with your software instrument track selected. Click on the Green button to add the effects on the right.

How to Share or Export Your Garageband iOS Song
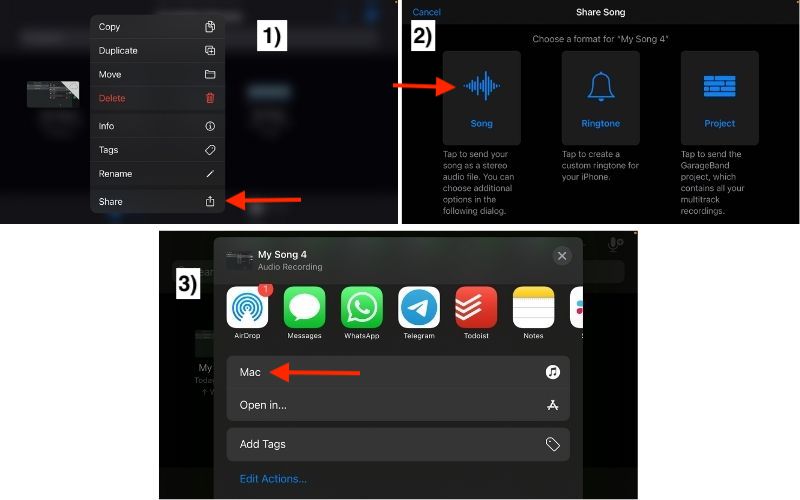
Now that you’ve finished adding everything to the tracks and you’ve changed the volume, it’s time to share the project by either exporting it as a Stereo file or by exporting it as a project so you can play around with it more in Garageband Mac.
To do this, you just have to go back to the song menu, right-click on the project, and then click the option “Share,” which is going to bring up the options menu for exporting the song.
If you choose to share it as a completed stereo track, choose the highest quality, which is the Uncompressed (AIFF).Another option is to share it as a project to your desktop so you can put it into Garageband.
You just have to select the option and it’ll take a moment for it to export. Once that’s done, it’ll be on your desktop and you can then open it in Garageband Mac.
Mastering the Song in Garageband iOS
This, like mixing, is a whole other tutorial on its own, however, we’ll explore it briefly here. The mastering phase is the final part of the process where we get the project to sound as good as we possibly can while also matching the volume of the competition (although not everyone likes this).
To master, select the song and then export it as a stereo .WAV file. Share it as a Song and once it has been successfully exported as a .WAV file which you do by saving it, then you reinsert it into Garageband iOS interface to add a compressor, a channel EQ, a limiter, and other dynamics processors.
Important Things to Note About Making Songs in Garageband iOS
1) Mix and Master the Song in Garageband Mac Instead
As I’ve explored already, making a song in Garageband iOS is fairly easy, but when it comes to mixing and mastering, I would say it’s definitely a much better option to use Garageband Mac.
Sure, it can be done with iOS, but your workflow is just going to be a lot smoother and simpler if you use Garageband Mac. This same argument could probably be made for making the song from scratch as well.
Products Mentioned
1) PRS SE Custom 24
2) iRig HD 2
3) 2020 13″ MacBook Pro
4) Bobby Owsinski’s The Mixing Engineer’s Handbook
5) Etymotic ER4SE Headphones

 Written By :