Automation in Garageband, next to panning, is probably my new favorite toy to play with other than Blue Cat Audio’s Axiom (on my Product Page).
A lot can be done with automation, including EQ swells, subtle dynamics changes such as adjusting the gain or attack of a compressor, delay, reverb adjustments, and so on and so forth.
You can use automation for the sake of making tracks more energetic, tense, slow, or even to adjust the pitch entirely. And maybe the best part is that it’s incredibly easy to do.
To use automation in Garageband
1) Hit ‘A’ on your keyboard to bring up the automation line
2) Select the effect that you want to automate from the drop-down menu, ie, Volume, Pan, Echo, or Reverb
3) Drop automation points on the yellow line wherever you want the effect to begin and end
You can use the brief step-by-step process above to make all kinds of changes to your music and your audio recordings.
Sometimes you might even just want to use it to increase the volume of a specific section of the song, for instance, a guitar solo or the vocals during the loudest part of the song (check out Singorama from their site if you’re trying to learn how to sing – this is the best way to learn other than getting an actual vocal coach).
Today, we’re going to run through a full tutorial on the automation function, using several FX and dynamics plug-ins like EQ automation as examples. But first, I’m going to show you how to do arguably the most commonly requested automation function: fading in and out.
This has the added effect of providing you with a very simple introduction to automation and what can be done with it. Fading in and out in Garageband is incredibly simple. Before I show you how I normally do it, I’ll show you the option which will do it for you automatically, and then I’ll run through the better way.
How To Fade Out Automatically
1) To fade out automatically, click the “Mix” option in Garageband’s top toolbar.
2) Click the option “Create Volume Fade Out On Main Output.”
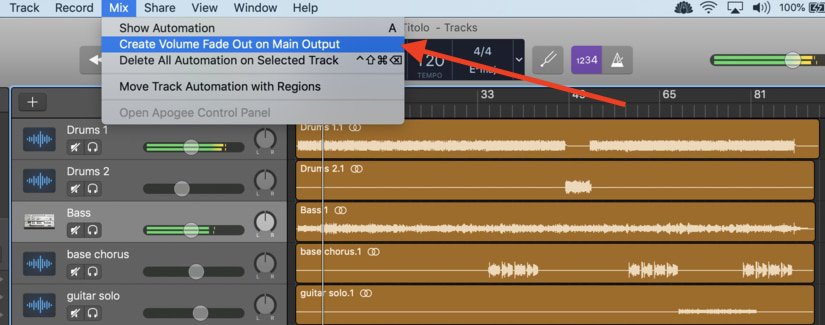
This is going to fade out your song automatically without having to do much, however, this doesn’t work if you want to fade your track in, so we’ll run through that next, in fact, I’ve written about it in my mixing article as well.
How to Fade In and Out Manually
Your track is built, and now you’re in the mixing phase.
What you want to do is this:
1) Hit “A” on your keyboard, which is going to bring up your automation controls. “A,” obviously, stands for “automation.”
You can also click on the “Mix” option in the top Garageband toolbar, and select the option, “Show Automation.”
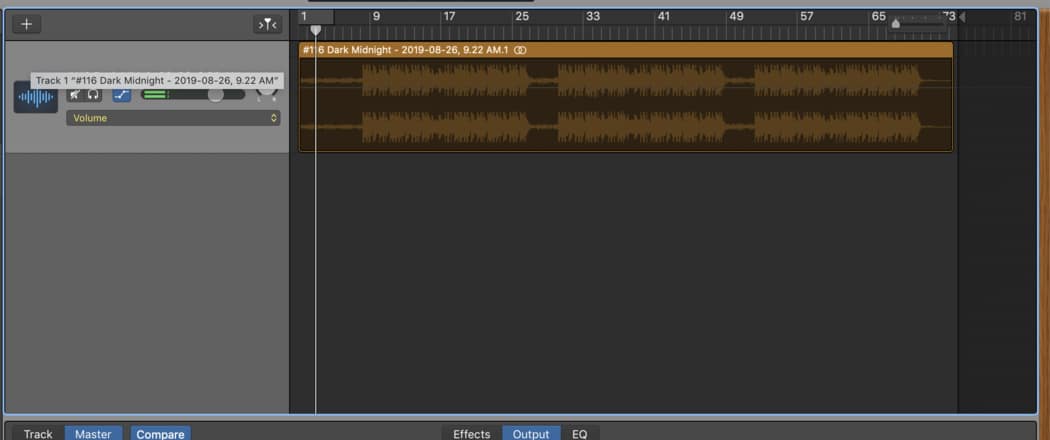
2) Now that your automation controls are up, you just have to click the track, and you’ll notice that it brings up a yellow line.
This is the automation line, and you can double click various spots on the automation line to determine at which point you want the volume to decrease or increase.
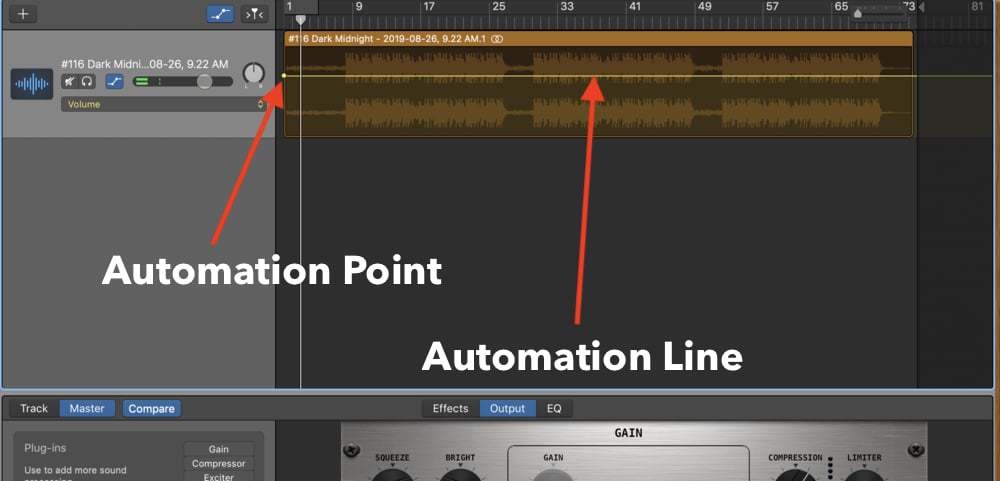
Additionally, the automation line can work for more than one type of effect as well, including EQ, Compression, and so on and so forth.
3) Double click to place the automation point where you want it to begin, and then double click another one to where you want to pull it up or down.
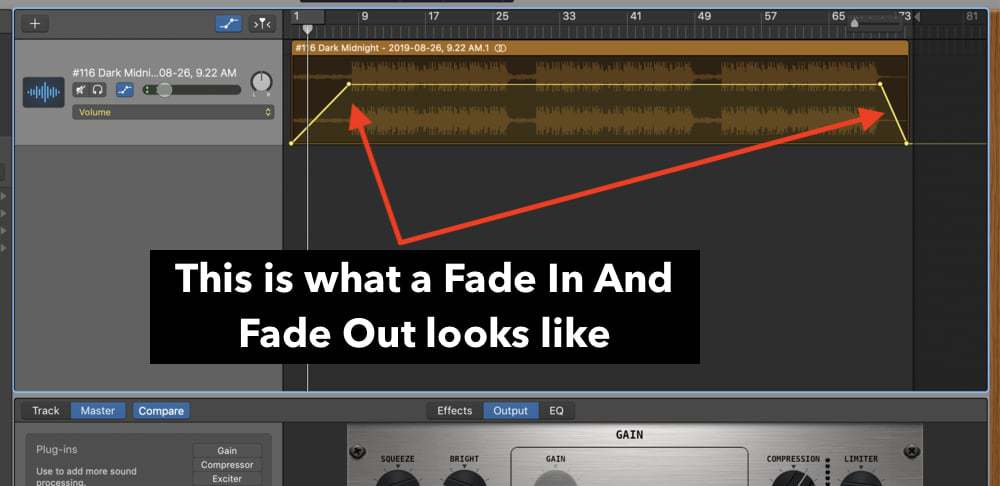
And voila! You’ve set up an in-and-out fade.
As I mentioned in passing above, this can be done in a variety of different effects, plug-ins, including dynamics processors and FX settings such as delay, reverb, distortion, and so on and so forth.
Learning how to fade in and out like this is a nice introduction to the world of automation. You can take this to the next level in a number of other ways.
For instance, as a hip-hop producer, I’ve noticed other producers doing all kinds of awesome effects in their songs that I never knew how to do, including EQ swells up to a drop, which is a pretty cool way of introducing some drama into a track.
What we’re going to do next, is run through one trick using some of the most common dynamics processors and effects units, notably, the chorus, flanger, reverb, delay, distortion, volume, panning, and EQ.
Once you’ve clicked “A” on your keyboard and you’ve brought up your automation grid, you can select the automation toolbar that’s directly below your VU meter.
From here, it’ll bring up a menu that shows the first four functions, including “Volume,” “Pan,” “Echo,” and “Reverb.“
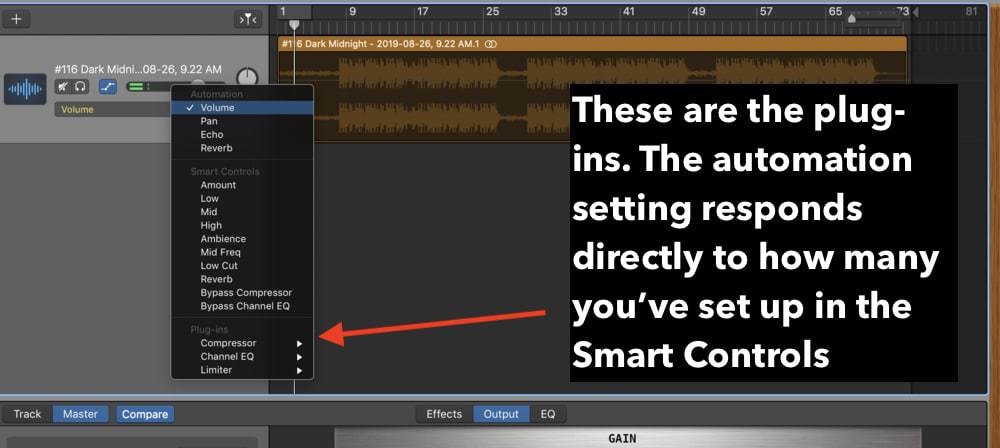
The number one thing worth mentioning right off the bat is that the automation menu will respond directly to the plug-ins you’ve set up in the Smart Controls.
For instance, in the image you can see below, I’ve set up a Compression plug-in, Channel EQ, a Flanger, Distortion, as well as Phaser, and you can see that the automation menu now also has these effects.
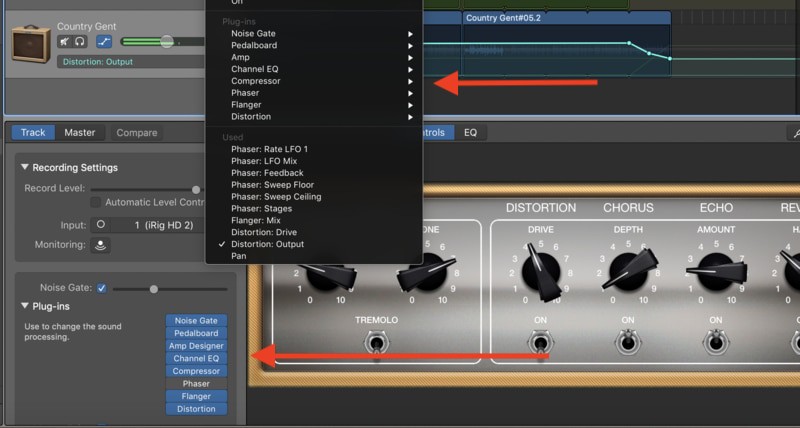
This is the handiest feature of automation that allows you to automate a cornucopia of dynamics, effects, and other extremely useful features.
It’s worth noting that you can introduce any downloaded plug-ins as well, and not just the ones that come stock with Garageband.
Moreover, each dynamics plug-in and FX plug-in has different automation options unique to each feature, for instance, with the Chorus plug-in, the automation option include “Intensity,” “Mix,” and “Rate,” whereas the Flanger comes with, “Feedback,” “Intensity,” “Mix,” and “Rate.”
Without further ado, I’m going to show you one technique with each of the plug-ins I mentioned above, for the sake of illustrating what can be done with automation.
To see what all of these tactics sound like, make sure that you watch the accompanying YouTube video to hear and see what I’ve done.
Chorus
What the Chorus effect does, is that it takes a sound and duplicates it set to a specific pitch and time. In other words, the Chorus effect plays back a very similar sound super fast, so it sounds like just one sound is coming out at once.
The Chorus can serve a number of different functions, including as a “thickening” agent, so to speak, for the bass guitar or the background vocals, kind of like what you can see on the bass guitar below:
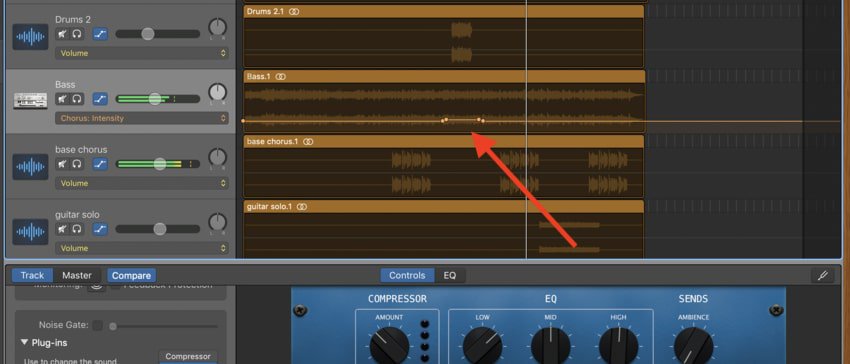
You’ll notice that I turned the chorus’ intensity up just a tiny bit on the bass guitar during the interlude of the song, where there is just a drum fill, the bass-guitar playing, as well as the vocals.
The “Intensity” parameter is self-explanatory, it’s essentially how strong the effect is, and the mix is how much of the sound is being introduced to the signal.
Typically, I like to keep the “Mix” set to around 30% whereas you can increase the “Intensity” up to 12% or 15% during the track you want to thicken.
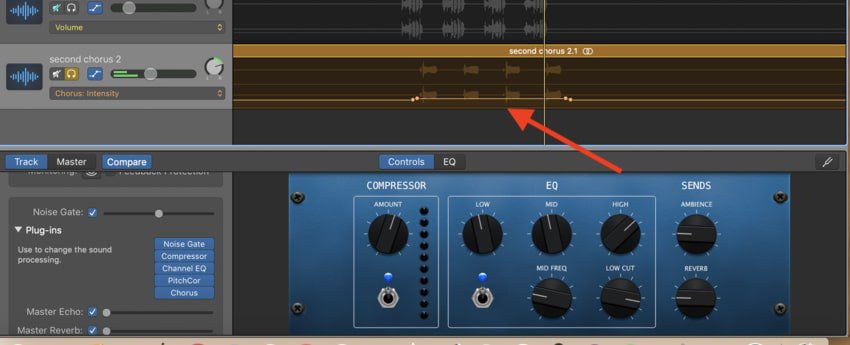
In the next image below, you can see that I’ve introduced a Chorus on one of the background vocals just as a way to introduce more thickness to the vocals and make them stand out just a little bit more.
Flanger
For the flanger effect, I used it on the introduction chord progression by cranking the “Mix” automation line to the top, and gradually decreased it until the end, just before the final chord strum hits before the drum and bass drop.
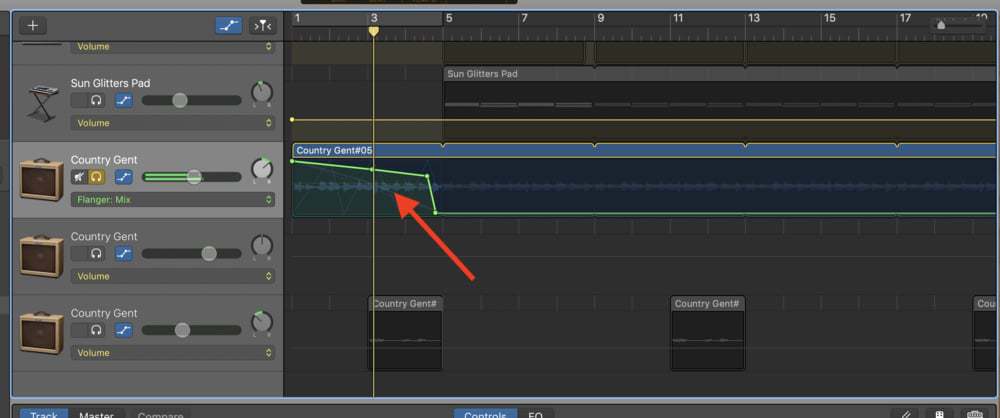
When using automation, especially when it comes to using FX and dynamics processors, it can get really tricky really quick, on account of the sophistication of the plug-in.
For instance, the flanger comes with a number of different parameters, and you can use automation to adjust each one.
Typically, I like to keep things simple, and just use a preset, and then use the automation line to adjust one parameter, usually, the “Mix,” parameter, because it’s the one that’s going to determine how much of the effect is present in the sound.
Case-in-point, in the introduction of the song that I’ve used right here, I’ve set up the Flanger, and I tapered off the “Mix,” before the end of the introduction, that way when the drums and bass hit, the progression goes back to normal.
Delay
Delay, like all of the other plug-ins I’ve mentioned, obviously, has many other purposes.
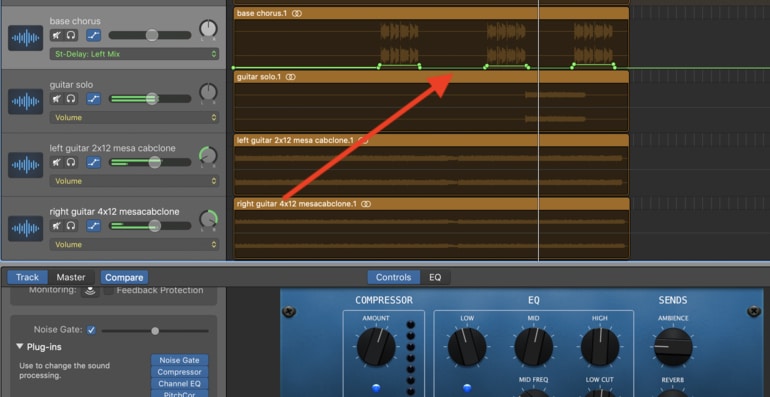
However, what I like to use the Stereo Delay for in my mixes is to make the vocals stand out a little more in desired parts of the song, for instance, during the chorus, where the vocals need a little bit of help standing out in the mix.
What I like to do, is I leave all of the Stereo Delay settings the way they are on Default, but then I set the Left and Right note to 1/8 notes.
Then, I use automation to increase the Left and Right mix of the Stereo Delay to around 7-8% during that part of the song.
You can see what this looks like in the image below. I’ve shown here the automation of the Left Mix.
And then in this image, you can see the way the automation is the same for the right mix.
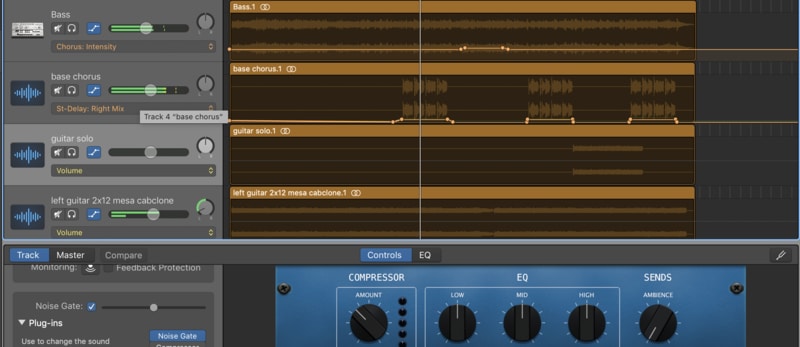
Notice the way that I’ve dropped off the effect right after the desired part.
Distortion
The most common use of distortion is for 1) guitar and bass tone, and 2) for particular drum parts.
For instance, using a bit of overdrive on a kick, snare, or a boutique 808 can be the difference between a really thick bass-line, although, I think if you’re serious about getting better 808s you should just get Initial Audio’s 808 Studio II from Plugin Boutique.
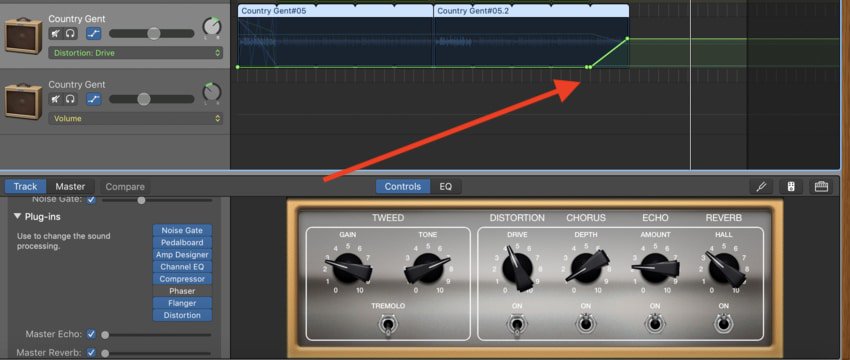
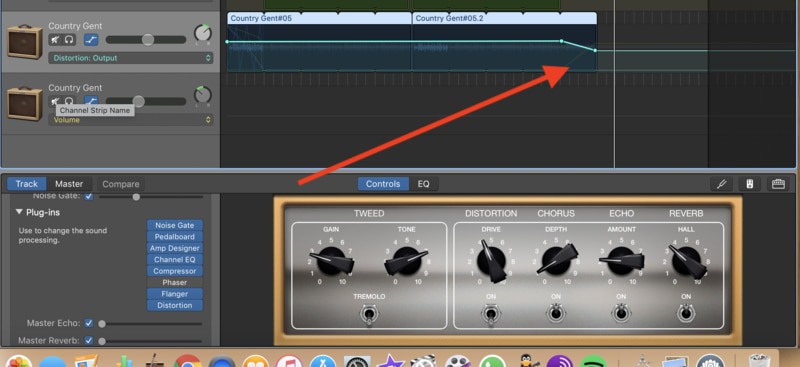
Distortion can also be used to create drama and tension. For instance, in the image that you can see below, I’ve used the Distortion plug-in on the final couple seconds of the song as an outro.
Normally, the guitar would just play out on its own, but in this case, I increased the drive gradually and decreased the output gradually as well to finish off the song.
You can see what increasing the drive with automation looks like in the image below:
And to counter-balance against the increase in volume from increasing the distortion, I decreased the output a little bit as the distortion increased, that way it doesn’t get too loud which looks like what you can see here.
EQ
Perhaps the most familiar example of Automation regarding EQ is the Oscillating low-cut frequency that so many hip-hop and EDM producers employ in their songs, in fact, I’ve talked more about this in my EQ automation tutorial.
It’s kind of like setting up a phaser, but you do it manually and have more control over what you’re doing. Imitating what some EDMs producers do in their songs, I did just that in the image that you can see below.
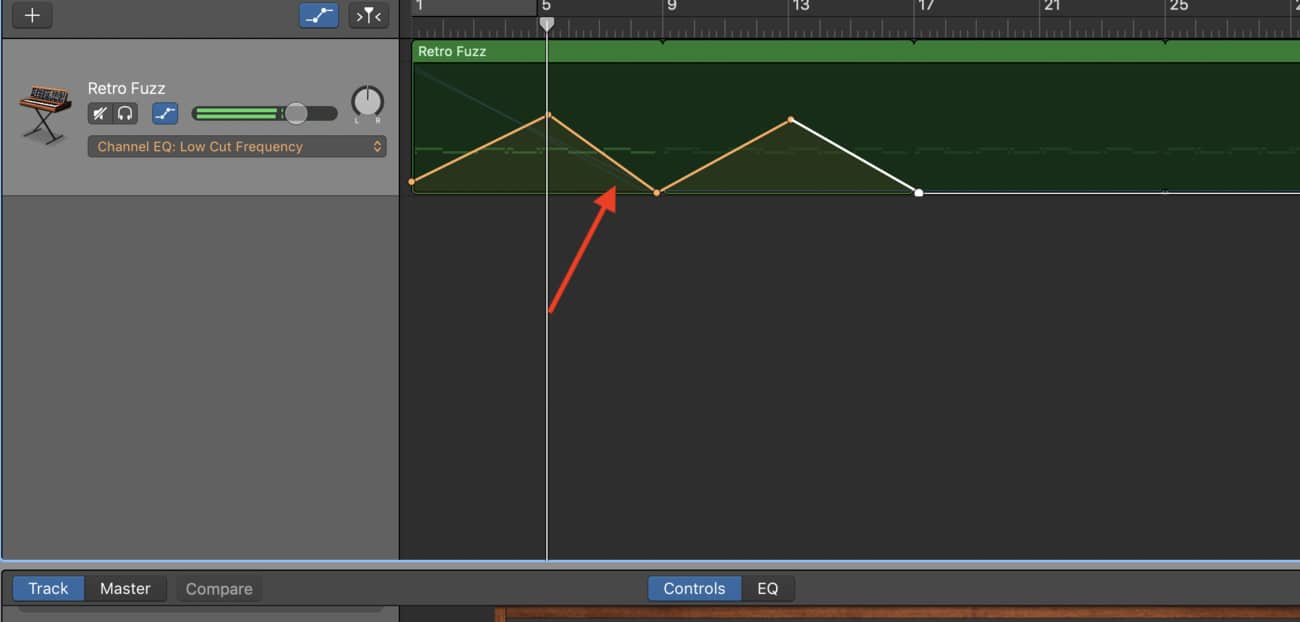
I’ve got the Channel EQ set up in my plug-ins, and I chose the sub-setting, “Channel EQ – Low Cut Frequency,” and then created peaks and valleys on the automation line to oscillate between high and low frequencies on my Retro Fuzz synthesizer.
You can use this technique all over popular music, but from what I can tell, the most common use of this is in introductions as well as outros. Moreover, you might start with the Low-Frequency cut all the way at the top at the beginning, gradually increasing it until the bass-drop.
Volume
Volume is more straight forward, due to the fact we’re simply adjusting the volume, or what’s actually called the amplitude.
Check out the image below to see what I’ve done here. It’s the same part of the song that I mentioned in my Chorus example in the sub-section above.
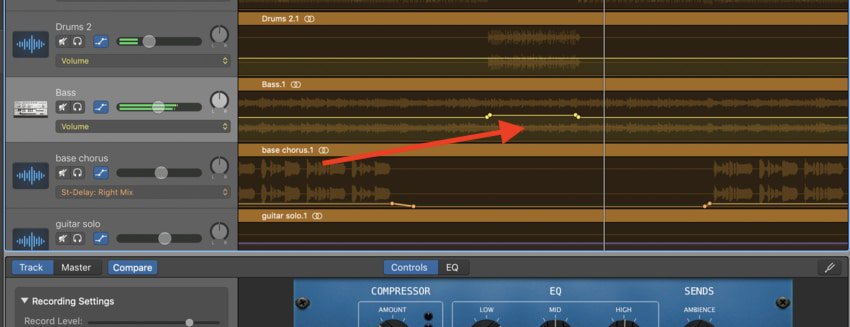
I’ve increased not only the Chorus at that point, but I’ve also increased the volume of the bass guitar just a little bit.
It’s a point in the song that calls for more drums and bass to create a bit of anticipation for what’s coming next in the track, so you can just use the automation line to increase it to the point that’s appropriate, and then when the part is over, you decrease it back to where it was before.
Panning
Panning, which I have a very straightforward guide on as well, is when we spread different instruments and sounds apart from one another to create room or space in a mix.
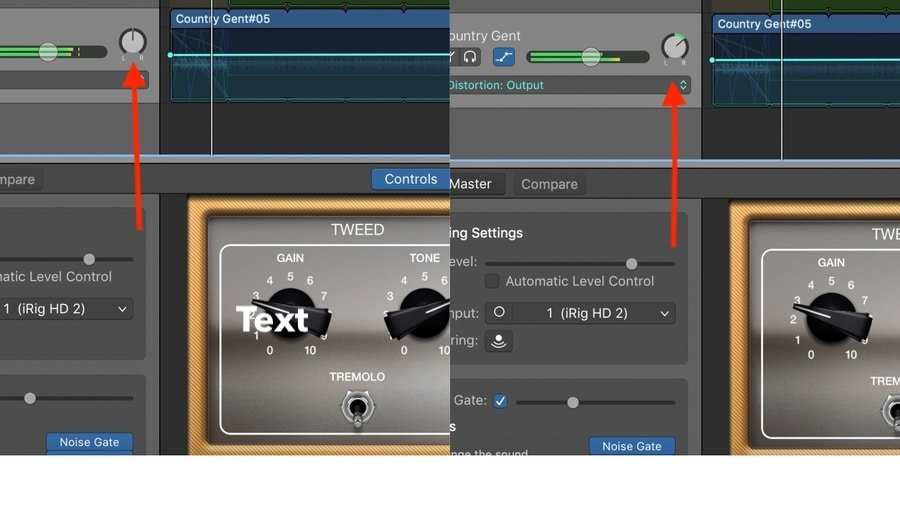
For instance, if we’ve used a guitar part as an introduction (I use this PRS SE Custom 24 on my Product Page, by the way), we might want to have the guitar front and center, but then when the other instruments come in, we might want to pan the guitar slightly to the left or the center to make room for the others.
In the image you can see below, I’ve done precisely that. I’ve started out with the guitar in the front and center, but as soon as the other instruments come in, I’ve panned it a little bit to the right – about +20.
We can use this technique literally all over the mix. For instance, let’s say that you have a guitar solo and vocals competing for the same frequencies, what you can do is that you have your vocals panned to where they usually are in the mix.
But when the guitar starts playing, you can slightly pan the vocals to a different position in the mix, to make a bit of room for the other frequencies, in addition to compensating for frequency competition through using dynamics processors like the EQ.
YouTube Video Tutorial
Conclusion
That’s all for today. I hope that this automation tutorial was helpful to you. Do me a favor and post this article to your social media – I’d appreciate it a lot!

 Written By :