Written By :
 To add sustain to a note in Garageband or almost any other DAW, you just have to print the note into Celemony’s Melodyne and then stretch the note out for as long as the recording lasts. You could also use things like delay and reverb to add more sustain, but Melodyne can do it much better.
If you want to add sustain to a sound in almost any DAW, it’s really quite simple, as long as you’re using the proper software. I scoured the internet for hours before I finally realized that something I already owned was capable of stretching out the note in such a way that is natural, seamless, and also sounds great.
While using delay and reverb can work, the reality is that you’re just manipulating the signal to make it appear as if it’s lasting longer, but Melodyne will actually stretch it out, rather than use a smoke and mirrors effect. If you’re hesitant about Melodyne, get the 30-day trial of the Studio version of the software (the highest-grade version) from Celemony’s website.

I would recommend just buying Melodyne because it’s the type of software that is going to answer so many of the questions that you already have about audio editing, and it’s good for more than just vocals.
If you only want to do basic edits like adding sustain and spot-correcting particular errors, then I would suggest getting Melodyne Assistant .
However, if you’re serious about music production and you want the most amount of value for the price, I would suggest grabbing the Editor version instead (this is the one I have too).
Without further ado, I’m going to go ahead and show you how to use Melodyne to stretch out notes and effectively create more sustain.
How to Use Melodyne to Add Sustain to a Note
If you don’t already have Melodyne, you can read my article on how to download it as well as all of its useful features. However, I’m going to go ahead and assume we’re past that point now. Essentially, there are just a few steps that we need to follow to get this done. It’s really quite simple.
1) Print the Sound Into Melodyne
To do this, you need to open up Melodyne in the plug-in section of your DAW. Your first need to isolate the track that you want to change. In the plug-in section of your DAW, specifically on the track that you want to make changes to, open up Melodyne.
In the image below, notice the way the track, “main voice,” has been highlighted.

Once you’ve opened Melodyne, you just have to hit the “Transfer” button on the top-left-hand side of the interface. Find the spot that you want to add sustain to, and then press play on your DAW and Melodyne will start recording the sounds into its workspace.

2) Stretch the Note Out Using the ‘Blob’ Feature
Once you’ve recorded your sounds into Melodyne, you’ll notice that you have a bunch of blobs in your workspace. These represent the notes, and to stretch them out, you just have to hover your cursor over the blob and then click on it and pull it to the right.
This is what it looks like before I’ve stretched it out.

This will lengthen the note and effectively make it play out for a much longer time. Amazingly, Melodyne has the ability to do this and make it sound fairly natural and human.
This is what it looks like after I’ve stretched the note out.

And that’s it. It really isn’t more complicated than that, however, there are a few things that are worth mentioning.
Important Things To Note
1) It Will Only Stretch Certain Notes
For whatever reason, this feature will only work on certain notes, for instance, if a note is already incredibly short or it’s right before another note, Melodyne won’t be able to stretch it out a lot more, although it will stretch it a little bit.
Explained in another way, it seems to work best on the notes that are at the end of a passage, rather than right in the middle. You can see what I mean with the image shown below:

2) You Don’t Have to Print Everything into Melodyne
Rather than printing the entire recording into Melodyne, you can actually just drag the cursor right before the part begins and then begin recording at that point.
3) Don’t Use Command + Z to Undo Changes
For whatever reason, using the Command + Z function while using Melodyne doesn’t have the desired effect that you think it will. If you try using this function to undo any changes, assuming you’re an Apple user, you’ll probably wind up in a totally different place.
In other words, you can’t just hit Command + Z after making a change in Melodyne. Melodyne does have the Undo option but I believe it’s only available in versions Assistant and up, although I could be wrong.
Other Ways of Adding Sustain
There are other ways of adding sustain to notes, as I mentioned at the beginning of the article, such as things like delay and reverb. Moreover, there are certain types of delays that actually come with a parameter called “decay,” and this feature is great for getting more sound out of a signal.
Using the Kilohearts plug-in, a software I’ve explored in one of my other articles, you can also add a delay effect that will sound like there is more sustain on a note, but it won’t be as flawless as using Melodyne.
However, with enough tweaking and adjustments, you should be able to get it to sound fairly realistic, especially if you’ve incorporated volume automation as well.
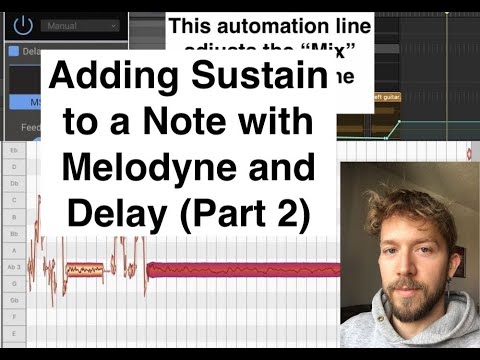
Using Delay to Add More Sustain to A Note
Delay Time and Mix
There is more than one way of adding sustain to a note using Delay. You can use a delay plug-in with a decay function, but you can also set it so that the delay time is very slow, and then slowly increase the dry/wet parameter so you can’t hear the note starting over again when the plug-in first starts attacking the signal.
Using the Kilohearts Delay plug-in, I set the Delay time to 2 seconds, and then I used Garageband’s automation feature to turn up the mix on the plug-in gradually until the note starts to ring out, but you can’t hear the note start to replay.
To bring up the automation lines, you just have to hit ‘A’ on your keyboard and the automation controls will respond to however many plug-ins you have set up on the track in the smart controls. In case you’re unfamiliar with automation, I have a whole other guide on how to use it.

Reverb
Reverb can also have the effect of making a note sound as if it’s ringing out for much longer than it really is. I don’t think I need to do a tutorial on how to use reverb, because it’s usually as simple as setting up a preset or turning it up, depending on what DAW or reverb plug-in you’re using.
Admittedly, this is just a complimentary way of adding a bit more sustain, but it’s not going to work nearly as well as the delay or the Melodyne trick that I’ve shown you above.
A Sustain Pedal
Assuming you’re using a guitar, there are actually sustain pedals on the market that will literally play the note on repeat forever, but not like a looper pedal. A sustain pedal will ring the note out for as long as you need it too.
While a sustain pedal won’t work for post-processing, it’s a good tool to have if you want notes to ring out a lot longer when recording.
YouTube Video Tutorial