To use automation in Garageband iOS:
1) Press on the instrument’s icon to bring up the menu
2) Click “Automation”
3) Click the Automation symbol underneath the instrument track icon to turn it on.
4) Slide the “Pen” icon to the right
5) Add automation points by pressing on the yellow line
Garageband iOS and Garageband MacOS are very similar in a number of ways, however, there are some key differences. How you do things on Mac OS and iOS Garageband are fundamentally the same, but with minor variations, which is also the case with automation.
On Garageband MacOS, using automation is as simple as hitting the ‘A’ on your keyboard and then dropping points on the yellow line to drag them according to your needs (I have a guide on that here).
It’s done a little differently in Garageband iOS.
Using Automation on Garageband iOS
As I’ve already mentioned, using automation in Garageband on an iPhone like this one is a bit different than automation on Mac OS Garageband like what you would see on a MacBook Pro (this is the one I recommend by the way).
However, learning how to use it is very straight forward and it’s something you catch on to very quickly.
For this section, I’m going to show you how to get everything set-up in a more in-depth way.
1) Press on the instrument’s icon to bring up the menu.
On the left-hand side of the Garageband iOS interface, there are icons that signify what type of instrument track you’re using, whether it be the drummer track, the software instrument track like a piano, synth, or a vocal track.

In this particular case, we’re going to use the piano, simply because it’s the first instrument that shows up when you first open up a new project after clicking on the Smart Piano, which is typically the option shown to you first when opening up the workspace.
Press on the icon with your finger, and it’ll show you the menu that you can see below:
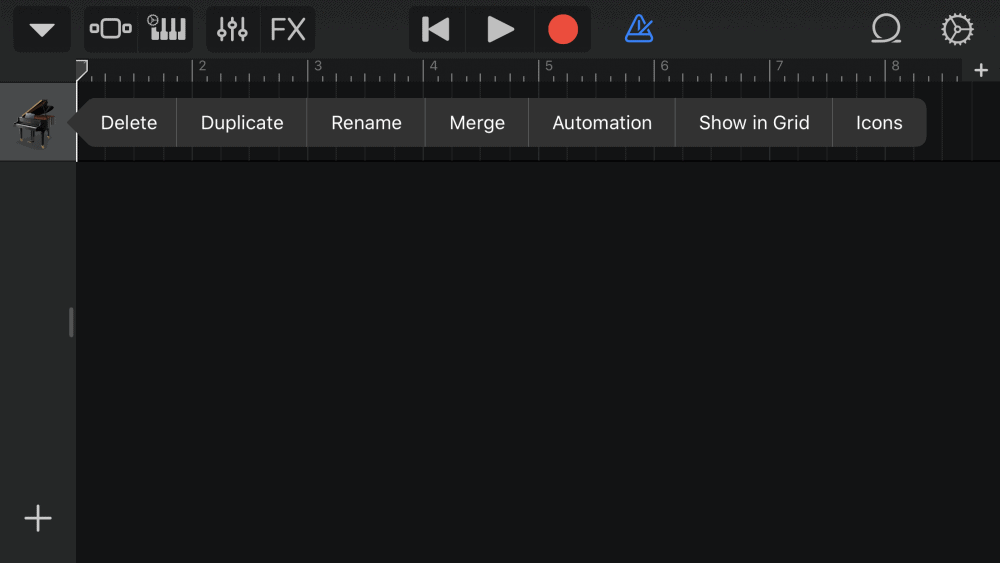
2) Click “Automation.”
After bringing up the menu, you just have to hit the little button that says “Automation,” to bring up the automation points.
From here, it’s going to bring up the automation line, including the little icon on the left-hand side, but it won’t be turned on.
3) Press On the Automation Line to Turn it On. It Will Turn Yellow
If you want to actually turn the automation on, you can approach it in two different ways.
Either you can press on the line in the workspace, or you can click on the Automation icon on the left-hand side.

Either way is going to work just fine. Once it turns yellow, the automation has been activated and you’re almost ready to start automating the volume, however, there is just one more thing you have to do.
4) Slide the “Pen” icon over to the right.
On the top-left hand side of the Garageband iOS interface, you can see what looks like a little “Pen” icon and a “Lock” symbol.
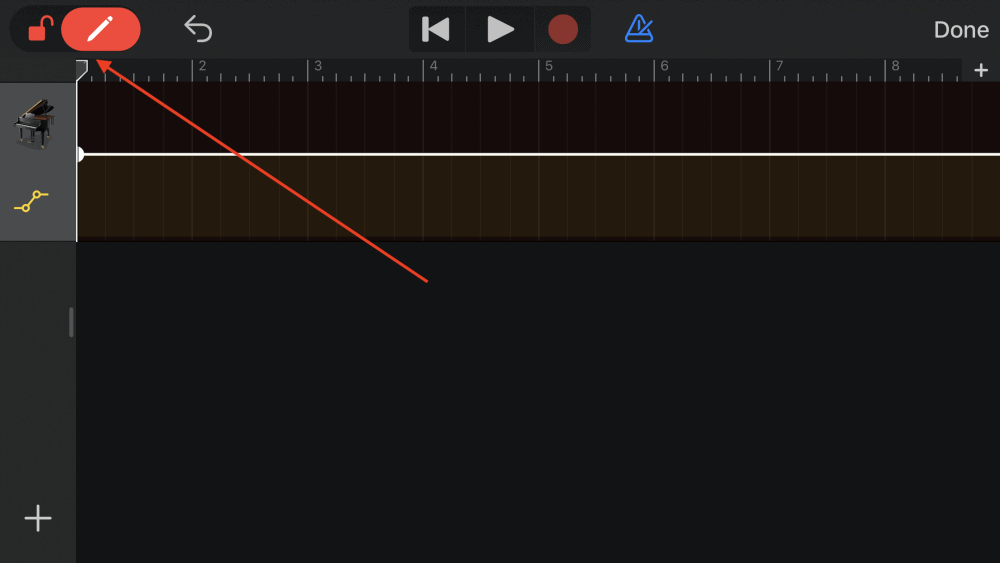
What you want to do is click on the pen, and slide it over to the right.
Once you’ve activated this option, you can now adjust the automation and make changes which will be reflected in real-time. You’ll know it’s working because the “Pen” and “Lock” icons will turn a bright red color.
5) Add automation points by pressing on the yellow line.

Now that the automation is turned on and the lock has been turned off, if you want to add automation points, you just press on the line wherever you want to add points.
After you’ve finished adding points, you can drag and drop them according to how you actually want to adjust the volume.
Once you’re done, make sure you slide the “Pen” icon over to the left-hand side again in order to no longer make changes accidentally to the automation points.

At this point, hit the “Done” icon on the top-right hand side, and then you’re good to go.
You’ve now changed the automation, and Garageband will show you a transparent automation line that shows there have been some changes made, but it won’t get in the way of your interface, that way you can still see what you’re doing.

Useful Tips and Tricks for Volume Automation in Garageband iOS
Typically, when adding volume automation, there won’t be any crazy adjustments. For the most part, the changes will be subtle, small, and gradual, rather than abrupt and drastic.
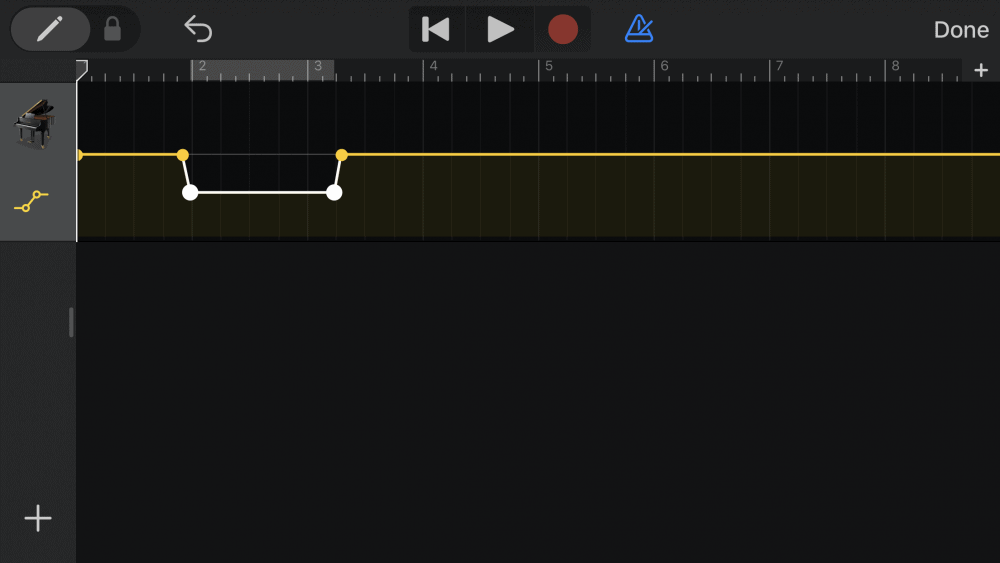
1) Double Automation Points.

I find it’s useful to use double automation points.
What I mean by that, is that you add one automation point at the beginning of the phrase, and then another one right after, and then the same thing on the other side of the automated phrase.
This means that you can make changes within the range that are specified by the two automation points on the far left and right-hand side of the phrase.
2) Refreshing The Automation Settings
If you’re struggling to get your automation points set up correctly, and maybe you’ve done so incorrectly and would like to start over again, it can be somewhat of a pain if you don’t know how to refresh it.
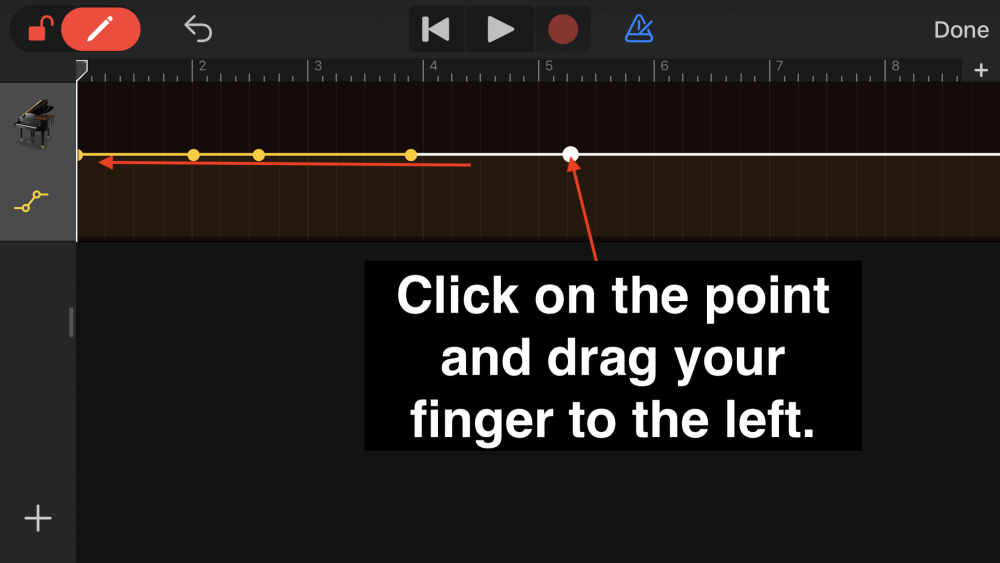
In order to refresh the automation points to start all over again, what you want to do again is slide the “Pen” icon again over to the right-hand side, and then you can make adjustments to everything again.
Click on the far right side of the automation line, and then drag your finger across the screen to the left in order to wipe everything clean. From here, you’re ready to start again with a clean slate.
3) Make Sure Not To Exceed + 0dB
When making adjustments to the automation, it’s easy to forget sometimes that you’re not supposed to go above +0dB.
The reason for this is that anything above +0dB is exceeding the digital ceiling.
If you exceed +0dB on a bunch of different tracks, it may cause problems for you later when you want to mix and master everything in the final stages.
The same thing goes for Mac OS Garageband as well.
Another reason that you don’t want to exceed +0dB is simply because it allows for more headroom.
As I’ve explained before in my mixing tips article, it’s a good practice to drop all of your VU meters to around -15dB to -10dB that way you have enough headroom to make adjustments and mix your track. Essentially, it makes it easier to mix later.
4) Use Volume Automation Last
Typically, you’re unable to adjust the volume of a track once you’ve set up automation on it.
You’ll find that once you’ve automated the volume, the volume faders on the left-hand side won’t function as they normally do.
For that reason, it’s best to use volume automation last after you’ve already mixed everything and got all of the volume levels down to where you want them to be.
Admittedly, this is quite annoying, and it’s the same on Garageband Mac OS, however, if you just do it as the last thing on tracks, you should be fine.
Panning Automation and Effects
In Garageband iOS, we’re not at a point yet where it’s actually capable of automating effects in the same way as Garageband Mac, however, there are some things we can do.
For instance, the automation of effects and panning can be done through duplication, which means that you duplicate the software instrument track and then adjust the volume, panning, and effects on each track depending on what you want to do with it.
Essentially, this is a way around the fact that you’re unable to automate panning and effects in Garageband iOS. It’s one of the reasons why using Garageband MacOS is always superior in my opinion (more on panning in my guide). Either way, let’s explore how to do this.
How To Automate Panning in Garageband iOS.
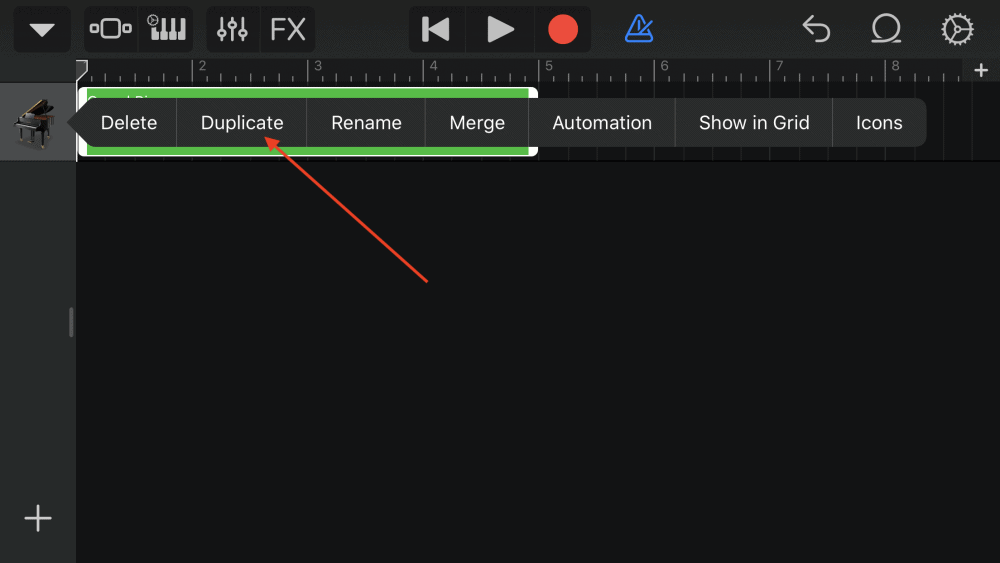
1) Duplicate the Track You Want To Automate
To do this, you just click on the icon on the left-hand side, whether it’s the piano, vocal track, synth, or the drummer track.

You’ll see the horizontal menu where “Duplicate” is the second option.
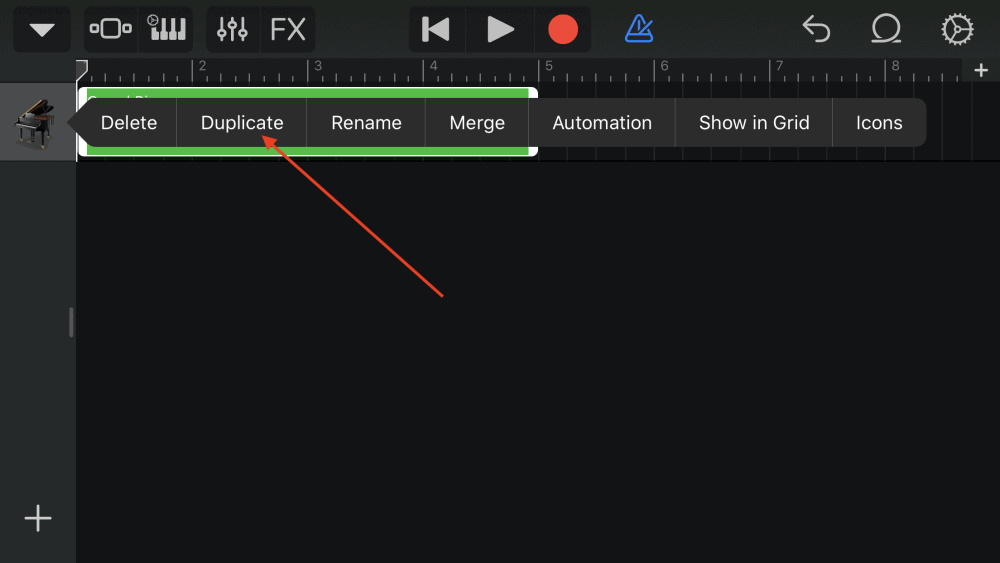
You’ll notice that you now have an entirely new track to work on.
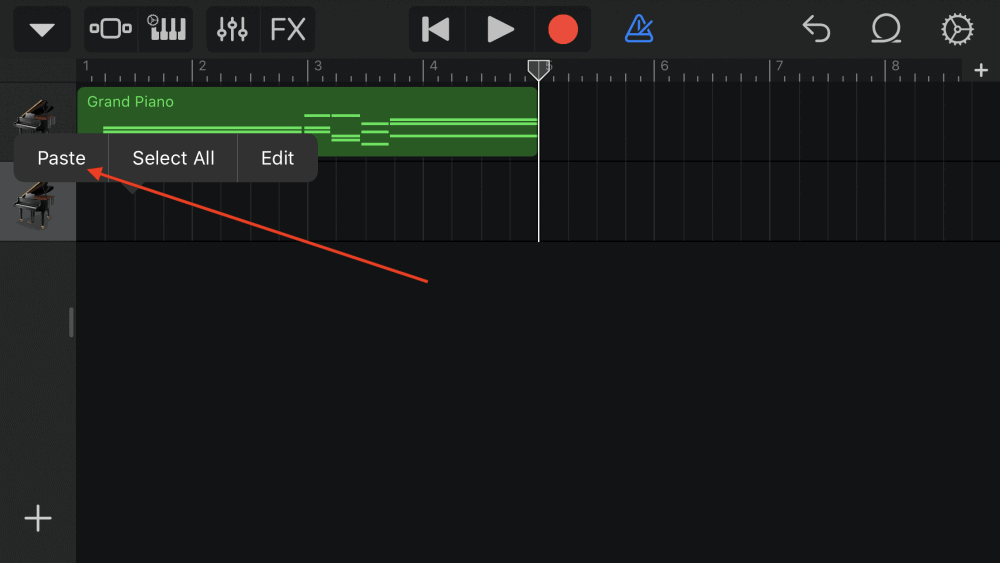
2) Click on the Track Region and Hit “Copy.”

Select the option, “Copy,” and then you’re ready to paste it in the new software instrument track.
3) Click on the new Instrument Track Region.
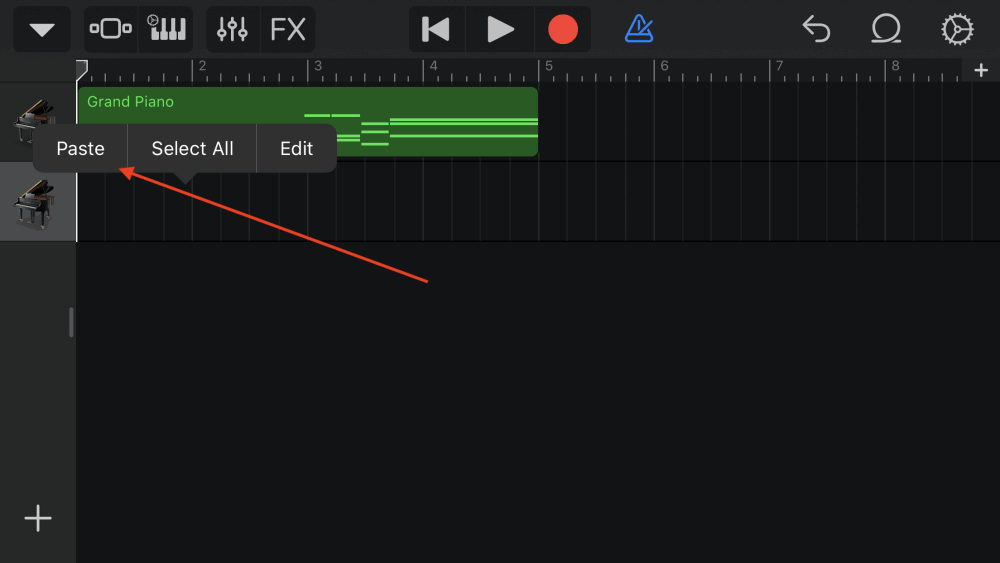
Hit the Option, “Paste,” and you’ll have a new instrument track with the same settings and everything.
4) Hit The Fader Icon to Pan Both Tracks
From here, you want to hit the Fader Icon on the top left-hand side to bring up the “Track Pan” function.
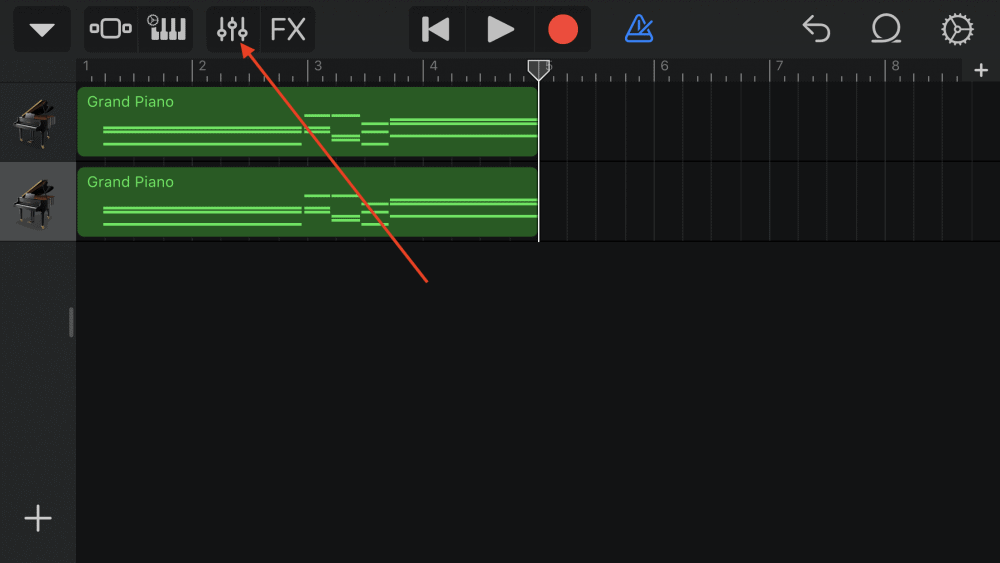
Slide the “Track Pan” icon all the way to the left.
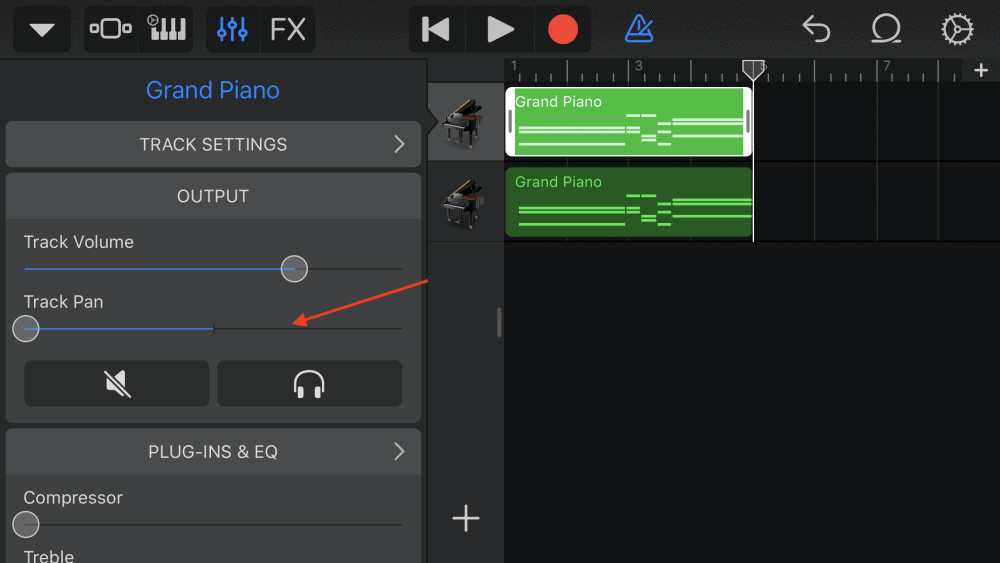
Do this same thing for the next software instrument track but slide it all the way to the right.

After you’ve done this, you can now set up the volume automation to create a stereo panning effect on the tracks.
5) Set Up Volume Automation on Both Tracks
From here, you want to crank the volume automation on the top track and the bottom track.
It looks like what you can see in the image below:

And that’s how you automate a panning effect in Garageband iOS.
Admittedly, this is inferior to what can be done in Garageband Mac OS, but regardless, it’s how you get around the limited capabilities of the iPhone/iPad version of the software.
How To Automate Effects in Garageband iOS
Through a similar tactic, duplication, you can actually do the same thing with the automation of effects.
Essentially, you choose the desired effect that you want to add to the track, and then you crank the wet signal to 100% or however much you want.
The first track, the one you’ve duplicated, is the audio signal without the effect.
The second track, which is the duplicated version, has the effect on it.
You duplicate tracks, add an effect on to one, and then automate the volume so the dry one lowers in volume around the same time as the wet track increases in volume.
This is a way of getting around the fact you can’t automate effects like the way you can in Mac OS Garageband.
In this particular case, we’re going to add a delay to the final chord of a piano track.
1) Duplicate the Track You Want To Automate
2) Paste It Into A New Software Instrument Track.
3) Add the Effect On The New Software Instrument Track.

From here, you want to delete part of the second track so it corresponds to what you want to change. For instance, in this case, I only want delay on the final part of the track.
So I’ll delete all of the track with the exception of the final chord.
4) Increase the “Wet” Signal of the Effect on the Second Track.

5) Decrease the Volume Automation on The Dry Signal

6) Set the Volume of the Wet Track.
You adjust the volume automation of the dry track so it decreases in volume right around the same time as the second track starts to play.
It looks like what’s shown in the image below:

And that’s how you create automated effects in Garageband iOS.
Important Things To Note
As I’ve already said, this is a limited and time-consuming way of using effects automation in GarageBand.
Regardless, it works, and it’ll do for the primary draft.
Once you’ve set up the main draft, it’s time to export it and put it into Garageband Mac OS to do everything for real that way you can use the piano roll, MIDI keyboard, and your list of plugins to their full advantage.
You should’ve also read through and practiced along to PianoForAll as well if you’re serious about really using the piano to its capacity for melodies.
YouTube Video Tutorial
Conclusion
I hope this was helpful to you. Make sure to subscribe to my YouTube Channel and share this with your friends.

 Written By :