Cutting and editing music in Garageband is as simple as using the (Command + T) option on your keyboard.
For instance, you line up the “Ruler,” to the point you want to isolate, and then use the (Command + T) function. You can do this in two separate areas of your workspace, in the “Piano Roll Grid,” or in the regular workspace.
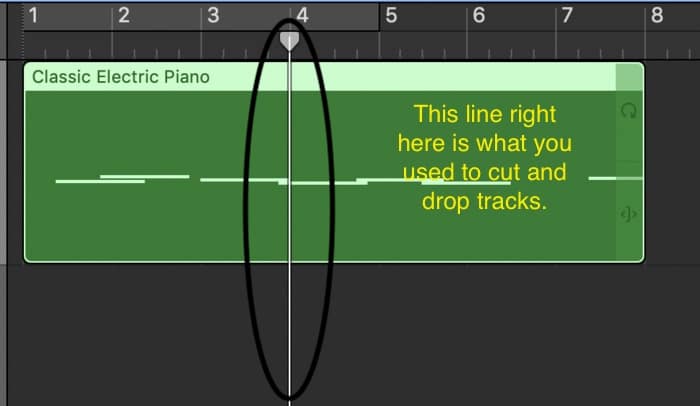
One can also edit the music using the Marquee line within the “Piano Roll Grid.” For example, when you zoom in on the audio file, you can highlight the part of it you want to eliminate down to the tiniest detail.

You simply highlight it by hovering the ‘+’ sign over the Audio Region, clicking and dragging over the part you want to delete and then hit the “delete” button your keyboard. This comes in handy for audio rather than MIDI recordings.
However, you have to make sure that you’re isolating just one track, whether it be a sample, an audio recording, or a software instrument track, etc. You can’t cut and edit more than one piece of music at once. It has to be just one.
How To Undo the Previous Command (Command + Z)
In case you make a mistake, you can always hit the (Command + Z) function to go back to where you were before.
As I’ve explained in my 12 things you should know about Garageband article, one of the great things about Garageband is that all of the commands used for day-to-day use on the computer are transferable to the software. It’s all fairly intuitive.
Many of the commands that you’ve grown accustomed to as a Mac user are all the same functions for Garageband.
Use Melodyne 5 As An Editing Tool for Vocals and Instruments
My comprehensive tutorial on Melodyne 5 explains everything this amazing plug-in can do. Celemony’s Melodyne 5, on my Product Page, is an editing tool that allows you to spot correct vocal recording errors and other mistakes that are made during the recording process.
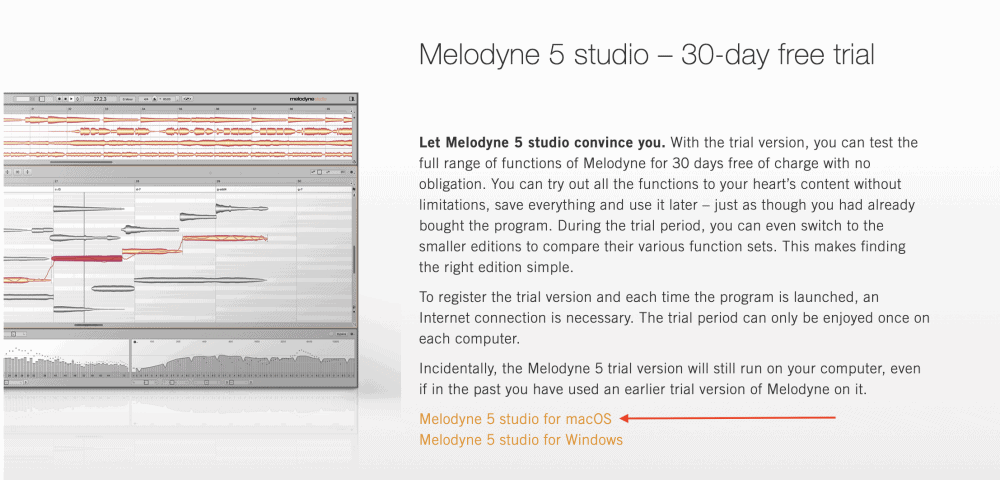
You can use this to do things that you would never be able to do with Garageband’s default pitch correction tool, includng spot-correcting errors, converting tracks to MIDI, and the list goes on and on.
How To Zoom In And Out (Command + Left and Right Arrow Key)
You can zoom in and out on your MIDI region to see the audio file in more detail by separating your fingers or moving them closer together.
This is especially useful for when you’re trying to edit minute details, that you otherwise wouldn’t be able to see and thus, isolate.
You can also zoom in and out through the (Command – Left or Right arrow key).
Merging Tracks Together (Command + J)
Another incredibly useful editing tool in Garageband is the (Command + J) function, which allows the user to essentially combine or merge the tracks together.
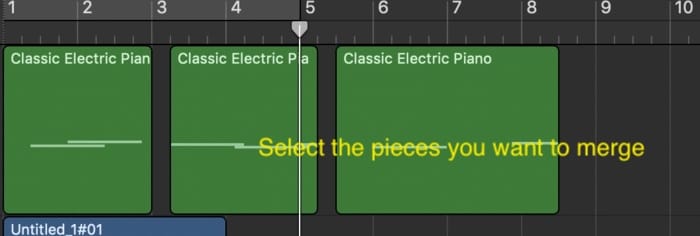
This stops the user from having to copy and paste every little individual track. Instead, one can just merge all of the music together as one track, and then put it on a loop.
To do this, just select the two or more regions you want to combine and hit the (Command + J) function and it will all come together.

It’s a great way of saving time and energy during the editing process.
Using The Cycle Area For Editing
The cycle area on top of the workspace in Garageband is used for repeating the same bar of a recording over and over again. There are a few purposes for this, including practicing a part just before recording, multiple takes, and editing.

For instance, a user can loop the same part repeatedly to judge whether the proper changes have been made during editing.
In other words, if you’ve recorded vocals (using my guide), and forgot the lyrics during one part and said “um,” or something like that, you can loop the same part over and over again, and figure out what needs to be eliminated down to the last millisecond, without having to press “Play” repeatedly.
You know that Cycle Mode is on when it’s displayed as a yellow trip in the top portion of the ruler. When it’s turned off, it’s no longer yellow.
There are two ways of turning it on and off:
You can press the Cycle button within the control bar, or simply press ‘C’ on your keyboard.
Changing at what point Cycle Mode starts and stops:
Select the top part of the ruler, then drag your cursor to the desired starting and stopping part of the recording.
How to Edit Using The Re-Size Pointer (Trimming)
Another way of editing the music is through the “Resize Pointer,” which is at the end of every piece of the “event,” as Garageband’s “Quick Help” section calls it.

Take the cursor and grab your recording, moving it from side to side, left to right. Using the “Snap To Grid” setting/function allows for the music to literally “snap” back to the line, and thus, stays more in time.

Snap to Grid Function (Command + G)
It’s a lot easier to edit music in Garageband when you have this option selected within the “Edit” menu on the toolbar on top. You can turn this function on and off, by hitting the (Command + G) function.
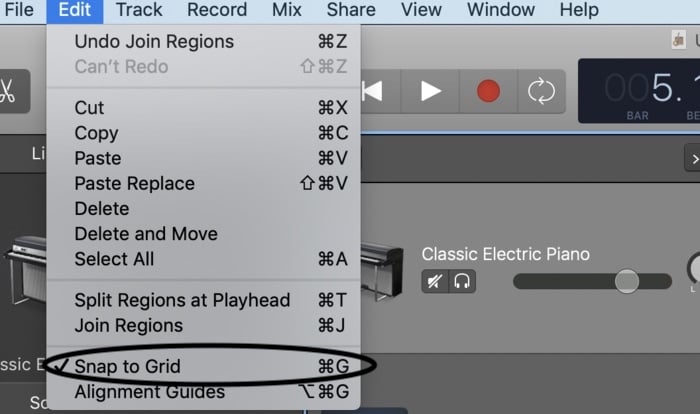
Essentially, as I mentioned above, what this does is it literally “snaps” the music right back to the lines on the grid, that way whenever you edit a piece of music, it falls back exactly on the beat.
If you want, you can turn this function off and see how difficult it is to edit music in Garageband. It becomes super annoying, however, there are moments where it’s worth your while to turn it off.
How To Copy and Paste in Garageband (Command + C and Command + V)
Once you’ve isolated the part you want, hit the (Command + C) function to copy it, and then the (Command + V) function to paste as many copies of it that you want.
Usually, after I’ve created a melody with the Steinway Grand Piano and PianoForAll as an accompaniment, I’ll open up a new “Software Instrument” track, and then copy and paste the music into a different instrument track.
This function allows you to fill out your mix, without coming up with an entirely different musical section. In many cases, you can create an entirely different piece of music, just by copy/pasting it onto a new Instrument track.
Another Way Of Copying And Pasting an Instrument Track
1) Select the Audio file you want to copy.
2) Hold down the “Option” key.
3) Drag the cursor to the left or right
4) While holding down the “Option” key, release the mouse and voila, you’ve just copied and pasted a new MIDI region.
Important Things To Note When Chopping Music
Whenever you want to isolate an audio recording, it’s worth noting that it may be helpful to understand at what beats-per-minute the song is, that way you can trim music at a specific beat.
This is especially important when creating music with samples which I’ve explained how to do before.
For instance, in a track that I made using the theme song written by Bear McCreary for The Walking Dead, I had to figure out the BPM of the track, that way I could make a different drum track for it.
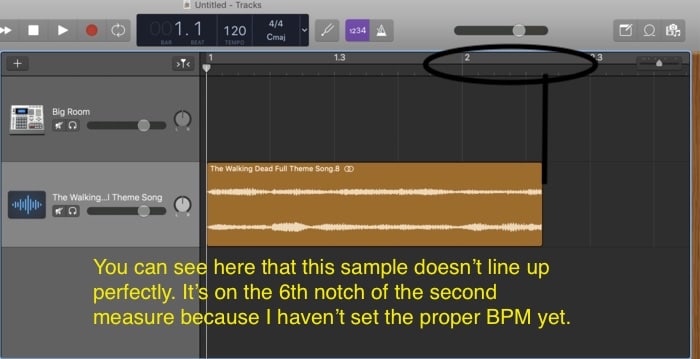
If you don’t have the proper BPM set up, it’ll be almost impossible to make drums for the song, because nothing will line up, and will sound unsynchronized.
Then, when you try and add other melodies through software instruments and so on, synchronization will be almost impossible. So knowing the Beats Per Minute is essential.
The best way of doing this is just counting along to the song by hitting the table with your hand or bobbing your head along to the beat.
Then, grab a metronome – or use one online, on your phone, or in your DAW – and match the tempo of the song with how fast you were slapping the table.I’d recommend using a real metronome like this one because they’re better to use.
There are other ways of figuring out the BPM of a song, of course, but this is how I do it.
(Every person knows how to count the BPM intuitively because whenever you’re jamming along to a song by bobbing your head, you move along to the beat. I’ll write a more in-depth article on this topic later).
Moreover, you can check whether you’ve calculated it properly or not through the way the MIDI Region lines up in your DAW.
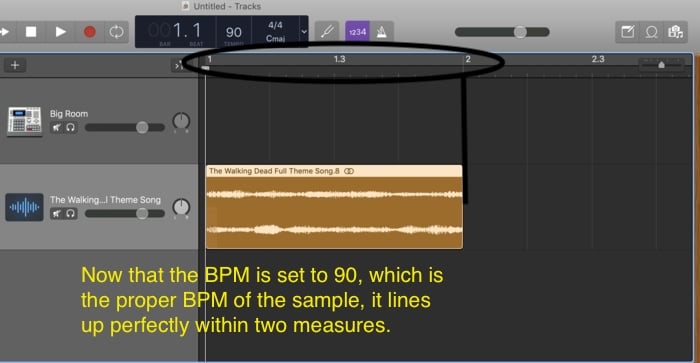
*There are other options available online, including songbpm.com, and beatsperminuteonline.com. The latter is superior for calculating the beats-per-minute because it’s manual and can be used for the most obscure of music. However, the former is more for commercially available songs.
Using the Score Editor to Fix Your Music (For People Who Can Read Music)
I imagine this topic will be too much for the average DAW user, because frankly, most music producers, especially nowadays, don’t know how to read music. There’s nothing wrong with that, but it’s just the way it is.
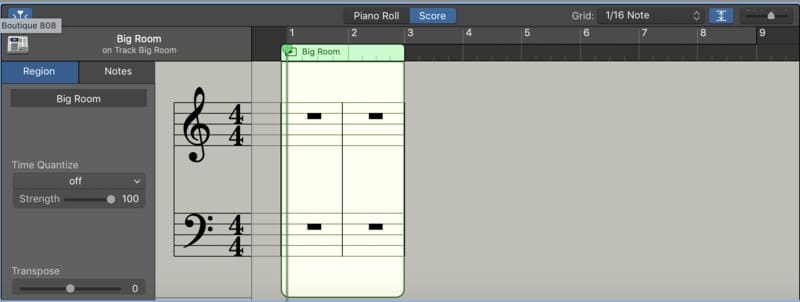
1) You can access the Score Editor simply by double-clicking on your music or “Midi Region.”
2) And then go down into the Smart Controls, and click on the button that says “Score.”
In this section, you can edit the music through standard notation which I talked more about in my guide on using the score editor. I actually use this every once in a while, because I learned how to read music when I was a kid (although, I’m not nearly as good as I was as a kid).
I usually use it for creating bass lines. Sometimes, it’s harder to hear if your bass line is off-key, so you can either push it up a few octaves so you can hear it or, you can look at the standard notation to figure out if the music is off-key or not.
Naming Your Tracks
If you want to name your track, use the “Secondary Click” function (“right-click,” and that’ll bring up your options where you can see where it says, “Rename Track.”
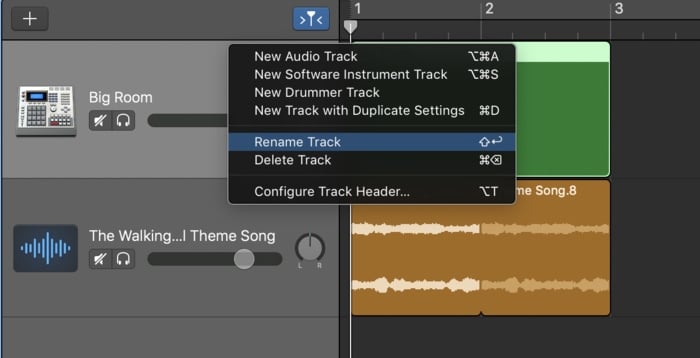
You can do the very same thing to the actual MIDI Region.
This seems like an obvious one because it is. If you’re going to be making music in a DAW, naming each track region will save you a ton of time, running through each one, trying to figure out which one is the kick and which one is the snare.
Reordering Tracks Through Drag and Drop
By clicking on and dragging the “Track Headers,” Garageband users can actually easily move each software instrument track to and from wherever they want.
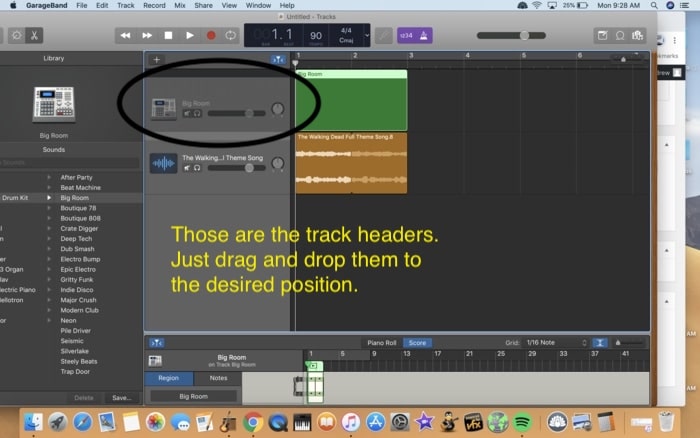
For instance, grouping the guitars together, or the kick and bassline. You don’t have to manually move the MIDI Region either; it will move with the Track Header.
Time Quantizing
As you’d know if you’ve read my piano roll guide, rather than dragging and dropping each note so it falls exactly on the grid-lines in the Piano Roll, which is normally what I would do, you can use the Time Quantize function down in the DAW’s Smart Controls.
For instance, if you’ve recorded music with a MIDI Keyboard, and some of the notes are offbeat, using the Time Quantizing function will bring each note to where it needs to be, rather than doing it all manually (more time quantizing tips in my guide).
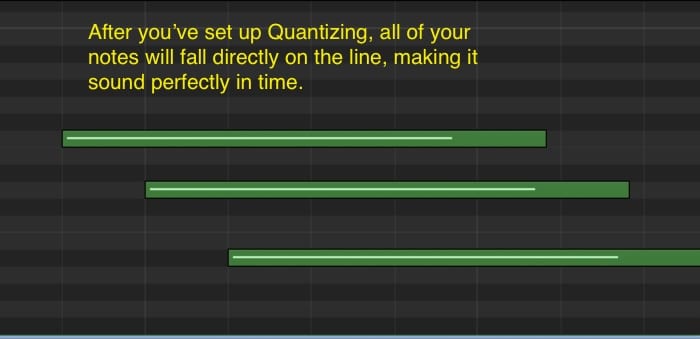
1) First things first, in the Software Instrument track, choose the option “Region,” rather than “Notes,” in the Smart Controls.
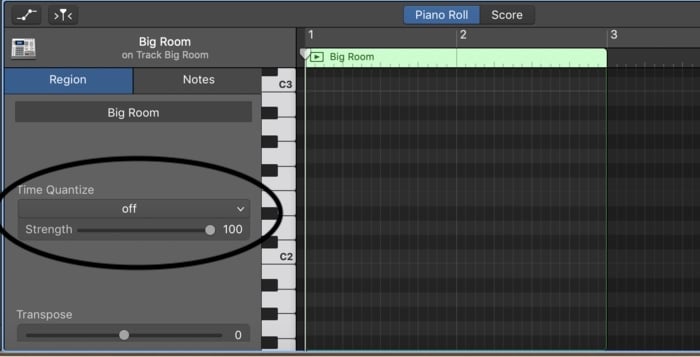
2) In your Smart Controls, underneath the setting, “Time Quantize,” select 1/8 Note, and keep your Quantizing strength at around ’75 to 100.’ This should suck in all of the notes accordingly.
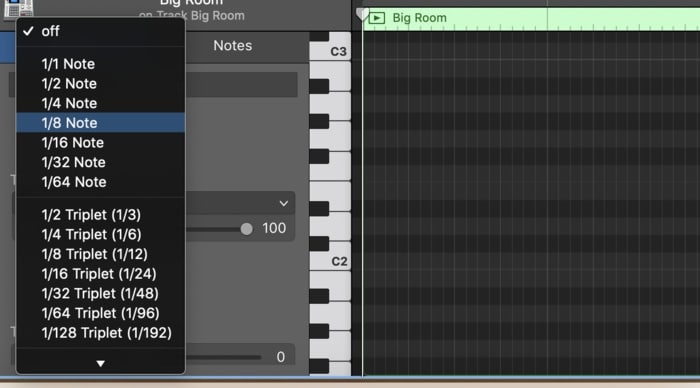
Obviously, there are more Timing settings one can use, but this is as far as I’ve ever used the quantizing function.
Some people argue against the use of Time Quantizing, accusing the practice of robbing the music of its “soul.” The argument goes that there are idiosyncrasies and personality traits eliminated from the music through the quantization practice.
For instance, when playing a guitar riff, if something is slightly off-key or not in proper time, the inaccuracy and “incorrectness” of the note may precisely be, the exact thing that gives it its unique flavor.
The Blues Scale, probably one of the most used scales in guitar playing, is the epitome of this. The Blues Scale isn’t classically “correct,” due to its flattened fifth in relation to the minor pentatonic scale, or flattened third in relation to the major pentatonic.
How to Select and De-Select Options Way Faster
This is another one that I just came across. Rather than manually selecting, say, for example, the “Mute” button on a bunch of tracks, and having to go through each one individually, there is a way of hitting all of them at once.
For instance, if I want to hit the “Mute” button on 10 of my 20 Software Instrument tracks, I’ll hover my cursor over the “Mute” button, and then click the track-pad and hold it while I drag the cursor down the screen. This will hit every “Mute” button on the way down. It’s the same practice for turning them off.


 Written By :
Do you have a book to purchase for Garageband?
No I do not. Funny that you ask because a company offered me some money to write one, but I declined for a few reasons.
Maybe some day I’ll make one for ya that’s like an E-Book / Video Course all in one.