In this article today, I’m going to run through all of the things that you should probably know right off the bat about producing music with Garageband.
Some of these tips, however, are for all music producers and musicians alike.
Let’s just get right into it.
1) Turn Off The Auto-Normalize Function
The very first thing you should do when you start using Garageband is to understand that the software comes with a volume automizer that you should turn off right away.
The reasoning for this becomes clear when you start exporting your music out of the DAW and into iTunes, SoundCloud, YouTube, Spotify, and so on and so forth.
So, how do you do this? It’s simple.

a) Open Up Garageband
b) Go into the Advanced Settings.
c) Uncheck the box that says, “Auto-Normalize – Export Projects at Full Volume.”
It’s a bit counter-intuitive because you’d figure that the auto-normalize function would allow one to export music at the loudest volume, but really it doesn’t.
If I had to guess, I would say that this function exports your music at a volume that’s about -8.0dB too quiet.
If you want to read more about how to export music at a better volume, you can check out my article here on how I would make a trap beat, as well as my article on how I would make a hip-hop beat.
This article too will help you with that subject as well.
Moving on…
2) Get an Audio Interface.
Thankfully, I already owned an Audio Interface because when I grew up, someone told me that if I wanted to make music with my guitar and a computer, I would need to connect my guitar to my computer, and you can’t do that without an interface of some kind.
The one I bought was the Focusrite Saffire 6USB, although, truthfully, it was a bit beyond my capabilities at the time.
While it has come in handy, to another user who’s just starting out, I would recommend the iRig HD 2 due to its size, convenience of use, and price ($129).
It’s a great small audio interface that won’t break the bank, and it’s super convenient.
Due to the unavailability of the Focusrite Saffire 6USB, I’d suggest getting the Focusrite Scarlett 2i2 instead.
You can read about the audio interface and the other pieces of gear here.
It doesn’t take up a lot of room; you can take it on flights, trains, in your car, and so on and so forth. Not having to cart around a big interface is key.
3) Plug-ins Are Awesome And You Should Learn How To Download Them
If you don’t already know, plug-ins are the illest.
There are a ton of great plug-ins available and I download a new one every once in a while just to break out of a creative slump or for other necessary functionalities.
I’ve actually never paid for one yet, but in the future, I’ll likely pick up ones like Superior Drummer as well as Amplitube.
In my article here about plug-ins, you’ll see that I compiled a huge list of all the great free plug-ins out there.
I also included a link for each one so you can find all of them.
With that said, however, don’t waste all of your time continuously looking for new plug-ins, or that magic piece of software that’s going to make you an expert producer.

Truth be told, DAW’s are so good these days that you don’t even need a lot of plug-ins.
Garageband, for instance, is actually a fantastic software that comes with many good plug-ins despite what all of the haters may say.
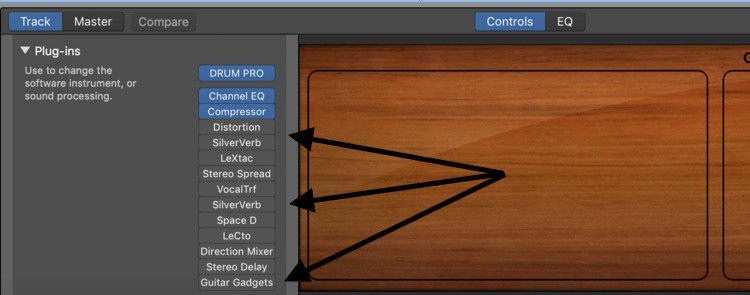
4) You Can Have More Than 6 Plug-Ins On Each Instrument Track.
It’s true that you can actually add more than the default number of plug-ins on each track.
To do this, simply drag your cursor on the bottom portion of the plug-in slot until you can see a little white line appear.
When that line appears, click on it, and load a plug-in up as you normally would, however, you’ll notice that it drops yet another slot.

It seems like you’re just changing an already existing plug-in.
Watch out though, because if you run way too many plug-ins on your computer, you might actually cause lagging issues.
The reasoning for that is that it’s taking up a lot of your computer’s power to run all of those – what are really – little pieces of software.
Depending on your computer, you may or may not be able to run many of them at once.
5) Don’t Waste Hours of Your Time “Mixing”
While I’m not a professional engineer, from what I’ve read and from what I’ve been told by people more advanced than me, producers spend far too much time “perfecting” a beat in the mixing and mastering phase.
Truthfully, a lot of these guys who are “perfecting” something, are actually using the mixing process as a form of procrastination.
Explained in another way, and you can see this in many, many, many different disciplines, people who are not that serious about the art will actually spend all of their time obsessing over gear, getting new plug-ins, buying new products, getting all of the right accessories and so on and so forth.
And truth be told, it’s mostly just to impress other producers.
Thinking of producers as having their own sub-culture, there is a culture in which certain standards, traditions, and attitudes prevail.
One of them is that there are particular kinds of DAWs better than others and if you happen to use one of the “unapproved ones” – at least according to the elitists – than you must be less of a producer.
But the truth is that the person who’s making a beat a day consistently with Garageband is far ahead than the person who’s making one beat a month, the guy who’s spending all of his time searching for new plug-ins, arguing on forums about what’s the better DAW, and aggressively commenting on YouTube videos.
People who are truly hustling at their art, whether it’s playing football, guitar, computer programming, or making beats, don’t have time to spend arguing about this and that, or how some person isn’t great because they’re not using the right products.
Which brings me to my next point…
6) Stop Arguing With People Online About What’s The Better DAW
As a beginner, don’t waste your time with any of that stuff.
Just download Garageband right away on your computer and start creating music. When I first started – and I continued with this practice for a year – I made one song a day for about 5-6 months.
That may not be a lot to many people, but it was to me.
Moving on…
7) Compression Basically Acts As a Volume Control.
Compression is one of those elusive topics that people spend a lot of time figuring out.
I chose to list this here that way you don’t spend hours researching the topic and ending up believing that compression is some sort of ultra-sophisticated wizardry.
If you find the topic mind-boggling, I suggest reading my article on compression here. I go through and explain each one of its most commonly used parameters.
In a nutshell, understand that compression essentially increases the volume of quiet parts and decreases the volume of loud parts.
For that reason, it’s incredibly useful for shaping dynamics and so on and so forth. But that’s all it really is; it’s a volume or dynamics control.
8) All of the Commands are Very Useful
Garageband, like the rest of the Mac software, comes with a lot of super handy and fast command options in which you can quickly do things without having to click and search through each menu option.
In this list, I’ll try and provide all of the commands that I use on a regular basis.
(Command + K) – Brings up Musical Typing (GB’s built-in keyboard)
(Command + T) – This is the “Cut” function, used for dividing tracks as you see fit.
(Command + J) – Joins track regions together. Use the cursor and select two or more regions and then hit this function, and you’ll notice it literally joins them together as one.
(Command + D) – This function duplicates the track. Select your instrument/audio/drummer track and then use this function to copy and create a new one using the same settings as the first.
(Command + Option + S) – This creates a brand new Software Instrument track.
(Command + Option + A) – This creates a new Audio Track.
(Command + Option + U) – This will bring up a brand new drummer track.
(Command + C) – This will copy any piece of music.
(Command + V) – This will paste that very same music into a brand new track.
(B) – This command brings up the Smart Controls or hides it.
(Y) – Brings up the Library of instruments.
(E) – Brings up or hides the Piano Roll or the Editor.
(P) – By hitting the ‘P’ key on your keyboard, you can quickly bring up the Piano Roll as well.
And that’s all for now.
There are many other functions, but the aforementioned short-cuts are the ones I use the most.
9) Use the Quantizer Function.
It actually took me sometime before I started using this function. Before I knew about it, I actually would go through and adjust each MIDI note manually and it took longer than it should.
What you can actually do, is venture on into the Smart Controls/Piano Roll and look for the Quantizer function, allowing us to quickly fix any and nearly all imperfections with just the click of a button.

For a step-by-step guide:
a) Go into Garageband’s Smart Controls at the bottom of the screen by either hitting the ‘E’ or ‘P’ keys on your keyboard, clicking on the MIDI region by itself, or selecting the option that looks like a knob on the top left-hand side of the DAW.
b) Underneath the settings, “Region,” and “Track,” you can see the function, “Time Quantize.”
c) Click on the button, and notice that it’ll bring up all of the available parameters according to rhythm notation, “16th note, 8th note, 1/4 note,” etc.
I typically use the “16th” note option, and what it does is that it shifts all of the notes onto the grid-line in the workspace, essentially ensuring all of the notes fall exactly on time.
As I stated in my article about editing tips, some people argue that the Time Quantizer function destroys your dynamics by making literally every note sound perfect.
It’s up to you to decide whether or not you’re willing to take this argument into consideration.
10) Make Your Melodies and Rhythm Sections 4 Measures or Numbers Divisible of 4 (4,8,16,32 etc)
When I first began using Garageband, I couldn’t understand why none of my music sounded right.
I knew the melodies/rhythms weren’t in proper time whenever I began looping them using the Loop Pointer on the bottom-right side of each MIDI region.

After looping a melody and a rhythm section, the music wouldn’t sound good. The reason is that I was making music whose time signatures didn’t work together.
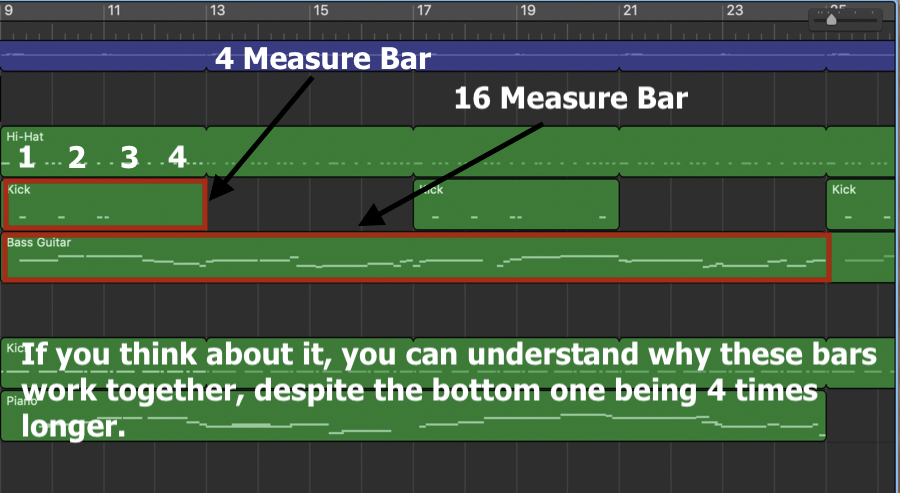
Explained in another way, build melodies and rhythms using just 4 measures and other multiples of 4.

For instance, having a drum truck that’s four measures, and looping that with a 16-measure melody will sound good due to the fact 4 is divisible of 16.
***It’s important to note, however, that as you become more sophisticated, you can start using different time signatures.
11) Make Sure To Download All Of The Available Sounds.
Garageband comes with quite a few instruments, arpeggiators, drum-kits etc. It’s actually pretty impressive.
To access all of them, you just have to download the sounds from the option in the top toolbar.
Beware though, this may take an hour or two, or possibly even longer depending on your internet connection and computer.

a) Go into Garageband’s eponymous tab, “Garageband” on the top-left of the toolbar.
b) Click on the tab, “Sound Library.”
c) Choose the tab, “Download All Available Sounds.”
It’s worth mentioning that you can purchase a pack in the app store named MainStage 3, which gives you literally thousands of options to choose from.
I actually haven’t bought it yet, because I find that what Garageband offers is fine. But, if you want more, you can always download the package for 40$.
12) Don’t Discount The Loops
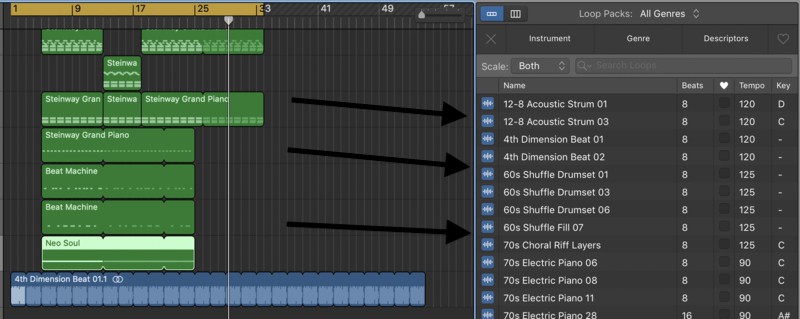
Garageband and Logic Pro X’s loops are not too bad.
There are thousands of them, organized by genre, instrument, and emotion, and they’re completely royalty-free and won’t cause you any problems legally or financially, a topic I wrote about here.

For an article on how to go about using and creating your own loops, check this one out here.
Some people might say that using Loops doesn’t make you a real artist, and it’s your decision whether you choose to believe that or not.
Hip-Hop, Jazz, and Blues culture though have all co-opted styles, sounds, and songs from other artists. It’s a part of the culture, in my opinion.
That’s All!
That’s all for now, make sure to share this article on your social media if you enjoyed it. It’s much appreciated!

 Written By :