Assuming you’re an absolute beginner, this tutorial should save you a fair amount of time in terms of avoiding common mistakes and workflow issues.
To make a beat in Garageband, choose a melodic Apple Loop by clicking on the Loops icon on the right-hand side of Garageband. Use the command ⌥ + ⌘ + U, to open a Drummer Track and use one of the Hip-Hop drummers, Dez, Anton, or Maurice.
Features Of Hip-Hop
Hip-hop, like metal, rock, and many other genres, has a ton of sub-genres and dynamic differences between each other.
Therefore, in my opinion, there’s no point in saying that it has to sound a certain way – because it doesn’t.
In the past, there were many beats that had kind of a major/happy sound and there are many minor sounding beats of varying stylistic characters such as jazz, soul, funk, country, and even rock.
Moreover, hip-hop utilizes a ton of soul and funk samples from the 1960s and 1970s like James Brown, Funkadelic, Parlament, and so on and so forth.
Perhaps my favorite example is Kanye West’s song, “Touch The Sky,” created by Lupe Fiasco, which uses Curtis Mayfield’s legendary soul tune, “Move On Up.” You can do the same thing with Garageband’s sampler too as I’ve shown before in my article and in the short video down below:
The great part of hip-hop, like rock music, is that it’s versatile, so as long as you have a melody and a rhythm section, a rapper can probably spit bars over it. To get good at it, follow some of the tips in my songwriting article.
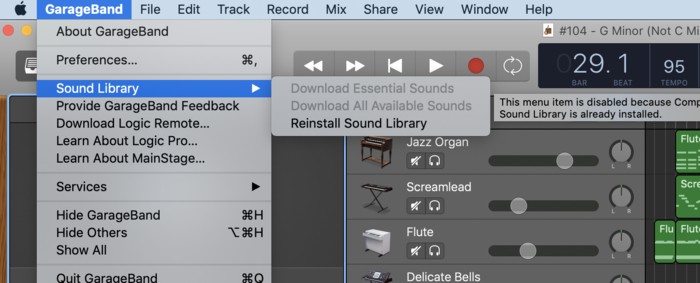
Before continuing, make sure you’ve downloaded all of the available sounds. To do that, just go into Garageband’s Preferences, and go to “Sound Library,” and then choose the option, “Download All Available Sounds.”
Without further ado…
How To Make A Hip-Hop Song In Garageband
The first thing that you want to do is open up Garageband.
1) Open up Garageband.
2) Select the hip-hop template.
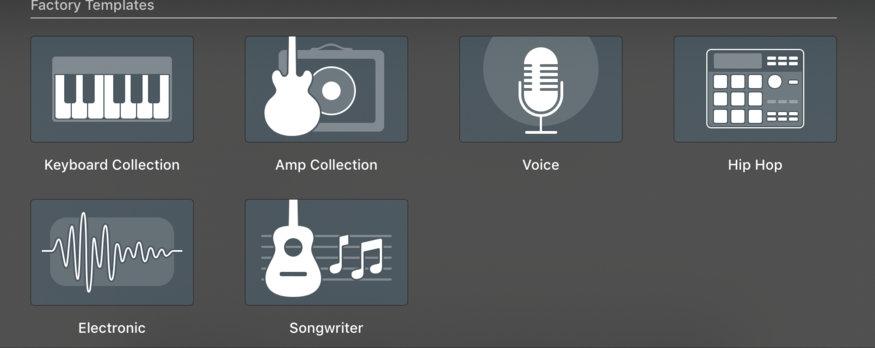
The first thing that shows up is the Trap Door template, and the drummer’s name apparently is Dez. Personally, I hate the sound of the Trap Door pre-sets, so I avoid it at all costs.
It can be doctored to sound good, in my opinion, by decreasing the complexity of the fills and also choosing the “Simple” setting by dragging the little yellow ball to the left, or changing the actual kit of the pre-set.
Another amazing tool to have for making beats is Initial Audio’s 808 Studio II, which is obviously a bass synth/808 tool.
Around half of the instruments that Garageband gives you sound good, with the “Steinway Grand Piano,” Deep Sub Bass,” “808 Bass,” “Vox Box Lead,” and the “String Ensemble” being the most important and useful, although, there are many others for hip-hop as I’ve pointed out before.
If you’re using iOS Garageband on the iPhone I recommend the most, there are even more sounds to choose from, but either way, the “Arctic Noise Lead” is definitely a popular choice.
3) Go ahead and choose the “Flute” option under “Vintage Mellotron,” the “Jazz Organ,” the “Scream Lead” from the synthesizer section, as well as the “String Movements” from the Soundscapes option.
Also, choose the “Beat Machine” drum-kit under the Electronic Drum Kit section.
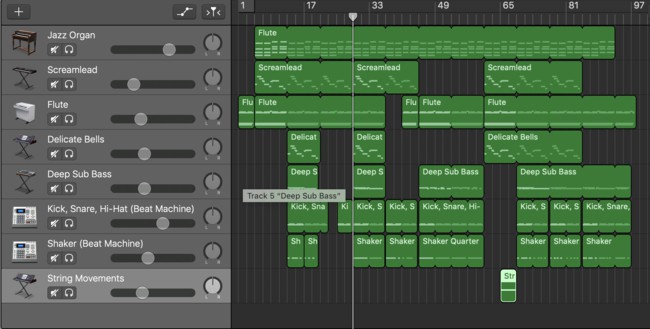
4) First Melody (Chord Progression) – (Jazz Organ)
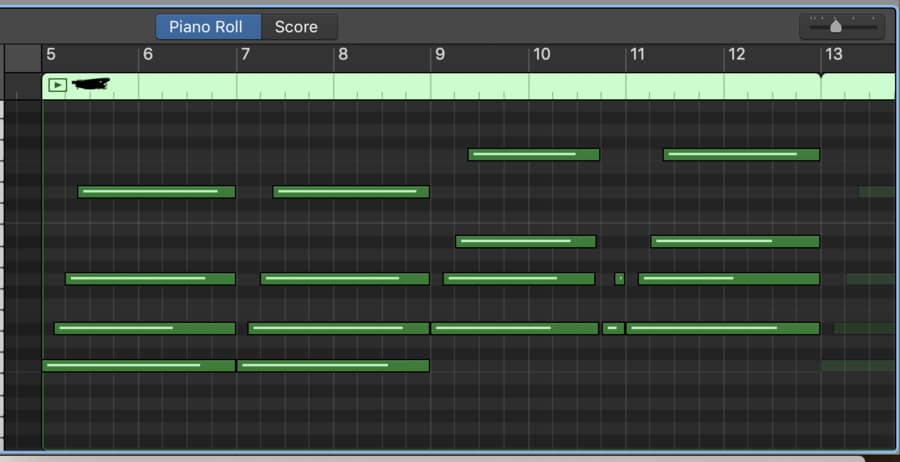
For this particular track, “Spaceship Underwater,” the very first thing is that I made the chord progression with the “Jazz Organ,” which is just a C Minor with an added 9th and an Eb Major with an added 9th.
You can give the final track a listen here:
Cmin9 = C, Eb, G, D
Ebadd9 = Eb, G, Bb, F
Both of these chords belong to the Key of G Minor.
Here are all of the chords of G Minor (relative minor of Bb Major):
i – G Minor – G-B-D
iiº – A Diminished – A-C-Eb
III+ – Bb Major – Bb-D-F
iv – C Minor – C-Eb-G
v – D Minor – D-F-A
VI – Eb Major – Eb-G-Bb
VII – F Major – F-A-C
In case you haven’t seen the scale degrees before and how they look, know that the lower-case roman numerals., “i,” mean Minor, and the upper-case numerals, “V,” mean Major.
***To learn more about theory, go over to Music Theory’s website, or pick up Mark Sarnecki’s book on theory from Amazon as well as the answer book which is equally as important.
The “+” means augmented and the “º” means diminished.
If these words are scary don’t worry about it. Just pay attention to the letters of the chord, “GBD.”
Check out the diagram I created of the “Musical Typing” below if you’re totally unfamiliar of where the notes of the Piano lie, but if I were you, I would eventually get a copy of PianoForAll because it’ll help a lot as well.
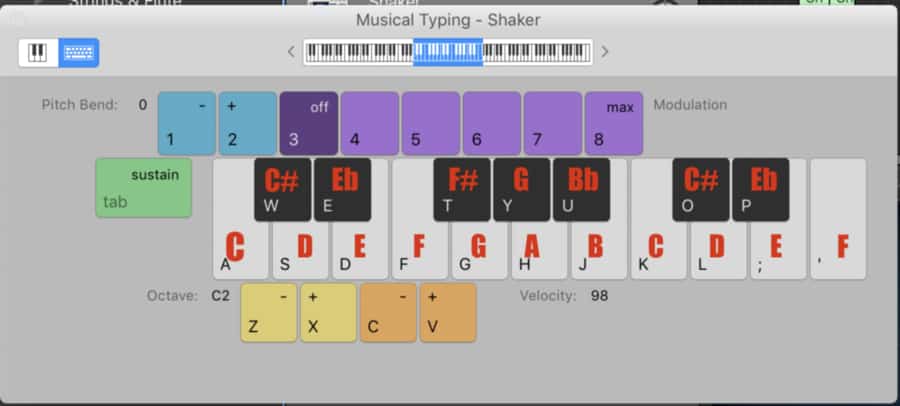
When I build beats, I pretty much always start with the melody and then I build the drums, bass, and everything else afterward.
5) Second Melody – (Screamlead Synth)
Because I know that I’m in the Key of G Minor, there are certain notes available to me that will sound “correct.” They are the following:
G, A, Bb, C, D, Eb, F.
The relative Major of G Minor is actually Bb Major, which means they are the same notes, just played in a different order and having a different root note or tonal center.
Here is the Bb Major scale:
Bb, C, D, Eb, F, G, A
asically, after I built the chord progression, I loaded up an instrument that sounded cool and started playing around with it on my MIDI Keyboard.
I usually start with an Ehru, Piano, or another instrument with a sound I love. The reasoning for this, as an artist, is for the inspiration.
In this case, I chose the Screamlead instrument, which you’ll find in the Lead subcategory within the Synthesizer section.
Here’s an image of how the second most important melody of the song looks in the MIDI work-space:
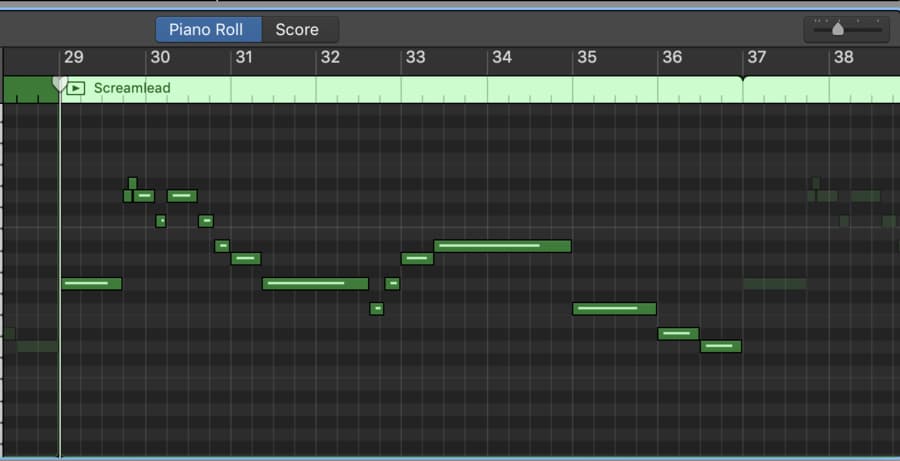
Tip: Always use instruments, plug-ins, arpeggiators, and other tools that inspire you to play.
That’s what being a musician is all about, frankly. It’s the same thing with playing the guitar or another instrument. You have to buy a piece of equipment that actually inspires you to play.
After I built the second melody using the “
At first, as I said before, it was the Pipu, but I couldn’t use that because I already made a track using it recently and I didn’t want to get too repetitive.
I turned it into a Screamlead, and then adjusted the settings of it.
In the image below, you can see all of the different settings for it, including, Glide, Sub, Shape, Depth, Harmonic, Overdrive, Delay, as well as a bit of Reverb.
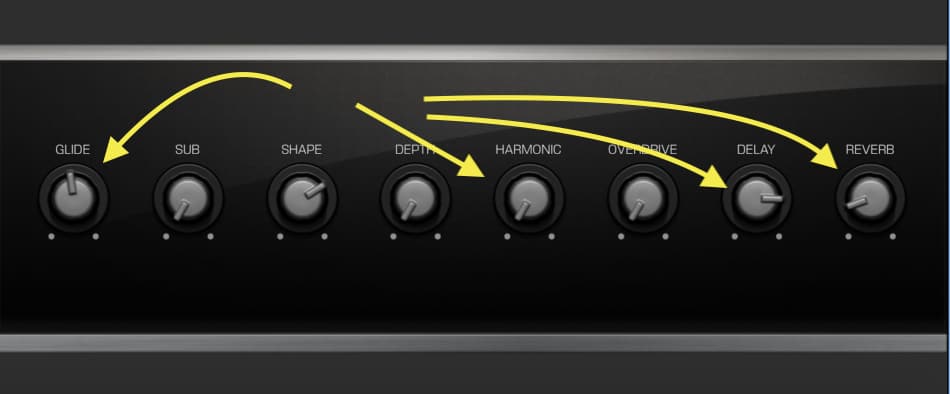
The part I changed the most was the “Glide” option as well as the “Shape.” That’s what gave it the sound that is completely different from the stock version of it.
Another big change I made was with the “Harmonic” option. I turned that bad boy all the way down.
5) Third Filler Melody – (Delicate Bells)
For the third melody, I simply used it as a filler, a way of filling out the rest of the track and adding a little bit of “Body” or character to the sound.
I used Delicate Bells, and I copy and pasted the track from the Screamlead and dropped it into the Delicate Bells track.
It was a one-two process, and I turned it down fairly significant so as not to take too much attention away from the rest of the more important instruments.
I also EQ’d it a little bit as well. For this section, I implemented a Low-Pass (a concept I’ve explained before), so in other words, I eliminated all of the highest frequencies. This EQ setting looks like this:
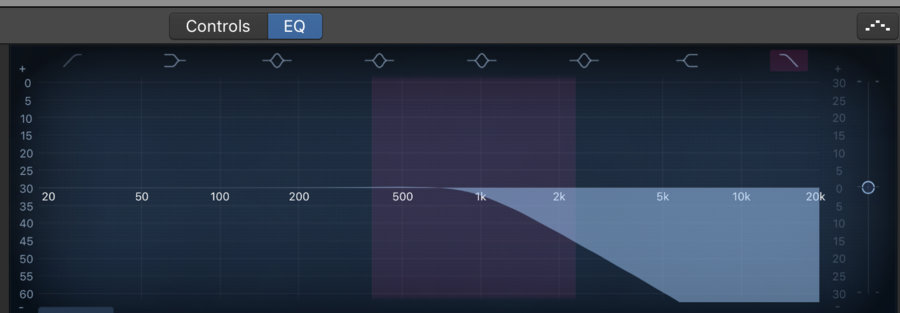
6) Fourth Melody (Flute)
Perhaps the most important melody of this song was the flute, rather than the initial chord progression and melody.
The flute is the part that repeats through the entirety of the song, and I loved the way it sounds. I think it was a nice touch.
The funny part about the flute melody here is the fact it’s simply three notes but played at two different octaves. It’s easily the LEAST sophisticated part of the entire track.

It goes to show that sophistication is not necessary at all, in fact, this plays into improvisation as a musician as well. It’s easy to get caught up in all of these incredibly convoluted details, but frankly, there’s simply no need.
A good question to ask yourself is: does this make the music sound good? Does this contribute to the entirety of the song?
Moving on to arguably the most important part of a hip-hop song: the drums and the Boutique 808 pattern.
I think, perhaps, a crucial detail to add here is the fact that the drums and boutiques are actually the most important part for music producers but not for the listener.
Listeners don’t care about EQing the snare as you do, they just want to hear a great melody and beat.

7) Drums (Kick, Snare and Hi-Hats)
Obviously, music producers have different ways of going about this. Many actually “draw” their music, by adding individual notes and so on and so forth in the “Piano Roll.”
To begin drawing in the Piano Roll, double-click (right-click) in the workspace and select the option, “Create Empty MIDI Region.” This will make a file in which you can start dropping notes (more on the piano roll in my guide).
Truth be told, I don’t do this.
I find this kind of thing to be, actually, annoying and not that fun.
I played guitar for my entire life before I started using a DAW, so I’m all about playing from the heart and improvising on the spot.
What I do, is I open up the Musical Typing (Garageband’s keyboard – Command + K), and I just start jamming on the Kick and Snare, trying to come up with a pattern that I’ve never used before but also sounds very good.

Usually, the Kick and Snare is loaded at the C3 level on Garageband’s Musical Typing, so I just hammer on the “C” and “D” note, or as it says on the actual laptop Keyboard, the letters “A” and “S.”
If you’re using a MIDI-Keyboard, it’ll likely be the very first C and D on the left-side of the Keyboard.
After I’ve built a cool sounding Kick and Snare pattern, I usually begin adding the other details.
8) Shaker
I’ve been actually using the Shaker function quite a bit lately. I feel like it’s a nice touch to the sound.
And for the most part, I either add the hi-hats on every single beat, or I add it about half-a-beat after the Snare Drum. I think it sounds cool.
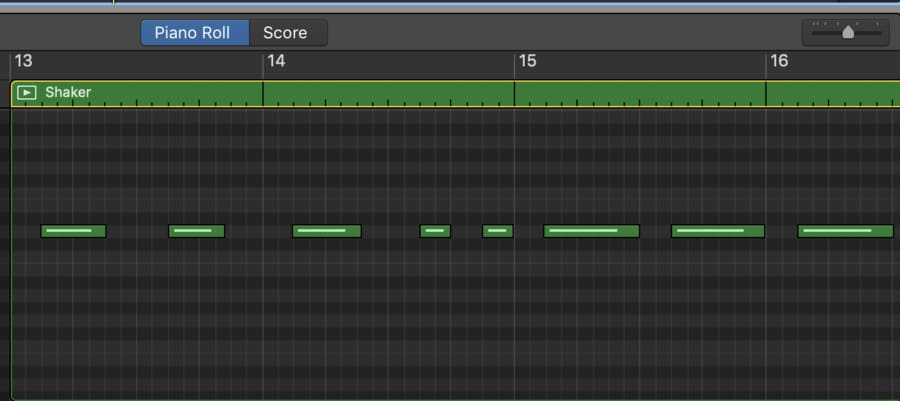
I use the shaker – and this is a great thing to keep in mind for producing all kinds of drum-centric music – to keep the beat at a more consistent pace.
Many producers use the Kick, Snare, or the Hi-Hat as a way to keep time.
For me, using the Shaker is good for that, because it’s not too intrusive or obstructing. In other words, it doesn’t take too much attention away from other sounds, instruments, and melodies.
A snare or kick can be quite aggressive.
9) Bass
This is arguably the most important part of hip-hop production, and frankly, I’m not the greatest at it, so you may want to check out another person’s tutorial to figure out how to make great Boutique 808s and bass-lines.
As I explained in this article about Boutique 808s, there are many different ways of drawing/playing bass-lines, as well as EQ-tactics and methods for making it sound good.
Make sure to check out the article at the above link to see what I’m talking about.
For the sake of this tutorial, however, I’ll outline what I did for “Spaceship Under Water.”
The first thing that I do when I build a bass-line is I usually think about the chord progression and melody, that way I can draw a bassline that is actually on-key.
Many producers struggle with building a bass-line that’s on-key due to the limitations of the human ear. It’s pretty hard to hear the lowest frequencies, so a good way of getting around it is the following:
Tip: Try making a bass-line with the Bass turned up 1 or 2 octaves, that way you can find out if the bass is truly in the proper key signature.
Another thing that you can do is treat the bass as if it’s a melody of its own, and create maybe a piano melody, but then change the software instrument track into the Deep Sub Bass synth or the Boutique 808s.
Moving on…
I typically outline the notes of the chord in order to create the bassline. For example, I know that in this track there are two primary chords that lie as the song’s foundation: Cmin9 and Ebadd9.

These two chords, as I mentioned above, belong to the key of G Minor, where these are the following notes of the scale, G, A, Bb, C, D, Eb, and F.
Cmin9 = C, Eb, G, D
Ebadd9 = Eb, G, Bb, F
If I’m going to make a bassline, I would focus on the C note and the Eb note, just as a starter to see how that sounds. C and Eb are the root notes of the aforementioned chords.

After that, I’d play around with the G Minor scale, whose notes I listed above, and I’d see if I could make something out of that. However, usually I crave a little more out of the bassline, and most other people do as well.
Most people would argue that the main purpose of the bassline, whether it’s Boutique 808 or a bass guitar, is to hold the rhythm down of the song, so to speak.
It’s a way of solidifying the groove and flow of the track. It’s like strengthening its backbone.
Without bass, the song wouldn’t have the same “fullness” about it. It would sound likely more empty and hollow. Those lower frequencies really complete and warm-up the song.
In this case, I was struggling to come up with a bass-line that fulfilled that role, so I ended up just outlining the notes of the chords and keeping it very simple.
Sometimes, simplicity is where it’s at.
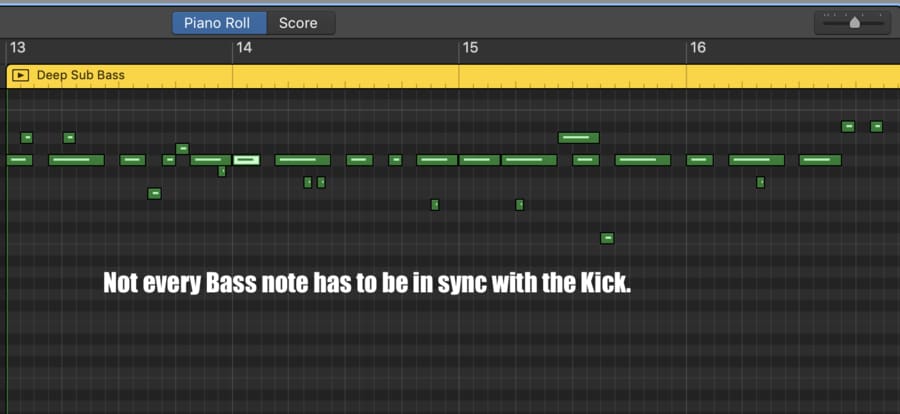
The final thing to note is the fact I copy and pasted the notes of the Kick Drum into the Deep Sub Bass track, that way I had a reference point for when the Kick and Snare hits.
As I wrote about in my 808s article, if you want your bassline to hit hard, which is arguably the most coveted aspect of hip-hop production, then it’s essential that you line your kick drum with the Boutique 808s or Deep Sub Bass Synthesizer.
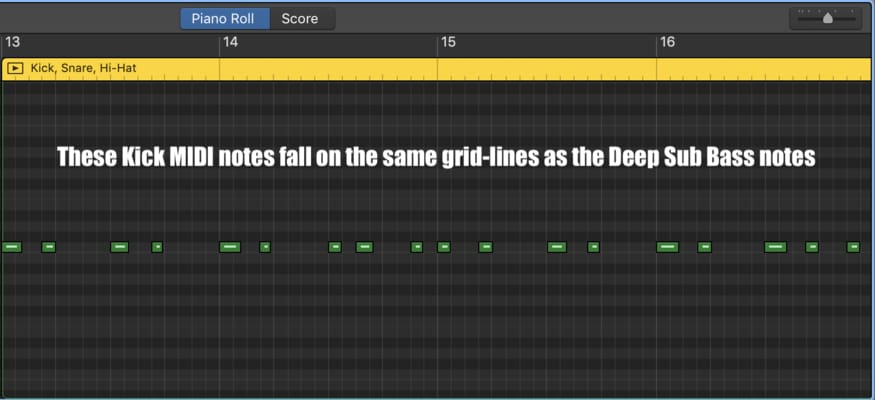
You can check out the image below of the Deep Sub Bass to see how I did that:
11) Volume Control
One last final thing to note before we get into the next section: I did a volume fade at the beginning of the song for the flute section.
In my automation tutorial, I explained that In order to do that, you hit the ‘A’ button on the track for “Automation.”
You’ll notice right away that the yellow automation lines will pop up.
By clicking on the line, you’ll drop automation points and then you can drag the line around according to how you want to adjust the volume.
Check out the picture below to see what I did for that particular track.

Moving on to the Exporting, Mixing, and then Mastering stage…
12) Export As AIFF
Now that the song is pretty much completed, we can move on to the easiest stage: the “exporting stage.”
For this part, make sure that absolutely none of your tracks are clipping (going into the red), otherwise, it’ll sound terrible later on.
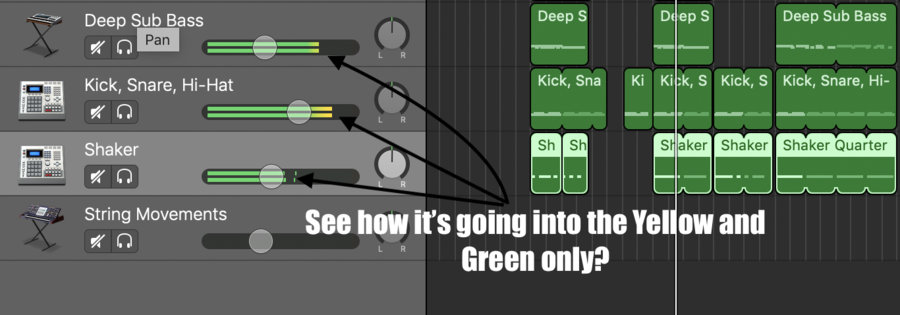
As a general rule, you want your volume tracks to be going into the yellow only during the loudest parts of the song. It’s cool if the tracks ride in the green the entire time.
Also, turn down the Master Volume to +0.0. I haven’t heard anyone say this matters at all, but for me, it absolutely does.
Make sure the Master Volume is at zero, otherwise, your track won’t mix and master properly.

Make sure there are no plug-ins running on your master track as well.
To do that, go down into the Smart Controls and click on the button that says. “Master,” among the other two options, “Track,” and “Compare.”

You’ll see the list of the plug-ins, and make sure they’re all turned off.
It’s ok if you have plug-ins running on the individual tracks, but you don’t want any on the master channel, from what I’ve been told anyway.
At this stage, your track is nearly ready for export. Listen to the whole thing and make sure all of the instruments sound good, and exactly as you want them to.
Keep in mind, when you go to master the track, some of the other sounds may sound accentuated. For that reason, I typically turn down the sound of the hi-hats, shakers, and other high-frequency instruments.
Explained in another way, If you plan on using compression and an EQ boost, some of the higher frequency instruments, such as the hi-hat or cymbals, tend to make that hissing sound.
For that reason, consider turning the volume down on the individual tracks.
a) Click on the option, “Share,” in Garageband’s Toolbar at the top
b) and then click the option, “Export to Disk,” from there,
c) hit the AIFF check-box,
d) name your track
e) and then export it on to your desktop that way you can simply drag and drop it into the DAW.
From this stage, we can actually drag and drop the AIFF file right back into the DAW among all of the other software instrument tracks.
f) Hit the “Solo” button on the track that looks like a pair of headphones to isolate the song.
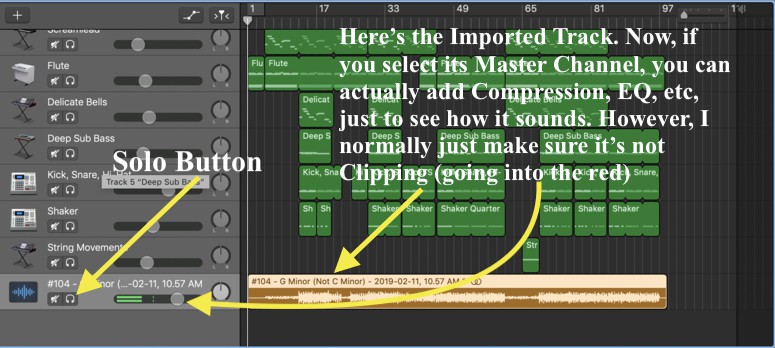
The reason for this is that we’ll check and see that our track isn’t clipping it all, and we give it a general test to see what it’s going to sound like after we add a compressor, channel EQ, and so on and so forth.
Now that we can see there’s nothing wrong with the track and it isn’t too loud, we’ll move on to the mixing stage.
g) Start a new project.
11) Mixing.
I’m by no means an expert mixing engineer, so just keep that in mind, but for this stage, I actually don’t do a lot to it. I showed more of the process in my guide on mixing beats. In his book on Amazon, Bobby Owsinski and some of the engineers explain that there doesn’t always need to be a lot done to a mix.
I usually add a Channel EQ, a compressor or Multipressor, and then maybe a Limiter as well just in case.
a) Channel EQ
As you can see by the image below, I cut the lowest and highest frequencies, dropped the 205hz frequency by -3.5 dB, and then gave the song a bit of a boost by 3dB or so starting from the range of 500hz to 10,000 kHz.
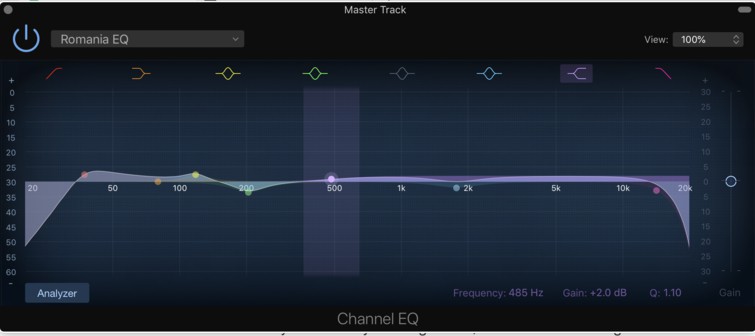
I also gave it a small boost to around 35hz.
b) Multipressor
For the multipressor, I just used the “Final Hip Hop Compressor” pre-set which dropped the gain by around -3.6dB.
I really like the way the multipressor sounds. I find it gives the track quite a bit of punchiness.
*In the YouTube version of this song, I used a compressor instead of a multipressor, but on my SoundCloud, I used the multipressor version.
c) Limiter
As I wrote in my article about limiting, the limiter acts as a compressor with an extremely high ratio, or in other words, it’s a “brick wall” in which no frequencies can pass through.
Using the limiter, we’ll boost the overall volume of the track by +3.0dB, and then we’ll set the output level at -0.2dB.
The gain is best increased by just 1, 2, or 3 dB because then we’re not pushing it too hard.
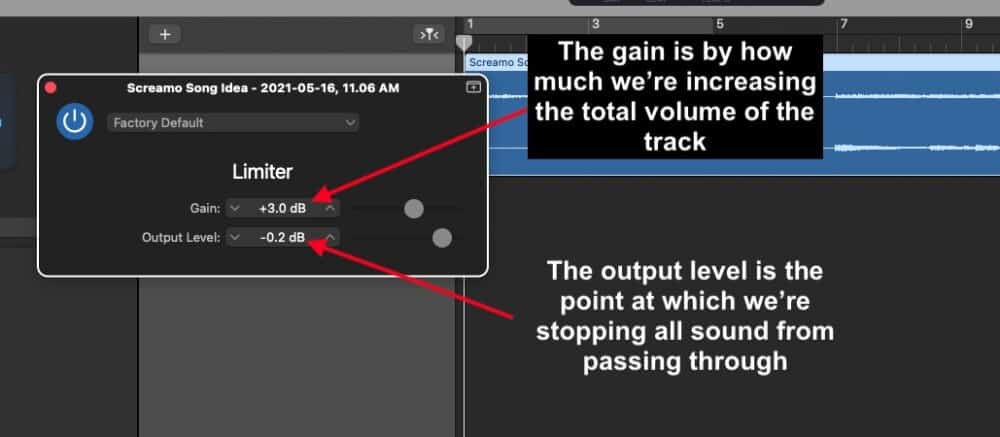
Regarding the Output Level knob, technically, the point past 0dB is the point of distortion according to what I’ve read.
If we have it set at -0.2dB, then we don’t have to worry about the song exceeding that point and thus, creating distortion.
Because of the way the limiter works, a lot of people like to use it as a volume-increaser at the end of the mixing process.
However, it’s much better thought of as a tool that we can use to ensure no undesirable sounds are heard in the mix.
12) Final Step
Ensure the volume of the track is consistent with other music you’ve created.
If you have an album on your phone and you hook it into a Bluetooth speaker at someone’s house, you want the tracks to be the same volume as each other.
That way, you won’t have to continuously come back and turn the volume up.
For this point, I would try and match the volume of, not other artists on YouTube or SoundCloud, but your favorite artists and their professionally mixed and mastered hit singles.
If you’re going to try and make a song, you might as well get used to trying to match the amplitude (volume) of their music.
I usually choose the volume to be around +1.6dB on the Master Volume channel. In between +1.6 and +2.0 dB, depending on whether I’ve used a compressor a multipressor.
13) Export
Now, if you want to export your music, thankfully, Garageband comes with a convenient “Share” function on the top toolbar that allows you to easily export music to either SoundCloud, iTunes, or YouTube.
Before doing this, however, make sure you do this one last thing if you haven’t already.
a) Go into the Garageband Preferences.
b) Click on Advanced.
c) See where it says, “Auto Normalize – Export Projects At Full Volume?”
Make sure this box is unchecked, otherwise, Garageband will export your music at a level that is far too quiet, and the competition will just outshine you like crazy.
Moving on…
With that said, try to avoid making your tracks too loud.
I’m not an expert on this topic, so take notice of this warning, but some people say that making your tracks super loud is a part of what’s called the “Loudness War.”
It’s up to you whether or not you want to engage in this. If you’re curious to read more about it, I recommend this article here.
Some people might argue that an artist/audio engineer has to do whatever they can to get noticed, and that includes exporting music at too high of a volume.
Others will hate you for making your music so loud.
It’s up to you as to whether you want to annoy other producers and audio engineers. I guess you have to ask yourself though, “am I making music for myself, other people, or other producers?”
Anyway, I hope this tutorial was helpful to you. As I said before, I’m not a Billboard-topping artist, so I can’t tell you how to make the illest beat you’ve ever heard. I can only show you how I make them.
Enjoy.
Do me a solid and share this on social media.


 Written By :