In this tutorial today, I’m going to show you how I would make a very simple trap beat in Garageband.
I should probably start out with a few disclaimers to protect myself from getting eviscerated in the comments.
Truthfully, I can’t show you how to make the best trap beat around and also score you a #1 hit on the Billboard 100, because I’ve done neither of those things, but I can get you started down the right path.
Moreover, I’m not an expert on Trap Music. From an outsider looking in, all I can do is show you how I would make a Trap Beat if I was going to create one – stamped with my individual style – for a client.
With all that said, I find that trap beats are some of the simplest songs to make because they tend to be short, they don’t have interludes, and they usually use the same melody throughout the song. Ultimately, there are a few steps one can take.
To Make a Trap Beat in Garageband
- Use the Trap Door or the Trap Kit from Drum Pro
- Have a snare on every third beat
- Use double or triple-time hi-hats
- Set the BPM between 100 and 170
- Make a melody in a minor key
- Use the same melody throughout the song
- Use a flute or another woodwind instrument
- Use chants, sirens, and other sounds
Some of these steps will need to be unpacked, so we’ll do that now.
What This Tutorial Will Include
For this tutorial, I created a track and called it “Gunshots.”
I’ll explain the simple music theory behind the melodies, including chords, key signatures, scales, and modes. I’ll assume that you know almost nothing about music theory.
I should also add that it’s not necessary at all to learn music theory if you want to create cool songs and melodies. As I mentioned before, it’s mostly just a way of communicating efficiently with other musicians.
In fact, when I wrote this song, I had no idea what scales or modes I was using. I just created a simple chord progression, and then messed around until I found something that sounded cool.
Lets Begin
Characteristics Of Trap Music
There are a few qualities of trap music which many people have grown accustomed to. I’m going to outline just a few of those things right now.
Obviously, there are other thematic principles and characteristics related to the lyrics and culture, but we’re talking about the musical aspects only for the sake of this tutorial. I made another tutorial on making sad trap beats as well.
Here are some of the most stand-out features of trap music:
- The snare on every third beat.
- Roland TR-808 (Boutique 808s) plays a key role
- Uses the Trap drum-kit which has its very own sound.
- Double or Triple Time hi-hats.
- In many cases, a dark-vibe
- Usually created with a Minor Key signature or Aeolian Mode.
- Tracks are typically between 100 and 175 Beats Per Minute but usually hovers around 145 – according to DJ Johnny Terror.
- Often incorporates the use of flutes
- Often uses chants/sirens/other miscellaneous sounds.
Without further ado…
Here’s the beat that I’ll show you how I made.
The actual process
Obviously, the first thing you want to do is create a new project in Garageband.
You could use the Hip-Hop template, but that would give you sounds and drum-kits that are more basic Hip-Hop, like Boom Bap, rather than a Trap beat.
1) Load the ‘Trap Door” drum-kit.
The first important step is to load up the Trap Door drum kit – found in the Electronic Drum Kit category near the very bottom.
I chose this as the first step, because the drum-kit commonly used by Trap producers is the most easily recognized characteristic.
Of course, there are other aspects to the style, but for the most part, that drum kit is going to make the listener think, “Oh, this sounds like a trap beat.”
Bonus tip: (There is also a great Trap Set that comes with the Drum Pro plug-in that I wrote about in this article here. You can find the Drum Pro plug-in at Plugins4Free)
2) Make the First Melody
I usually start with the melody afterward, and then I make the rhythm section because I guess I would say that I’m more of a melody rather than a rhythm-focused kind of a guy.
In this particular track, I wrote a melody using a simple C Minor chord, C-Eb, G, using the Classic Clean guitar setting, which you can find in the category, “Guitar,” in the Software Instruments tracks.
Now, you don’t have to make a beat using a minor key signature or minor chord progression, but a minor key signature is pretty common.
Thinking of Post-Malone’s Trap-influenced “Rockstar,” in particular, that track has a strong minor tonality.
It’s easily one of the most minor pop hits I’ve heard in a while, and it doesn’t have a switch to a Major Key signature at any point in the song.
If that isn’t Trap enough for you, Dave East and 2 Chainz’s track, “Can’t Ignore.”
That song is in D Minor and it really emphasizes the tonal center (the dominant note of the song, the note on which the rest of the track revolves) throughout the entire track by coming back to the D note repeatedly with both the piano and the 808s.
In the image you can see below, you can check out the simple chord on which the entire song (my song) is based, C Minor.

When I first began messing around with the MIDI keyboard, the C minor chord was my go-to chord. I literally just played around with that chord, C Eb, and G.
There are 12 notes in standard Western notation, C, Db, D, Eb, E, F, (F# or Gb), G, Ab, A, B, and Bb. Some of these notes have different ways of describing them, for instance, Gb can actually be F#.
Anyway, chords are known as triads, because there are literally 3 notes in it, hence the use of the “tri” prefix. Putting that to good use, a C Major chord means it’s the Root, the Third, and the Fifth.
Essentially, you just pick the root, in this case, C, and then the 3rd, E, and then G is the 5th because it’s literally the 5th note from C.
See:
C(1), D(2), E(3), F(4), G(5).
If you want to make the chord a minor, you use a flat on the third, which makes it a minor third. Now, it’s C, Eb, G = a C minor chord.
There are literally three notes in the entire chord progression in my song, “Gunshots.”
Assuming you’re an absolute beginner, you can play around with that chord to get a handle on the sound.
If you wanted to change it to a minor sound, you would just raise the Eb to instead, an E, which looks like this on the keyboard.
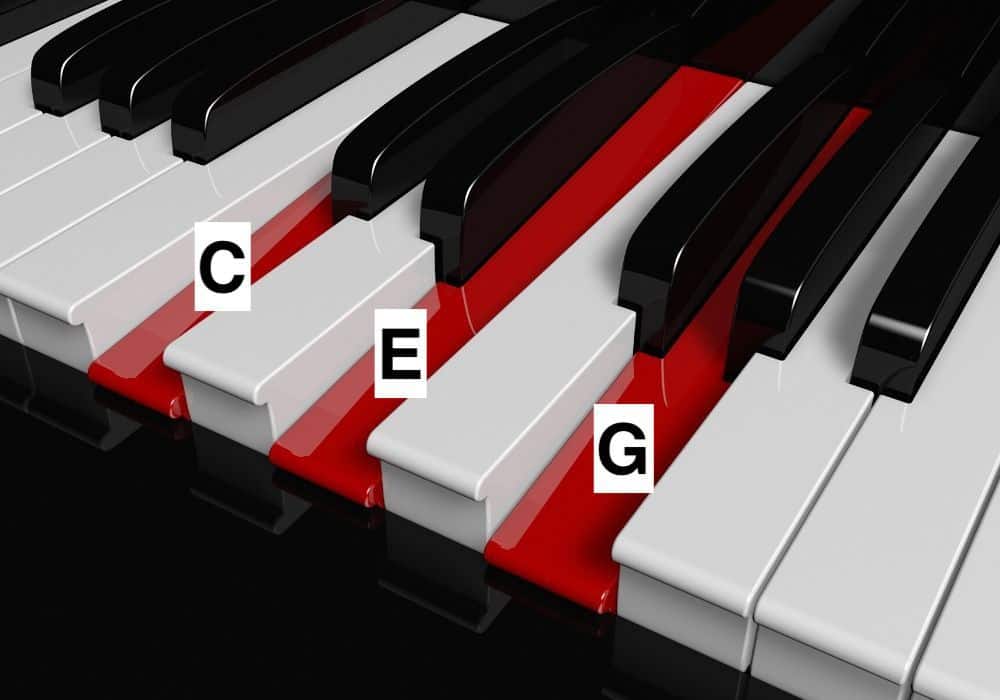
The great thing about this is that you can actually move these chords around all over the keyboard.
Additionally, once you’ve learned a couple of different shapes, you can create entirely different sounds just by modifying the formula a little bit.
3) Additional Melodies To Fill Things Out
After I’ve built the foundation of a melody, which is usually some kind of chord or chord progression I love, I move on to filling out the melody with other instruments.
In this case, I used two Steinway Grand Pianos for additional melodies. You’ll notice that adding another melodic line to a simple chord like that is already enough for a melody.
Building a cool sounding melody really doesn’t have to be rocket science, however, if you do want to get more sophisticated in your use of the piano, you can’t go wrong with PianoForAll which is probably the easiest and cheapest way of learning.
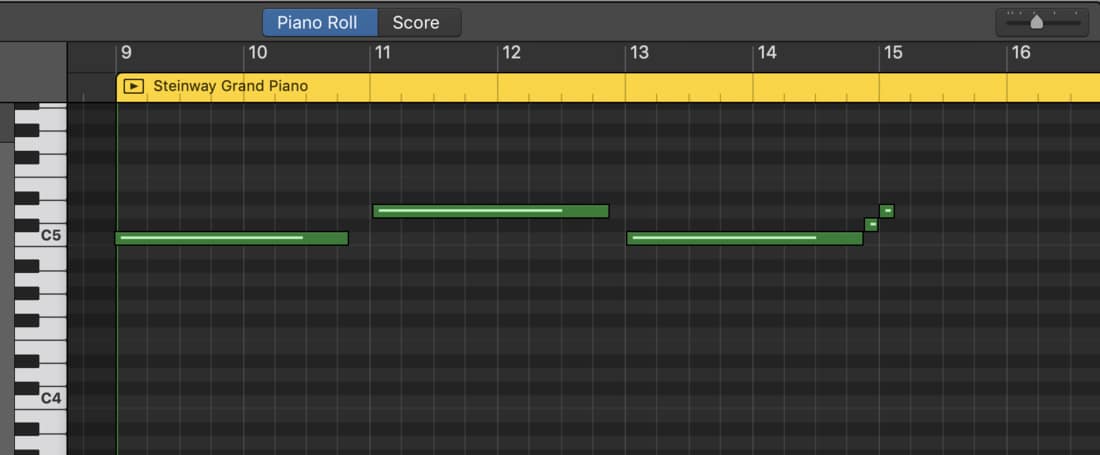
After making a simple C Minor chord as my melody, I used a Steinway Grand Piano and fooled around until I found something else that sounded cool, which just happened to be a C, but a much higher C note (2 Octaves higher).
Once I established a nice 3-note melody over top of the simple C Minor chord, I basically just messed around on the Steinway Grand Piano until I created something good, while keeping in mind the notes I used in the chord as a basis for the rest of the song.
In the case of this track, I played through a C Minor scale over top of a C Minor chord.
C, D, Eb, F, G, Ab, Bb.

However, the C Minor scale had a raised ‘A’ – a raised sixth degree of the scale, Which means that it’s actually the C Dorian mode, the Bb Major scale with its tonal center on the C, over top of the C Minor Chord.
If you took a chance and listened to the song I created, you’ll notice it has that jazzy sound, courtesy of the Dorian mode.
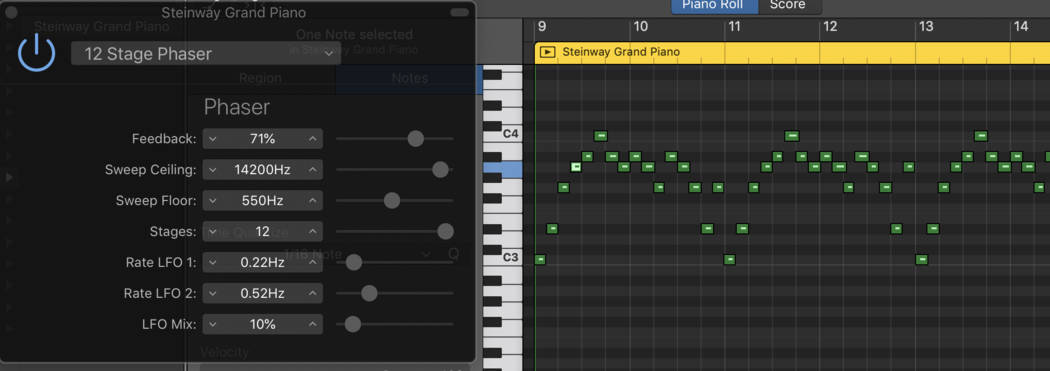
b) On the C Minor scale, I used a 12-Stage Phaser which you can set up in the plug-ins down in the smart controls. I set it to 71% feedback.
The picture below shows the Piano Roll for the Piano melody as well, not the three-note melody, or the Chord Progression, but the arpeggio that plays in the background.
4) Hi-Hats, Cymbals, and Shakers
Creating the hi-hats is probably the easiest part, due to the fact they’re so mathematical and precise in trap music.
For instance, you could easily just create each hi-hat exactly on the grid-line, or every other grid-line, and it’ll sound decent.
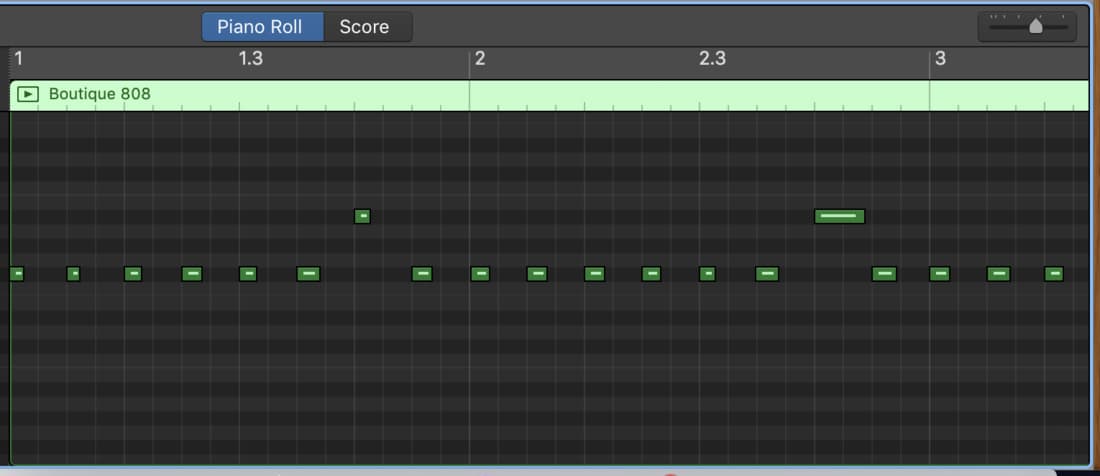
In this track, in particular, there is a hi-hat on every other grid-line. You’ll quickly pick up on how the hi-hats work in trap music. Also, you’ll see the two notes that are at a different level, those are the cymbals.
In other words, the hi-hats are on the eighth note, and the cymbal is every fourth beat.
Once you’ve
For example, rather than having a hi-hat on every other grid line, you could have one short part where there is a hi-hat on every single line, and then it goes back to just every other-grid line, which means that it’ll have that machine gun sound.
It’s hard to explain, but producers do it quite a lot in Trap music. The hi-hats are kind of like the way Metallica plays the main guitar riff of “Battery,” off of Master Of Puppets.
5) Creating the Kick and Snare
When creating the kick and snare, for me, it’s honestly as simple as making a beat the same way you would tap on your desk along to a song, or play the mock drums while in class like I always did in high school.
By that, I mean that most people can think of a beat right away just by banging on a table. It’s pretty intuitive and comes naturally to most people.
First things first, make sure your Trap Door kit is loaded up.
b) Have the octave set at ‘C1’ so you’re actually playing notes
c) The ‘A’ key on your keyboard is the Kick, and the ‘S’ key, is the snare. Just fool around with those two keys until you’ve created a cool kick and snare combination, hit the “Record” button, and then record it.
After you’ve created the rhythm section, you can go back manually and push the notes over closer to the grid-line.
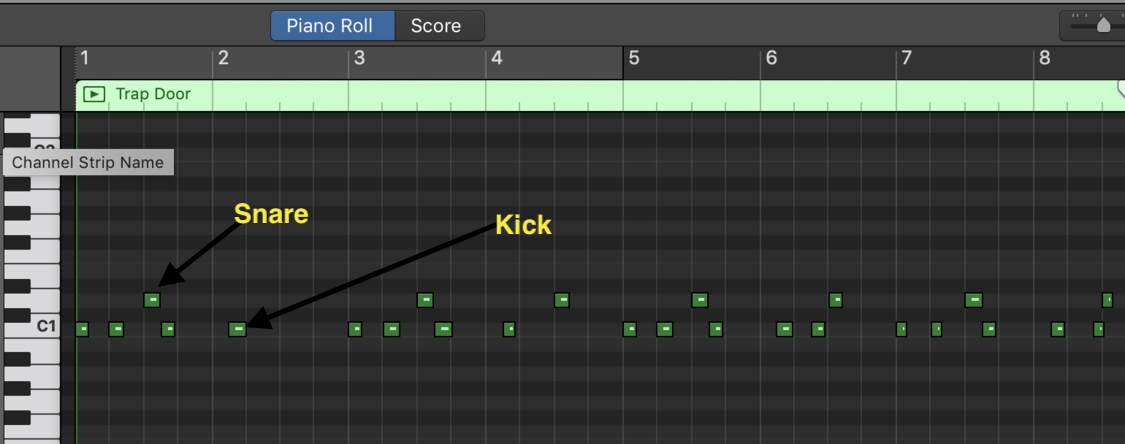
There’s a much better way of doing this called the Quantizer function, however, it will change every note by a certain degree through automation.
I use it sometimes, but not always.
The truth is that the quantizer function can make everything sound a bit mechanical because everything is just a bit too perfect, or alternatively, the automation will make the beats not fall in line the way you wanted.
Assuming you want to use it, I’ll briefly explain to you how to use it here:
How to Use the Quantizer Function
By using the Quantize function – by the way, I have an entire tutorial on this – you can actually have Garageband fix all of the imperfections for you. The Quantize function is in the Piano Roll in the bottom section of the Smart Controls.
Click on the drop-down menu that has “Time Quantize” over top of it, and set it to 16th notes or 8th notes, depending on just how much work you want Garageband to do for you.
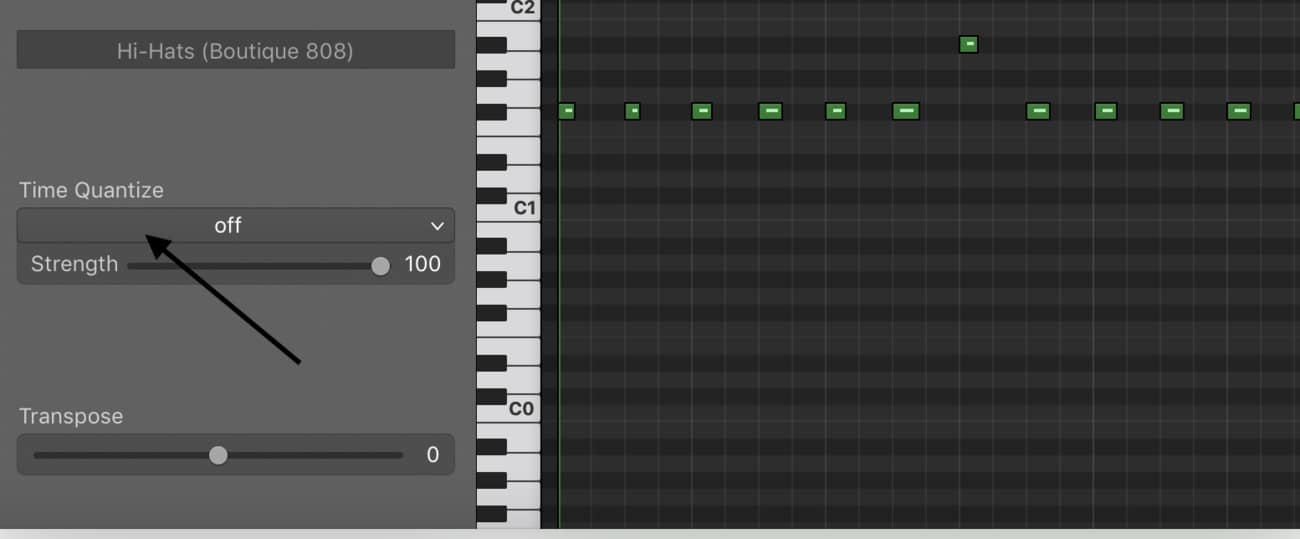
What this does, is it brings all of your MIDI notes exactly on the grid-line, that way everything sounds synchronized. The same thing can be done with more advanced software like Melodyne 5, however, the way Melodyne 5 does it is way more detailed and exact.
6) Creating the Bass with 808s/Deep Sub Bass Synth
In Garageband, you basically have a couple of different options for writing a bass-line using stock plug-ins and software instruments. We have Boutique 808s, 808 Bass, as well as the Deep Sub Bass synthesizer.
I’ll typically create one bass-line with an instrument and then copy and paste it into another software instrument track, just to see which one sounds better, the Deep Sub Bass, 808 Bass, or the Boutique 808.
However, these days, I’ll use Initial Audio’s 808 Studio II Synth instead which is probably the best 808 plugin I’ve used.
Remember above when I said that we used a C Minor chord for the main foundation of the song?
That will come in handy later on when I’m writing the bass-line. For instance, I’ll usually test out the notes of the chord on the bass-line, just to see how it sounds.
So, in this case, I’ll play the root note, C, as the primary bass-line to see what that sounds like, and then I’ll mess around with the notes of the chord, (C, Eb, and G) until I’ve found something that sounds cool.
You can see from the picture below that the bass-line isn’t overly complicated.
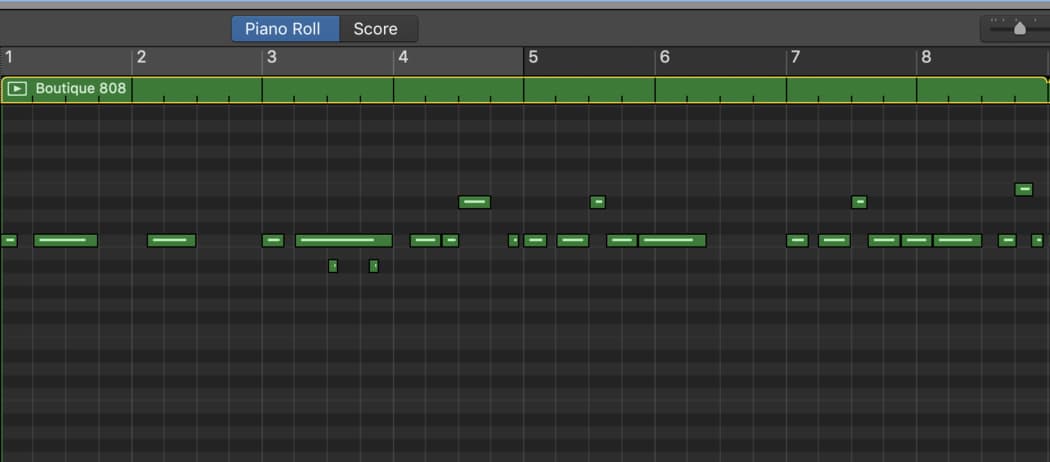
The notes of C Minor are thus: C, Eb, F, G, Ab, Bb, C, D. Playing any one of those notes with your bass-line over a C Minor chord will work and sound alright.
Of course, you don’t have to JUST use those notes. It’s just a basic guideline so you have an idea of what can be played.
b) Lining up the Kick and Bass
Once you’ve played about the bass-instrument, and crafted something you’re into, make sure to line up some of those notes with the Kick drum, to make sure you get that hard bass sound that people love to blast in their cars.
Explained in another way, you want to make your bass-line notes, or at least some of them, start on the same grid-line as the kick.
The reason for this is that it combines the attack of the kick with the bass-line and literally makes the track pump and bang.
7) EQ, Compression, Mastering, and Finally Uploading The Track
After you’ve made yourself a simple trap beat, following the guideline I laid out for you above, it’s time to mix and master everything. Like a lot of things in life, people love to over complicate things.
I’m not sure if it’s a type of procrastination or what, but personally, I’ve found that the less I mess around in this phase the better. Then again, I’m not a mixing master, so maybe there’s something I’m missing.
a) First thing I normally do, I head over to the master volume output meter and I set to +0 dB.
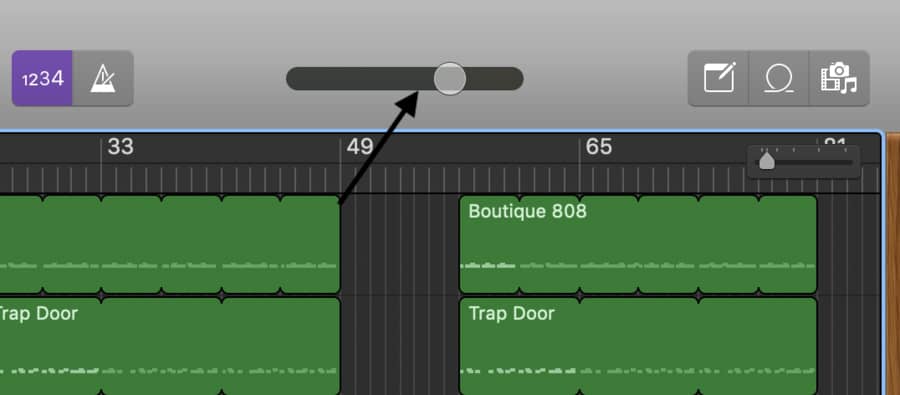
I’ve heard people say this level doesn’t matter, but I’ve found that when I have it cranked when I put it through the mixing and mastering process afterward, my mix ends up distorted, so I always make sure to turn it down.
b) Next thing I do, is I listen closely to the track together. I don’t listen to each track individually, I listen to everything as one song, as one unit. Turning up and down each VU metre as I see fit.
Bonus Tip: The Mixing and Mastering phase will likely make your hi-hats “hiss” too much, especially if you’ve increased the hi-end of your mix. So keep in mind that you want to turn down the loud drum parts a bit more than others.
c) Start playing the song, and pay close to attention to the colour of each individual track’s VU meter. At no point, ever, should the Green bar turn into Red.
You want the VU meters to hover in the green for most of the song, but during the loudest parts, the meter can go into the yellow.

d) EQ the Deep Sub Bass/Boutique 808 as well as the Kick. For the bass line, I’ll always drop the high frequencies because there’s no reason for them to be there.
*To access the EQ for individual Track Regions, double-click on the Track Region, and typically, there will be two options, “Control,” and “EQ.”
You can see from the image below, that I’ve given a little boost at 145 hz, and 35 hz, usually by around +3.5-4.0 dB.
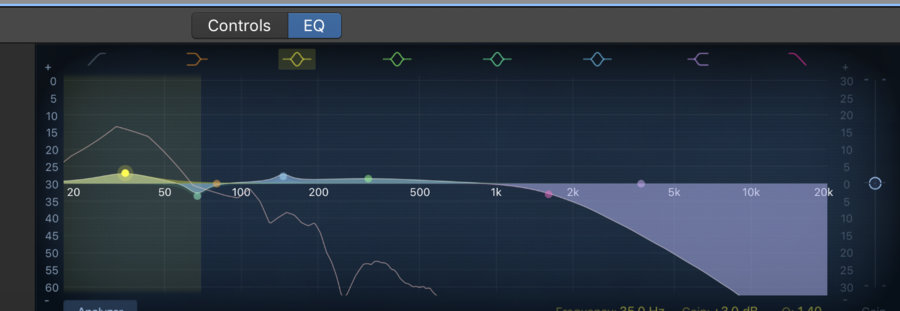
There’s no reason to go too far ahead of +4 dB because you’ll end up just messing up your mix. However, if you think increasing the frequency by +15dB somewhere sounds good, give it a whirl, and tell me how it turns out.
e) Where you boosted the sound of the kick, subtract from the bass, to make room for that hard kick sound. This part isn’t that necessary for a beginner, so I won’t go into much detail.
f) Add a bit of distortion on the Boutique 808/Deep Sub Bass to make it sound a bit dirty.
To find distortion, just go into the plug-ins and find it in the drop-down menu. You can see it in the image I posted below:

The key to using distortion is to not use it too much. It’s kind of like a spice, like cayenne pepper.
You can see from the image below, that I have the Distortion set at +1.5 dB, and then the Output is turned down to -6.0dB.
The output is turned down because distortion makes the bass so much louder.
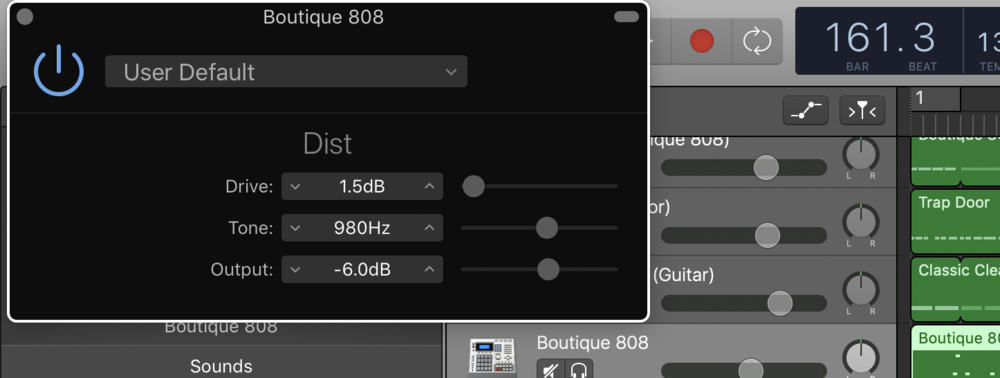
Basically, I just turned down the distortion to the point where the volume doesn’t change, but the gritty sound as a consequence of the distortion has stayed the same.
Now that you’ve adjusted everything to your liking, it’s time to Export the track to your Desktop.
8) Export As An AIFF File
- To do this, click on the Tab in the top toolbar that says, “Share.”
- Then, go down where it says, “Export Song To Hardrive.”
- Make sure you choose the option, AIFF.
- Export it to your desktop, that way you have a much easier time finding it.
9) Open A New File – Drag And Drop AIFF File Back Into Garageband
Once you’ve dragged and dropped the file back into Garageband, you can start adjusting the EQ, Compressor, Multipressor, and so on and so forth.
For the sake of this tutorial, I’m only going to show you what adjustments I made to my track, before finally exporting it into Music.
There are literally tons of things you can do during this phase, and all of it is far beyond the scope of this brief tutorial. For that reason, I’ll just show you the three things that I did in this phase, and then we’ll call it a day.
Once you start the mastering process, you’ll notice that you have the options, “Track,” or “Master.”
You want to click on the button that says, “Master.”
Once the plug-ins show up, start modifying from there.
a) Compressor
Usually, I compress the file first using the Compressor plug-in down in the smart controls (more on the compressor in my guide).
In the past, I almost always used the Platinum Analog Tape preset, and it worked great, however, as I learned a lot more about the compressor, I decided to start using my own settings.
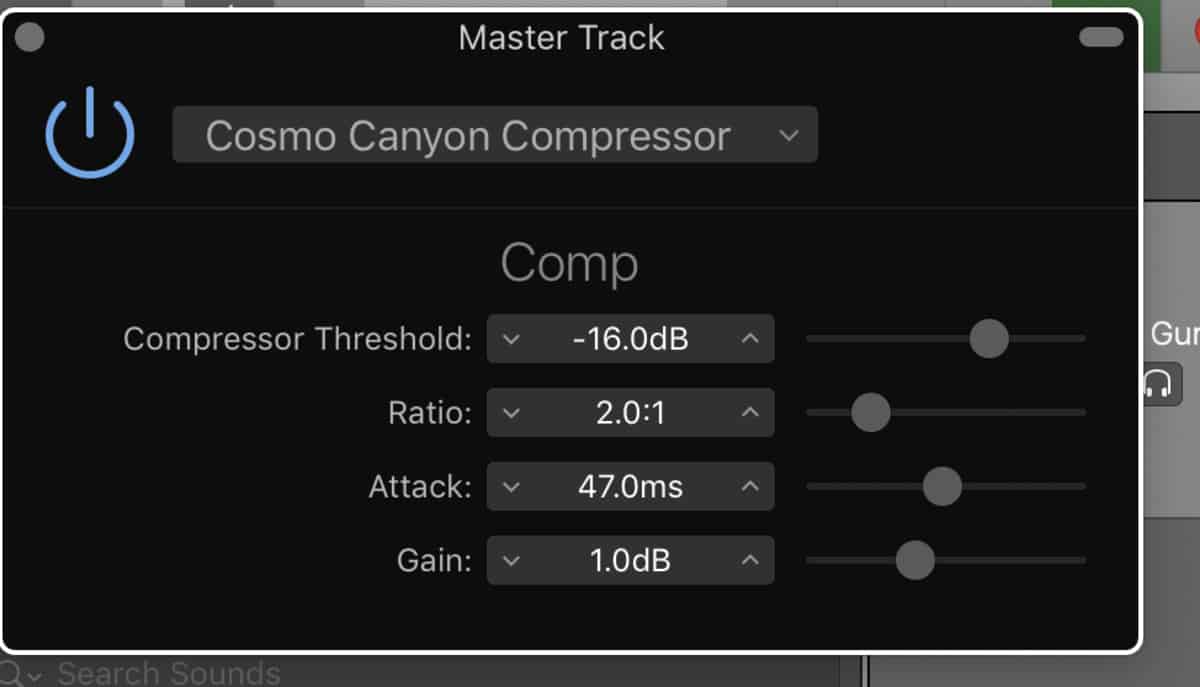
I set it to the settings below for “Gunshots.” Ignore the name of the preset.
b) EQ
As I’ve mentioned many other times before, less EQ is usually more.
There’s no reason to mess around with it too much, otherwise, you’ll just end up throwing something out of whack, and while it’ll sound good
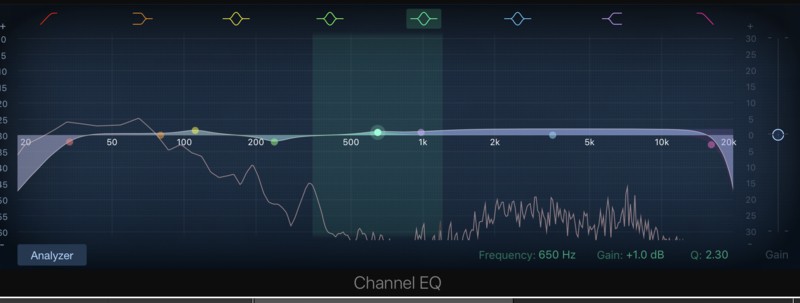
I’ll usually drop the low-end a bit first, and then the high-end a bit, boost the mid-lows by 3-4 dB and then bring up the highs from 1000khz to 10,000khz by about +2dB.
I find that EQ adds a bit of brightness to the music, which I really enjoy.
You can check out the picture below to see for yourself.
c) Limiter
Go back into your plug-ins and then bring up a limiter.
No reason to get too sophisticated with this plug-in, just turn the gain up by around +1.5dB and turn down the output level to -0.5dB.
d) Finale
Give your final track a listen, and then go into the tool bar and click, “Share,” and share it to your iTunes or SoundCloud after filling out all of the information.
Uploading your music to iTunes first is usually the way to go, because then you get a quick judgment on the final product through an alternative platform, rather than just through Garageband.
Important Things to Consider
1) Make sure you’ve gone into the Garageband Preferences, into the Advanced Settings, and then uncheck the box, “Export At Full Volume,” as I’ve explained before.
If this option is turned on, it’ll bring the total volume significantly down, to the point where it’s practically no good, because your music will be so much quieter than the competition.
2) Another disclaimer I have for people, just for the sake of avoiding confusion, is that I actually don’t use much music theory when I’m composing something.
Music theory is just a way of analyzing what you’ve created and then communicating that with other musicians, artists, and producers.
I may use basic theory, like understanding what the chords are in a key signature, but for the most part, I actually don’t use too much theoretical stuff. I just mess around until I’ve created something.
I could’ve gone into detail of the exact musical technical terminology to describe this stuff, but it wouldn’t be a beginner’s tutorial, so I tried to keep it as easy as possible.
Regardless, if you want to learn more about theory, I suggest checking out Mark Sarnecki’s book including the Answer book which is an absolute must.

 Written By :