Nearly all of us have listened to a recording with programmed drums without even realizing it. Garageband’s drummer track is a nice introduction to this world, however, not everyone knows how to use it. So what’s the best way to approach the Garageband Drummer?
To create drums in Garageband:
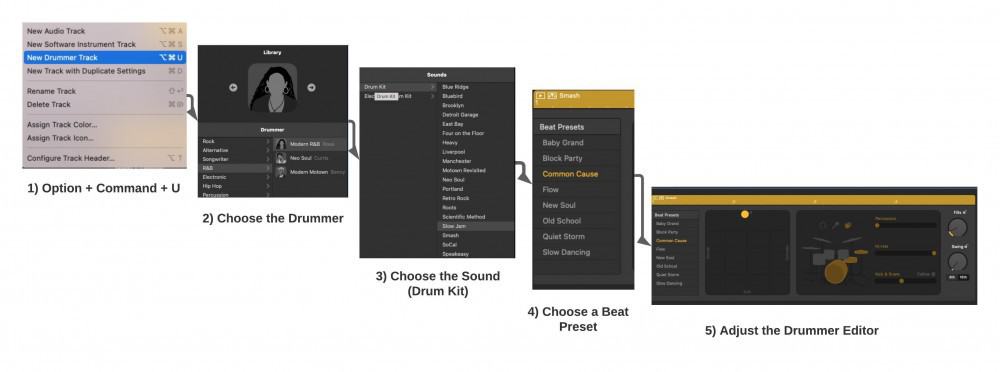
1) Use the command, (⌥ + ⌘ + U), to bring up the drummer track.
2) Choose a drummer, a sound, and then pick a beat preset that goes with your song.
3) Adjust the dynamics with the X/Y pad in the Drummer Editor.
There are a few other techniques you can use as well.
How to Use Garageband’s Drummer Track to Create Drums
1) Hit the Command (Option + Command + U) to bring up the Drummer Track
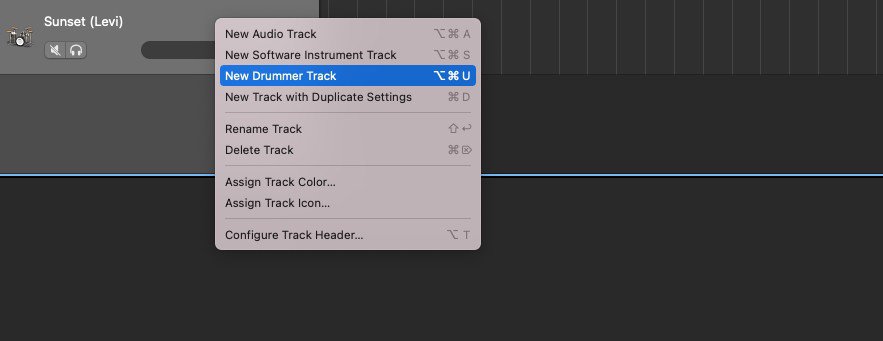
The (Option + Command +U) command is the keyboard shortcut for loading up the drummer track in your Garageband projects. You can also load it by right-clicking on the instrument track and then selecting the option, “New Drummer Track.”
After inserting it into your workspace, you’ll notice that Garageband brings up a new yellow instrument region that is unlike the other file formats used by the software.
MIDI instrument tracks are always green, actual recordings are blue, and then the Drummer Track is yellow.
In the latest Garageband update, they made it possible to change the color of the tracks via the (Option + C) command, but this isn’t going to help you create the drums that you want. For the sake of speed, I almost always use the (⌥ + ⌘ + U) function because it’s just way faster.
2) Choose a Drummer, Sound, and a Beat Preset
Drummers, Sounds, and Beat Presets are the fundamental parameters of Garageband’s Drummer Track. The most changes you can make to it will be selected from one of these three categories.
Think of what genre you like the most and choose a drummer from one of the sub-categories, ie, rock, alternative, hip-hop, etc. From there, you can scroll through the different beat presets and figure out which one sounds the coolest to you.
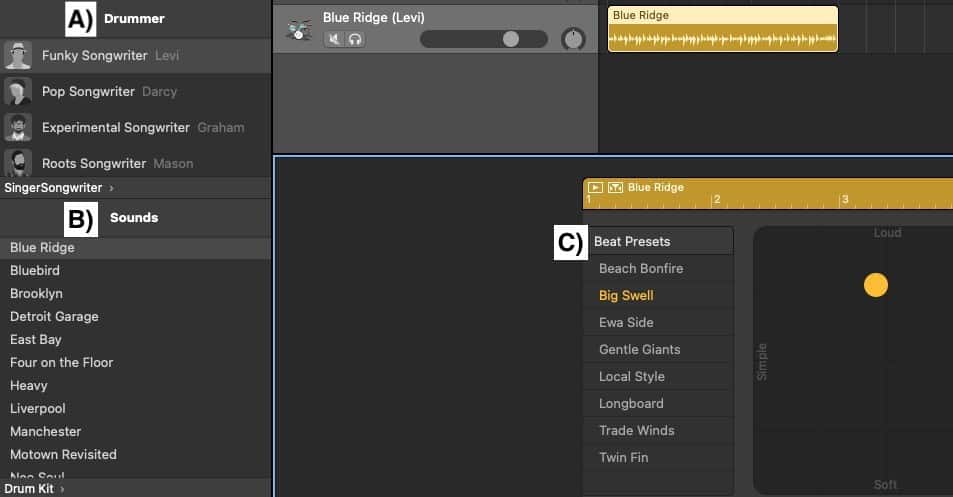
A) Drummers
There are approximately 33 different drummers in Garageband, and each one serves an entirely different purpose, including what style of music they’re meant for. Depending on what genre you choose, there are around 3-7 drummers for each.
Every drummer has their own style and beat pre-sets, with the singer-songwriter coming with the highest number of drummer types, probably due to the popularity of the genre at the time of the Drummer Track’s creation.
For the most part, the sub-categories, genres, and drummers all sound fairly close to how you would imagine them, given their titles.
For example, the Brit Pop drummer, Ian, sounds as if he’s straight out of an Oasis song, whereas the Pop Rock drummer, Kyle, just sounds like the drums of every pop rock song.
Don’t sleep on some of the more obscure ones. Isabela, from the Latin Percussion genre, sounds super cool and she has very interesting presets as well including Coconut Grove, Miami Nights, and a few others.
The way you adjust her instruments is quite a bit different as well considering it’s an entirely different kit that includes marachas, bongos and congas.
| Main Genre | Sub-Genre and Drummer Name |
| Rock | Pop Rock (Kyle), Retro Rock (Logan), Hard Rock (Anders), Punk Rock (Max), Funk Rock (Jesse), and Brit Pop (Ian). |
| Alternative | Indie Pop (Aidan), Indie Disco (Nikki), Indie Rock (Gavin), Garage Rock (Zak), Modern 80s (Maya), and then Synth Pop (Duncan). |
| Songwriter | Funky Songwriter (Levi), Pop Songwriter (Darcy), Experimental Songwriter (Graham), Roots Songwriter (Mason), 60s Songwriter (Parker), Roots Brush (Austin), and then Pop Brush (Tyrell). |
| Rhythm and Blues | Modern R & B (Rose), Neo Soul (Curtis), and Modern Motown (Benny) |
| Electronic | Big Room EDM (Magnus), Tech House (Leah), Dubstep (Jasper), Electro Trap (Ronnie), Modern House (Julian). |
| Hip-Hop | Trap (Dez), Modern Hip-Hop (Anton), Boom Bap (Maurice) |
| Percussion | Latin Percussion (Isabela), Songwriter Percussion (Finn), Pop Percussion (Quincy). |
B) Sounds
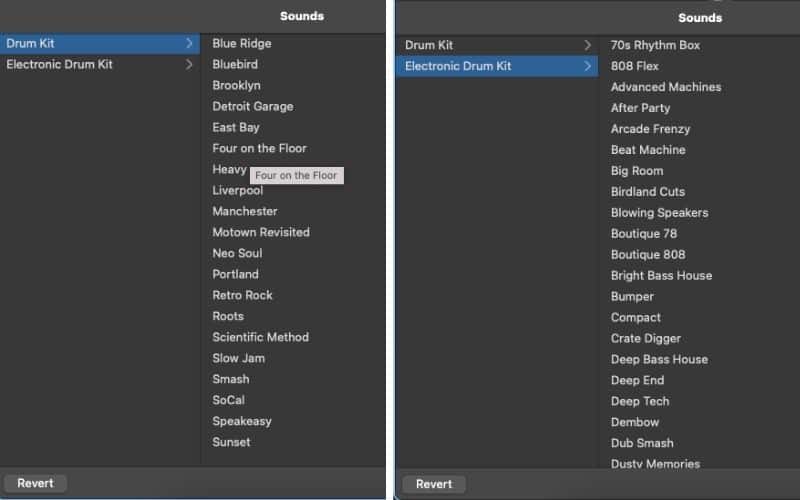
The drummer track’s “Sounds” are really just the drum-kits. There are 20 different drum kits in Garageband, including Manchester, Modern Revisited, Sunset, SoCal, and more.
The title of the kit usually says something about the drum kit, itself, for instance, you can assume that SoCal is a light drum kit that’s meant for maybe a light rock music, like Sublime or a similar band, or the Heavy kit which is more for metal or hard rock songs.
And these are just the sounds from the regular drum kit section. The electronic drum kit section in Garageband has 71 kits, and this comes just after the 10.4.3 update that included a fresh batch of new kits.
For instance, there is the Modern 808, Modern 909, the Roland TR-808, and many others now as well. Additionally, there is an 808 bass in the Bass Synth which is worth looking at.
C) Beat Presets
Each drummer has 8 different beat-presets, and they all serve a different purpose. Using Max, the punk-rock drummer, as an example, there is Broken Glass, Crowd Control, Turn It Up, and Wave a Flag. Similar to the drum kits, the title tends to say something about the beat preset itself.
For example, Turn it Up is for a loud part of the song, and you can tell because there is a more aggressive crash cymbal. Wave A Flag, on the other hand, is meant more for an introduction or maybe an interlude of some kind.
3) Adjust The Drummer Editor
Choosing just the genre, the drummer, and the drum kit is usually enough to make a massive difference in how your drums sound right off the bat.
It’s not uncommon for me to just choose the drummer the way that it is, and not even mess around with the other settings, however, the additional parameters and presets are available for those of us who want to be a bit more creative.
If you want to customize the Garageband drummer, you just have to use the Drummer Editor, which looks like the image shown below. It includes the X/Y Pad, the presets, and a few other settings that are worth exploring for a moment. While it may seem overwhelming at first, the learning curve is small.
A) X/Y Pad

The X/Y Pad is incredibly intuitive and simple to use. There are four different parameters of the X/Y pad, including Soft, Loud, Complex, and Simple.
To use the X/Y pad, you just grab the little yellow ball and drag it toward the lettering on the top, bottom, left, and right-hand sides of the X/Y pad. You’ll notice how the drummer changes up their style according to where you’ve placed the ball.
There really isn’t much else to say about the X/Y Pad, because it’s just as simple as dragging the little yellow ball according to how you want it to sound, whether it’s loud, soft, complex, or simple.
Think about what’s going on in your song. More specifically, think about the dynamics of the section and whether it’s intense, loud, angry, powerful, emotional, soft, etc. Drag the X/Y Pad toward the term that best describes what’s going on in your song.
B) Beat Presets
I already explored what the Beat Presets are in the sub-section above, but it’s important to note how the Beat Presets change according to the X/Y pad, in conjunction with the style of the individual drummers.
For instance, if you’ve chosen the Punk Rock drummer, Max, as well as the preset, Mercury Rising, you can see the way in which the drumming pattern changes according to how you’ve dragged the X/Y pad along with the preset.
More importantly, while the Beat Presets are used for different purposes, the X/Y Pad will adjust the complexity and the volume of the pattern, but it won’t change the fundamental purpose that the Beat Preset was made for. As another example, the Funky Singer-Songwriter drummer, Levi, has a preset called Ewa Side and Big Swell.
As is shown in the video below, Ewa Side is clearly meant to be the rhythm section for a soft verse or maybe an introduction, compared to Big Swell which is much louder and sounds like it could either be for a chorus or a loud verse. You could adjust the X/Y pad to try and make it sound like it was made for something else for creativity’s sake.
C) Percussion, Hi-Hats (Cymbals), and Kick and Snare

Percussion, Hi-Hats, Kick and Snare are the three sub-categories on the right-hand side of the Drummer Editor, and each one includes a numerical format in which you can change the amount of the instruments that are heard in the pre-set.
For instance, if you’ve selected #3 of the Percussion, the Drummer Track will include more percussion sounds.
This will change even more if you make adjustments to the Tambourine, Shaker, and the Clap. There are 3-8 different presets related to each part of the kit. For example, for the percussion sub-category, there are three different presets, but the hi-hat has 8, and the kick and snare usually does as well.
Choose the part of the drum-kit you want to include simply by clicking on it and it will be highlighted yellow, whereas the muted section will be grey. You can really get creative by muting and unmuting different parts of the kit and playing around in the presets.
Drag the little yellow ball to the left and right to see how it affects the patterns of the kit. Dragging the ball to the left or right will either decrease or increase the prevalence of those instruments in the Drummer Track.
If you pull the “Cymbals” to the right all the way to #3, it’s going to increase the speed and number of the cymbals. The same thing can be said about the kick and snare as well.
However, when it comes to the kick and snare, there is more variability, including the ability to create half-time and double-time patterns, indicated by 1/2 and 2x, respectively. Moreover, certain drummers have the capacity for Brush Taps and Sweeps which are really just small fills and sweeps on the snare. These can also be called grace notes, and we’ll talk about them later.

As I said before, even though you can make significant changes to how the Drummer Track sounds with these functions, it’s not going to throw off the fundamental purpose of what the particular preset was made for, so that’s something worth keeping in mind.
D) Tambourine, Shaker, and the Clap
The Tambourine, Shaker, and the Clap are really quite self-explanatory. You can click on each one, and you’ll notice that the instrument icon will be a highlighted yellow.
These settings indicate whether you’re including tambourine, shaker, or clap sounds in the Drummer Track. I honestly think these settings are pretty cool, and they add a bit of flavor to your drummer.
The numeral presets that range from 1-3 also includes these instruments as part of their adjustment. Explained in another way, if you turn on the Shaker by clicking on it, and then drag the little yellow ball to 1, 2, or 3, the amount of shaker in the Drummer Track will change accordingly.
If it has been dragged all the way to the right, it will be at maximum intensity, and if dragged to the left, minimum intensity.
E) Fills

The Drummer Track’s fills are also very cool, and I use them all of the time to stylize individual parts of the drummer track, especially between verses, interludes, or choruses. The best part of using the Drummer Track is that it’s just so simple to understand.
Simply put, to use the fills of the Drummer Track, you turn up the knob according to how many fills you want. If you crank it all the way to the right, you’ll have the maximum amount of fills. If you crank it all the way to the left, there will be hardly any fills at all.
As I just mentioned, the Fill dial is incredibly useful for stylizing parts of the Drummer Track, especially during transitions between particular parts of the song.
You can see what this looks like in the image below. The best way to do this is to cut the drummer track at the section you want to customize and separate it from the rest.

F) Swing
The Swing option is another cool feature. Essentially, the Drummer Track’s swing knob adjusts the degree of syncopation in the track. Syncopation just means the notes between the beat, and the level of syncopation is determined by how far you’ve turned the dial.
Similar to the dial for the Fills, you crank it to the right to add as much syncopation as possible, and to the left if you don’t want any notes between the beats at all.
The Swing dial is really for if you want to add a ton of flavor and complexity to your song. One way of seeing the impact of this dial in real-time is to convert the drummer track into a MIDI track both before and after you’ve adjusted the Swing dial. You can see how turning up the Swing dial will push the MIDI notes away from the grid-line. We’ll talk more about this in a second.
G) 8th and 16th
Furthermore, the Swing dial includes the 8th and 16th note options, which means that you can adjust whether the Swing revolves around 8th or 16th notes.
I find that the Swing button primarily adjusts the Kick and the Snare, with the hi-hats and cymbals remaining the same. As a rule of thumb, I find the Swing is best set to 10% – 20%, but this will obviously depend on musical context.
If you’ve selected the 8th note option, you’ll notice that the syncopation is relatively slow and controlled, but if you increase it to the 16th note option, it will become faster and more abrupt.
If you don’t understand music theory at all, just know that 8th notes and 16th notes indicate a certain amount of time, with 8th notes taking up more units of time than a 16th note.
H) Lock Button

The Drummer Track’s Lock button locks all of the changes you’ve made, that way if you switch a drum kit, or even the drummer for that matter, all of the changes will stay the same, but they’ll now apply to the new drummer or the new drum kit.
This is handy to use if you’ve set up your Drummer Track to your liking, but you’d like to change it to another drummer just to see how it sounds.
I) Follow Button
The Follow button is a great feature as well. The Follow button determines what instrument the drummer track is actually following and revolving its patterns around.
Typically, the drummer and the bass guitar work together, but this isn’t always the case. You can have the drummer follow the rhythm guitar, the vocalist, the lead guitarist, or the bassist if you want to.
It’s really up to you to choose which one you think sounds the best, however, it’s a common practice to pair the drummer and bass guitarist together. Once you click on the Follow button, you’ll notice the addition of the drop-down menu which includes all of the software instrument and audio tracks you’ve used in the project thus far.
J) Groove Track

The Groove Track is a feature that allows you to have one instrument base its patterns around the timing of another instrument rather than the rhythm like the Follow button. Garageband’s Artificial Intelligence will use the data from another instrument to inform how it creates more patterns and sounds.
The Groove Track – which can be used with any instrument – is a bit different because it’s not actually a part of the Drummer Track, however, it does have a useful purpose for programming drums. To bring it up, you just have to right-click on your software instrument track and then select the option, “Configure Track Heading,” as what’s shown in the first image above.
After that, you’ll notice there is a yellow star on the left-hand side of the software instrument track, as well as the ability to add a checkmark on the left-hand side of the other instrument tracks.
Essentially, the Yellow Star indicates that this is the instrument that the others will follow. The software instrument tracks with the checkmarks beside them will revolve around the instrument with the yellow star.

6 Tips for Using the Garageband Drummer Track
1) Mix Different Drum Kit Parts Together

To mix different drum kits together in Garageband, the first thing you’ll need to do is actually separate each part of the kit into a different instrument track region by converting it to MIDI and then by copy and pasting it into a new software instrument track region.
Again, I’ve talked all about how to do this in my article on editing drums in Garageband. Once the kit has been separated, you can change the kit to whatever one you’d like.
For instance, I’ve said this in other articles, but what I like to do is combine the kick of the Beat Machine with the Drum Pro plugin’s Hip-Hop 8 snare. You could figure out your own patters, however, for good measure, I’ll say that another one I like to mix is the hi-hats and cymbals from the Neo Soul kit along with the Beat Machine’s kick.
Before the Big Sur Update, I would sometimes use awesome patterns from the hailed Steven Slate Drums 5 with Garageband drum-kits. But it unfortunately doesn’t work with the latest operating system. If you have Catalina or earlier installed, it’ll work just fine, but Big Sur doesn’t work with it.
2) Hit the Directional Pad On the Drummer Image Icon to Quickly Change Drummers

While this may seem like a throw-away tip, it’s really not. Hit the directional pad on the drummer image icon to shift through all of the available drummers.
This is a good thing to do if you’ve created a melody, you’re out of ideas, and you’d like to see what kind of rhythm section you can come up with. Just shift through all of the available drums to see if there is something that would work with it. Make sure you lock it first.
3) Use the Follow Button to Follow the Rhythm of Another Instrument
As I just stated, there is a marked difference between the Follow Button and the Groove Track. If you go ahead and try it, you’ll see the difference.
The Follow Button will adjust the drummer track in a way where it follows how and when the notes are played, whereas, the Groove Track pays more attention to the number of beats in the measure. Check out the short video here to see the distinction.
4) Dampen Kick and Snare in the Drummer Track Smart Controls by Deleting the Plugins

As I talked about in my Tips and Tricks for the Drummer Track article, if you delete the plug-ins from the Drummer, it’ll give you the option to dampen the kick and snare, which means you can turn down the volume of each part of the kit to make it sound a lot quieter.
One way you could use this is to change the dynamics, but then put the plugins back on the kit once you’re done.
5) Download All of the Available Sounds For Every Drum Kit

Make sure you’ve downloaded all of the drummers by clicking “Download All Available Sounds,” which will give you gigabytes worth of instruments rather than just a few.
The most recent Garageband update came with a whole list of new electronic drum kits as well including more hip-hop sounds and kits.
In the synth category, for example, they added an 808 Bass Synth, which a lot of people, including myself, had eagerly awaited.
However, if you’ve been following me at all, you’d know that I now recommend using Initial Audio’s 808 Studio II plug-in, which has a way better sampler, kicks, bass synths, and presets, and it doesn’t even cost that much either.
6) Match the Number of Drummer Track Bars with the Other Instruments

By matching the drummer track bars with other instruments, I mean that if your chord progression or synth progression only has 4 bars, it wouldn’t be a terrible idea to make your Drummer Track also 4 bars.
This is just going to make everything a lot more cohesive, however, this certainly doesn’t need to be followed as some kind of hard-set rule.
You can deviate from this as you become more and more familiar with how the drummer track works. If you have short bars of the drummer track, I find it’s best to keep the Fill option turned down, otherwise, the drummer track will play far too many fills and far too often.
6 Tips for Programming Drums in Garageband From Scratch
So what if you wanted to program drums in Garageband just by using MIDI? What if you didn’t want to use the drummer track anymore and you wanted to create everything from scratch?
This is much harder, but with some practice and some guidance, I think you should be ok. Follow the tips below to learn a few things that helped me (although I’m no master either), and then I’ll run you through how to create some of the most common patterns.
1) One Part of the Kit Always Keeps the Beat

One of the best pieces of advice I’ve ever heard regarding drums was from a YouTube video I watched a long time ago with Matt Halpern from Periphery.
If I recall correctly, he said that there is almost always one part of the kit that’s keeping time. This made the drums make a lot more sense to me after that, because it always seemed so chaotic.
What he means by that is there is literally one part of the kit that’s consistent throughout an entire phrase, maybe even the whole song. It’s very common for it to be the snare drum, but it can also be the hi-hats or any other part of the kit. The image above shows that it’s the kick, and it’s on every full beat.
2) Make the Velocity of Each Part of the Kit Different to Make it More Realistic
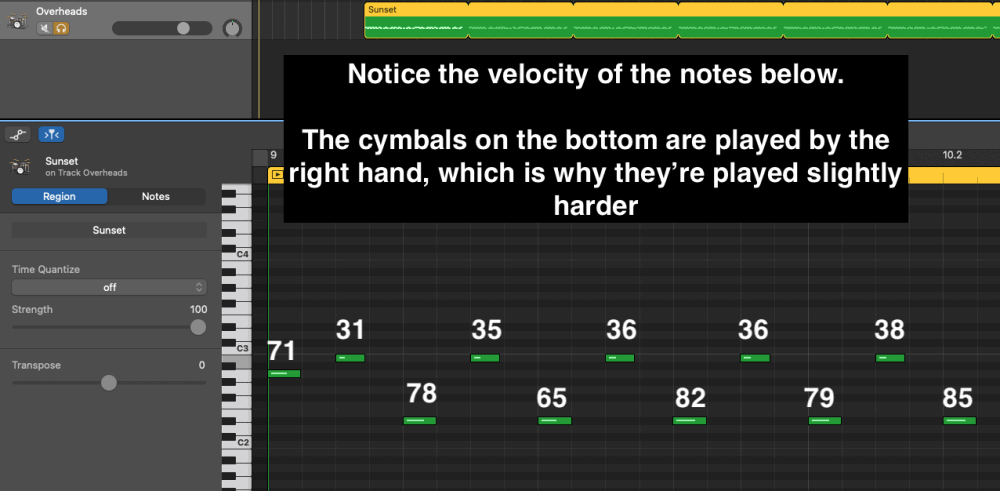
A great way to make programmed drums seem a lot more real is to have the velocity of each part of the kit different from each note to the next.
A great example of this is the hi-hats, which tend to have notes that are far louder than the other depending on if there was recently a snare hit. Rick Beato makes reference to this in his video on how to program drum grooves.
Additionally, if there is one hi-hat that is played by the left hand and one by the right, one of them will be much stronger depending on whether that person, in real-life, is right or left-handed. You can do the very same thing with your drum programming, and this will ultimately make them sound a lot closer to the real thing.
3) Add Grace Notes to Make a Basic Pattern Sound Awesome
A grace note is an ancillary (or unimportant) note that’s played between notes that are considered more relevant to the sound of the musical phrase as a whole. For instance, you could throw in an extra snare hit somewhere in your drum phrase to add a bit of flavour to it.

On a guitar, this would look like maybe sliding into an arpeggio from a note that’s technically not part of the arpeggio. Chad Smith from the Red Hot Chili Peppers explains it better here on YouTube.
Simply put, a grace note is kind of like an extra note that you throw right before or after a main note as a way of just making it sound cool, and it usually doesn’t have a time value in the same way that a ghost note does.
4) Put Notes of the Snare Off the Grid Line for Groove and Syncopation
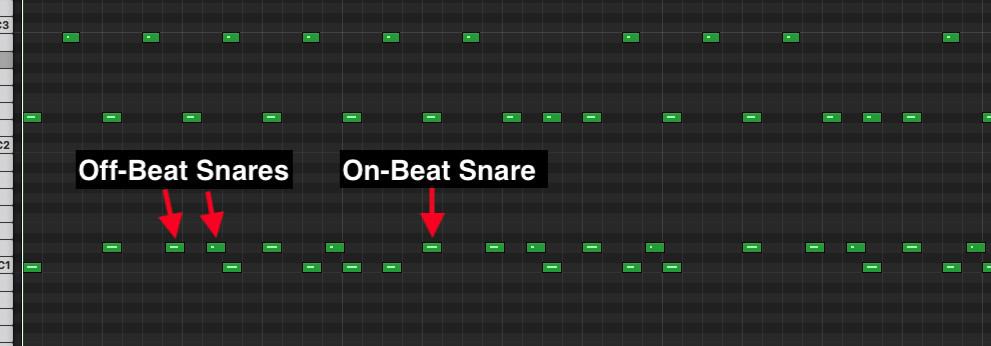
This is another big one that I stumbled upon after I began dissecting the drummer track by copy and pasting the patterns into a new software instrument track.
By making snare beats slightly off time, in addition to a main note that’s right on the grid-line, you can add a lot of style to a basic drum pattern. This is a great way of making your patterns sound a lot cooler.
5) Use Ghost Notes to Make a Pattern Sound Interesting
A ghost note is different from a grace note in the sense that it has a time value whereas a grace note does not. A ghost note is a part of the main phrase but it’s just played a bit quieter than the other notes.
You can imitate the execution of ghost notes by significantly lowering the velocity of certain notes of the drum pattern. This has the effect of changing the vibe of the pattern completely like this guy explains on YouTube.
A better way of explaining ghost notes is that’s just a regular note of the drum pattern but the velocity is low. That’s why it’s called a “ghost note” – you can barely hear it, but it’s loud enough where it makes a significant difference in terms of how the pattern sounds.
6) Don’t Be Afraid to Play Two Notes at Once
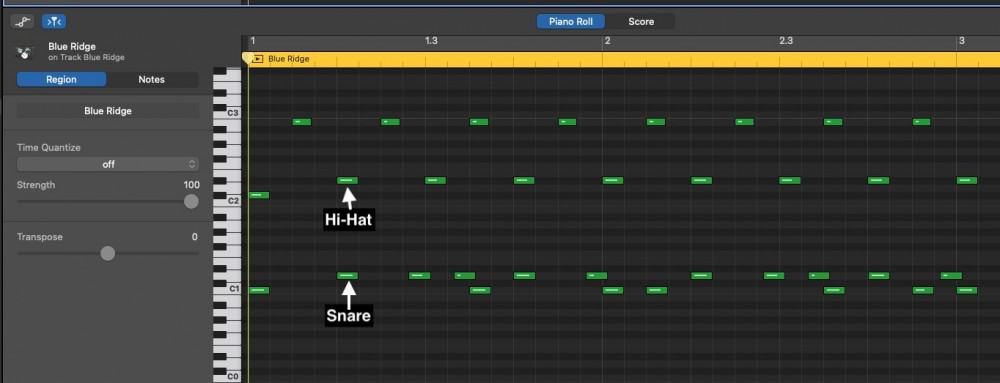
Maybe it’s just me, but when I first started programming drums into Garageband, I found that I had the tendency to only have one part of the kit playing at one time, but this isn’t actually how the drums are played.
If you take a look at any of the drummer track patterns in MIDI format, you’ll notice how there are snares and hi-hats played at the same time and hi-hats and kicks played at the same time primarily (there are other combinations too obviously).
Study the image above and notice how the hi-hats and the cymbals are consistently being played throughout the drum pattern, and very often those very same notes are played at the same time as a snare, kick drum, or even a cymbal like a crash, ride, etc.
How to Program Drums in Garageband (7 Basic Patterns to Get You Started)
To program drums in Garageband, choose a drum kit like So-Cal or Beat Machine from the Drum Kit or Electronic Drum Kit sections and then use the (⌘ + Click) command to start drawing notes on and in between the gridlines in the Piano Roll.
However, as you probably know. It’s a little more complicated than that. Use some of the examples that I’ve demonstrated below to get a feel for the most basic drum patterns as well as how to program them yourself. I’ve included a brief notation guide as well that way you can understand what is being communicated.
Additionally, each image that I’ve shown below demonstrates what the drum pattern looks like not only in MIDI Format in Garageband but in Standard Notation as well which I’ve explored in other tutorials. If you want to learn more about the most basic patterns, I recommend checking out Jeff Strong’s Drums for Dummies on Amazon.
Brief Notation Guide

1) Eighth-Note Pattern

The eighth-note pattern is one of the most common drum beats on the planet, and it’s featured on the song, “Back In Black,” from AC/DC.
It’s a very basic pattern but also a great way to familiarize yourself with the way programming drums works. Notice the way the notes in the drumming measure on the bottom look similar to what’s in the piano roll. The good thing about the piano roll is that it’s fairly intuitive for drumming.
2) Sixteenth-Note Pattern

The thing about the above pattern is that it’s not a whole lot different from the eighth-note pattern. There are just more hi-hat strikes, however, the difference in tone and style is tremendous.
This is a pattern that’s for more of a slower tempo song. Think about it, if you tried to play this at 200 BPM, that would be far too fast. Use this pattern to make something appear faster.
3) Shuffle Pattern

This is the type of shuffle that you won’t see very often anymore, but it was big in the 60s and 70s. It’s just a regular eighth-note triplet pattern but you don’t play the middle part on the hi-hats.
It’s like a disjointed triplet. The purpose of this type of pattern is to get a groove or a swing in there, which is a lot easier to do in real life than it is with a DAW, I must admit (unless you use the Drummer’s Swing feature).
4) Half-Time Pattern

This is one of my favorite patterns. It creates the perception of being slow even though it isn’t, moreover, I find it can serve itself really well for making a “heavy” sound, so to speak.
In other words, a half-time pattern can be used to make something sound really gnarly if done the right way. It has a snare drum on every third beat, which is a common characteristic of trap music too as I explained in my trap music tutorial.
5) Syncopated Rock Pattern

This is a basic rock pattern but with a syncopated kick. You can see by the image of the Piano Roll that the kick has been shifted slightly off the grid for syncopation’s sake. This type of thing is pretty normal in rock music these days, but there was a time when it was revolutionary.
6) Syncopated Pattern with a Fill

This isn’t much different from what I just showed you, however, there is a quick little fill on the snare drum at the end of the pattern. It’s nothing too extreme, that’s for sure. If you know anything about drumming, you’d know that using the snare drum for fills is a big thing Lars Ulrich from Metallica likes to do.
7) Basic R & B Pattern
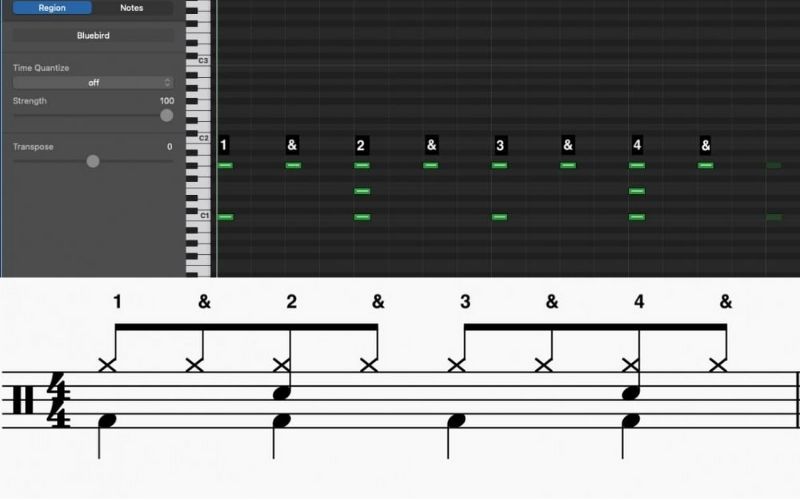
R&B drumming is a bit different from rock and blues in the sense that it’s supposed to be played with a more chilled out vibe. However, there is still a certain amount of importance on the backbeat which is supposed to be played with a lot of power and guts.
Important Things to Note About the Drummer Track
1) Converting Drummer Tracks to MIDI for Studying, Editing, and Mixing
I’ve already touched on this in my article on how to edit drums, but it’s actually possible to turn the Drummer Track into a MIDI track, and this has a number of very important functions.
If you know absolutely nothing about creating or programming drums, you can use the Drummer Track as a guideline and as a tool for studying. After you’ve converted the drums to MIDI, you can see how hi-hats, cymbals, and kick patterns look in grid format.
More importantly, if there is a certain part of the Drummer Track that you like and you’d like to figure out how to make it yourself, but maybe with slight variations, you can see how it’s done.
To change the Drummer Track to MIDI in Garageband, you just have to copy and paste the drummer track into a software instrument track region. It will automatically turn the Drummer Track into MIDI notes.
2) The Difference Between the Groove Track and Follow Button
It’s important to notice the distinction between the Groove Track and the Follow Button. The Groove Track is more for timing whereas the follow button is for rhythm, contrary to what one would expect from their names.
This means the Groove Track will set the drummer up so it matches the actual beats, ie, (1, 2, 3, 4) of one instrument, rather than the rhythm and flow of it. Additionally, the Follow button is used exclusively with the Drummer Track, whereas the Groove Track can be used with any instrument.

Products Mentioned
All links take you to Amazon unless noted otherwise
1) Melodyne 5
2) Initial Audio’s 808 Studio II
3) Drums for Dummies by Jeff Strong

 Written By :