Drums are hard to EQ, in my view, because there are so many of them. Especially in more complex genres of music where kits can have over 12 pieces. Presets will help a lot when you first start applying EQ to drums.
To EQ drums in Garageband
1) set your volume and panning first
2) use presets as guidelines to make your own adjustments
3) think of the drums both as individual parts and as part of a cohesive whole
4) Use low and high-cut filters to make sonic space
5) always consider the stereo image
Important Principles And Tips for EQing Garageband Drums
1) Think of the Drums as Separate Pieces and As A Whole
The principle is the importance of listening to how things sound cohesively, and not as separate parts. Some people will say they don’t use the solo button when mixing ever, and I’m not one of those people. Using the solo button is a great way to see how you’ve changed the sound of something.
That said, I understand the importance of listening to how the drums sound in context with not only each other but in the rest of the mix as well. I recommend you do the same thing.
By the way, I use quality headphones like the DT 990 Pros, and you should too. All the tactics in the world will never make up for the wrong monitors. Without further ado, approach listening to your drums like this:
1) Listen to the way drum pieces sound on their own. Pay attention to how small EQ adjustments change the sound.
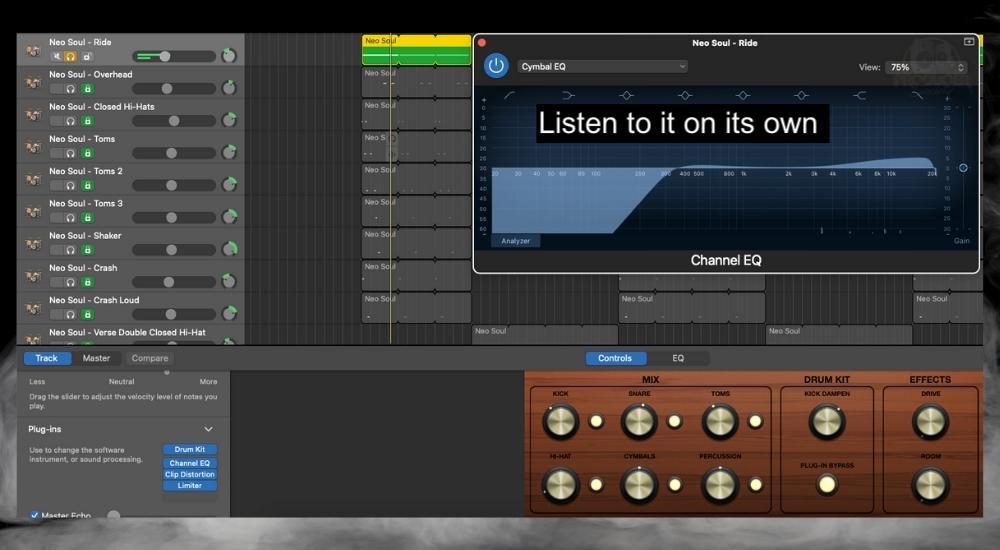
2) But also make sure to listen to the way every part of the kit sounds together, without the other instruments.

3) Listen to the drums in the context of the mix as well. This means you should pay attention to the way the drums sound with every sound and instrument.

I said in my EQ guide before that I’m always riding the solo button and that’s still the truth today. I’m constantly seeing how things sound on their own and in the context of the rest of the mix.
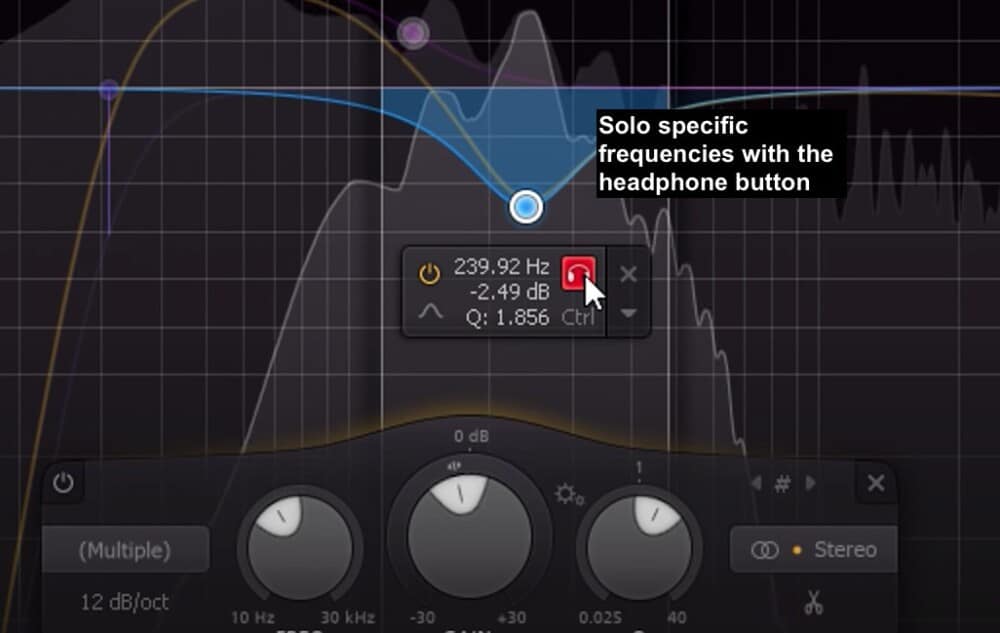
Sometimes I’ll solo two instruments together and see how they sound on their own. Additionally, Fab Filter’s Pro-Q EQ plugin (on my Product Page) has an incredible feature where you can solo one part of the frequency range compared to another.
2) Garageband Drums Tend to Sound Heavy in the Mid-Range

Unlike Superior Drums 3 from Toon Track, Garageband drums tend to sound fairly muffled due to low-mid frequencies. Attacking the 200Hz range is a good way to start the EQ on any of the drums. The same thing often applies to other instruments too.
Particularly, the kick and the snare seem to benefit a lot from increasing the upper mid to high frequencies. You can do a lot just by increasing the high-end frequency on the snare. Have a look at the video of the snare below, for instance.
I increased the low-end and the upper-mids on it and it gave the snare a bit more power, “thwap,” and a bit more definition in the high-end.
The Snare Before and After Middle-Highs Have Been Increased
Adding more highs to Garageband drums tends to introduce a lot more life and clarity to them. Otherwise, they tend to sound muffled, as if there is a big tarp over the top of your kit.
3) You Should Have An Idea Of What Certain Frequencies Sound Like
Have a look at the chart that I’ve provided down below. This originally appeared in my Piano EQ guide, but I find that much of it applies to the frequency spectrum on the whole, rather than just the piano. Ask yourself what your drums need. Do they need power and boom? If you do, you’ll want to boost the 20Hz to 120Hz range.
But if you’re looking for clarity and definition, then the area between 1000Hz to 2500Hz is a better bet. If you’re trying to get a bit more sparkle in your mix, boost between 5000Hz – 10,000 Hz and see how that sounds. A good rule of thumb is to first use an EQ sweep to find where the desired frequency range actually is.
For instance, jacking up the 2000Hz range on the snare is where you can really find the power and the “thwap,” so to speak. The “thwap” is the sound of the stick really smacking against the drum. It’s the attack.
| Frequency Range | Term | Quality |
|---|---|---|
| 20Hz to 50Hz | Sub | Power |
| 50Hz to 80Hz | Upper Sub | Boominess |
| 80Hz to 120Hz | Low Bass | Bass, Boominess, Warmth, Thumpiness, Fullness |
| 120Hz to 180Hz | Bass | Boom and Bass |
| 180Hz to 300Hz | Upper Bass/Lower Mid | Fullness or Muddiness |
| 400Hz to 1000kHz | Mids | Depth or Boxiness (Hollow) |
| 1000kHz to 2500kHz | High Mids | Definition and Clarity |
| 2500kHz to 5000kHz | Lower-Highs | Presence and Air |
| 5000kHz to 10,000 kHz | Highs | Crystal and Sparkle |
| 10,000kHz – 20,000 kHz | Highest | Brilliance |
But on the kick, you can find the power between 50Hz and 150Hz. You can get more power out of certain instruments in slightly different areas on the spectrum.
4) You Should Know How The Pieces of the Standard Kit Are Positioned
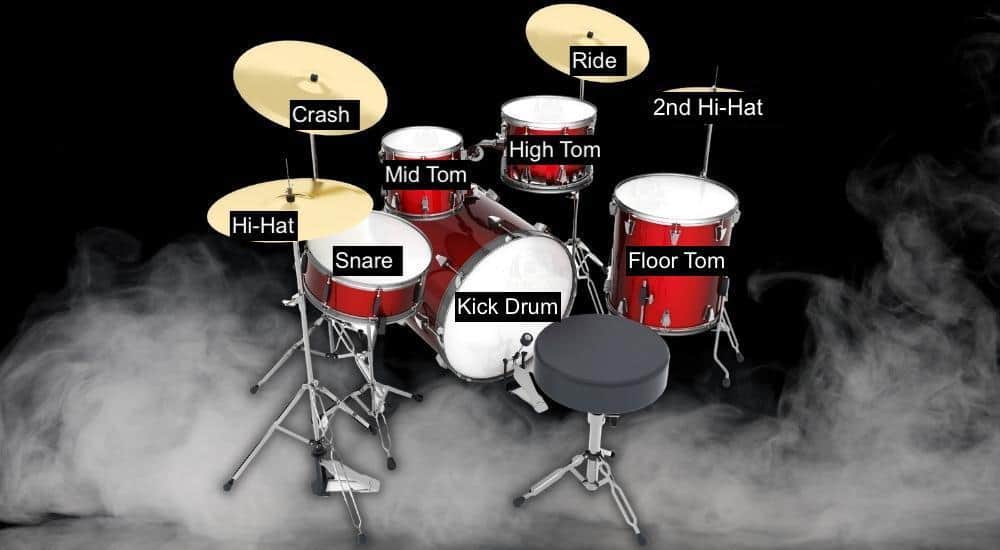
Understanding how a standard drum looks – or at least to have a frame of reference – will help you EQ. It’ll help with everything including programming (my guide on that), as a matter of fact, but it certainly helps with EQ as well.
Use this as a reference so you know what instruments are closest to each other. Understand what pieces of the kit tend to bleed into each other. Know where the cymbals and the hi-hats are in relation to the drummer, etc.
7 Great Tricks To Use When EQing Drums
1) Start With Presets and Then Adjust From There

A lot of people will talk smack about this tip, but who cares? What sounds good, sounds good, and that’s the point. Presets, particularly Garageband and Logic Pro X presets, are pretty great. I’ve said this in many tutorials including in my on how to make beat drops.
The idea behind using presets is to provide a jumping-off point, so to speak, for you to begin. Bring up the Channel EQ presets and then take a look at all of the ones available. Apply the preset to the corresponding piece of the drum kit, and then see how it sounds.
Does it improve it? Or does it make it worse? From there, you can make whatever changes you need to make using the chart that I provided above. There are other EQ charts that’ll help you too, including another one I’ve made down below, so keep that in mind.
2) Use EQ Sweeps to Find Desirable and Undesirable Sounds
Use EQ sweeps to actually find out what you’re doing. By using an EQ sweep, you can find the sound that you want to either increase or decrease, depending on what you need. It’s dead simple. I use it all of the time for increasing desired sounds and minimizing undesirable sounds.

In other words, an EQ sweep is how you find out what frequencies are causing the problems. The image above shows you how to do it.
Essentially, you just want to get a fairly narrow Q, about 5.00, and then you pull down the frequency by approximately 25dB. You can pull it down or push it way up.
You can use it either way. I boost the frequency with a narrow EQ if I want to add something, but if I want to attenuate, I pull it way down.
Regardless, having your EQ jacked up by +25dB isn’t where you’re going to leave it. Once you’ve found the frequency in question, you can pull it down to a more reasonable level like +/- 3dB.
3) Set Up Low and High Pass Filters
I’ve talked about low and high pass filters everywhere on the site, including in my mixing tips guide, and also in my guide to mixing the drums in Garageband. Low and high-pass filters – like EQ sweeps – are easy to understand and equally as effective.
A low-pass (high-cut) and a high-pass (low-cut) filter are when you eliminate a significant part of the frequency spectrum to make room for others to pass through. A low-pass is when you cut the high frequencies to allow the low frequencies to pass through.

Compare that to the high-pass filter where you cut the low-cut frequencies to let the higher frequencies pass through. The name implies what goes on. A high-pass filter lets the highs pass.

I set these up on all kinds of instruments and sounds, and not just on the drums. They’re useful for all kinds of things. You can really make space for instruments to co-exist by getting rid of frequencies where there shouldn’t be any.
For instance, there’s really no reason for the high-end frequencies on an 808 to be there. At least in most cases. You can drop out the high frequencies of the 808 because you want the guitars and the vocalists to occupy that space instead.
4) Make Room in the Frequency Spectrum (Stereo Image)
There’s no better depiction of the stereo image than what I saw in David Gibson’s book, The Art of Mixing, which you can find here.
That’s why you should definitely watch the video from Gibson above, which is probably one of the more entertaining ways to learn how to mix.
He has a great presentational style so it makes a somewhat dull topic fairly interesting. A lot of Reddit users say the same thing about the video.
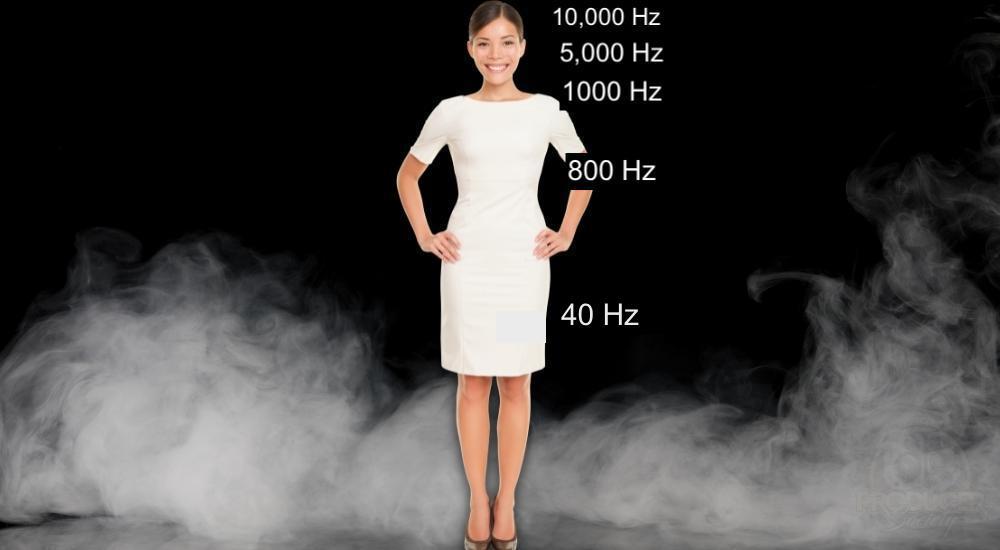
What David manages to do is teaches how to move things around in the stereo image. How to use effects and EQ to push things further back in the mix. Or how to use the same effects to bring it forward.
How to create a wall of sound. How to create space for instruments to exist together. All of these things he’s able to do with his super helpful diagrams and charts. Each page has one that’s visual and easy to understand, which is the big thing.
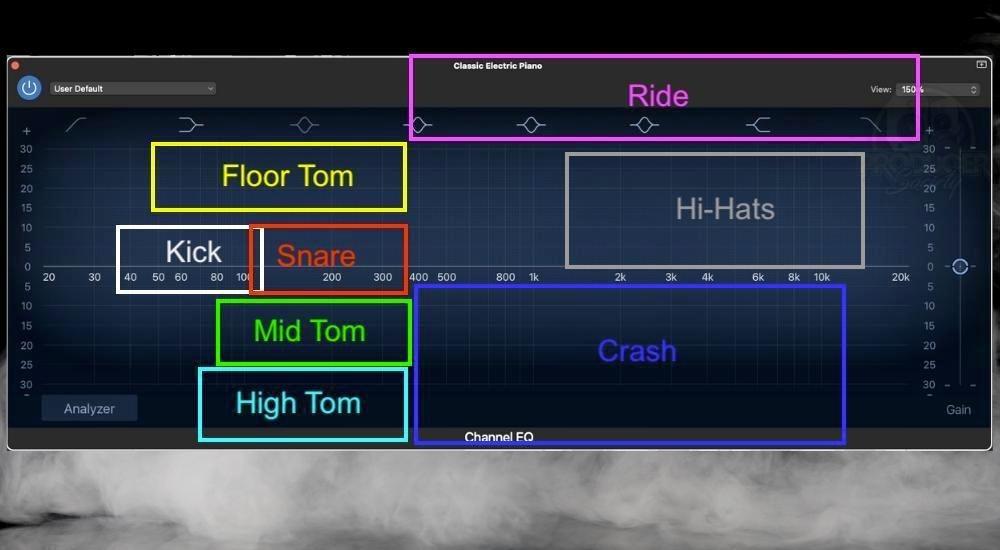
Every part of the kit has frequencies that are outside of the predominant range. And the same thing goes for other instruments too. The chart is meant to illustrate where the loudest frequencies usually are whenever that instrument is heard.
Kick: 40 – 120Hz
Snare: 110 – 350 Hz
Floor Tom: 45 – 350Hz
Mid Tom: 70 – 390Hz
High Tom: 80 – 400Hz
Ride: 400Hz – 20,000kHz
Hi-Hats: 1500 kHz – 15,000kHz
Crash: 400Hz – 12,000kHz
5) Use A Second EQ for More Control

By using a second EQ in the signal chain, you can make additional changes after the first EQ, the compression, drive, and so on. When you use a second EQ, you take more control over how it sounds in the end. Use it to make any other changes that you want.
6) EQ Can Also Be Used to Create Distance
As I said in my guide to using reverb on drums, I prefer to use reverb to create distance. But the thing about it is that it’s easy to overuse. If you want to make a similar effect with EQ, roll off the highs from 5000kHz.
7) Use Cuts For Improvements and Boosts To Make It Different
Cut frequencies to improve the sound of your instruments, and then use boosts to make something different altogether. This is just one of the general tips in Owsinski’s book, The Mixing Engineer’s Handbook (which you can get on Amazon). By the way, I reached out to him recently on how to mix drums and he had a useful tip for me:

I’m usually fairly sparing when adding boosts as well. Mixers will often say that none of us should go above a +3dB boost, but it obviously depends on the project.
Either way, I find this general wisdom to be fairly on the money. Cuts do seem to be a better method for improving how something sounds compared to boosts. But I still use boosts too. I think most mixers do, even though they may say otherwise.
A Step-By-Step Guide to EQing Drums in Garageband
I’ll start by saying I don’t impose any limitations or rules on myself. By that, I mean I’m constantly using samples, presets, and other tactics that some people like to call “cheating.” Sometimes I’ll EQ something right from scratch, and other times I’ll use a preset.
If something sounds good, I don’t bother changing it. If it’s not broken, don’t fix it. That’s my motto. So, for my latest project (that I also used for my drum mixing tutorial), I used a healthy mix of EQs I made from scratch and presets. Why not?
Important Drum Frequency Chart
Again, before we begin with how I EQ’d my drums, I want to give you another little chart that has been really helpful for me over the last couple of years.
These are frequencies on each part of the kit that are integral to its sound. That means that when you adjust them a certain way, you get a big result.
| Drum Part | The Frequency and How It Sounds |
|---|---|
| Kick | 80Hz – Power/Thump 350 – 400Hz – Hollow/Boxy 3000Hz to 5000 Hz – Punch |
| Snare | 120Hz – Thick/Fat 1000 – 4000Hz – Snap, Crystal, Attack 10,000Hz+ – Sizzle |
| Cymbals and Hi-Hats | 100Hz to 200Hz – Clank, Ding 8000Hz to 11,000Hz – Sparkle or Sizzle |
| Floor Tom | 80 to 100Hz – Boom/Power 500Hz to 800Hz – Boxy 8000 Hz to 10000Hz – Air |
| Mid and High Toms | 80 to 100Hz – Boom/Power 500Hz to 800Hz – Boxy 8000 Hz to 10000Hz – Air |
Let’s start with the kick, snare, and ride. That’s how I normally start and I recommend you give it a shot too.
Kick
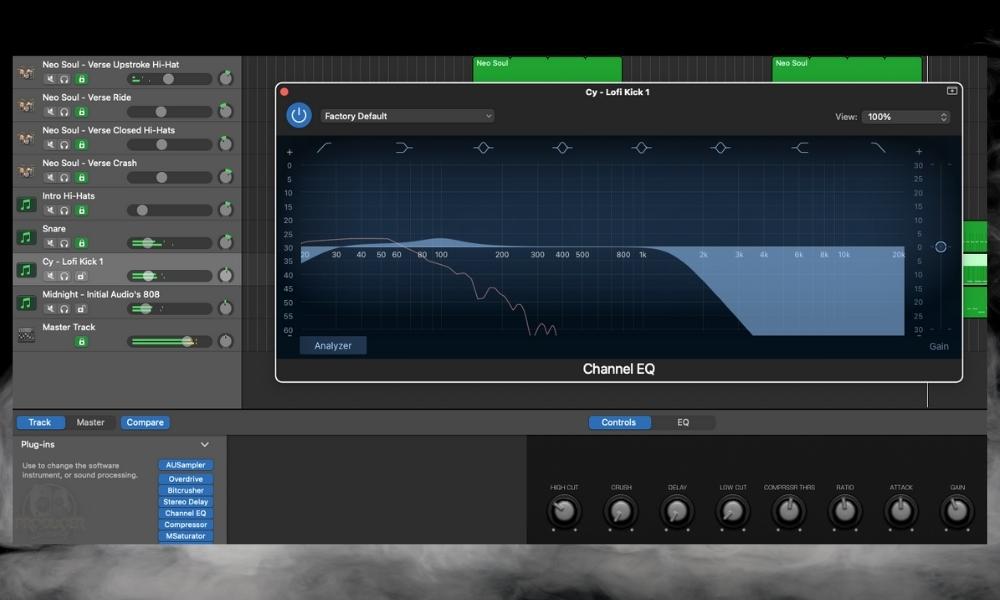
The first thing is that I tried out a couple of presets. One had the title, “Low-End Kick,” but it wasn’t much because it attenuated and increased frequencies that weren’t even there to begin with.
Eventually, I chose just to EQ it right from scratch because I didn’t mind the kick straight out of the box from Cymatics. So what did I do? I kept it simple.
I added that high-cut you can see and then boosted the frequency at 100Hz by 3dB. The high-cut is to carve out space for other instruments and the boost goes along with a cut at 100Hz on my 808 instrument. I’ve discussed this tactic in my guide to making 808s.
Snare
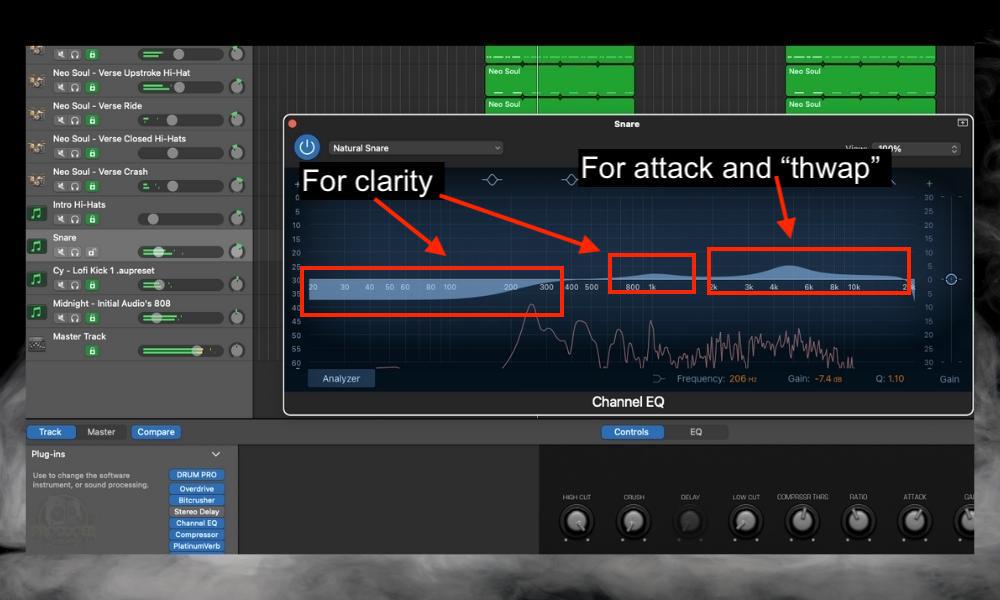
The video above demonstrated how I EQ’d the snare. I found the snare muffled, dry, and muddy too. So I did a few things to it in regard to EQ.
For one, I dropped out the lows and low-mids to clear it up a bit. Then, I gave it a small boost at 1000Hz and again at 5000Hz. The point of that was to bring out more clarity but also increase the attack and the “thwap” sound that the stick makes when it hits the snare.
Ride

The ride was an important part of this drum track. It played throughout the entire thing and it kept time for the whole song. However, because it sounded dull and lifeless, I boosted the frequencies between 5000Hz and 18000Hz to give it some air and sparkle.
The low-cut at the beginning is something I did because there aren’t many frequencies in that area anyway. Many mixers recommend doing this because you free up space for other instruments that might need that range.
Crash

I approached the crash just like I did for the ride. It was slightly dull and lifeless so I increased the highest frequency range to give it the sparkle it needed.
One thing I’ve noticed about Garageband instruments is they’re fairly versatile. I believe they’ve been made so they can be EQ’d in any way if needed.
Hi-Hats

You can probably see a theme now. All of the overheads, cymbals, and hi-hats are easy to EQ. The reason is they’re fairly focused in one frequency range. Throw a low-cut on them and boost the predominant range and they’ll sound great.
Toms

I think the tom presets sound pretty good. Best to use the tom presets because they work just fine straight out of the box. If your track has a lot of toms, you may have to approach it differently than this though.
What makes them sometimes harder to EQ, in my opinion, is actually finding where they are on the frequency spectrum. To hear your toms better for EQ, I have a simple trick for you.
On the right-hand side of the plugin, pull up the EQ Gain so you can actually hear and see the tom when it hits. The image above shows you where you can find that control.
Shakers, Congas, Bongos, and Other Niche Drums

After you’ve used EQ on the kick and snare, I feel like it’s half the battle. The rest of the kit is easier to EQ because, as I said before, they tend to dominate in one area of the frequency spectrum.
The rules apply to niche parts of the drum kit in the same way as the other more dominant and ubiquitous parts. Use an EQ sweep to find the frequency that needs to be boosted or attenuated, and attack it from there.
Start out with a preset to give yourself a place to jump off from, and then customize where needed. But as I’ll say in a second, you may not even need to add EQ to your toms, shakers, and other less-frequently-used parts of the kit.
Important Things to Note About EQing Drums in Garageband
1) Drums Are Sampled – Do You Even Need EQ?
A common question is whether sampled drums, VSTs, and other sounds even need EQ considering they’ve already been mixed. It’s a mix of yes and no. Some instruments need to be EQ’d to fit into your project perfectly, while others may sound just fine the way they are.
That said, I think it’s a worthwhile question to ask yourself when mixing. Sometimes I might not even change something, because why would you if it already sounds good? Really, the point of mixing is to make music sound good.
2) Don’t Forget to Mix At Relatively Low Volume
Another thing I forgot to mention in this article was the importance of mixing at different volumes too. I usually mix at 30% volume. But I oscillate between 30% and much higher if I’m trying to hear something from a different perspective.
Gear Mentioned
1) Beyerdynamic’s DT 990 Pros (from Amazon)
2) David Gibson’s The Art of Mixing (on Amazon)
3) Bobby Owsinski’s The Mixing Engineer’s Handbook (also from Amazon)
4) Fab Filter’s Pro-Q EQ (on Plugin Boutique)
5) Toon Track’s Superior Drummer (on Plugin Fox)

 Written By :