Probably the most popular kind of “beat drop,” is the kind used by EDM producers. Most people will think of EDM music when the term comes up. Similar to the diversity of genres you’ll find that use beat drops, there is an equal number of diverse ways you can create them, including in Garageband.
To make a beat drop in Garageband
1) Use an accelerating kick and snare pattern
2) Add a descending bass pattern on a bass synth just before a new bar
3) Make a drop by omitting certain tracks before a more intense bar
4) Increase or decrease the volume with automation on the master track.
What Are Bass and Beat Drops?
Beat drops are an interesting way to create dynamics, emotion, and intensity regardless of genre. My favorite type of drop is the kind you’ll find in post-hardcore and metalcore music, but that’s just my preference. There are other types too.
I used to think that a drop was only referring to the most intense part right before a breakdown, particularly in metal and post-hardcore but also in electronic music. With electronic music, particularly EDM, the term is actually used for other things too.
The Most Common Definition of Beat Drop
Probably the most useful way of defining a drop is the following: A beat or bass drop is a part of a song where the music, including the lead instrument, melody, kick, and the bass, are more intense than what came before it.
This means that it’s not necessarily in the form of a bass instrument, nor does there need to be a breakdown. It could just be an increase in intensity as a new part of the song begins.
Here’s how I think of a bass or beat drop: A part of a song where there is an acceleration or increase in intensity until it suddenly stops right before the new and more intense part of the track begins. In other words, I thought of a beat drop as more like a breakdown. Regardless, you can find drops all over popular music.
An Example Of A Beat Drop You’d Find In Heavy Music
I think a part of the reason why I think of a drop differently is due to the fact that my background or specialty is in metal and hard rock like Rage Against the Machine, and not electronic music.
A really good example of a metal or post-hardcore beat/bass drop can be found on Underoath’s Define the Great Line, which is probably one of the best metal/post-hardcore albums of 2006.
The song I’m thinking of is “A Moment Suspended in Time,” and it starts exactly at 01:29 of the track. You can take a look at that in the video down below.
Pay attention to how there is an increase in intensity that is created mostly by the drummer’s accelerated pattern on the snare and kick drum. The vocalist, bassist, and guitarists are contributing to the dynamics too but a big part of the drop is from the snare pattern.
Underoath’s Define The Great Line is packed with all kinds of breakdowns and beat drops, so make sure to check that out. As for the electronic music genre, a good example of a drop happens at the beginning of “Smack My Bitch Up” from The Prodigy.
An Example of An Electronic Music Beat Drop
Really, the entire first 49 seconds of “Smack My Bitch Up” from The Prodigy’s Fat Of The Land is a part of a beat drop, and then finally the bass drops on the second half of 49 seconds and into the 50th second.
A lot of people would say that “Smack My Bitch Up” isn’t really EDM, and that’s probably true, but this song is the first electronic track that came to mind when I envisioned a really well-done beat drop. Miraculously, the intro doesn’t sound corny or weird despite the entire first minute of the song acting as a beat drop.
“Smack My Bitch Up” and “A Moment Suspended In Time” are completely different songs and in entirely separate styles from obviously different artists, but the technique of the beat drop is one that can be used in all kinds of music, so ultimately the genre doesn’t matter.
As a technique, building intensity isn’t specific to any one genre. The same thing can be said about a bass drop which can be done in any genre as well. You may be wondering what the difference is between a bass and beat drop.
A bass drop refers specifically to a bass instrument dropping in pitch right before a more intense part begins, in contrast to a beat drop which can concern really any other instrument.
That all said, let’s move on to how we’ll actually go about creating a “drop” effect in our music. The first one involves a technique that I’ve heard in both metal and EDM music.
Making Beat and Bass Drops in Garageband – A Step-By-Step Guide
The first method that I’m going to show you for creating beat drops in Garageband involves the kick and snare pattern, which I talked about earlier in relation to the Underoath song, “A Moment Suspended In Time.” As was mentioned above, the exact same technique can be used in any genre. The only difference is the instruments.
1) Using An Accelerated Pattern of Kicks and Snares
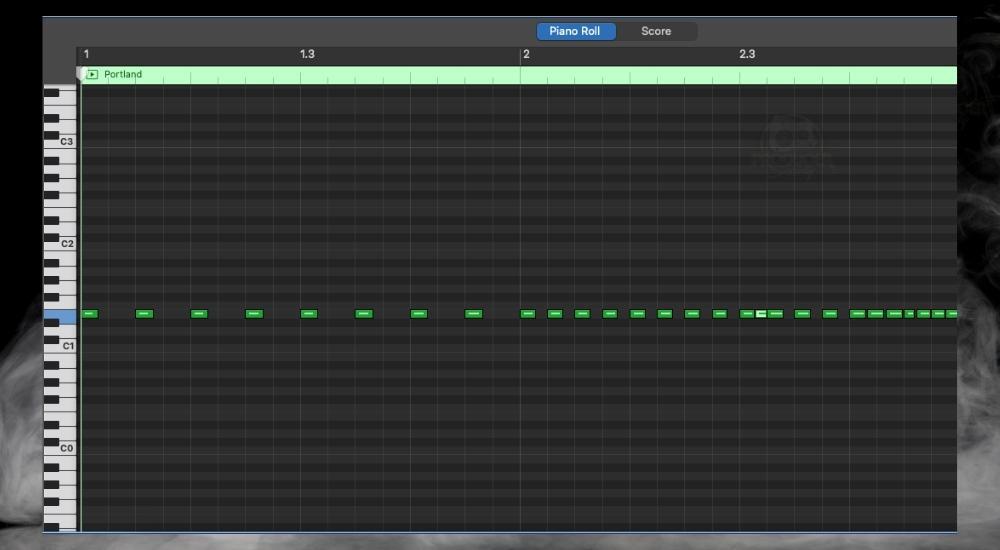
If you’re trying to build intensity, you’ll want to increase the frequency, but there are other things you can do at the same time.
One way of doing this is to actually increase the velocity in conjunction with the frequency. In other words, by gradually increasing the velocity of each snare hit, it’ll get stronger and stronger. I’ll show you what that looks like here:
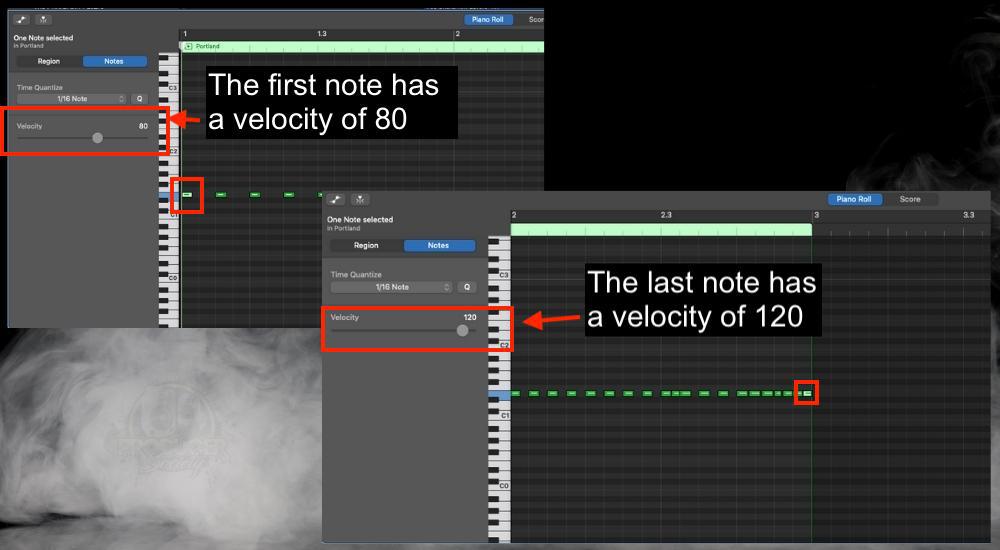
If you really want to build intensity, a gradual increase of velocity from note to note is a great way of doing about it, particularly on the snare. The same thing can be done with other instruments too. It’s not just the drums. Use both a gradual increase in velocity and frequency, and you’ll get a more intense sound.
So that’s the snare pattern that I made as a demonstration for this article. But what about the kick? Frankly, the kick isn’t as important as the snare is when it comes to creating a drop like this. The snare is the king. However, the kick is important in its own way. Here’s what I did with the kick drum:
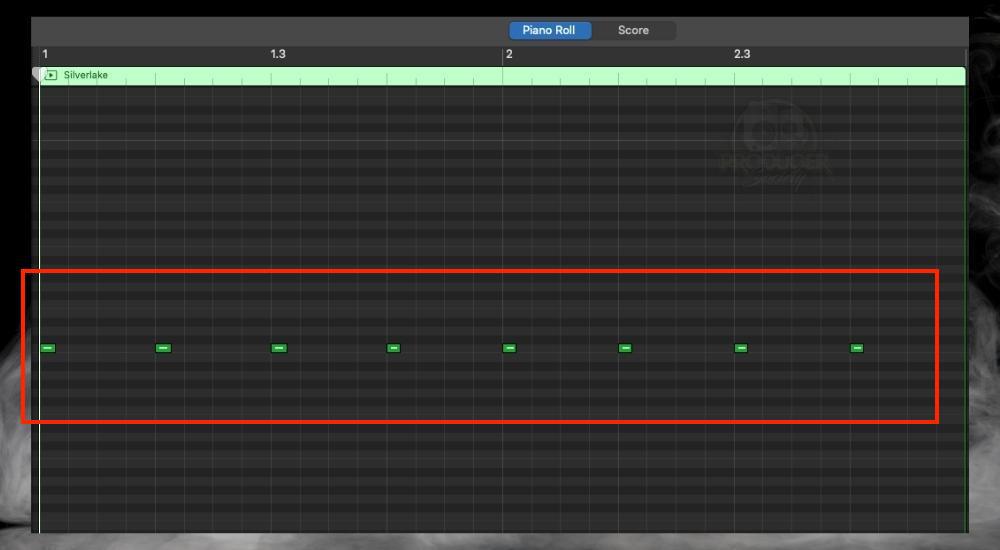
I didn’t do anything special with the kick drum, although, you could make it more rhythmically interesting rather than just making it a bunch of eighth notes. However, one thing I did do to facilitate the “dropping” nature of it was to increase the velocity as I did to the snare. And really that’s all for this method.
Now that I’ve shown you how to make a drop in Garageband by using an accelerated kick and snare pattern, let’s use another technique that I used in conjunction with it. It involves a bass synth instrument which is how we’re going to make a bass drop, rather than a beat drop.
2) Drop the Pitch Of A Mixed Bass Synth Instrument
The first thing you need to do is pick a good-sounding bass instrument. Like anything else with music production, the quality of your instruments and sounds is paramount for getting a great final product, otherwise, it just won’t sound good.
For the sake of keeping this tutorial free, I used the Vintage Synth Bass which has been a GarageBand mainstay for years. That said, there are many others now that you can use including the Deep Sub Bass, the Hard 808 Bass, the Sweeping 808 Bass, the Heavy 808 Bass, and more. The screenshot below shows you a lot of these.
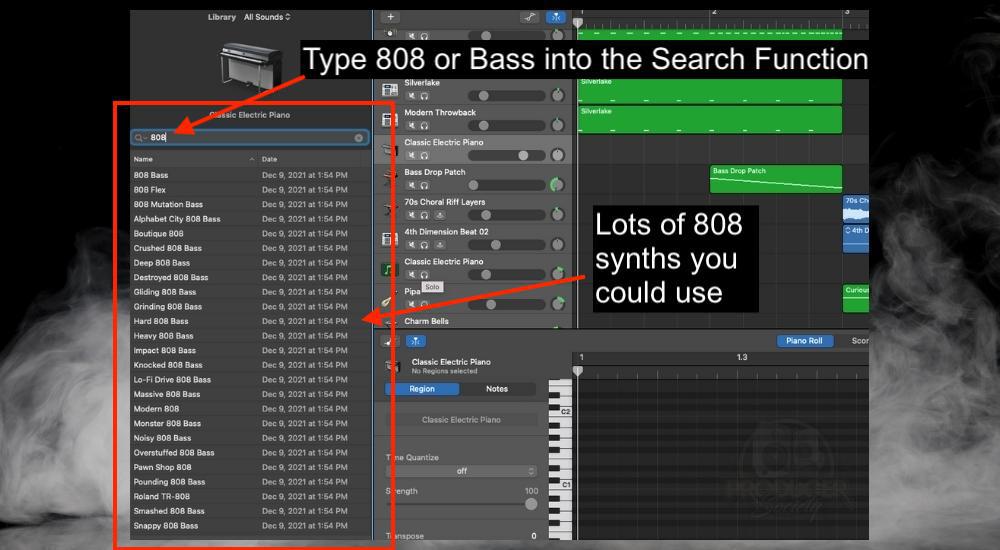
Once you’ve chosen your 808 instruments, we’ll go to the next part which involves mixing the bass so it fits with what we’re trying to do. Here’s a brief table of contents that’ll help you with that.
Let’s adjust the smart controls first.
Changing the Smart Controls of the Vintage Synth Bass
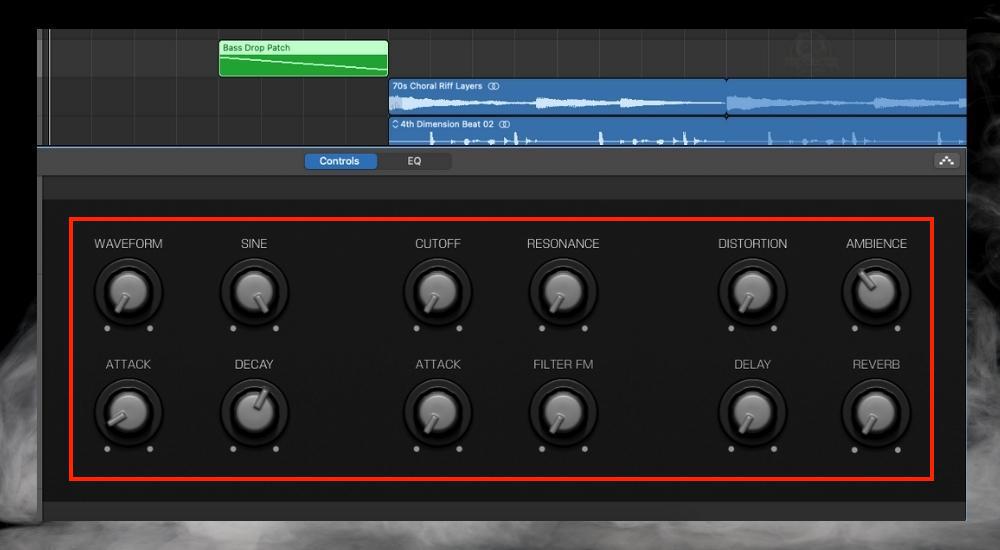
The default smart controls settings on the Vintage Synth Bass would be quite a bit different from this. So what did I do? Basically, I rolled back every single dial except the “Sine” back to zero. I learned this from this YouTube video here from NeonKatt13, which was quite helpful.
The “Sine” synth I rolled all the way to the maximum setting but then also kept up the Decay and the Ambience a bit. Even the Decay could’ve come down though because having it turned up a bit in this context doesn’t really do much for us.
After that, we’ll look into creating the MIDI pattern that would result in a drop. The technique is self-explanatory because the drop is literally describing a “drop” in pitch. I’ll show you how to do it here:
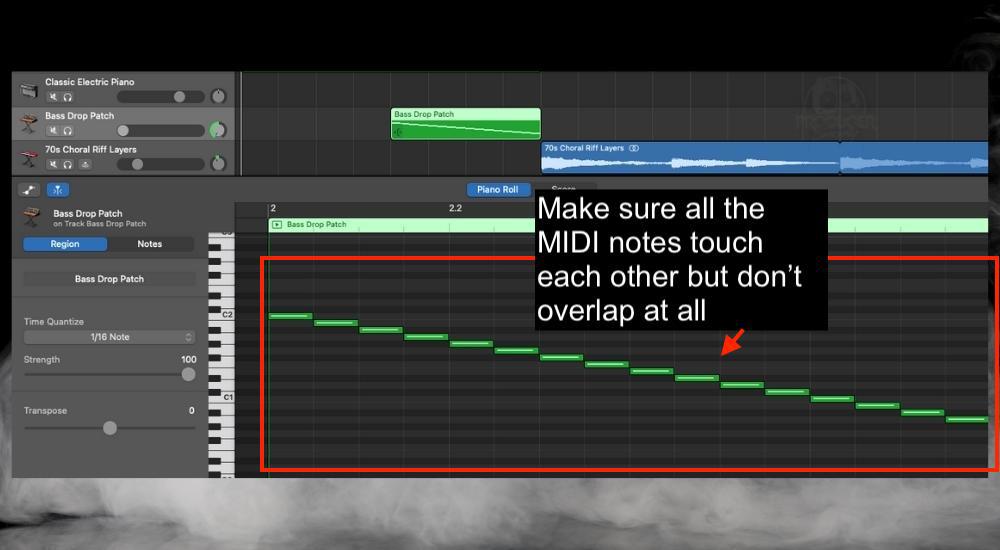
There are other ways of doing the exact same thing using just a sine wave. But Garageband (at least from what I’ve seen), doesn’t have a sine wave synth that functions in the same way that you would see in FL Studio 20 or in Logic Pro X, but I digress.
The bass drop on the Deep Sub Bass also sounds great, and when you use it in conjunction with other instruments, it can sound really full and aggressive.
Let’s look at some other ways of getting the bass drop to sound a little cooler, a little more energetic, and intense. By the way, my 10 tips for 808s article should help with this too.
Adding the AUBandPass to Emphasize Bass Frequencies
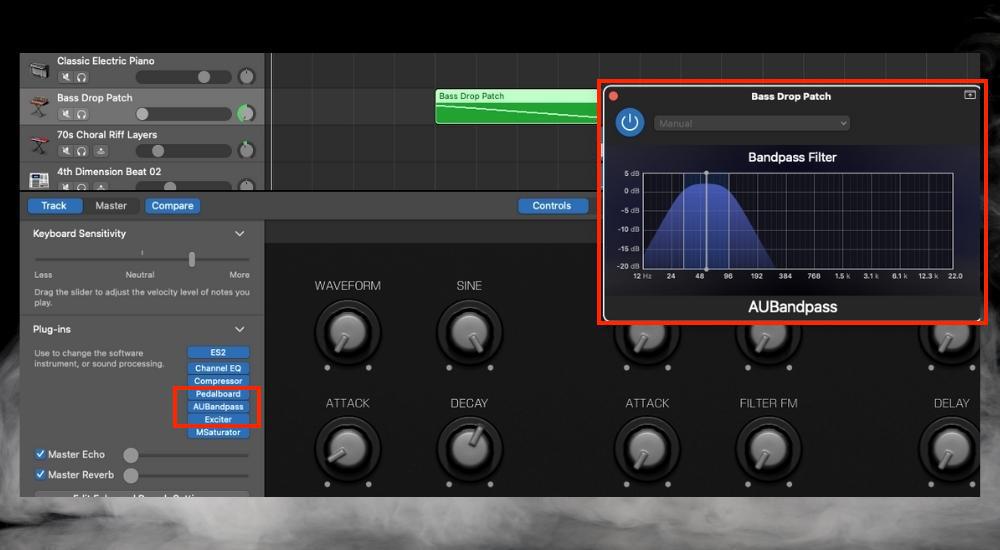
First things first, to find the AUBandPass in Garageband, you need to click on one of the plugin slots in the “Plug-ins” area of the smart controls. From there, click on Audio Units > Apple > AUBandPass.
By increasing the frequencies from the 24Hz to the 150Hz range, you’ll get a much thicker, warmer, and ‘bassier’ sound on your sub-bass. That isn’t it for the EQ though, as there is a separate EQ on it that does something else to it too (more on how to use EQ in my guide).
Adding A Channel EQ For More Bass Frequencies
I’m not so sure that adding another EQ to the bass instrument is really necessary, but if you want to get really specific in terms of how your bass synth and drop sounds, then adding another EQ in there will probably help you get to where you need to be, wherever that is.
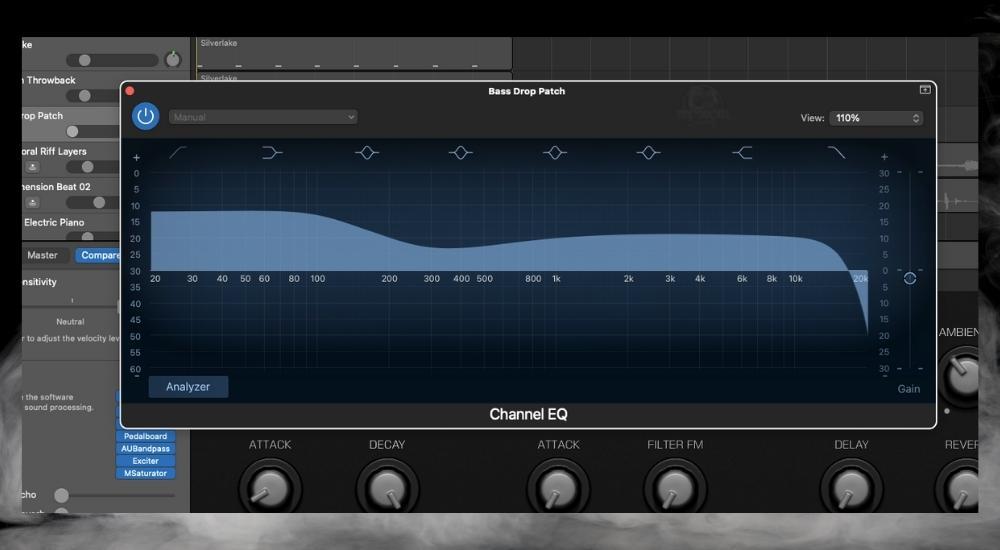
I probably could’ve imitated this effect just by increasing the volume of the instrument, but there is a bit of a difference when doing this exact thing with the EQ because it’s increasing the bass sound just slightly more than the rest of the frequency range.
Using an Exciter To Get More Harmonics
An exciter is a cool way of adding more harmonics and high-end frequencies to the bass sound. You may ask yourself why we just didn’t add more high-end with the EQ? The exciter has a way of doing it where there are more harmonics. It doesn’t just boost the high-end. In effect, it just sounds cooler.
Just choose an Exciter preset like the “Refresh Airless Material.” Run through them one-by-one if you don’t like the one I’ve given to you, or you can customize them to your liking.
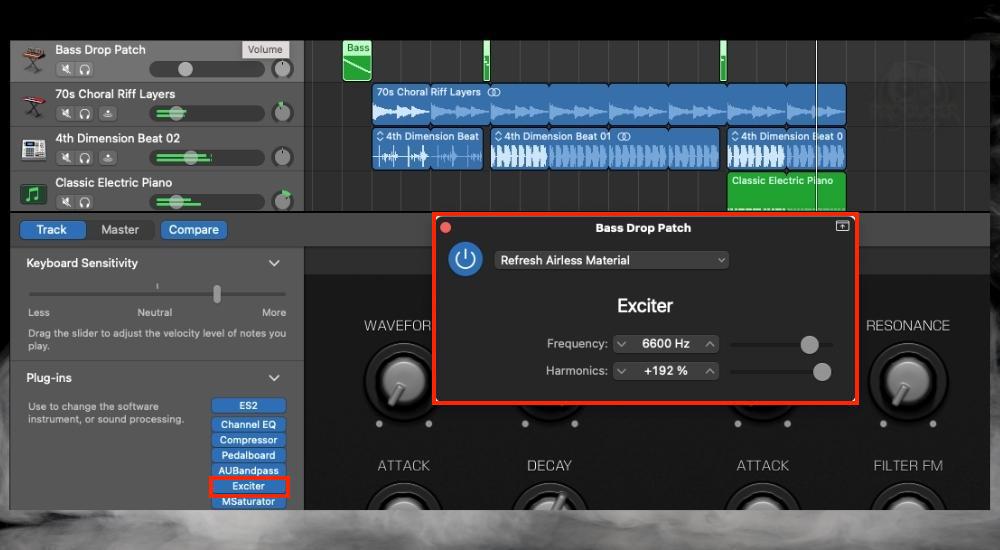
After I’ve used the Exciter plugin which is a stock Garageband plugin, I slap on the MSaturator from Melda Productions. I’ve written about this useful plugin before in my guide on the best plugins for Garageband but it’s worth stating here again that it’s especially useful for creating a bass drop.
Depending on how you’ve set it up, the Saturator can give it more bass, it can make it thicker, or it can even make the sound warmer. It’s up to you, and if you need help creating a bass-line, I have a guide on that too on my other site Traveling Guitarist.
Adding Saturation to the Bass Synth
I add saturation to the bass synth in the same way that I just did with the exciter: with presets, and I also do the same thing with other instruments too. In this case, I chose the “Soft 2” preset because I didn’t want to add too much saturation to it.
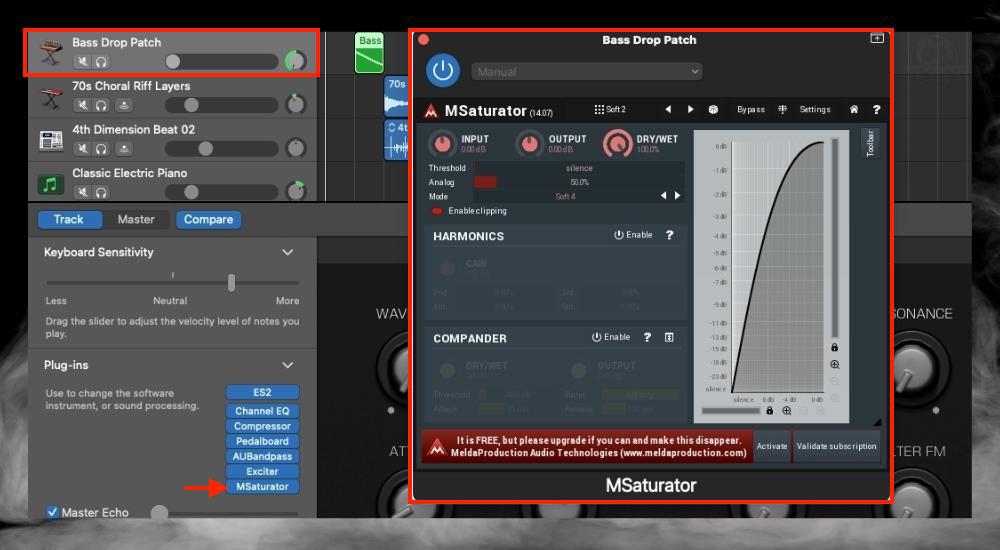
Saturation is the type of effect where less is more, in my personal experience. It’s an effect that I commonly put on instruments and sounds just to thicken it up a bit or give it a bit of extra juiciness, conviction, or flavor, so to speak.
Adding Distortion to the Synth Bass
Another way to increase the intensity of the synth bass is to add distortion to it which is something I’ve talked about many times in my 808 articles. What distortion or drive you want to use is up to you, but I find that FuzzPlus 3 from Audio Damage is a good one to use, as is Garageband’s default “Distortion” and “Overdrive.”
Mixing The Sine Wave Bass (Vintage Synth Bass) With Another Bass Instrument
Mixing two different bass instruments together is one way that people thicken up a bass sound. For example, you could use the Vintage Synth Bass with all of the controls turned down like what I showed you earlier, alongside Initial Audio’s 808 Studio II Synth (on my Product Page).
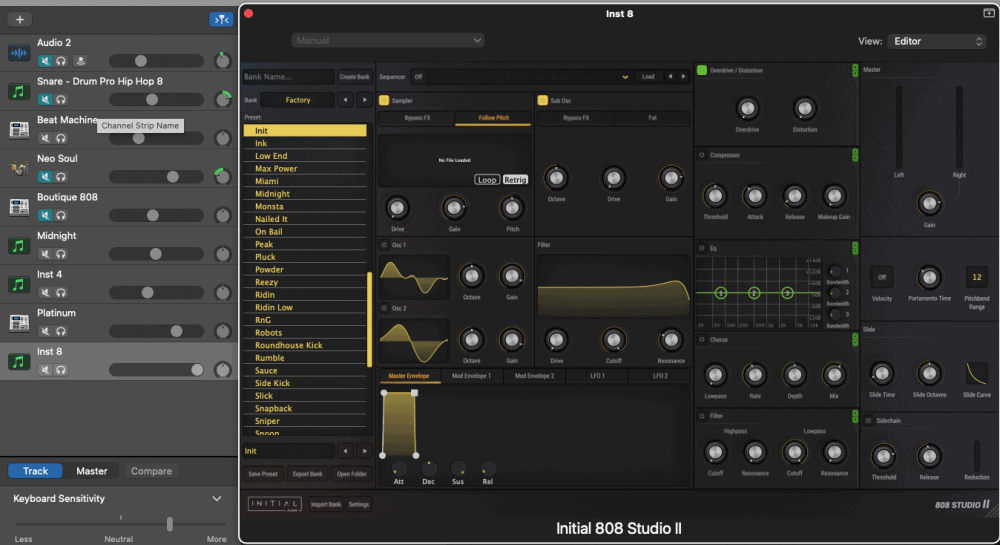
Also, you could use a Deep Sub Bass panned to the left and then the Vintage Synth Bass panned to the right. That could sound really cool. What I like about the Deep Sub Bass is that it sounds fairly clean straight out of the box. It’s like a canvas that’s waiting to be painted on.
3) Using Volume Automation on the Master and Instrument Tracks to Create A Drop
Like I showed in my automation guide, to use automation in Garageband, press ‘A’ on your keyboard to bring up the automation menu. Obviously, using volume automation is a great way to build intensity before a drop because you can increase the volume up to the point before the drop.
I use this tactic on not only the master track but also on the accelerating snare and kick pattern that I showed you at the start of the article. Additionally, you could use the same tactic on your entire track as the song builds in intensity. I’ll show you how I did all of this now.
Using Volume Automation on the Master Track To Create A Beat Drop
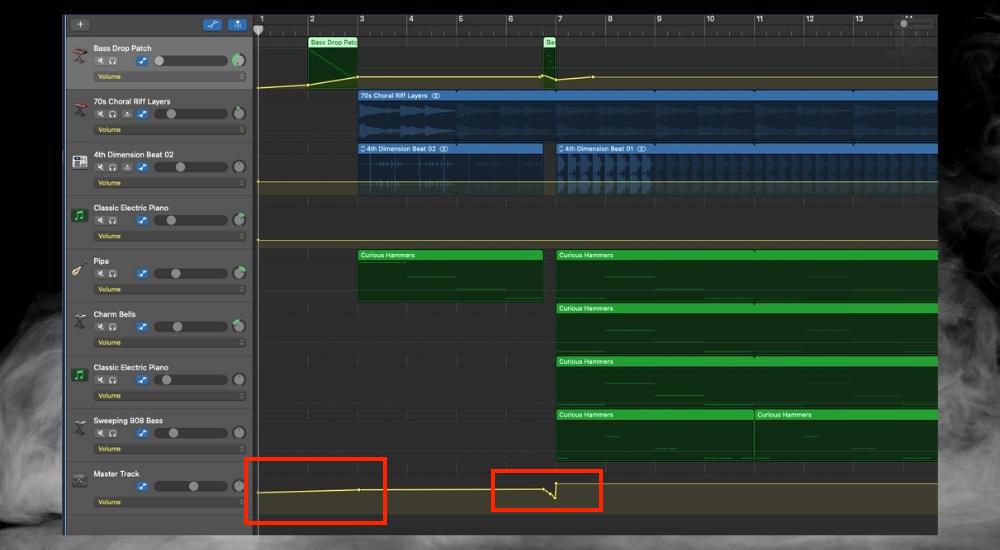
As you can see from the image above, I’ve got a bit of volume automation on the master track at the beginning to go along with the accelerated kick and snare pattern, in addition to the other bass drop on the bass synth which is the second red rectangle on the bottom right.
There’s also volume automation on the instrument track, Bass Drop Patch. Create automation points by clicking on the yellow line, and then you can drag your automation line in any way that you want.
Using Volume Automation on Instrument Tracks to Create A Beat Drop
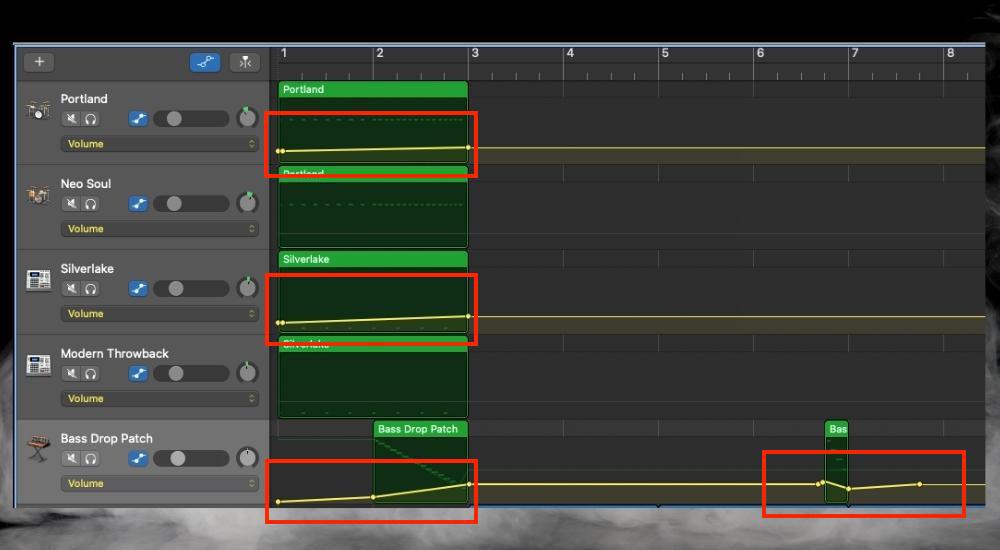
The volume automation on the individual tracks functions in pretty much the same way. Drop your automation points where you need them and then drag the line to increase or decrease the volume.
You’ll notice that the automation line on the bottom-right red rectangle goes up and then down by a bit. I’ve created that so the bass synth starts out with higher volume, and then gradually decreases down to where it needs to be before the drop.
4) Increasing Intensity of the Song Post-Drop By Adding More Instruments
Another way to create a beat drop is to continuously add more and more instruments as the song continues to increase in intensity. There are many ways to do this, but for the sake of this example, I used additional hi-hats like what’s shown in the image below.
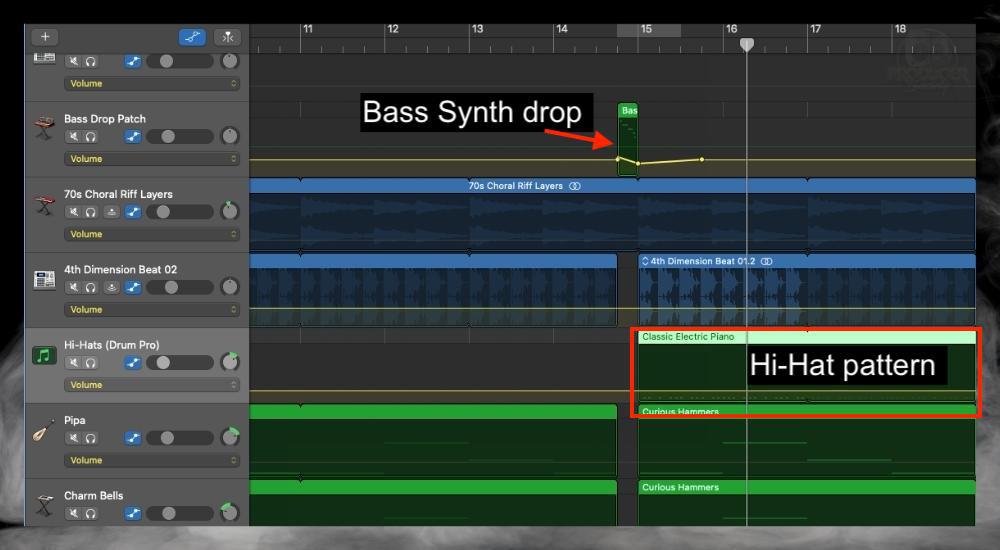
How you set up the MIDI notes of the hi-hat pattern also plays a role in the intensity of the drop. For example, I’ve chosen to add fairly quick hi-hats because a faster hi-hat pattern tends to make it seem as if the song is faster, even though the song hasn’t sped up at all.
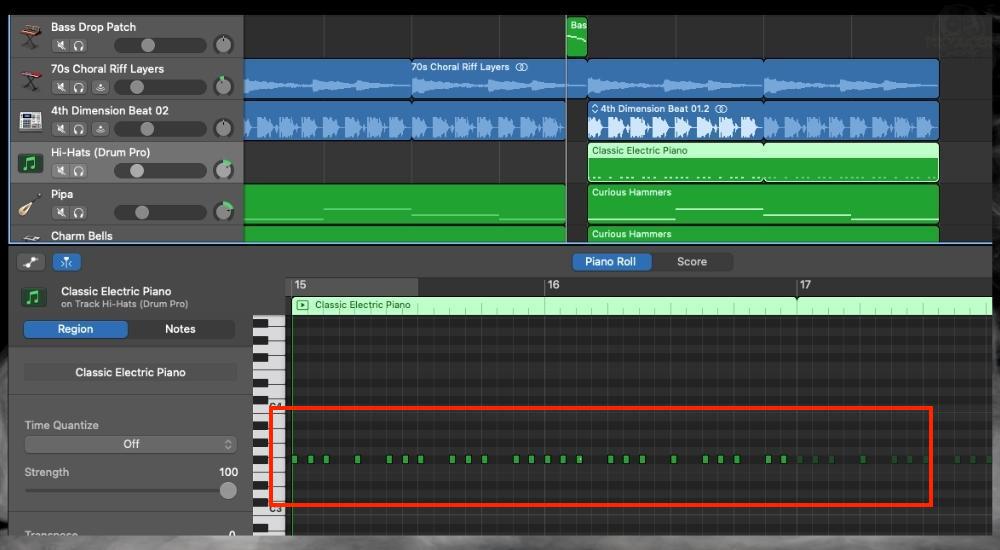
The cool thing about hi-hat patterns is that they can often manipulate how the listener perceives the speed of a song. A fast hi-hat pattern increases perceived speed and a slower one slows it down.
Use this tactic before a drop to increase the intensity or use it after to maintain the intensity. Learning to create bass drops with synth instruments is something that I came upon years after starting to create music. But the omission of instruments as part of a drop was intuitive. I did it right from the start.
5) Omitting Instrument Tracks Before an Intense Part To Create A Drop
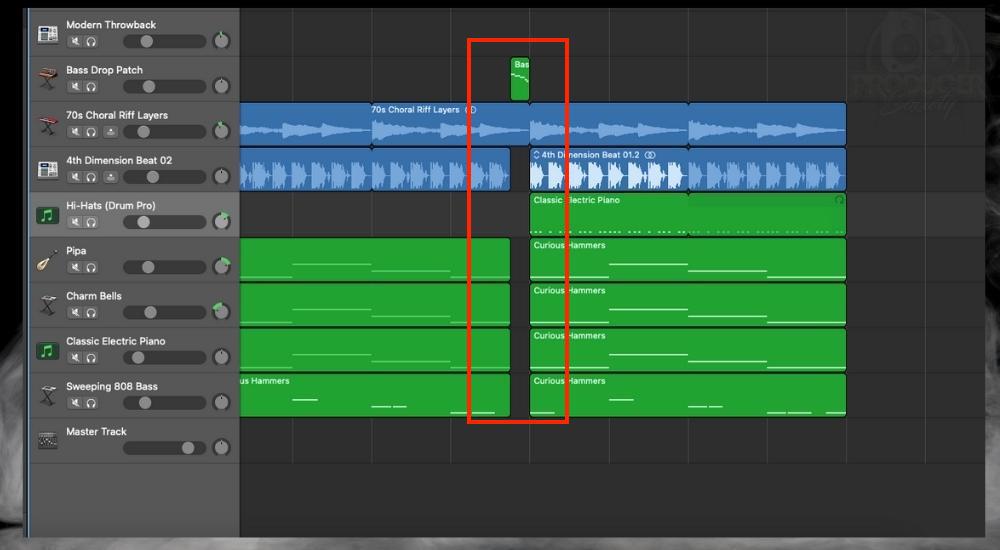
Omitting tracks just before another part of a song is another way we can build intensity. A “beat drop,” is really just a specific kind of arrangement. As I said in my article on arrangement vs production, omitting tracks is really just an organizational tool for creating a particular sound.
Track omission is really one of the most commonly used techniques just before a bass drops in an EDM song. It can be done in a multitude of ways, but what I do is like what’s shown in the image above, which is to omit nearly all tracks except for the bass or another melodic instrument of some kind.
Other Techniques To Use
What I’ve shown in this article just scratches the surface of how you can create beat drops because there are many other ways.
Adding Effects Before A Bass Drop
Another way to create a beat drop and a bass drop is to use effects. In metal, this might be done by creating a lo-fi radio effect on the vocals just before a bass drop, or it could be done by having a flanger on the drums just before a new and more intense part begins.
As I said earlier, panning is another tool that you can use, and I actually used it for the bass drop that I made for this tutorial (check out my panning guide here).
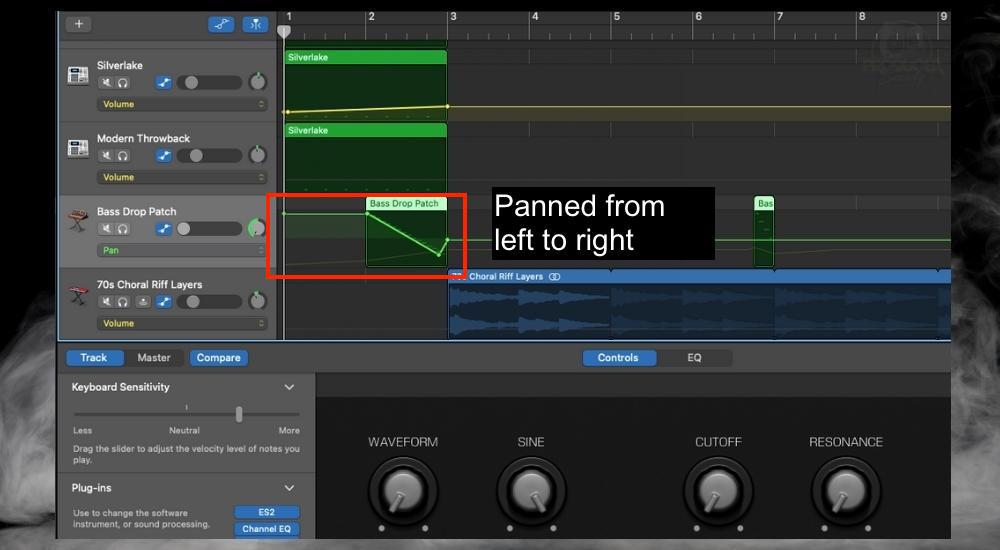
You can use panning to increase or decrease intensity in a number of ways too. In this case, I just automated the pan from left to right as the synth bass increased in volume. You can see and hear the result of all of this down in the video demonstration below:
Another commonly used effect is sidechain compression, especially in EDM music, which brings me to the next section.
How to Make an EDM Drop in Garageband?
Volume automation, silence, and sidechain compression are probably the best ways to create an EDM drop in Garageband, but there are other techniques too.
I said at the start of the article that drops are common all across genres, but the ones that come to mind most probably exist in EDM and metal. They’re often called “breakdowns” in metal.
Either way, how you go about creating bass drops in Garageband is similar to other genres. However, you would probably focus on slightly different things depending on what style of music you want to make.
Regarding sidechain compression, that’s something that I have to make an entirely separate tutorial on because there is quite a bit to discuss. My article on compression is a great introduction to the topic though.
Important Things to Note About Garageband Beat Drops
1) A Beat Drop Is An Exercise In Dynamics and Arrangement
What you should be noticing now is that creating beat drops in Garageband (and other DAWs) is mostly about manipulating dynamics and using arrangement techniques to create intensity.
It seems like there is no limit to how you create intensity, so the same thing goes for creating beat drops. This article is a jumping-off point for you to get started with your own drops.

 Written By :