If you’ve ever loaded 3rd party 808s into your project, you may have come across dissonant 808s. Put simply, the notes won’t be at the same pitch as those in the piano roll. The note can say “C3” in the piano roll, but really it’s a “G” note because the sample was recorded at a different pitch. There’s an easy way to get around this.
To tune 808s in Garageband, compare the 808 to a software instrument using the same note. While using the cycling option, adjust the “Coarse” and “Fine Tuning” parameters in the AU Sampler until the 808 is tuned to pitch, and then use Garageband’s default tuner on an audio track to get it perfect.
3 Ways to Tune Your 808s in Garageband
Garageband, unfortunately, doesn’t come with an advanced feature that automatically detects the pitch of the note.
However, there are a number of plug-ins that can do this for you. You can also use Garageband’s default tuner to get a better idea of the pitch.
1) Compare and Contrast Method With Garageband’s Default Tuner
2) Celemony’s Melodyne

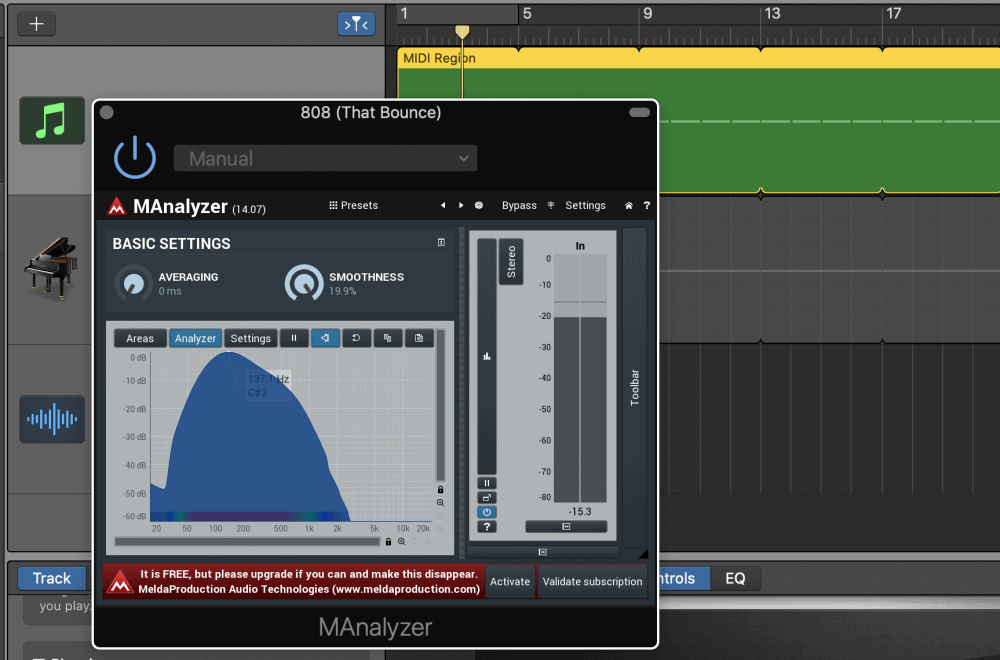
3) MAnalyzer from Melda Productions
The compare and contrast method is easily the best way to make sure our 808s are tuned properly. It doesn’t take any other external software or third-party plug-ins, and it takes the least amount of time as well.
Regardless, I’m going to explore each one of these methods in-depth down below that way there is no possible way you won’t know how to tune your 808s after reading this article or watching the YouTube video at the end.
1) Using a Software Instrument Track to Compare and Contrast
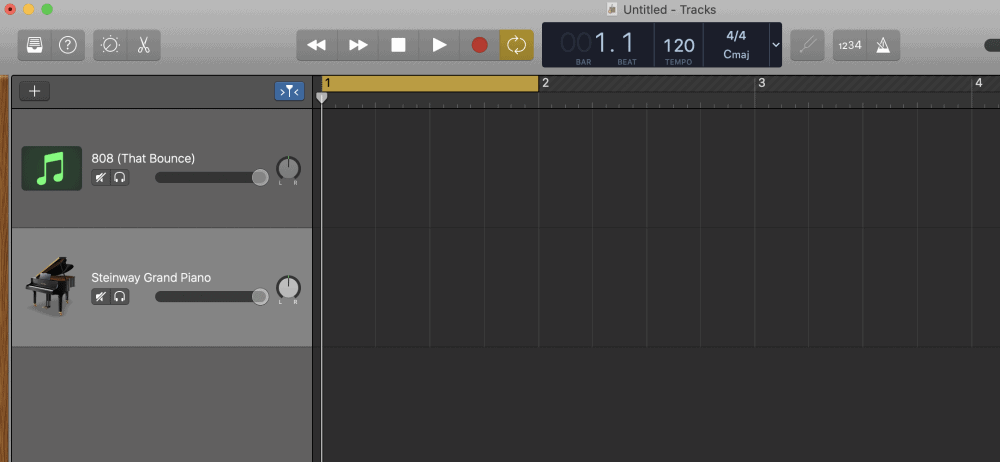
A) Set Up Your 808 of Choice And the Steinway Grand Piano
After you’ve selected the 808 you want to use, whether it’s from cymatics.fm, or from my article on making 808s in iOS, load it into the AUSampler by hitting the little gear icon and clicking the prompt, “Add Samples.” If you don’t already know how to use the sampler, I have a guide here.

After you’ve loaded the sample into the AUSampler, open up a new software instrument track to run alongside the 808.
I prefer to use the stock Steinway Grand Piano, and then I use the “C” note at the 4th octave, (C4), as a reference point, simply because any lower than that is too low for the 808. It makes it too hard to hear for tuning purposes.

B) Solo the Two Instruments and Use the “Cycling” Feature
Obviously, the Steinway Grand Piano is a stock instrument in Garageband, so if it says the note is “C3,” the note is definitely “C3.” Another useful thing to use is the “Cycling” feature, which allows you to play the same note over and over again while tuning the notes to pitch.
C) Adjust the “Coarse” and “Fine Tuning” in the Sampler While Playing a “C4” Note

Record a reoccurring “C4” note in the Steinway Grand Piano and then hit the Cycling option so it continues to play over and over again. Then, you want to compare the note from the 808 to the same one in the Steinway Grand Piano.
Every time you hit the note on the 808 using your MIDI keyboard or the Musical Typing, adjust the “Coarse Tuning” until it sounds as close as you can get it. This is where the vast majority of the tuning will take place.
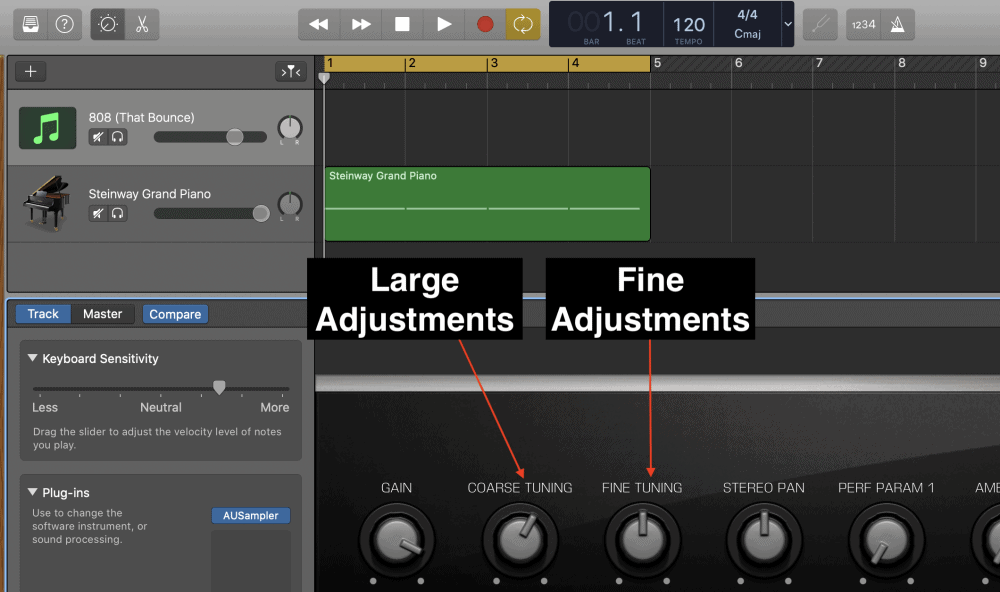
The “Coarse Tuning,” sounds like what it is, it’s a knob that you adjust if you need to change the pitch by several semi-tones or tones.
The “Fine Tuning,” on the other hand, adjusts the tuning of the notes by individual cents, which means the adjustments are much smaller and less noticeable.
For example, the 808 sound that I used for this tutorial was off by approximately 3 notes. The first note of the passage was playing an A when it was supposed to be playing a C.
To compensate for this, I just had to turn the “Coarse Tuning” knob the tiniest bit. Using the clock for reference, I turned the knob from 12:00 pm to 1:00 pm. And that was enough.
D) Use the Default Tuner on an Audio Track to Get The Tuning Perfect
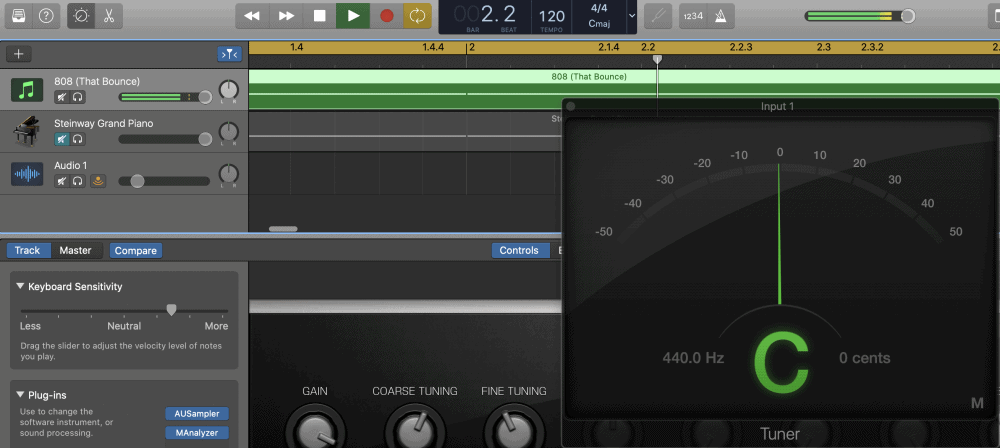
Once you’ve handled the vast majority of the tuning, you won’t want to stop there, because you want to make sure it’s tuned as perfect as you can.
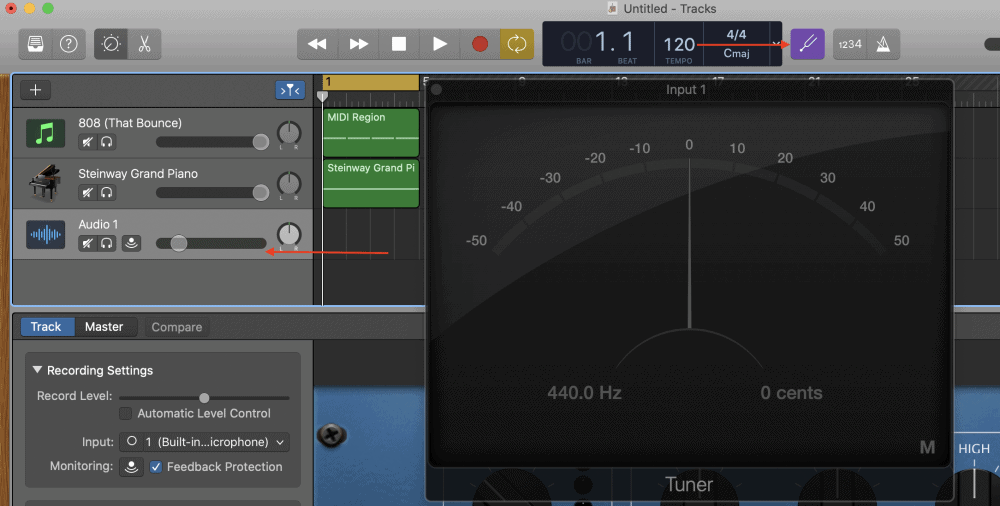
If you want to use the tuner, you have to set up an audio track rather than a software instrument track. It’s very simple to do this, just open up a new audio track, and then hit the tuning fork icon.
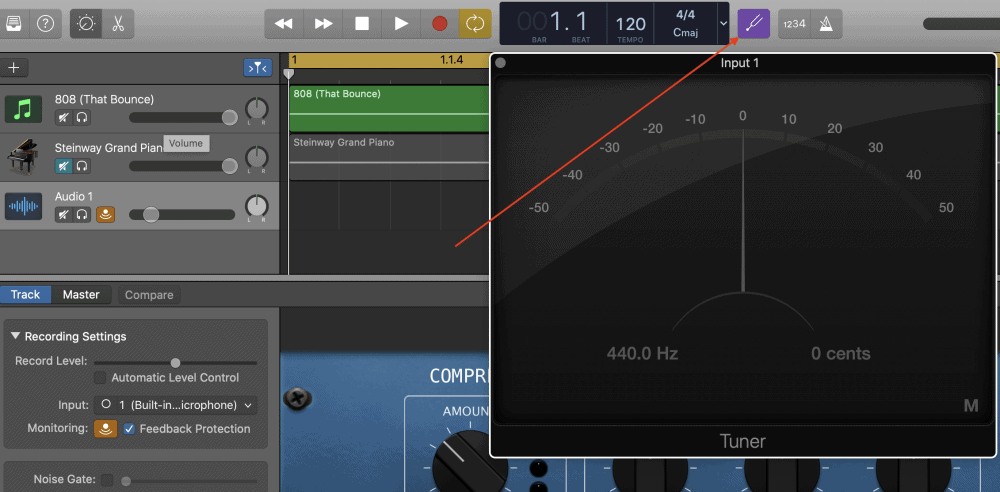
Turn off the monitoring button afterward and highlight the 808 track region, and then you’re ready to add the finishing touches.
To make the final small adjustments to get everything tuned almost perfectly, use the “Fine Tuning” knob rather than the “Coarse Tuning.” You probably won’t be able to get the 808 perfectly in-tune, but you’ll be able to get it extremely close.
I would argue that this is actually the easiest way to tune the notes, however, there are two other ways to figure out the pitch of the notes and change the pitch accordingly.
2) Using Celemony’s Melodyne
Celemony’s Melodyne is a great way to figure out the pitch of the notes because it does so automatically after you’ve printed the notes into the plug-in.
As I already noted above, if you want to get your hands on Melodyne, get the free trial version that I linked earlier, or you can get Melodyne Editor on my Product Page, which is enough to perform this basic function.
Using Melodyne is fairly straight-forward, you just have to load up the plug-in on the track that needs to be changed, and then print the notes into the software.
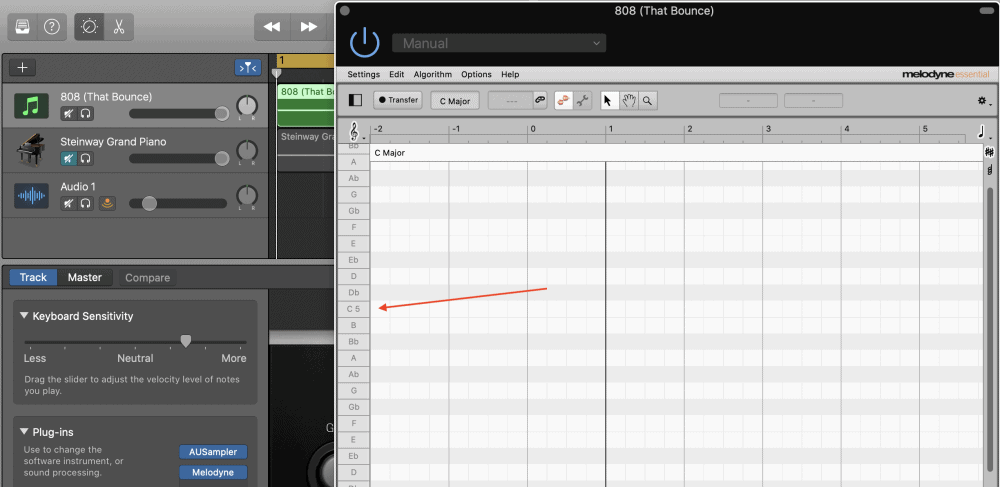
Once you’re at that stage, Melodyne will clearly tell you the pitch of the notes using the “blob” format along the note grid on the left-hand side of the interface.
A) Load Up Melodyne on Your Track
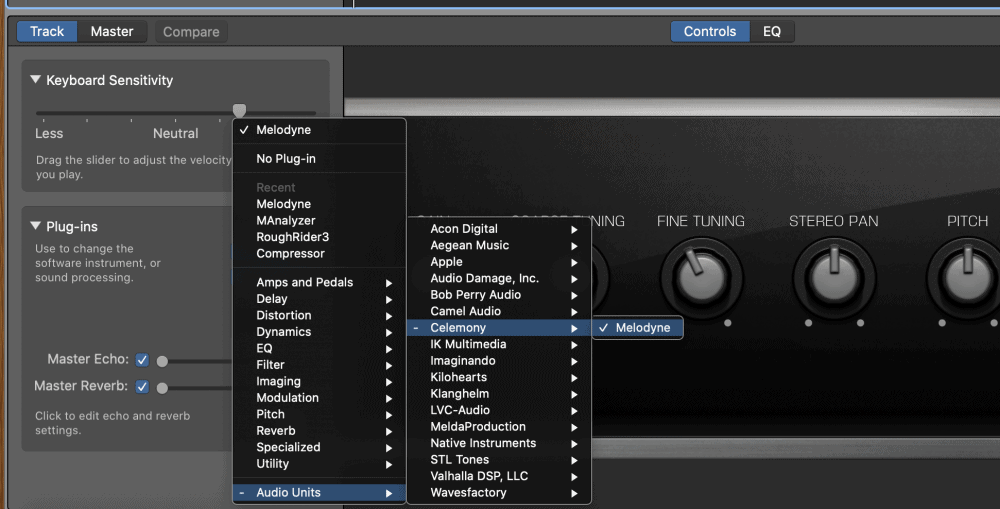
After you’ve downloaded Melodyne and restarted your computer, you just have to go into the Smart Controls and then go into the plug-ins. It should be in the “Audio Units” plug-in section every time.
B) Print the Notes into Melodyne
Once you’ve loaded up the plug-in, you want to hit the Transfer button which will turn red when it’s ready to start printing the notes into the software. Hit play on the project (don’t worry about the other instruments because Melodyne will only respond to the track on which it has been loaded), and then it will start printing.

C) Look at the Note Grid to Determine the Pitch
Melodyne has loaded the notes into the project, and you can now see where they are on the grid. The note-grid is on the left-hand side.
Assuming that you’ve loaded up your 808 sounds on an instrument that was supposed to be on key, all you would really have to do from here is to drag and drop each note to the corresponding notes in the piano roll.
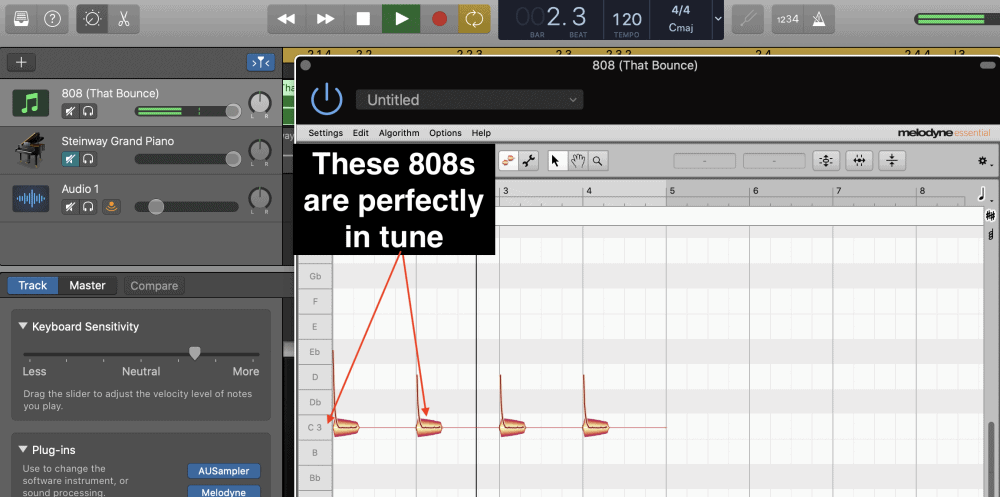
Explained in another way, if the notes in the Piano Roll are “C3,” “D4″, F4,” then drag and drop the notes accordingly in Melodyne. The primary issue with using Melodyne to tune the notes, however, is that you won’t be able to play the 808 instrument so it’s on key with the rest of the song.
In other words, once you’ve changed the notes in Melodyne, the Sampler itself, will still be out of tune. It’s just that Melodyne has changed the notes after they’ve been recorded.
With all that being said, Melodyne is a great way to figure out the actual pitch of the notes, so then you can use the “Coarse” and “Fine Tuning” option in the Sampler to adjust the sound of the notes accordingly.
Put simply, use Melodyne not as the pitch adjusting tool in the case of changing your 808s, but as the analyzer tool that will allow you to see just how out of tune your notes are.
The same thing could be said about the Melda Production MAnalyzer as well. Additionally, you could use Melodyne to adjust the pitch drift, which is how much the pitch is dropping as it fades.
3) Using The MAnalyzer to Determine the Pitch
Use the MAnalyzer in the same way. There is nothing about the MAnalyzer that allows you to change the pitch of your 808 sounds, it’s just a useful tool to figure out just how off-key or on-key your 808 sounds are.
You can get the MAnalyzer individually from their website, however, I recommend the YouLean Loudness Metering Tool instead these days.
Once you’ve downloaded the MAnalyzer, you want to bring it up in your Smart Controls, and again, like Melodyne, on the track that is hosting the 808 sound. Bring it up in your Workspace, and then adjust the “Averaging” setting to around 5150 milliseconds, and then the “Smoothness” to around 10%.

The same rule applies to this software as well, in the sense that you’re using this plug-in just to figure out what note is playing. After you’ve done this, just adjust the “Coarse” and “Fine Tuning” in the Sampler to get everything to sound just right.
Important Things To Note
At the end of the day, I would say it’s best to just use the compare and contrast method along with the default tuning fork for determining what the pitch of the notes are. This is going to be the easiest way to adjust the notes and make everything sound on-key.
YouTube Video Tutorial
Conclusion
And that’s all for tuning your 808s in Garageband. Make sure to check out my recommended gear page for more plug-ins, books, products, and other gear that will help you a lot with your music production skills.

 Written By :