 Written By :
 Mixing music is one of those things that are kind of elusive, because it seems like every mix is a little bit different from the other, despite the fact you may have done nearly the same thing to each song. Some songs just end up sounding a bit different than the other and that’s part of the magic, however, by following someone else’s template for mixing music in Garageband, I think a lot can be learned, so what would such a template look like?
To mix a song using Garageband
1) Drop the VU meters to -15dB, and then slowly bring them up so every recording sounds good together.
2) Use presets like “Studio Vocal,” “Electric Guitar,” and “Electric Bass,” with dynamics processors like Compressors and Channel EQ.
3) Use Melodyne 5 or Garageband’s default pitch correction to fix any vocal errors
4) Add effects to any recording that is too dry
5) Add volume automation to ensure the song has dynamics
6) Ensure there are no plugins on the Master Channel
7) Export the project as an AIFF to your desktop with “Share” > “Export Song to Disk,” to get it ready for mastering
The list shown above is a great “meat and potatoes” introduction into what I would typically do for a mix, additionally, in this tutorial, I’m going to show an example of a song that I mixed for a client. In the very first section, I briefly outline how the person you’re working with can send the files to you in an email. The most important thing right away to know is that the person you’re working with has to understand how to actually record music and send it across the internet (here’s my guide on how to do that).
I’ve outlined how one can export each track on its own in ‘Solo’ mode, gather up all of the files individually, put them in a zip file, and then send them using Gmail or another emailing service. I recommend checking out the aforementioned article if you want to learn how to do that.
How to Mix a Song or Audio Recording With Garageband
So, you’ve opened the Zip File and loaded all of the music into your DAW.
The first thing I do is I just listen to the song as it is, without any changes to plug-ins or volume settings.
My personal choice is to get the bass-guitar/808s handled first because the low-end is perhaps the most intrusive audio frequency, however, if you’ve chosen to use something like Initial Audio’s 808 Studio II from Plugin Boutique (my favorite), I find less mixing is needed. You listen to music while slowly moving the volume to the point that sounds good.
Move down each software instrument track, one at a time, perhaps moving to the drums, guitars, and then the vocals in that order. Once the volume is set to the point you want, you can start adding the plug-ins and EQ to clean things up.
At this stage, it’s really up to you to mix the volume of the instrument tracks to your liking. No one can show you the actual steps for lowering and increasing the volumes, because it’s up to you to figure out what you think sounds good.
Background Vocals
For the background vocals, I dropped the dB to around -2.3dB, then I added a Noise Gate, Channel EQ, and a bit of Stereo Delay.
Noise Gate
One has to be careful with a noise gate because you can end up eliminating desirable transients. A transient is a short-lived part of the audio signal that often gives body and character to a sound. In many cases, they’re intrusive and should be eliminated, but sometimes they’re part of what makes it sound good.
It’s one of the reasons why I typically don’t add a noise gate to the guitar instruments, especially in the case of punk rock, because the “messiness” of guitar tone is part of what makes it punk.
However, Noise Gating is a very common practice among metal guitar players and others, and my favorite amp simulator plugin, Blue Cat Audio’s Axe Pack (also from Plugin Boutique), is probably the best way to achieve that sound.
I set the Noise Gate to the Background Vocals to -35dB. This eliminates any undesirable sounds, without pulling the life out of the track.
Channel EQ
For the channel EQ, I cleaned up the vocals by using a Garageband pre-set titled, “Soften Background Vocals.”

Many of the presets that one has access to are actually pretty good, especially in the case of Garageband and Logic Pro X.
When dealing with male vocals, a common practice among mixers, from what I understand, is to jack up the frequencies between 5000kHz and 20,000kHz and then decrease the low frequencies. It really depends on the person’s voice.
A man’s voice typically has more low-end, which is one of the reasons why you boost the higher frequencies and decrease the lower ones. For female vocals, I imagine it’s probably the opposite, although I could be wrong.
Stereo Delay
The Stereo Delay, I used very minimally, because only minor adjustments are necessary to dramatically change the sound for the better. In the image you can see below, I used the 1/4 Delay setting, and then I set the ‘left mix’ and ‘right mix’ to 30% equally.
The added delay has the effect of making the vocals less dry.

I also set the Ambience and Reverb to around half-way, which is plenty of reverb.
It’s important not to use too much reverb on your instrument tracks because then everything will sound “washed-out,” or in other words, way too many effects to the point of distraction or saturation.

Bass
Channel EQ and Noise Gate
The next instrument I mixed was the bass guitar, which I set around -12.0dB in total volume, along with a channel EQ.
I set the Noise Gate to around -30dB.
In this particular song, I used the “E-Bass EQ,” which increases the frequencies pretty much right across the broad, with an added EQ boost to the area between 900 and 1000kHz.

The bass is an instrument that a lot of people like to mix way down for whatever reason.
I find the bass sounds the best when you can actually hear it in the mix, but in popular music, it seems like it’s pretty much almost always super quiet, with the exception of hip-hop which emphasizes the bass frequencies.
Drums
Channel EQ
When I mixed the drums, I ended up using the preset, “Refresh Drums.” You can see what this pre-set looks below.

Initially, I had a compressor on the drums, because I was trying to equalize all of the sounds of the kit, however, the client used a drummer track (which I also have a guide on, by the way), so that means all of the instruments are together.
When I loaded it into Garageband again to do the final mixing, I noticed that there was too much compression on the track and sounded like the audio waves was hitting the ceiling, so to speak.
For that reason, I had to go back and turn the compressor right off.
When it comes to mixing a drummer track, there really isn’t that much that can be done to it, because in an actual studio, from what I understand, there would be individual microphones on each part of the kit, and then you can mix it all together afterward.
This isn’t possible when using an automation drummer, because the kit comes together as one sound.
There isn’t much you can do with the mix, other than use a little compression and a bit of EQ and that’s it. Perhaps, a noise gate, but it’s not really needed either, considering it’s an automation drummer and it’s not recorded for real.
Guitar Solo
For the guitar solo, I had to use a compressor as well as an EQ, and I found that using the compressor really brought the guitar into the track. In the image you can see below, I adjusted the compressor’s settings to:
Threshold: -14.5dB
Ratio: 2:1:1
Attack: 23.0ms
Gain: +1.0dB.

Channel EQ
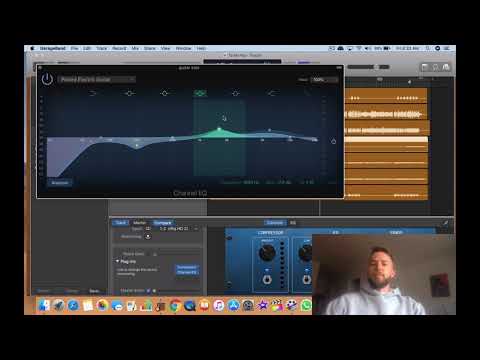
For the Channel EQ, I used the pre-set, “Picked Electric,” which you can see what that looks like in the image below:

The “Picked Electric Guitar” preset works well because it eliminates lower-mid frequencies, to avoid any potential muddiness, and increases the higher frequencies to make the guitar sound more “crunchy” and “biting,” so to speak.
There are always a ton of mid-range and low-mid frequencies in music, so it’s important to pay close attention to them because it’s very easy to have too many of them; then the music doesn’t sound great.
The volume is set at +1.5dB.
It was a bit of a challenge to have the vocals and the guitar solo play at the same time, which it does in the song.
Both the solo and the vocals are competing for the same frequency, so I found that balancing the two was a bit challenging.
However, the “Picked Electric Guitar” setting, I think played a nice role in balancing the two sounds out so it sounded good.
Main Left and Right Guitar
For the two guitars, I panned one of them to the left and the other one to the right, which, as I’ve explained in my other tutorial, is a common tactic for mixing guitars. There’s a noise gate set up on each one of -50dB, as well as the “Clean Up Guitar” preset for the EQ.

The style of the song is punk-rock, so the guitar tone is incredibly important. Most punk rock songs have the biting “crunchy” guitar tone, whose frequencies typically lie between 500Hz and 2000kHz.

I’ll also eliminate the sub frequencies within the guitar tracks so as to create room for the bass guitar.
Main Vocals
To the client, the main vocals are pretty much always the most important thing because of the way that popular music emphasizes singing so much over the other instruments.
It’s another reason why I recommend people work on their singing chops with a vocal coach or with Singorama at the beginning (on my Product Page), because it’s a good way to practice.
Initially, I used Stereo Delay on the vocals, reverb, ambient, and I had them turned down a bit so that the vocals would sit nicely in the mix, however, the client wanted them turned up.

I had to go back and change them because they didn’t like it, although, in my opinion, the first mix was far superior to the second one.
Franky, that’s how this goes. At the end of the day, the client is paying you to do work for them, not the other way around.
Truthfully, if they tell you to do something, then you just have to swallow your pride and do it, even if you know your way sounds way better.
Otherwise, if you get your way, there’s a good chance they won’t be happy with it and will harbor some kind of resentment, and no longer want to work with you anymore.
While this may not be the option with the most integrity, it’s kind of what you have to do to continue working.
Compression on Vocals
For the vocals, I used the Studio Vocal preset, whose parameters you can see in the image below.

I have the noise gate set to -32dB, the Channel EQ set to “Vocal Refresh,” and then the reverb and the ambient settings at the dial, 4.
This particular track, I had to be careful with, because the vocal performance was slightly out of tune at times, so when you use pitch-correction, it ends up making that “robot” sound, as people like to call it.
Truthfully, people believe that Autotune is some kind of magic software that fixes terrible vocals and makes them amazing, but from what I’ve experienced thus far, that’s not how they really work.
Pitch-correction/Autotune, including Melodyne 5 (also on my Product Page) which is the best audio editing software on the market, only make good vocals sound better. If the vocal performance isn’t great, then no amount of pitch-correction is going to fix them.
Pitch Correction
As I mentioned above, from what I’ve learned so far about music production, especially vocals, autotune is really a tool that only improves an already good performance.
In all probability, Ariana Grande is an extremely good singer, it’s not all just some studio tactic that makes her sound the way she does.
The same thing can be said for clients you work with.
Pitch Correction software will make minor adjustments that make them sound just a little better; they won’t be the thing that makes or breaks your vocal tracks, unlike what a lot of people on the internet tell you.
With that said, there is a possibility that software does exist where it can turn a terrible vocalist into Ariana Grande, although, I don’t know what it is or whether it exists.
The pitch correction software in Garageband is pretty basic (my guide); it just has the check-box to turn it on and off, as well as the slider bar where you can turn it up from 0 to 100.
What you can also do to correct imperfections in the vocal track is to zoom in to the highest degree of the vocal track, and then select and delete whatever sound is ruining the mix.
For instance, from what I’ve been told, deleting the inhales before a person starts singing is something you can do with this tactic.
Another way to do this is to use a noise gate, but with the noise gate, there is a risk that you’ll eliminate desired frequencies and sounds.
What I did for this particular track, is I turned the pitch correction to around 67, because anything above that was creating the “robot” effect as people on the internet call it.

It’s a lot more common for me to turn the pitch correction up to 75-77, but this wasn’t the case in this particular track.
Moreover, you have to know the key signature of the song, which you then select in the top-center of Garageband’s interface.
The song was in Bb Major, which, I believe, is a relatively common key signature for a popular music song to be in.

If the client doesn’t know what key the song is in, it’s as simple as grabbing your guitar or piano, finding a note that matches the song, and then play the notes of the major scale up from that note.
Vocal EQ
For the vocal EQ, I used the preset, “Male Vocal Refresh,” which essentially, does the most common thing that’s done to male vocals, drop out the frequencies below 100Hz and then add a boost to frequencies between 1000kHz to 20,000kHz.

If you google how to EQ vocals, you’ll likely get many other blog posts which describe the same tactic for male vocals.
Now that we’ve done the bulk of the mixing, it’s time to move on to the final stage of the process.
Mastering
Before getting into this final step which I’ve explored in an entirely separate article/video, ensure that you don’t have any plug-ins running on your music’s master channel. It’s ok to have plug-ins running on all of the software instrument tracks, but not the main master channel.
Once you’re at this stage, you can export the song using the Share button, and choose Export to Disk, then the AIFF option, which is a high-quality lossless file format.
After you’ve exported the song to your desktop, drag and drop the song back into a new file in Garageband, and you can begin making the final tweaks.
When I’m in the final stage of the mixing process, I’ll typically add three plug-ins on top of it, Compression, Channel EQ, as well as the Limiter.
For Compression, I’ll use the “Platinum Analog Tape” preset. It’s parameters look like what you can see below.

However, I did make minor adjustments to the compressor, including decreasing the threshold as well as decreasing the ratio.
If you want to read more about the compressor, I suggest you check out this article here. In layman’s terms, the ratio is how hard the compressor is working, and the threshold is at which point the compressor kicks in.
Channel EQ
For the Channel EQ, I scooped out the sub-frequencies between 20Hz and 40Hz, and then I also scooped the frequencies between 10,000kHz and 20,000 kHz.
I also subtracted the EQ by -2.0dB at 417 Hz as well as 1160kHz. That’s all one really has to when it comes to the final stage of EQ. As a general rule, less is more when it comes to EQ.

You don’t have to spend a ton of time subtracting and adding EQ all over the place, and if you feel this is necessary, it’s probably because there’s something up with your original mix.
For instance, if there is too much low-end in your mix, don’t bother trying to fix this in the mastering stage.
Go back to the original mix and decrease the volume of whatever instrument is causing too much low-end, whether it be the bass guitar, the boutique 808s, or the kick drum. You can read more about using Channel EQ in this article here.
Limiter
The stock limiter in Garageband really only has two parameters, the output level, and the gain, so making adjustments to it is very straightforward and easy.
What I usually do, is I increase the gain by a small amount, around +2.0dB and then I set the output level to -0.1dB or -0.2dB.

The limiter acts as a ceiling, so it will stop any undesired frequencies past a certain point.
From what I understand, 0dB is the point of distortion, so setting it at -0.1dB and the gain at +2.0dB will be enough limiting.
Remember, a limiter is essentially a compressor with the ratio turned super high, however, it can be used in a number of different ways which I briefly touched on in my tutorial.
Other Important Things To Remember
- Regarding the master volume on the final track, I’ll increase it by +2.0dB and that’s it. Any more than that, and it’s starting to get too loud in my opinion.
- Also, make sure you’ve turned off the Auto-Normalize function in Garageband’s Preferences within the Advanced Settings tab. This is the reason why many people’s exported tracks are far too quiet and they can’t figure out the reason.
- When I export the original mix as an AIFF file, I’ll have the Master Volume set at +0.0dB. I’ve never heard anyone else ever mention this, but I find that if I export the original mix say, by +4.0dB, the track ends up being distorted in the final mastering stage.
YouTube Video
So glad to see our track featured here 🙂 you really did a great job here man. If you want to take a listen, here’s our track that Andrew mastered: https://soundcloud.com/user-663435390/te-ne-vai