Mixing vocals is an artform on its own that takes a bit of practice to do well, however, there are a few things one can do right away that will make a world of difference. Nevertheless, there are a few things one can do to mix their vocals in GarageBand.
To mix vocals in Garageband:
1) Turn on the noise-gate
2) Use the compressor’s “Studio Vocals” preset
3) Use the Channel EQ’s preset, “Natural Vocal”
4) Add reverb
5) Adjust the volume so they fit in the mix
6) Pan the vocal tracks if there is more than one
7) Apply pitch correction
How you mix your vocals is going to depend on factors including the singer, the microphone they used, the genre of music, the room they sang in, etc. Many of the principles will remain the principle regardless of the vocal performance (use Singorama – from their website – if you’re looking to improve your skills).
1) Apply The Noise Gate
Starting from the beginning of the aforementioned list I just laid out, the best thing to do first, in my opinion, is to apply a noise gate.
Typically, there will be a ton of background noise when clients send you their music, whether it’s the very light sound of a TV going in the background, someone talking, breathing, or an old grumbling air conditioning system.
You can see the Noise Gate in the plug-in section of the Smart Controls beneath the workspace.
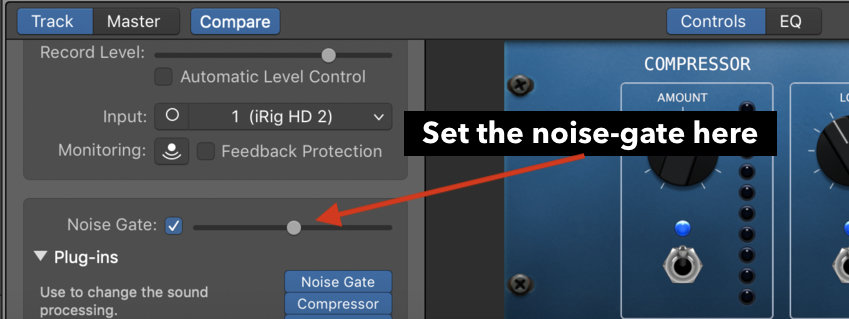
I find that, when using a noise gate on vocals, you don’t want to set it too aggressively, otherwise you’ll squeeze out other transients and sounds you may want.
Moreover, if you’ve set the noise gate too high, it’ll eliminate sustain in notes, for instance, if you’ve tracked a guitar solo and there’s a moment where you hold a bend, the noise gate will mute the ending of the note, rather than let it drone out gently.
Truthfully, this is a rule you can use for pretty much every instance of the noise gate.
The last time I used one, I set it to around -49 dBs.
To see what you’ve done, you can hit the “Solo” button to see how much of a difference this makes in the vocals. It’ll eliminate pretty much all of the undesired noise in the background (more on eliminating background noise in my tutorial).

It might be tempting to simply go through every vocal track and set up a noise gate around -49dBs, but the truth is that the attention to detail, and caring for each track individually, as well as how it relates to the whole mix, is the way to make a song sound really good.
2) Apply Compression
The beautiful thing about Garageband and even Logic Pro X are the surprisingly useful presets.
The stock presets that come with the software work pretty well, or if they’re not great right off the bat, they work as a solid jumping-off point.
Now, in case you’re new to compression, you can read about it in my article here, but essentially, compression is lowering the volume of the loud sounds and increasing the volume of the quiet sounds.
The tool can be very useful, but also damaging if used too much.
Threshold – the point, in dB, at which the compressor starts working
Ratio – how hard the compressor is actually working
Attack – how fast the compressor is
Gain (makeup gain) – a gain knob that compensates for the volume loss as a consequence of compression.
If you’re a beginner to the compressor, it’s a good move to use some of the presets.
In my case, I’ll use the “Studio Vocal” preset, and any other changes I’ll just make to it manually. As I mentioned above, the presets are a great jumping-off point, so any changes you want to make you can ever-so-gently dial them in.
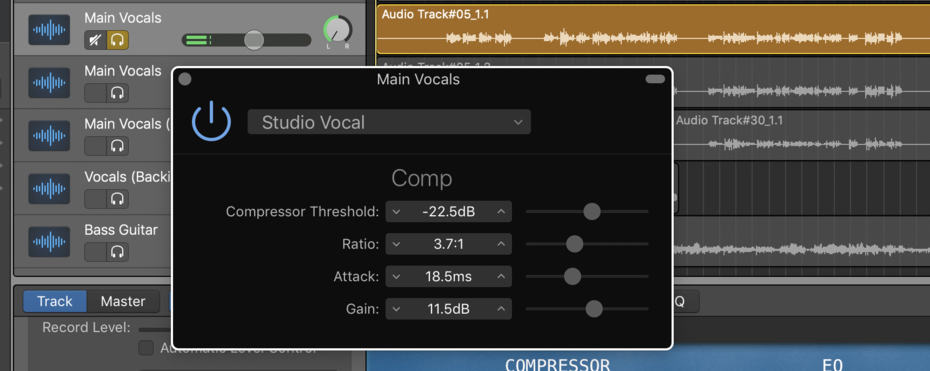
When making changes to the compressor, it’s always best to go a little bit by a little bit. Assuming you’re new, you can see what it sounds like when each parameter is cranked to the max.
The “Gain” and the “Ratio” knobs are without a doubt the most significant because the gain essentially increases the total volume of the track, or in more proper terminology, it increases the strength of the entire signal.
The ratio, on the other hand, is how much the compressor is compressing. It’s how hard it’s actually working.
For instance, a ratio of 3:1, means that whenever the signal exceeds the threshold by 3dB, the compressor will drop it down to just 1dB outside of the threshold.
(I really can’t stress enough that if this sounds foreign to you, head over to the compressor article I linked above. I did my best to explain everything as best as I could with diagrams and pictures as well).
The “Attack” knob is one that I don’t actually use that much. I might change it a little bit, depending on the instrument.
For instance, the “attack” setting is useful if you decide to apply a compressor on a hi-hat for instance, because the hi-hat has fast transients, so you need to increase the attack time in order for the compressor to actually be fast enough to compress them.
The attack is less useful for vocals because vocals aren’t “fast,” they’re drawn out and slow.
Think about it.
When a drummer hits a hi-hat, the sound blasts through the room very fast, in comparison to the sound of someone’s voice, which is drawn out and slow.
The “Attack” knob is, essentially, the control you turn to when you’re switching to alternative instruments. You may turn up the “Attack” when compressing a snare, for example.
Experiment with Garageband’s many presets, until you’ve figured out how to go about using it. It really just takes time.
3) Use Subtractive EQ
Now, we’ll move on to Subtractive EQ. In case you don’t know what this means, it’s a technique which means that, if we want to increase certain frequencies, what we do is we take away from other competing frequencies.
For instance, if the vocals aren’t loud enough, maybe the drums and the guitar are too loud. Turn down the guitar and the drums and see if the vocals now sit better in the mix.
This is a principal used all throughout this discipline, from my understanding of it.
Regarding how this relates to the EQ, when EQing a sound, if there’s not enough high-end, perhaps there is too much low end and it’s drowning out the high-end? One way to figure out where the problem is, is to solo the frequencies with Fab Filter’s Pro-Q EQ on my product page.
And the other way is to experiment with decreasing the low-end if you want the high-end to shine. Like the compressor, it’s best to try out some of Garageband’s presets and see what sounds good, also, you can apply these same presets to the Fab Filter plugin.
Each preset has a name that clearly states its purpose, and once you’ve found one that you like, you can make some very minor changes to really optimize the sound.
Changing the EQ of vocals is highly specific because it really depends on the person’s voice.
Someone like Jim Morrison, for instance, probably doesn’t need a boost in the low-end, because his voice is already so low. On the opposite side, Ariana Grande likely doesn’t need a boost in higher frequencies.

Listen closely to the singing and decide, “what needs to be eliminated here?” “How could this sound better?”
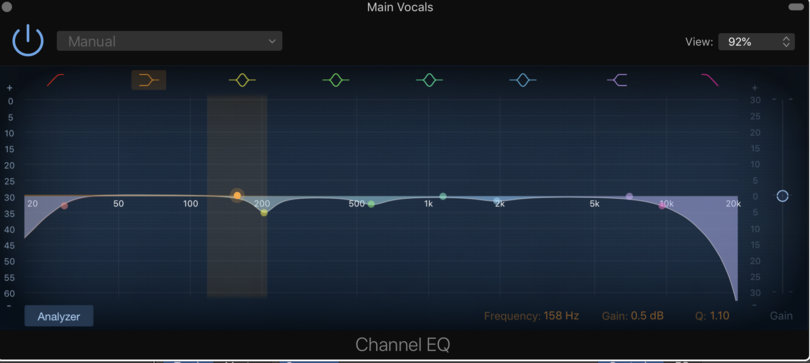
In the picture that you can see below, you’ll notice there are no boosts anywhere in the Channel EQ. I’ve dropped EQs instead, this is what’s called subtractive EQ because I’ve actually boosted frequencies, by dropping others. Another thing you could do is just use the “Natural Vocal” preset to get the job done quick and dirty.
4) Add Reverb
For the next part, I’ll add reverb just to give the vocals a bit of ambiance, but not too much. Reverb has the effect of making it seem like the vocals are either at “the front” at the “back of the mix,” as does volume.
Reverb is, essentially, the sound of the signal reverberating throughout the room after the source of the sound has already disappeared and some reverb plugins are better at imitating this effect than others.
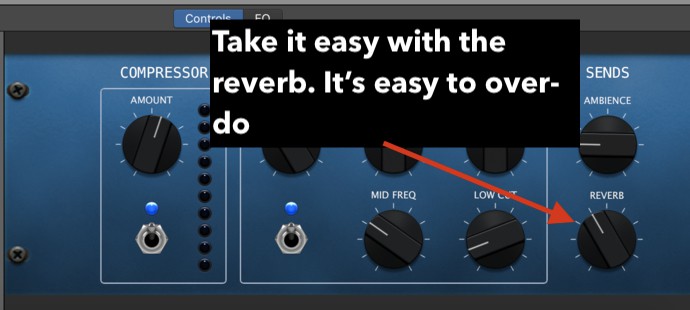
Assuming you’ve chosen to simply use Garageband’s default reverb, there’s not much to look at here, just keep in mind that if each track gets reverb on it, you risk having a sound that’s completely “washed out,” or “too wet,” which are audio engineering terms explaining how there is simply too much of a certain effect.
5) Set The Volume
At this point, you can begin setting the volume of the vocals so they sit appropriately in the mix. This is something that you just have to use your ear to figure out.
It’s a phase that comes after the use of the compressor because you’ll notice the compressor has the biggest impact on the volume.
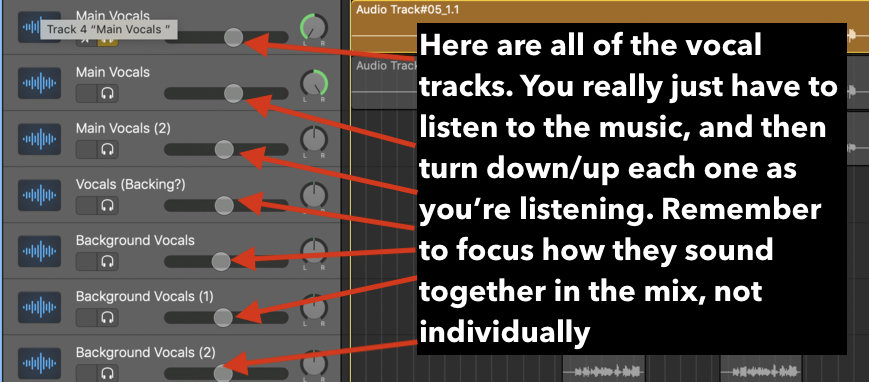
If you set the volume, and then set the compressor, you’ve done everything, essentially, for nothing.
6) Pan the vocals to the left and right (optional)
As I’ve explained before in my panning article, If you have back-up vocals, you can choose to pan them to the right and left by a little bit. The pan button is right beside the VU meter in Garageband on the righthand side. It has the letters, “L” and “R,” which obviously mean left and right.

Thankfully, there are exact numbers on the dials as well, so you can be precise in how much you’ve panned the tracks.
7) Apply Pitch Correction (autotune)
1) Set the Key Signature in the top center of the DAW.

2) Double click on the vocal track.
3) Click “Track” and not “Region.”
4) Go down into the Smart Controls and click on the button, “Limit To Key.”
5) Slowly increase the volume fader to the point before the vocals have that Travis Scott/Robot sound. It’s around 70 where it sounds good.
A lot of people like to overcomplicate this very simple feature, but it’s really not that complicated.
Just go down into the Smart Controls, click on the button that says, “Limit to Key,” and then increase the volume fader until you’ve noticed that the vocals sound more in tune.
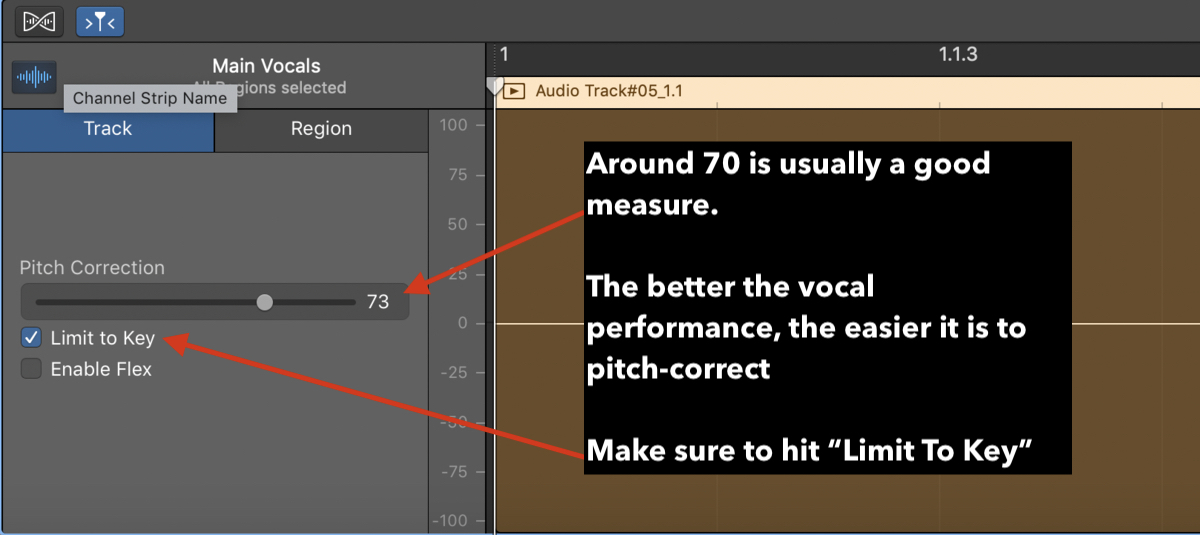
Don’t turn it all the way up to 100, because then you’ll get the Travis Scott/Robot voice that a lot of hip-hop guys like to use unless that’s your goal (here’s my guide on that if that’s the case).
It’s important to note that you have to know the key signature of the song first and set it in the top-center console of the DAW. Figuring out the key signature of the song is something I’ve written about a few different times, (however, plug-ins like Celemony’s Melodyne 5 – Editor on my Product Page can actually do it for you).
What I do, is I grab my guitar, and I play along to the song that I’m mixing.
As a general rule, the very first or last note or chord of the song tells what key signature the song is in, but this isn’t always the case. Figure out the very first note of the song, either by playing the notes on your keyboard or with your guitar.
Then you play the notes of the corresponding Major Scale.
Explained another way, figure out the root note. So if the first note of the song sounds like it’s Bb, then Google Bb Major and find out the notes, and they’re Bb, C, D, Eb, F, G, A, B, C.
Other Articles You May Be Interested In
- The Last Reference Track Mixing Tutorial You’ll Ever Need
- 24 Basic (And Actually Useful) Mixing Tips For Garageband
- How Loud Should Vocals Be? [ANSWERED – With Examples]
- How To Pitch Your Vocals in Garageband
- How To Record Vocals Over Music In Garageband
Important Things to Note About Mixing Vocals in Garageband
1) Understanding Major/Minor Scales is Very Helpful
Knowing what the Major Scale is and what Key Signatures are is extremely helpful, and definitely worth learning. If you’re looking to get into music theory, I suggest picking up Mark Sarneck’s book from Amazon as well as the equally important answer book from the same place.
2) Get Antares Auto-Tune Pro for Pitch-Correcting Vocals
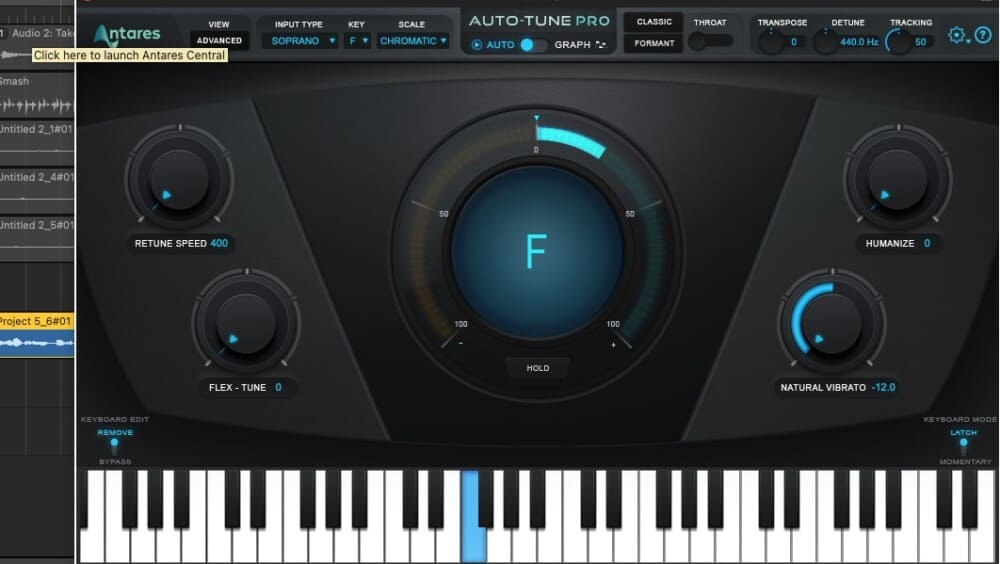
Garageband’s default pitch-correction is great, however, Antares Auto-Tune Pro is capable of doing a lot more which is the reason why I recommend it as the number one auto-tune plugin for Garageband, next to Melodyne 5, which is a multi-purpose audio editing tool rather than just for tuning vocals.


 Written By :
why are you talking about strings and guitars and shit, when it’s how to mix a vocal? idc about no band mixing or no instrument mixing…Just Rap vocal no one gives a full how to on those…A full how to on everything else tho
The reason why it’s called a “mix” is because you’re literally mixing instruments and sounds together.
However, you’re not the first person to ask for one on Rap Vocals specifically, so I’ll do one soon. Be patient.