Getting rid of background noise in GarageBand is pretty simple, and while there are many more sophisticated plug-ins for noise gating available on the internet, I would say that, from what I’ve experienced thus far, the stock noise gate that comes with Garageband works just fine.
To set up a noise gate in Garageband:
1) select the track that needs noise reduction.
2) Press ‘B’ on your keyboard to open the Smart Controls.
3) Click on a plug-in slot and then choose “Noise Gate” from the “Dynamics” sub-category.
4) Choose “Tighten Up” from the Noise Gate’s presets.
There are other ways to do the same thing as well. You could adjust the Noise Gate manually.
To eliminate background noise in Garageband:
1) Hit ‘B’ to open the Smart Controls with a track selected
2) Check the “Noise Gate” box
3) Slide the noise gate bar to the right until you’ve reached the point where the noise is reduced without affecting the sound (usually between -50dB and -15dB)
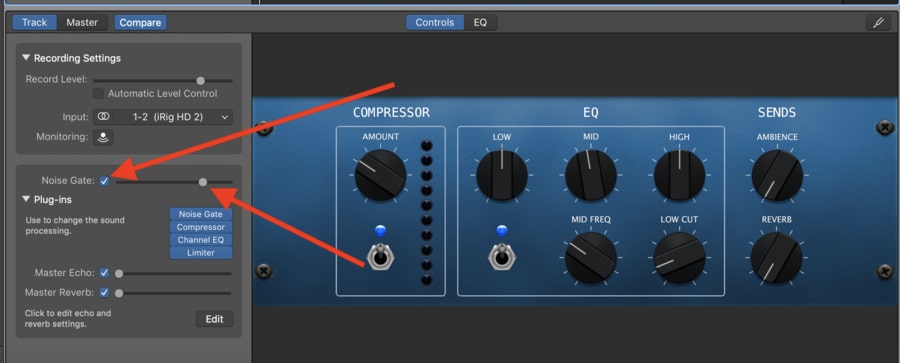
You can choose at which rate you’re going to set the noise gate, and of course, it really depends on what you’ve recorded and how loud the signal is, however, there is typically a range which sounds the best, and I would say that between -50dB and -15dB is the best area to be in.
For instance, on the latest track that I mixed for a client, I set the Noise Gate to around -20dB, and I’m sure that the client used a gate when he was recording as well.
Be careful not to turn the noise gate up so much that you eliminate all of the little sounds (transients) that make it sound authentic and human unless your goal is to make it sound “too perfect.”
Moreover, you might find that too much gating will create a choppy vocal during a quieter part of the vocals or narration performance which is something I learned how to avoid doing after I took the online singing course, Singorama, on my Product Page (and that’s not the only trick I learned from it either).
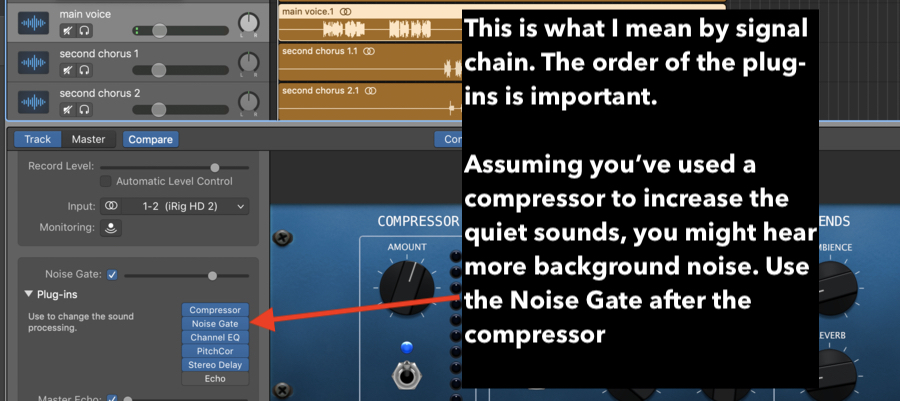
In combination with a compressor, the noise gate is very useful. In terms of where it should be in the signal chain, you want to use the Noise Gate right after wherever the noise is coming from.
As I’ve explained in my article on the compressor, if you’ve used a compressor to increase the quiet sounds and decrease the loud sounds, you might find that it brings up the undesirable sounds in the background.
In this case, you can use the Noise Gate after the compressor rather than before.
Here’s what I mean by the order of the plug-ins in the signal chain – the image below illustrates what I’m talking about. Frankly, you could even try putting a noise gate both before and after the compressor to really squash out some unwanted sounds.
Noise Gate Tips
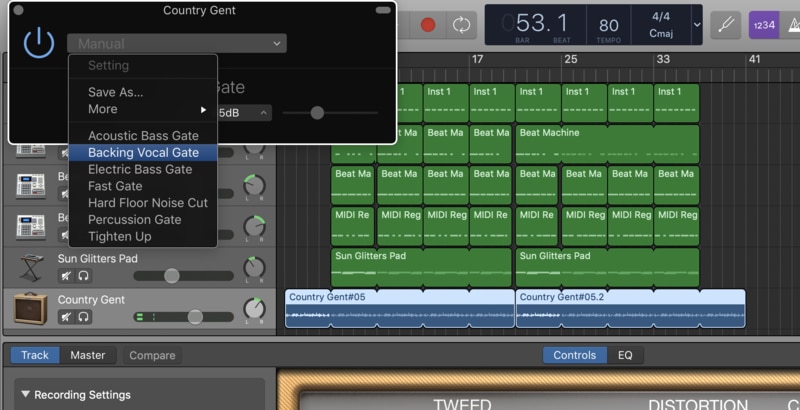
Also, notice that the Noise Gate comes with its very own pre-sets in GarageBand.
Click the Noise Gate plug-in the Smart Controls, and then in the Drop-Down menu, you can see the presets that come with it.
There are seven of them: Acoustic Bass Gate, Backing Vocal Gate, Electric Bass Gate, Fast Gate, Hard Floor Noise Cut, Percussion Gate, as well as Tighten Up. I have to say that “Tighten Up” is probably my favorite, however, I usually find that its setting, -30dB, is usually a bit much. I’ll put it to around -35dB instead.
It’s worth mentioning that just using a proper mic like the Audio Technica AT2021 on Amazon is going to do a great job of isolating unwanted noises.
In fact, if you just took one more step and purchased a microphone isolation filter, you would be able to eliminate the majority of external sounds, rather than trying to fix it in post-processing. An ounce of prevention is worth a pound of cure.
How To Eliminate Unwanted Background Noise Manually
In many cases, you might find that it’s better to move to actually go into the vocal track and eliminate the unwanted sounds manually, rather than gating merely everything.
Here’s how to do this:
1) Double click the Audio Recording in the Workspace to highlight it.
2) Zoom in to the track by using the Zoom function on your trackpad.
Zooming in on the audio file in the Smart Controls will allow you to see all of the little noises in the wave format.

3) Isolate the parts of the audio recording that you want to get rid of, and then use the (Command + T) function to actually cut them out.
a) Use the (Command + T) function to cut the first offending part.
b) Then move the Rule over to the next part and use the (Command + T) function again.
You’ve created a little square, and you can select the square, and then delete it from the audio track entirely.
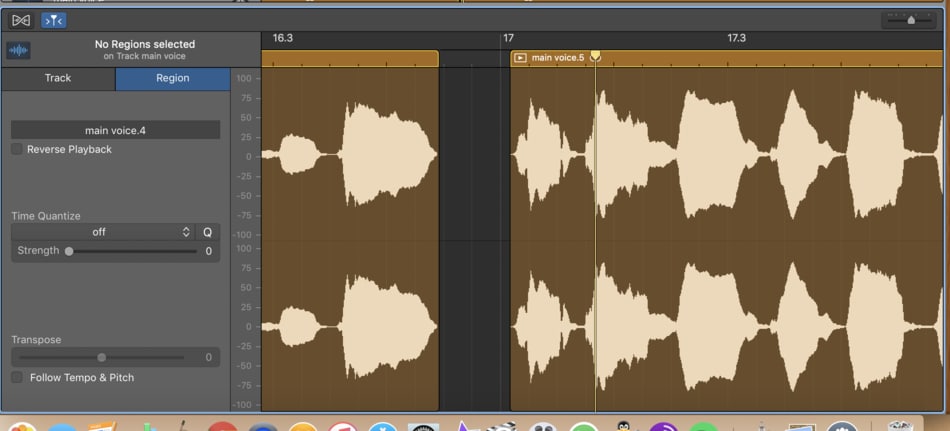
By doing this manually, we can actually delete the offending parts straight up, including the moment the singer takes a breath before starting to sing.
You can isolate the breath in the audio track and then delete it.
Once you’ve done this, you’re going to find that you run into problems later, however, when it comes to whether you want to duplicate that very same audio region and then loop it.
For instance, if you go through your vocal track, deleting each undesirable audio region, you’ll notice that you can’t loop it, due to the fact you deleted the parts out of it, essentially separating the vocal track from each other, and making it more than one track, rather than all combined as one.
If you try to use the (Command + J) function to merge the tracks together again, you’ll be right back where you started – the breaths and unwanted noises included, however, there is a way of getting around this.
Through the creation of a brand new audio file, as well as the (Command + J) function, you can actually make a new and improved audio file where the breaths and all of the undesired sounds have been eliminated.
However, if you try and do it without creating a brand new file, the (Command + J) function will just combine the tracks together and those mistakes and little errors that you deleted before will come right back again. This is a little bit tricky, so pay close attention.
How To Create A New Background Noise-Free Vocal Track
At this stage, you’ve gone through your vocal track and cut out all of the undesirable sounds, including the unwanted breathing right before the vocalist sung their first word.
1) Use the (Command + D) function to create an entirely new track with duplicate settings.
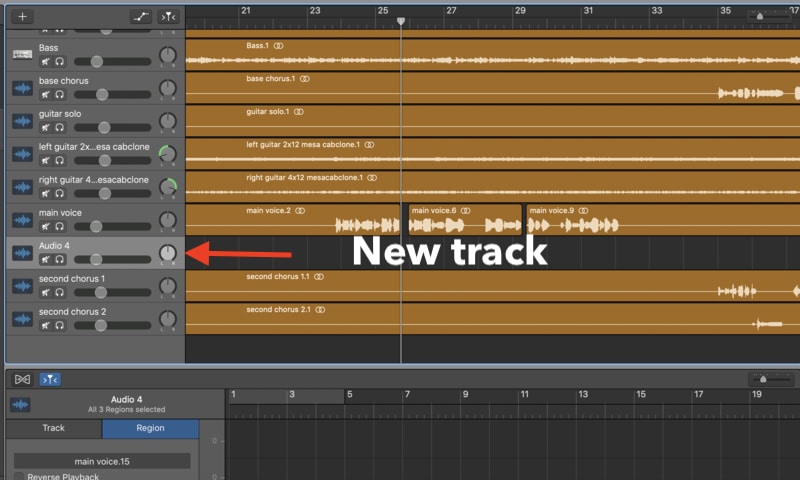
2) Copy and Select all of the edited vocal track, the one where you’ve eliminated all of the undesirable sounds, and then copy and paste it into the new Track Region, which is going to look like what you can see in the image below.

3) Select the new audio track and use the (Command + J) function to create an entirely new audio region without the unwanted noises and breathing.
Garageband will bring up a warning that says that for a new file to be created out of “noncontiguous” audio, a new track has to be created.
It’s worth noting that if you don’t get this warning sign, then what’s going to happen is that you’re just going to merge the tracks together again and wind up with very same breaths, errors, and background noise in the new track.

You want to click Ok, and then voila, you have a brand new track without the breathing and mistakes, and then you loop it however much you want.
Noise Gate Plug-Ins
In terms of what plug-ins you can actually get your hands on, I would say the most popular free plug-in for Noise Gates is the Bob Perry Noise gate which can be found on Plugins4Free.
This noise gate is more sophisticated than the stock plug-in that comes with Garageband, and it’s much closer to the analog noise gates like this ISP Decimator which you’d actually see in a professional recording studio or in a musician’s home.
Similar to the compressor, it has a few different parameters, including the Threshold, Attack, Hold, Release, and then the Range.
It has a few other parameters as well, including two toggle switches on the left and right-hand side.
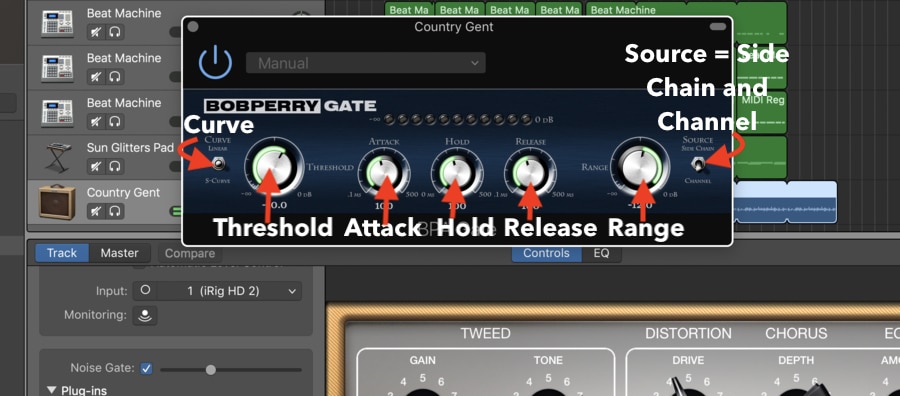
On the left side, it has the “Curve” toggle switch.
The curve has three parameters, Curve, Log, and S-Curve
And then on the right side, there is the “Source” toggle switch.
This toggle switch goes back and forth from Side Chain and Channel.
We’ll talk about how to set up a more sophisticated noise gate plug-in in the future, as well as some of the other functions of a gate.
Use Celemony’s Melodyne 5 to Eliminate Background Noise

There are other tools available to music producers that allow you to manually eliminate background noise, including what is easily the best audio editing tool available, Celemony’s Melodyne 5.
You can do it either by attenuating the volume like what’s shown in the image above, or you can just delete altogether.
In my Melodyne 5 tutorial, I explained how it is a more sophisticated software that allows you to eliminate extraneous noise down to the minute detail, among its many other features.
It’s fantastic for this very purpose, although, Antares Auto-Tune Pro is better if you want something for tuning vocals specifically which is surprising considering its reasonable price on Plugin Boutique.
YouTube Video Tutorial
Other Articles You May Be Interested In
- How to Use A Noise Gate in Garageband (Step-By-Step)
- How Loud Should Vocals Be? [ANSWERED – With Examples]
- Can Melodyne Fix Bad Vocals? [ANSWERED]
- How to Make Background Music in Garageband [STEP-BY-STEP]
- What Is Latency And How Do I Fix It?


 Written By :