There are several principles and guidelines we can learn from other more successful artists and apply to our productions as jumping-off points. For this article, I analyzed 6 different vocal tracks from the songs of 6 genres including pop, EDM, country, rap, rock, and pop-punk. Here’s what I found.
Generally speaking, mixing engineers will set vocal levels to approximately -18dB, plus or minus a few dB. They’re usually one of the louder parts of the mix. If they’re not the loudest part, they’re often perceived this way due to techniques like subtractive EQ, compression, and deessing.
How Loud Should Vocals Be? [An Experiment]
![5 Vocal Tracks - Should Vocals Be Louder Than the Beat [ANSWERED]](https://producersociety.com/wp-content/uploads/2022/05/5-Vocal-Tracks-Should-Vocals-Be-Louder-Than-the-Beat-ANSWERED.jpg)
So as I was saying a moment ago, I went to this website here and I downloaded 5 different vocal tracks from 5 different genres. I also analyzed the vocal track from one of my own mixes, and I came up with the figure that I mentioned above: -18dB. I’ve noticed that other sites online have made a similar guideline.
What I did is I downloaded the track, imported them into GarageBand, and then analyzed the loudness with Melda Productions’ MLoudnessAnalyzer which I showed you how to use once in my guide on how to use reference tracks.
In the following section, I’ll tell you the Integrated Loudness measurement, which is an average of the loudest sounds in the vocal track.
Then, there is also the True Peak. The True Peak is the measurement of the audio signal before it has been converted into the analog sound from the digital domain. Another thing I should state is that I believe all of these tracks were pre-master and post-mixing.
1) AM Contra’s “Heart Peripheral” (EDM)
Integrated Loudness: -14.7 LU
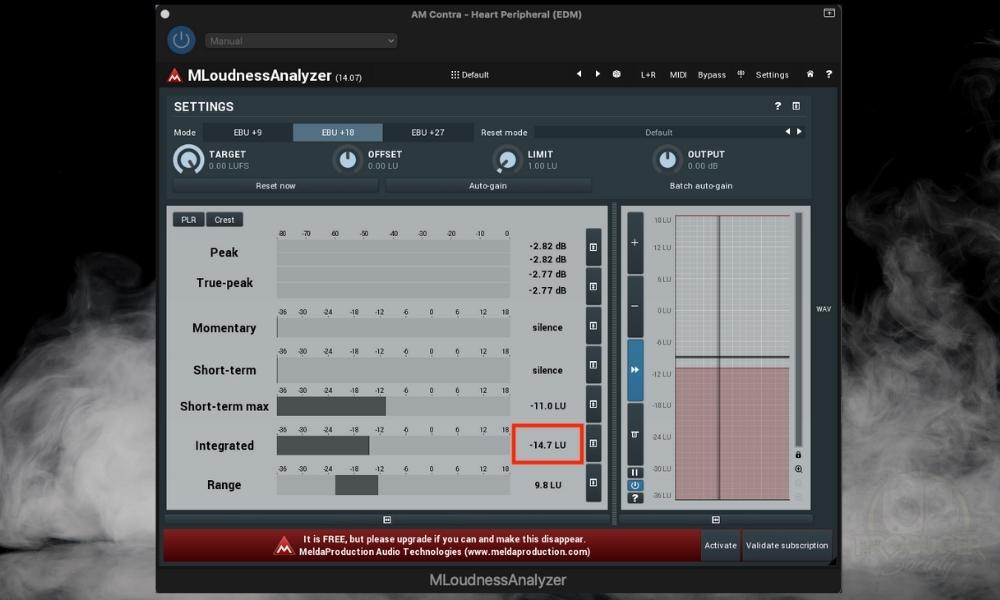
This was the EDM track, and it was the second loudest in volume next to the country/singer-songwriter song. Although, this song was kind of like an electronic pop song.
It makes sense for this one to be the 2nd loudest, in my mind, because electronic pop music tends to have a fairly loud vocal. Its True Peak was -2.77 dB. Listen to the song here.
2) Brian C Hai Fei Hong’s “Hold Me” (Pop)
Integrated Loudness: -20.9 LU
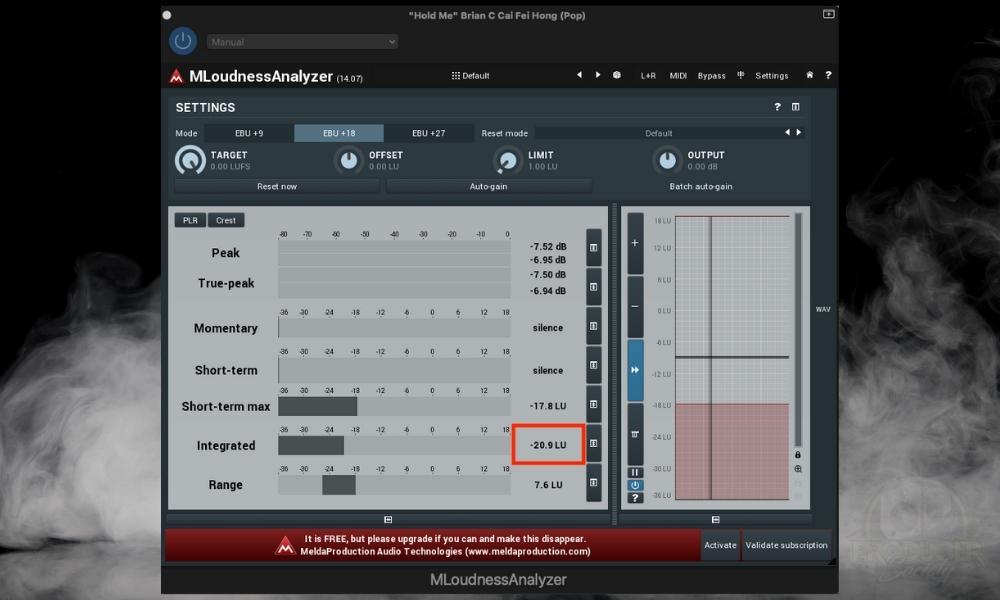
This one was a bit quieter, despite the fact that it’s also a pop tune. It had a true-peak reading of – 6.94 dB. Listen to the song here.
3) Angela Thomas Wade’s “Milk Cow Blues” (Country/Singer-Songwriter)
Integrated Loudness: -12.4 LU

This was the loudest vocal track out of all of them. I think the reason for this is the genre – country/singer-songwriter – and also the fact there was only one vocal track if I recall correctly.
In a genre like this, that’s meant to be more intimate and vocal-centric, it makes sense that the vocal would be so high compared to the post-hardcore song which I’ll talk to you about now. The True Peak reading was -0.10dB which is pretty close to the commonly stated maximum of – 0.00dB. Listen to the song here.
4) The Apprehended’s “Still Flying” (Post-Hardcore Rock)
Integrated Loudness: -23.9 LU

In my view, post-hardcore songs, metal, and rock tend to be just as much about the vocal performance as the instrumental performance. Considering many fans of this kind of music are also musicians, it would make sense then, for the vocal to be not quite as loud.
On the other hand, this song was a bit different because there were a lot of tracks. I counted the number of vocal tracks and there were 21 of them in this song. This matters because when you pair tracks together, they appear louder. The true peak was -10.7dB. Listen to the song here.
5) Killa L’s “Window” (Rap)
Integrated Loudness: -16.5 LU

The vocal track for the rap song, similar to the country song, was fairly loud. It makes sense because the rap, itself, usually stands out more to the average rap fan than the production side. Listen to the song here.
6) Novant Uno’s “SP26” (Pop-Punk) [My Mix]
Integrated Loudness: -23.7 LU
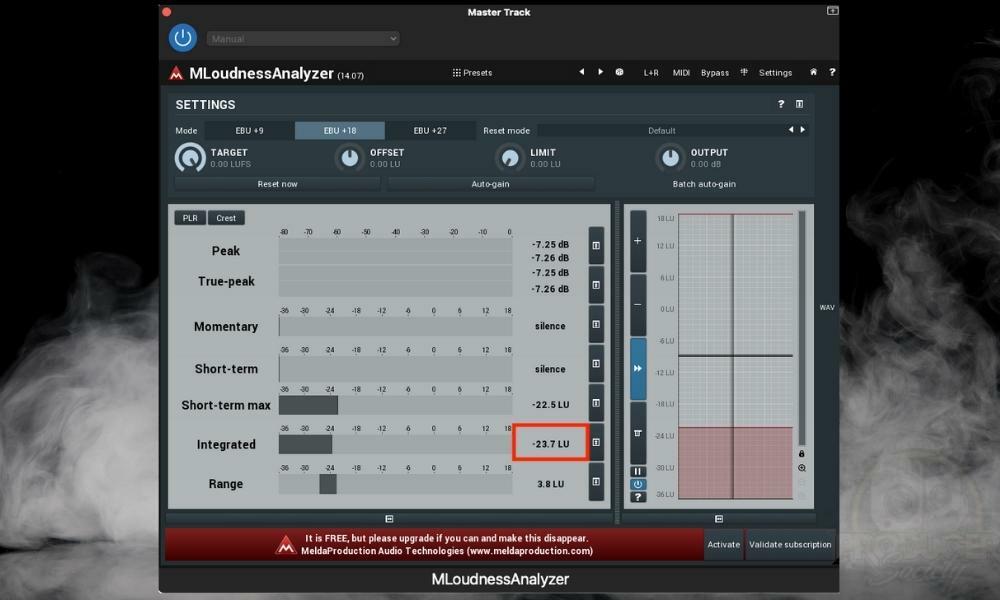
And finally, the last track was Novant Uno’s “SP26” which is the one that I mixed. It was a bit quieter than the others, although, not by a lot. One of the reasons it was quieter though is because there were also background vocals. As I said earlier, when paired together, they become louder. Listen to the song here.
If you take all these numbers and average them out, you get an average vocal level volume of -18.68dB. For the test, I used the MLoudnessAnalyzer with the Target set to 0.00LUFS, instead of the -14.00LU Spotify setting and the -23.00 LU default setting.
How To Test Whether Your Vocal Volume Is Right
We want our vocals to stand out from the rest of the mix, but what does that sound like? Whether you’ve been dropping mixtapes for years or you’re starting out, here’s one way to get a feel for how your vocals are sitting in your mix:
1) Turn down your mix’s master volume until you can barely hear it.
2) Ask yourself if you can still make out your vocals past the beat?
– If you can, without it being overbearing, your track is likely in good standing.
How to Get the Vocal Volume to Sit Right in the Mix
There’s a great big music world out there. Still, a few basic practices unify them all across genres, backgrounds, and even time. Follow these steps, and you’ll be on your way from amateur to virtuoso.
1) Pull the VU Meters Down Between -10dB and -15dB
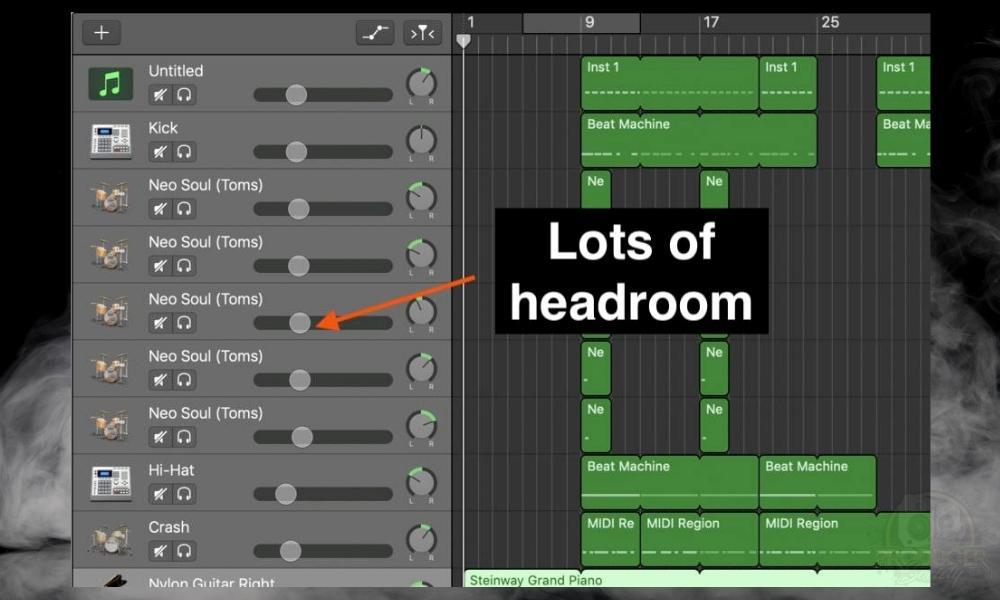
Volume unit (VU) meters come standard with most digital audio workstations (DAWs). We will use these meters as the first step in bringing out our vocals and reigning back the beat.
Each track’s VU meter controls its volume, meaning that the higher the dB level is, the louder the audio will be. This aspect is essential to complete first, as it’s the foundation of each of the following steps.

Your vocals should sound louder than the beat between -10dB and -15dB. A reliable method would be to set your lead vocal track to -12dB, then push back your instrumental tracks accordingly.
The purpose of this is to give you some headroom as I’ve talked about before in my mixing tips article, or, in other words, enough space for you to work and make major decisions without having to worry about clipping and other problems.
While we want the volume of our vocals to surpass that of the instrumental tracks, we don’t need our mix to be too loud. Keep an eye on the master VU meter. It’s not uncommon for people on the internet to tell you to ensure that it never spikes above -3dB, although, I have mine sitting all the way up to +0dB in many cases.
2) Put a Compressor on the Lead Vocals
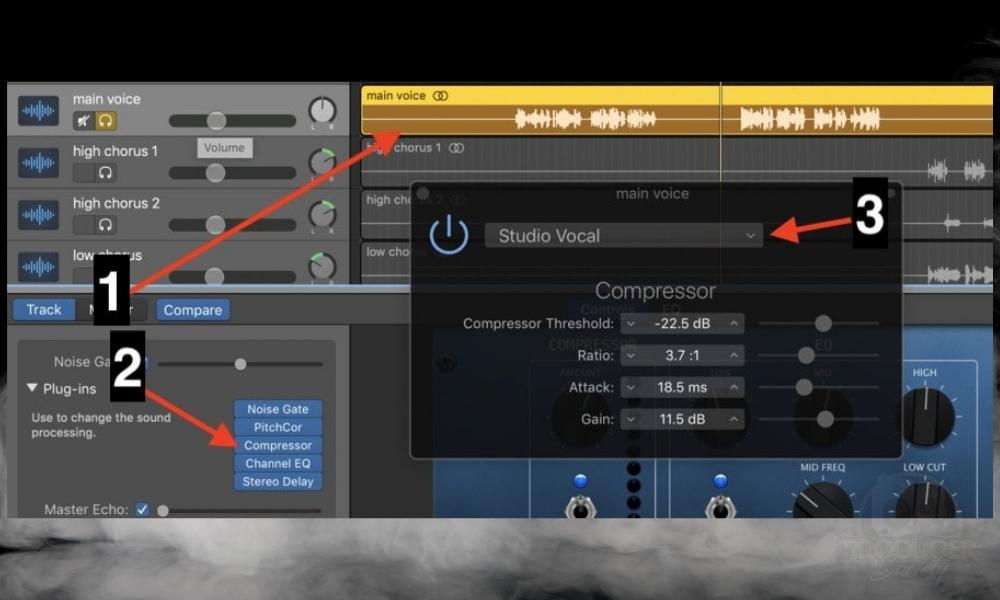
Compression is an essential tool to get your vocals – and instruments – sounding their best, whether you’re using a digital plugin or a physical, analog compressor (I’ve got a guide all about compressing vocals, by the way).
Essentially, compressors level the peaks and troughs of an audio signal. They squeeze it so the loudest parts are reduced and the quietest parts are increased in volume.
This will give your vocal performance more consistency, making it easier to bring forward in the mix. Putting a compressor on your vocal is kind of like one of those 90% actions in the sense that the moment you do it, it’ll sound way better.
Even just a compressor preset like “Studio Vocal” in GarageBand or Logic Pro X will make your vocals sound better right out of the box. Let’s face it, no one can sing perfectly all of the time.
Try compression before you let one bar that sounds louder than the rest send you back up to the mic. If this tool is missing from your DAW’s kit, you can easily purchase a compressor plugin online like Fab Filter’s Pro-C 2 (on Plugin Boutique) and install it in seconds.
Compression does many things for your vocal. Not only does it add a little consistency as I just stated, but it’s also going to make it stand out a bit more. Let’s talk about that now.
How a Compressor Can Make Your Vocals Stand Out
Generally, you’ll find that a compressor has 6 adjustable factors that impact its effect on your audio track: threshold, ratio, attack, release, make-up gain, and in many cases, the knee.
We’re only going to talk about 3 of these today though (you can read more about what compression is in this article).
Threshold
It determines at which point the compressor actually starts working. The threshold serves as a reference point for every other element of your compressor’s settings. If you set it to +0dB, you’re going to compress nothing. But if you set it to -50dB, you’re probably going to compress everything.
Mine is usually set somewhere between -15dB and -35dB. But what does this mean for the vocal volume? It means that you can control how much of the vocal signal you’re squeezing with the compressor. The more of the signal you squeeze, the more consistent the volume is across the entire vocal recording.
Ratio
In simple terms, the ratio refers to how much the compressor is reducing the signal after it has exceeded the threshold. Think of the ratio as the “cutoff” for the audio signals. Increase or decrease this setting depending on how lenient you want your compressor to be when allowing rogue signals to slip past the threshold.
To ensure your vocals retain the power needed to consistently surpass the beat, you’ll want your ratio programmed to a relatively softer setting – 4:1 is a good benchmark to start with. A ratio of 4:1 means that every time you exceed the threshold by 4dB, it gets reduced down to 1dB outside the threshold.
Gain
The gain parameter on a compressor is for making up for the loss in volume that the compression caused. After you level out the loudest and quiet parts of your vocal recording, you’ll notice that it actually decreases in volume, which makes sense because you’ve essentially squeezed the entire audio signal down to a smaller size.
So what does this mean for the vocal recording’s volume? It means that after you’ve compressed your vocal signal, it’ll be quieter.
To counter-balance, this, slowly increase the gain while turning the compressor on and off until you’ve literally made up for the loss in volume. Turning the compressor on and off is a way to compare and contrast pre-and-post compression.
3) Gradually Increase the VU Meter to Make the Vocals Stand Out
After you’ve set up your compressor on the vocal and got everything evened out the way that you want, we can start adjusting the VU meter on the vocal track.
You may notice that your vocals sound slightly quieter now, along with any instruments you added compression to. The trick is to compensate for compression by once more increasing the volume.
Tip:
Alternative between turning the volume up on your mix way up and way down to give you an idea of how loud the vocals sound in the mix at different volumes. This gives you a much better idea of how it’ll sound in the end.
I usually compress the vocal first to make it sound the way I want, and then I get it to sit right in the mix with the VU meter and tools like EQ. This step requires precision, so take your time and raise the volume in increments of about half a decibel. Now that we’ve got the essential volume and dynamics of the vocal set, we can move on to the EQ.
4) Use a Channel EQ to Eliminate Muddy and Undesirable Frequencies

Not all frequencies will play nicely in your mix, and some may actively detract from your vocal performance. In this case, we’ll use a channel EQ to preserve our lead vocal’s prominence ahead of the beat.
This is a great way to do as I said before and make it appear as if the vocal is much louder than everything else. We do this by carving out unwanted or needed frequencies to make room for other instruments’ frequencies.
Several frequency ranges may be causing unwanted conflict with your vocals. For example, “muddiness” results from clashing low to mid-range frequencies found between 100Hz and 300Hz.
Before correcting this issue with the VU meter, insert an EQ plugin like the Fab Filter Pro-Q EQ to your vocal channel or the main channel. Work to single out and push back those murky frequencies until you achieve a crisp, clear result.
Additionally, you can use an EQ to increase the presence of specific favorable frequencies. Bringing out the textures and nuances in your voice can help your track feel more organic and human while retaining the upper hand over the beat.
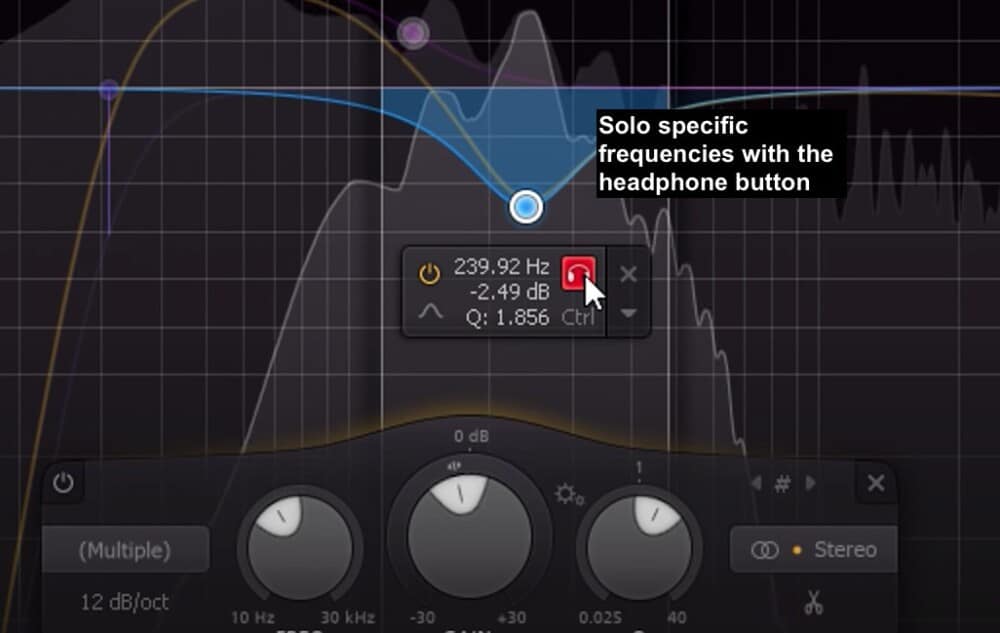
One thing I like about the Fab Filter Pro-Q EQ is that you can actually solo specific frequencies to see how they sound in isolation. This is an incredible tool for accentuating or attenuating any desirable or undesirable sounds in your vocal recording.
5) Use a De-Esser to Remove Harsh Sibilance

You may notice that your vocal track seems to spike around words that feature an “S” sound following compression. This is because those hissing noises are slipping past the threshold too quickly and filling your performance with sibilance.
Ironically, the answer to this problem is to apply more compression. What does this do for the vocal volume? A de-esser serves to quash those hisses at the end of your airier consonants, thus removing the need to turn down your vocal track.
The most cost-effective method to remove the sibilance from your vocals is to use a sidechain filter on your compressor. You’ll want to quickly reduce the frequencies between 5,000Hz and 10,000Hz and then release after about a quarter second.
6) Put the MLoudnessAnalyzer at the End of the Signal Chain To Know How Loud Your Vocal Is
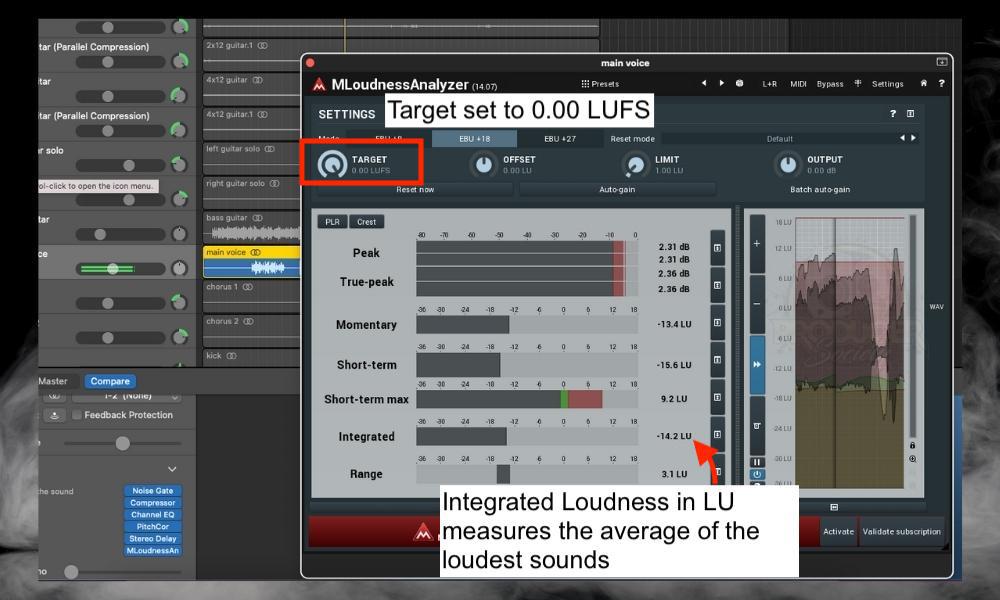
Although I wouldn’t really suggest doing this, you could always put a loudness analyzer at the end of the plugin signal chain to find out how loud your vocal is.
The reason I wouldn’t suggest doing it is that you don’t want plugins to tell you what sounds good. You decide that for yourself with your ears.
That said, you could probably use it for curiosity’s sake which is kind of why I did the same thing for the songs I used in the experiment. Get Punkademic’s All-Access Pass for courses on how all this stuff works if you want to learn more.
A Vocal Mixing Guideline for Different Genres
No matter what musical genre you work in, everything I’ve already shared above should give you a good idea of how to proceed. However, different genres will call for artists to use these tools in different capacities to ensure their vocals accompany the instrumental effectively.
With each genre, it’s vital to recognize what aspects of your beat compete against the vocals for the spotlight in the song. I’ve collected 4 different videos for how to mix vocals in 4 of the most popular genres. After you’ve read this article and consumed at least one of these videos, you’ll have more than enough information to continue.
Vocal Volume Mixing Guideline for Rap
Rap revolves around rhythm. Naturally, this means that the vocalist has to find a way to settle their performance amongst the rest of the rhythm section.
Bass and kick drum frequencies may interfere with a rapper’s vocals if they perform in a lower register. In this case, compression and equalization are essential.
Vocal tracks in a rap song require light compression to give the artist’s voice more spatial freedom. However, kicks, snares, and aggressive basslines may require heavier compression to control their volume.
Equalizing muddy frequencies demand extra care when bringing out the vocals of a rap song, especially in the presence of a bass-heavy beat.
You’ll want to filter out the lower frequencies of a rap vocal performance to allow the brighter, punchier tones to take the forefront.
When dealing with word-centric performances such as rap, de-essing is a must. However, a hair-trigger release will prove invaluable so that the compression doesn’t push back any desirable audio.
Vocal Volume Mixing Guideline for Rock
While the rhythm section plays an important role in rock music, the mid-range tones of the guitars will provide the most significant challenge for a vocal performance to overcome.
To compensate for a powerful, screeching performance, we may need to decrease the threshold when compressing rock vocals. However, we’ll still keep our ratio and knee silky smooth to allow for more dynamic variations in the volume.
Sidechain compression on guitar tracks may also prove beneficial to keep conflicting frequencies from flaring up and overshadowing the vocals.
Again, when applying an EQ to your mix, elevating your track’s best qualities is just as important as canceling out the undesirable ones.
Depending on your vocal range, you’ll want to use the EQ to filter your vocals’ high or low end to allow the desired tones to break through. For example, if the track mainly utilizes your lower register notes, you should cut off the higher frequencies.
De-essing may not be as essential in primarily sung songs. However, mixers should still employ this tool to ensure the highest quality outcome possible.
Vocal Volume Mixing Guideline for Country and Singer-Songwriter
Country and folk music are singer-centric styles in a similar vein to rap. However, the guitar’s timbre and other mid-to-high range instruments require a similar approach as seen with rock.
Many male country singers use a baritone singing register mixed with styles bordering on the spoken word. We want to prevent muddy, low-to-mid-range frequencies from clashing in these cases.
This genre calls for very subtle compression that allows the vocal performance to breathe and fill the dynamic space. At the same time, we’ll want to push the threshold for the guitars and other instruments back with stricter compression programming.
Applying an EQ is a reliable way to bring out the depth of a baritone country performance. We want to raise those lower frequencies and cut out the higher ranges here.
Of course, this means that we want to reduce the frequencies we raised for the vocals for the other instruments that share similar ranges. This balance is critical when staving off muddy interference.
Especially with spoken-word vocal stylings, we want to ensure that our de-esser effectively cuts out sibilance. These hissing frequencies may clash with the beat, and they will likely cause the vocals to become too loud at times.
Vocal Volume Mixing Guide for Pop
Pop music is defined by energy. Despite featuring a wide array of instrumental influences, the singer’s power needs to consistently punch through the noise.
It’s prevalent in pop music for male and female singers to explore the higher limits of their voice. For many singers, these higher notes will require more breath support and produce a louder sound.
When compressing a powerful vocal performance, it may be best to lower the threshold to keep the singer’s volume under control. Of course, we can always raise the total volume later with the VU meter.
Unless your mix features sudden shifts between soft and loud vocal styles, we’ll want to keep our ratio at a lower setting while employing sharper knee programming.
As you approach the equalization step in the mixing process, remember that we want to bring out those sweet, soaring high notes by raising the volume in the appropriate frequency ranges.
Likewise, be sure to reduce conflicting high-range frequencies present in the beat. Pop music draws from a wide range of genres. If your vocals feature styles prone to sibilance, de-essing is absolutely necessary.
Again, ensure that your de-esser isn’t quashing the performance’s volume following the hissing frequencies by employing a fast release time.


 Written By :