Using reference tracks as a way of informing your own mixing decisions is one of the most commonly recommended tips for music producers and audio engineers. Here are the basics of how to do it:
To use a reference track for your mix
1) Import a high-fidelity song in the same genre into your DAW
2) Compare the dynamics of your mix to the reference track
3) Measure the volume of both tracks in loudness units (LU) with a loudness analyzer
4) Compare the mastered mix with your reference track
How To Use A Reference Track
The reason for this is simple: it’s a great method for comparing your own music to the music created by others to see if you can match the quality, volume, and dynamics.
Admittedly, one of the first problems you’ll run into when using reference tracks is that there is almost always a large difference in volume. It seems like professional mixers are always able to get their mixes to sound a lot louder, moreover, one has to consider the fact that the track has been mastered as well.
1) Choose Your Reference Track
The first step to using a reference track is to find out which one you actually want to use. This will obviously depend on the genre of music you’re mixing and what kind of emotion you’re going for in the mix.
For instance, my main client plays in a pop-punk band so I find myself using tracks from artists like Sum 41 and Blink-182 to see how their mixes sound in comparison to my own.
How To Pick a Reference Track
So how would you go about choosing your own? Ultimately, you want to follow a similar line of thinking. It makes sense to choose some of the most respected songs, projects, and albums within a specific genre, as your points of reference.
Simply put, to pick a reference track, choose one of your favorite songs in the genre that is closest to the project you’re currently working on. For example, if you’re mixing a fairly aggressive hip-hop song, choose a critically acclaimed project like Kendrick Lamar’s “HUMBLE,” from DAMN.
Music is a part of culture and a part of society, and if you want to make art that resonates with other people, it has to be created, delivered, and manufactured in a way that is palatable to others.
Reference tracks are a great way of keeping a person closer to what needs to be done, or rather, a better way of explaining it is that it brings an engineer closer to what is commonly done in that style of music.
Because I’m such a huge fan of metal and hip-hop, I find myself wanting to mix the songs like they’re a metal or rap song, however, this may not be the best way to go about mixing a pop-punk song.
On the other hand, you could argue this is a great way to introduce my own style to the mixing process because I’m drawing on influences that are outside of the genre.
While it may not be a common practice to mix a pop-punk song as if it’s a metal or rap song, there may be small aspects of a typical metal or rap mix that would sound great when added to a pop-punk song, for instance, an emphasis on the kick and bass as if it’s a hip-hop track.
Ultimately, for this stage, I find it’s best not to overthink it. Just grab one of your favorite songs and load it into your DAW for comparison’s sake.
I like Jakub Zytecki and the Australian guitarist, Plini, and I use their music as a frame of reference for my own all of the time, however, there is really no limit. This isn’t going to cost you a fortune either, in fact, we’ll talk about where to get more free ones now.
Free Reference Tracks for Mixing
The best way to get free reference tracks for mixing purposes is to use Loopback, which allows you to record music from Spotify directly into your DAW. Additionally, it can do it in a way that doesn’t lead to a loss in quality and fidelity either.
I think there are some other useful tracks to use as well, including what I’ve shown in the lists below, however, It’s best to simply purchase the song that way you can support the artist and not break the law.
Best Reference Tracks for Mixing EDM
- “Polyphobia” by Deadmau5
- “Smack My Bitch Up” by The Prodigy
- “Out Here” from Pendulum
- “The Business” from Tiesto
- “Around The World” from Daft Punk
- “Where Are U Now?” from Skrillex and Justin Bieber
- “Genius” from Sia, Diplo, and Labrinth
- “I Took A Pill in Ibiza” from Mike Posner
- “Clarity” from Zedd
Best Reference Tracks for Mixing Hip-Hop
- “HUMBLE” from Kendrick Lamar
- “ELEMENT” from Kendrick Lamar
- “Type of Time” from Dave East
- “The Feeling” from Blu and Exile
- “Best Friend” from Saweetie and Doja Cat
- “Coffee Bean” from Travis Scott
- “Congratulations” from Post Malone
- “What’s Poppin’?” Jack Harlow
- “Deep Reverence” from Big Sean
2) Import The Track Into Your DAW
Once you’ve found the track you want to use as a reference, you have to grab it in Mp3 or AIFF format. Ideally, you want to get your hands on a version of the track that is the highest fidelity and quality available, that way you can really hear what’s going on in the song. WAV, FLAC, and AIFF are probably your best bet here.
The best way to do this is to simply purchase the song. Even though Apple has done a lot of promotion for their new streaming service, Apple Music, and iTunes seems to have faded into the background, you can still buy music from the iTunes Store.
For example, if you wanted to get your hands on one of the better EDM reference tracks, “Polyphobia,” from Deadmau5, you can just grab it the iTunes Store like what’s shown here.
For around $10, you could have a bank of 8-10 high quality songs that you can use for reference tracks. At the end of the day, you will only need so many reference tracks; it’s not like you need to have hundreds of them.

If you’re desperate and you don’t want to pay for the track, or perhaps it’s not readily available on Apple Music, Spotify, or some other streaming platform, then you could just find it on YouTube and then convert it into an Mp3 with a YouTube to Mp3 converter.
However, this isn’t a great way of going about it because this will lead to a reduction in quality.
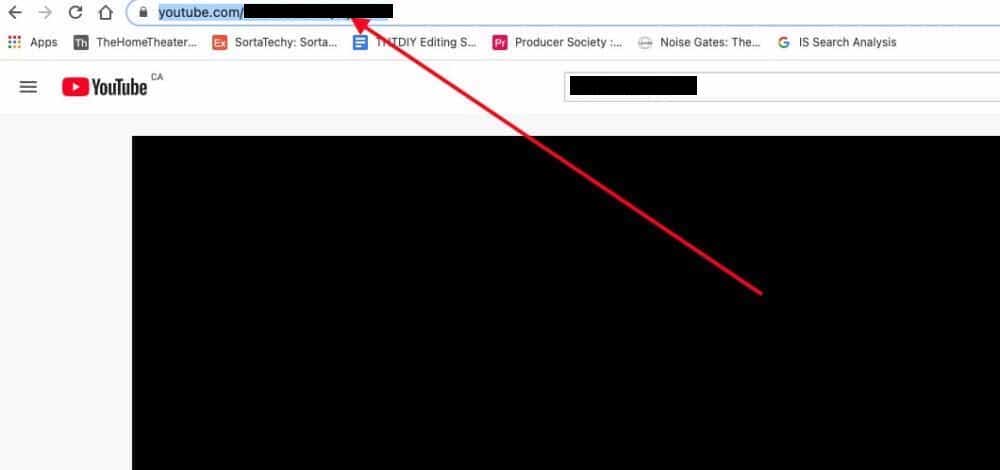
My guide on sampling runs through how to do this already, but the quick synopsis is that you just grab the song’s URL on YouTube, and then you input it into a YouTube to Mp3 converter.

After that, you can export the file to your desktop and then drag it back into your DAW. How you get your hands on the audio recording is up to you, but obviously, I recommend just purchasing the Mp3 version of the song that way you can support the artist.

3) Match the Volume of Your Mix and the Reference Track
Once you have the audio file into your DAW, you want to make sure the volume of the reference track is set to about the same as the rest of the mix. What do I mean by that? If all the VU meters on your tracks are hovering around -10dB, drop the VU meter of the reference track to a similar level.
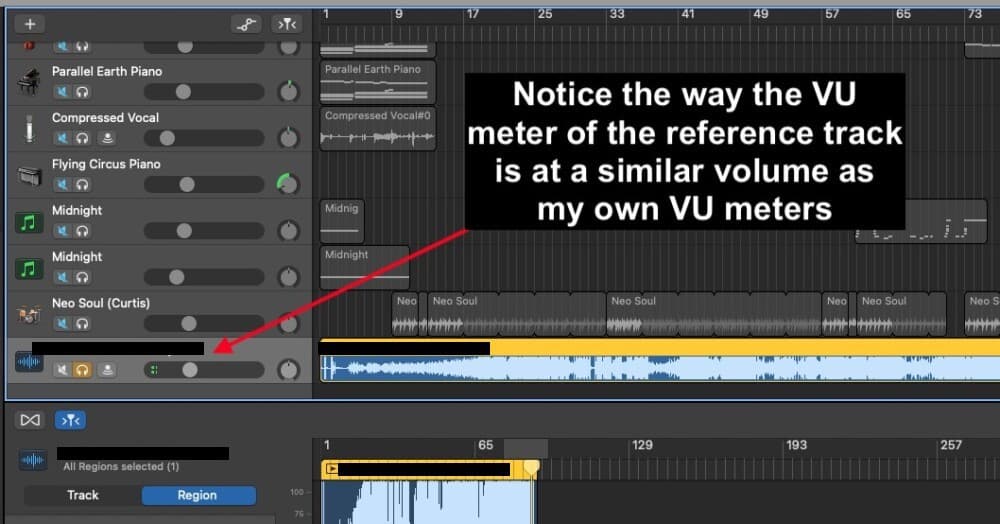
When I first started doing this, I was shocked by how much louder other songs are. And really, this is a fairly significant factor in why a beginner’s music sounds not nearly as good as the competition.
In my opinion, once you figure out how to get the volume at a similar level, you’ve made a significant step in your career as a mixer/artist.
4) Compare and Contrast by Using Solo and Mute
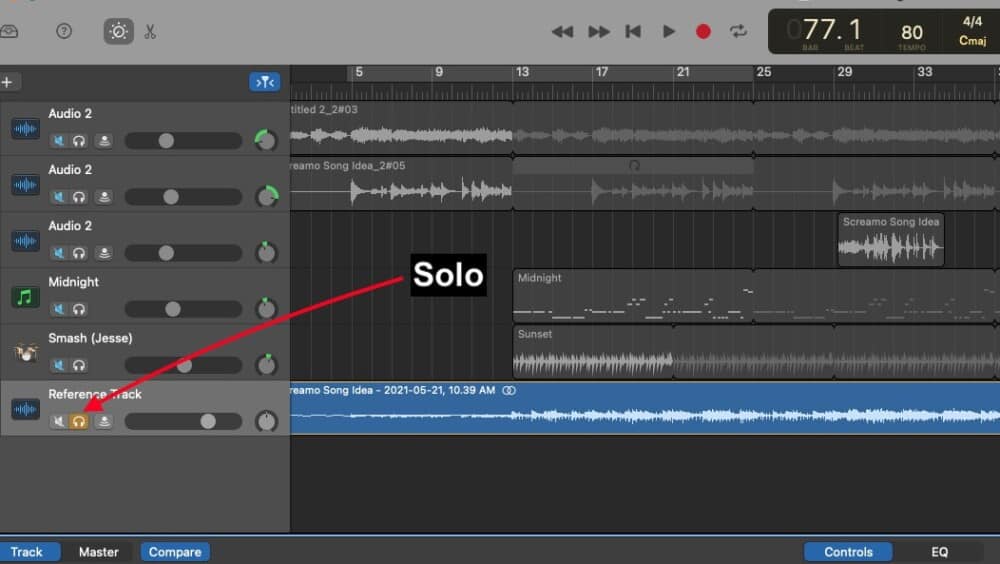
At this stage, there are two different ways of using the reference track in this way to inform the choices you make in your own mix.
For the first stage, you’ll be using the reference track as a way of seeing how things sound during the mixing process, however, there will be some big differences in how it sounds when you’re adding the finishing touches with the mastering plug-ins (FabFilter has the best ones on Plugin Boutique).
Important Tip:
How the reference track sounds in comparison to your mix is going to vary a lot in the beginning because the reference track has been mastered whereas yours has not. When you add a compressor, limiter, EQ, or a multi-band compressor on your final project, it’s going to make a huge difference once again.
For that reason, I find that it’s best to mute the reference track and then add your mastering plugins on the Master Track.
I usually add just a compressor, a channel EQ, and then an AUPeakLimiter on the master channel, and then whenever I want to compare and contrast it to the reference track, I go back into the master channel to turn off those plugins after having set them up, and then I listen to the reference track when it’s solo’d.
Another thing that I do is that I put the “Gain” plugin on the Master Channel so I can convert my mix to mono (here’s my guide on how to do that). Check out the video here to see all of these processes at play.
There’s no doubt this is the simplest way of using a reference track to compare and contrast your music to that created by professionals, however, there are even more ways of doing it.
There are plug-ins and software you can use for this very same purpose like YouLean Loudness Metering Tool, for example, and they come with additional features like spectrum analyzers and other tools which are useful for reference.
On the other hand, these tools aren’t really that necessary either. Mixing is largely done with the ear, not the eye, so the analyzers and extra tools are really just useful tools or toys that help you in your decisions.
With that said, I do use the MLoudnessAnalyzer from Melda Productions because it came as part of the MFreeFXBundle that I recommended in my article about vocal plugins. Let’s talk about MLoudnessAnalyzer now, because it’s very useful.
5) Use the MLoudnessAnalyzer to Compare and Contrast Your Mix and the Reference Track
The Best Free Reference Plugin
MLoudnessAnalyzer from Melda Productions is one of the best free reference plugins available because it allows you to measure key loudness components of a mix and it has the same features of some of the premium reference plugins.
Some people like to use it alongside the MCompare plugin, but I can’t say I’ve used MCompare all that much.
The MLoudnessAnalyzer in addition to my use of reference tracks is part of what really pushed my mixing and my music to the next level. I can’t harp on the importance of this enough; these two things in conjunction with each other really made a big difference for me.
But when you first look at the MLoudnessAnalyzer which can be found for free on their website, it can be pretty intimidating, and the same thing can be said for other spectrum and loudness analyzers.
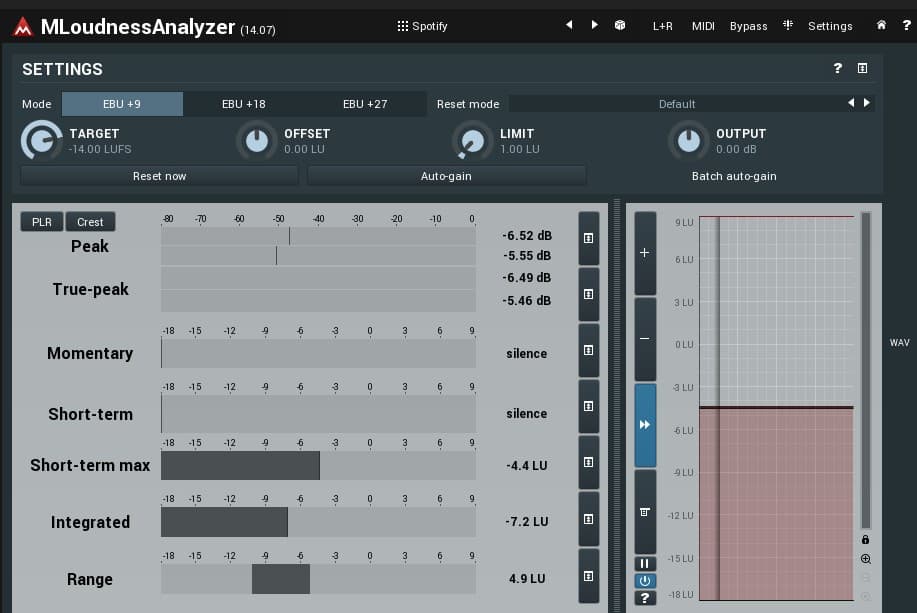
Let’s dive into what each one of these parameters mean, and what ones are the most important for measuring the volume of your mix compared to others. As you can see here, you have the Peak, True-peak, Momentary, Short-term, Short-term max, Integrated and the Range.
Peak
The peak is the loudest part of the audio recording when it’s in its digital format. The “peak” measurement is not considering how loud this very same signal will be in analog format, ie, after it has been converted into actual sound and then played through your speakers.
True-peak
The True-peak measures the loudest part of the audio recording as a digital file, but it also measures what this digital information will sound like after it has been converted into an analog format (real sound coming out of your speakers, and not just digital information).
Momentary
Momentary (which is short-form for ‘Momentary Loudness’) measures how loud the audio recording was just a moment beforehand, typically, within 400 milliseconds (half-a-second). In other words, the Momentary Loudness is self-explanatory; it’s a momentary volume measurement.
Short-term
Short-term loudness is similar to Momentary Loudness, however, instead of measuring the average of the last half-a-second, short-term loudness measures the average of the last 3 seconds. The Short-term loudness is going to come in handy in a few moments with the Range.
Short-term max
The short-term max is the loudest point, measured in LU, in the last 3 seconds. Whereas the short-term loudness is measuring the average of how loud the recording was in the last 3 seconds, the short-term max is measuring the loudest point, and not the average.
Integrated
The Integrated Loudness measures how loud the audio recording is on average. It takes the entire recording into consideration and measures the average loudness of the whole track. It’s easy to understand how this measurement might be important when you’re trying to get your mix to a particular total volume.
In fact, platforms like Spotify recommend songs be approximately -14.00 LUFS (loudness units full scale), although, in reality, almost no one actually follows this recommendation (they upload their fully mastered tracks well above -14.00 LUFS).
Range
The Range measures the average dynamic range between short-term levels. In other words, the range measures the distance between the loudest and quietest parts of an audio recording during a 3-second time-frame. This is also incredibly useful, because the Range can tell you whether your audio recordings are over-compressed or not.
For example, a range between -1 and -3 LU indicates there is hardly any dynamic range (probably over-compressed or over-limited), whereas an LRA measurement of -10 LU indicates that there is a high-degree of dynamic range (definitely a useful tool).
How to Use LU Measurements and Reference Tracks to Improve Your Mix
So how does one actually use all of these measurements within the MLoudnessAnalyzer and other metering tools? To use LU measurements and reference tracks, essentially what you want to do is compare and contrast the metering tool readings of the reference track and your mix.
Here is a good guideline to follow for LU measurements of your mix and reference tracks
| Peak | Don’t exceed 0.0 dBFS (decibels – full scale) |
| True-peak | Don’t exceed 0.0 dBFS (decibels – full scale) |
| Integrated | -11 LU |
| Loudness Range | 5 LU |
| Short-term, Momentary, and Short-term max | Don’t worry about short-term, momentary, and short-term max as much. If you follow the guideline shown above (which isn’t a hard rule by the way), you should be ok. |
You’ll probably have to make adjustments to many different things, including how much compression is being used, how much limiting is being used, and during the mastering phase (my guide), you might even have to decrease the amount of EQ because there could be harmonic distortions in there.
However, I find the biggest difference usually lies in how much pre-gain I’ve added to the master track with the AUPeakLimiter.
Nevertheless, there will obviously be a learning curve, but you’ll get it eventually.
One important recommendation in this area is that it’s best to have your song too loud rather than too quiet when uploading to a streaming platform, because the streaming platform will bring up the volume in a way that changes the mix more than if it were decreasing the volume.
Tips for Using A Reference Track When You’re Mixing
1) Transition Between Mono and Stereo
It’s very easy to use Mono as a frame of comparison (my guide), and the article I just linked to explains why it’s a good practice. Simply put, mixing in mono allows you to get a better representation of how your mix will actually sound across multiple platforms and speaker systems.
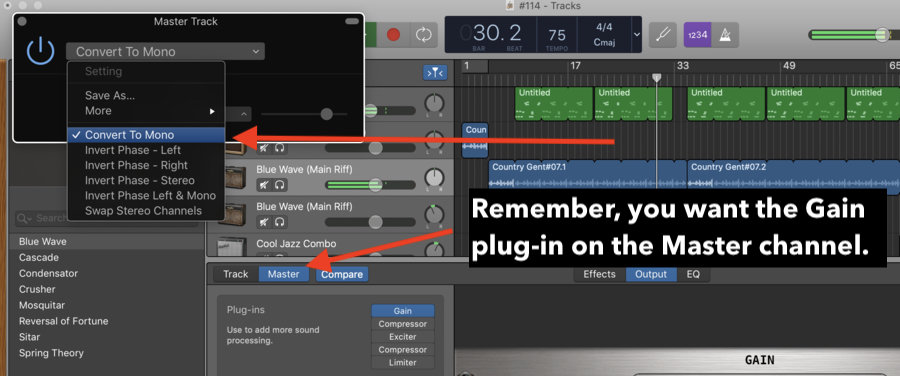
Additionally, it will bring to light any phase cancellation issues you might have, for instance, one guitar might disappear after you’ve switched to mono, which means your mix won’t sound good on a nightclub speaker system.
Just turn it on and off with the “Gain” plugin after having put it on the Master Track like I showed in my video above.
2) Put the Mastering Plugins on the Master Channel of Your Mix – Turn Them Off When Isolating the Reference Track

When you want to compare what your mix will sound like fully mastered compared to the competition, you just have to turn on your mastering plugins on the master channel, and then turn them off whenever you want to listen to the reference track.
The reason for this is because you don’t want to give the reference track a second mastering treatment. Give it a shot and you’ll see how awful it sounds.
3) Pay attention to the Low-End, Bass, and Stereo Image When Using Reference Tracks
There are many things you should pay attention to when using a reference track while you’re mixing, but I typically pay attention to a few things above all else. The first one is obviously the volume, and then the second one is the stereo-image, followed by the low-end and bass frequencies.
Bass is one of those things that are easy to get wrong, so pay close attention to it. By stereo-image, by the way, I’m referring to the panning (which I also have a guide on) of certain instruments from left-to-right.
Moreover, this is another benefit of using the mono-stereo comparison, because you can ensure you’ve actually panned everything correctly and you don’t have some kind of egregious phase cancelation issues.
Using Loopback to Connect Spotify to your DAW
This is a tip that I picked up from Musician on a Mission. He has a helpful tutorial on how to use reference tracks that I recommend checking out. Essentially, Loopback is a tool that allows you to redirect the computer’s audio into a different location.
Explained in another way, Loopback takes the audio from Spotify and then directs it into your DAW for recording. This is a great thing to do because Loopback and your DAW will record the song straight out of Spotify without a loss in quality or fidelity.
After you’ve done this, you now have a reference track at your disposal that is the highest quality and you didn’t have to download any Mp3s or anything like that. More importantly, it gives you the ability to instantly get your hands on any song you want for a reference track, however, you can only do this for educational purposes.
How to Install Loopback for Mac

1) Go to Loopback’s Website and Download the Free Trial
Download Loopback from the website simply by clicking on “Free Download.” After you’ve clicked it, Loopback will send a file to your browser where it will being to download. Open up the Zip File after dragging it to your desktop, and then open it.
Once you’ve done that, just go through the installer which is straightforward like every other installer. From there, you can adjust the settings in Garageband and Loopback to make them work together. From what I understand, Loopback will let you record 20 minutes at a time which is more than enough.
How to Set Up Loopback With Garageband (Or Any DAW)
1) Open Loopback and GarageBand
Open Loopback, Garageband, and Spotify (or any other streaming platform), that way all of the devices recognize each other.
Another extremely important thing that you need to do is ensure you’ve set up your DAW with a Stereo track and not a mono track. In Garageband, a stereo track is indicated by the setting: “Input 1 + Input 2.”
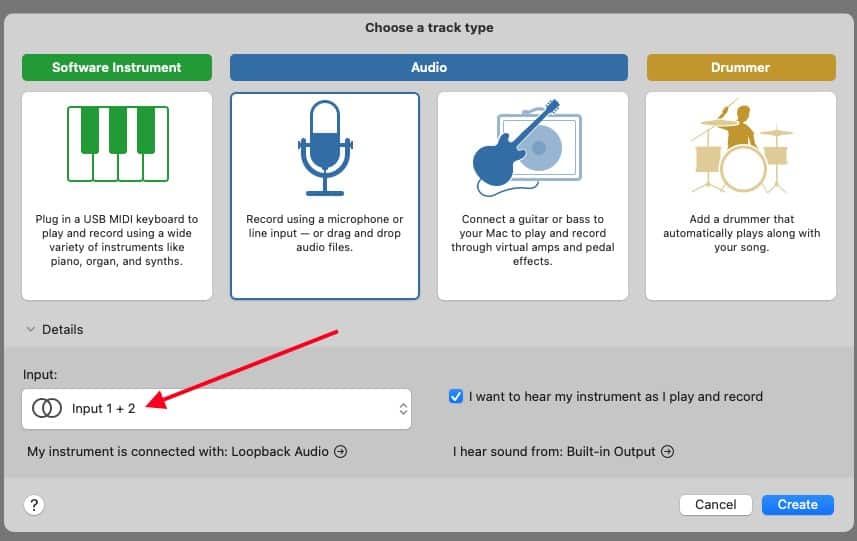
Make sure you don’t forget this fundamental step, because the reference track is going to sum to mono if you don’t set it up properly beforehand (and it’ll sound terrible).
I have to be honest: it took me several hours to figure out why the song kept summing to mono, and it turns out I just had to set it up as a stereo track. Maybe now you can avoid this same mistake.
2) Click on Sources and then the ‘+’ Sign to Add Your Browser as a Source

Add Google Chrome or whatever browser you’re using to play Spotify/YouTube. In this case, I’ve used Google Chrome so I just had to select that in Loopback’s Preferences.
3) Set The Input in Garageband’s Preferences to “Loopback Audio”
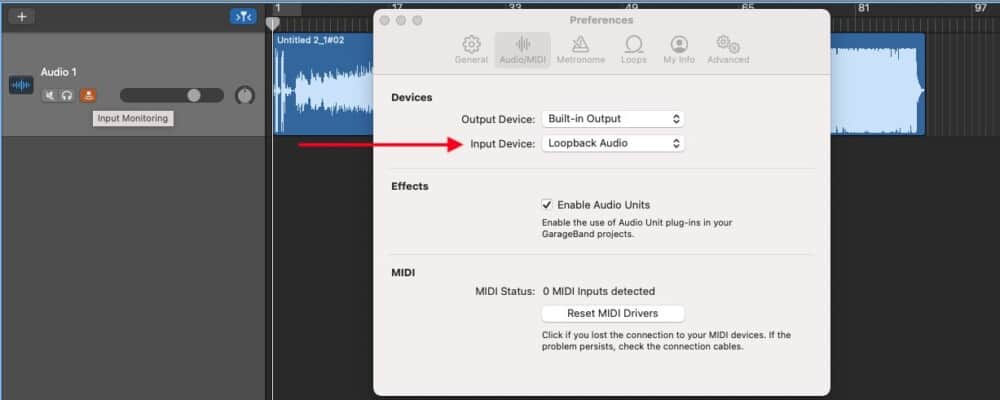
Go into Garageband’s Preferences by clicking on it in the top toolbar, select, Audio/MIDI and then adjust your input device to Loopback Audio and your Built-in Output to your speakers.
If you’re using an audio interface like my personal favorite from Amazon, the Scarlett 2i2, with studio monitors connected to the interface, you’ll want to select the audio interface instead for your output.
4) Hit Record in GarageBand and then Open Spotify and Press Play on the Song
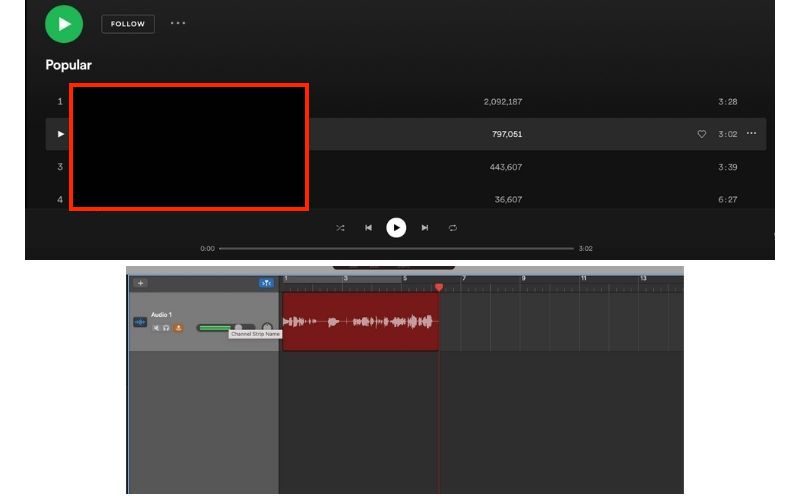
Once you’re all set-up, you just have to go back into Garageband, turn off the metronome, hit record, and then press play in Spotify to begin recording the track. Once it’s done, you can export it as an AIFF file (Apple’s Lossless format) and then re-import it back into your DAW.
How Do You Get a Mastering Reference Track?
Getting a reference track for the purposes of mastering isn’t much different from mixing. In fact, most completed tracks have been mastered.
Complete the mastering process on your recording and then compare that to your reference track. In Garageband, for example, you can use the Master Track to see how your song will sound before you’ve even exported it for mastering.
Once you start using “professionally made” recordings as reference tracks, you’ll notice how loud they are. Compare and contrast other recordings to your own on a regular basis, and you’ll gain a very good understanding of how to level your own music.
This all might seem like too much work, and you might ask yourself whether it even matters that much, because at the end of the day, you want to do your own thing anyway, right? Do they even matter, and are reference tracks even important?
Are Reference Tracks Important?
Using reference tracks while mixing is one of the biggest steps that a music producer can make, because they give you a frame of reference from which to improve your own recordings. If you don’t have a point of comparison, you will find it difficult to improve.
Important Things to Note About Mixing And Reference Tracks
1) Pay attention to your True Peak Meter and Your Integrated Average
As I showed in my guideline above, I’ll usually aim for -10 to -11 LU for the Integrated Average reading, and then I’ll master it from there. It’s ok if your integrated average is much higher, like -6.5 LU on your master track because you’ll notice that many major label recordings are similarly loud.
Pay close attention to your True-peak meters after you’ve mastered the song. Even if your recordings go above 0 dBFS every once in a while, it’s ok. If you upload your mastered music at -14 LUFS which is what Spotify recommends, you’ll notice that your music isn’t nearly as loud as the competitors.
2) The Mastered Recording Can Have A Much Higher Integrated Average
When I first began learning about reference tracks and these new terms like integrated average, true-peak, peak, short-term max, etc, I heard people say that -14LUFS wasn’t the real standard that people actually used to upload their music.
And this is true. While Spotify says they want songs to have an integrated average reading of -14 LUFS, you can actually upload your music to be louder.
In fact, I measured the volume of a song recently using the MLoudnessAnalyzer and the reading said it was actually much higher even than -0 LU. It measured at around 3.5 LU Integrated Average which is far beyond what it’s “supposed to be.”
3) It isn’t Just About Volume – Arrangement, EQ, and Effects Matter Too
This tutorial talked a lot about volume, but there are obviously other things to take into consideration when using a reference track. For example, you can focus on arrangement, EQ, how the instruments have been treated with things like compression and distortion, effects, and more.
Gear Mentioned
1) YouLean Loudness Metering Tool
2) FabFilter’s Mastering Suite from Plugin Boutique

 Written By :