Opening up the Mixer track with the (F9) command or the (fn + F9 if you’re using macOS), is just one step in the right direction. This is where you can also copy the effects of one plugin to another. So how do you copy the effects and dynamic processors from one track to another? Simply put…
To copy plugins from one track to another in FL Studio
1) Select the Insert in the Mixer
2) Right-click > “File” > “Save Mixer Track State As..”
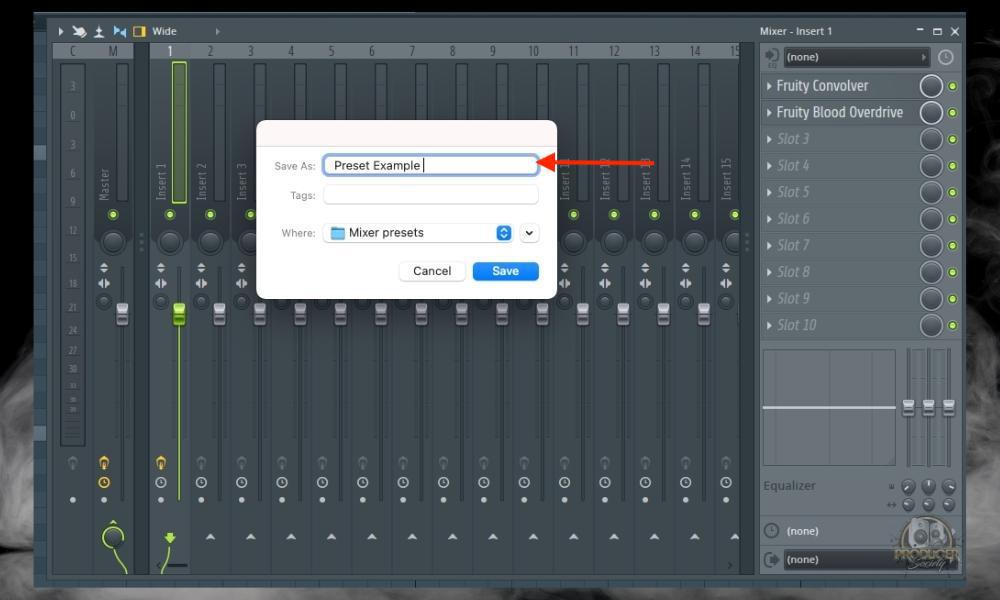
3) Choose the preset’s name
4) Right-click the Insert to which you’d like to add plugins
5) Select File, then choose the preset from the “States” menu.
Using Presets To Copy Plugins from Track to Track in FL Studio
Here’s a short video showing you how to:
1) Copy the plugins from one track to another in FL Studio
2) Recall the default plugin setting, and…
3) Bring up the Fl Studio mixer
If you’re trying to quickly drag and drop an entire batch of plugins from one track to another in FL Studio, you’re out of luck. There is no way of doing this unless you’re comfortable with dragging the plugins one at a time from one to the next.
I believe using presets is the best way. This is how GarageBand functions as well because you can’t just drag and drop an entire batch of plugins from one track to another. Trying to copy processing and effects this way has to be done via presets. Here’s the step-by-step and illustrated tutorial in case the video wasn’t enough.
1) With the Mixer Open, Right-Click on the Insert
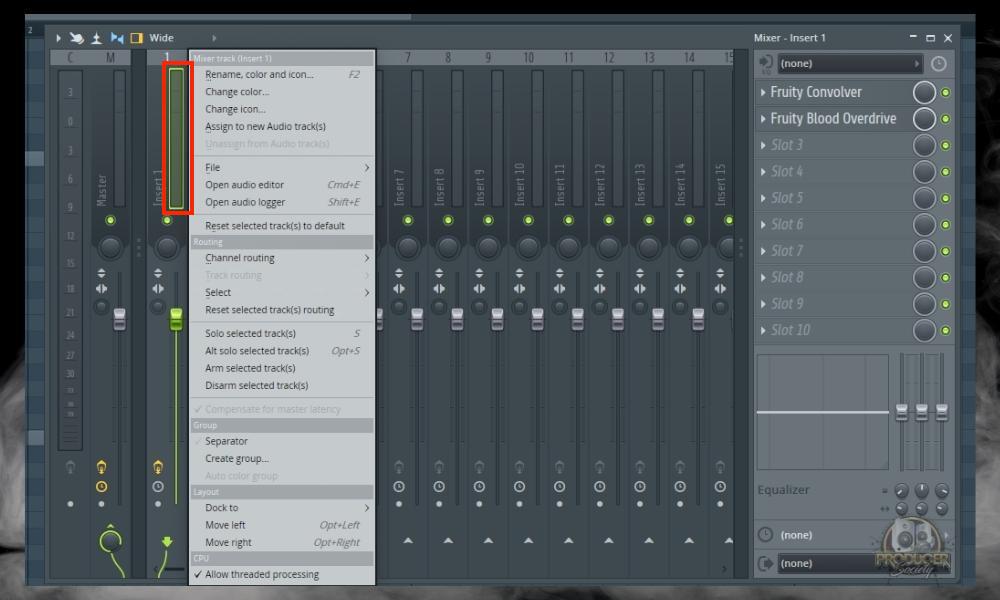
The first thing you want to do is bring up the mixer, which can be done in a few ways. In macOS, use the keyboard shortcut, (fn + F9). For Windows, just use (F9). Another way to do the same thing is to just click the little icon next to the Piano roll, Playlist, and Channel Rack buttons.
With your Insert/Instrument Track selected (it’ll clearly turn yellow), right-click and bring up all of the different options, including the colors, positioning, plugins, general processing, and a lot more.
As I said in my other tutorial on how to assign samples to a keyboard, Many macOS and Windows FL Studio shortcuts are similar. You just may have to use the (Command) or (fn) key, before the main shortcut, on macOS.
Take note that I’ll be using the term, “Insert” and “Instrument Track” interchangeably throughout this tutorial because they’re practically the same thing.
2) Select “File” and then “Save Mixer Track State As..”
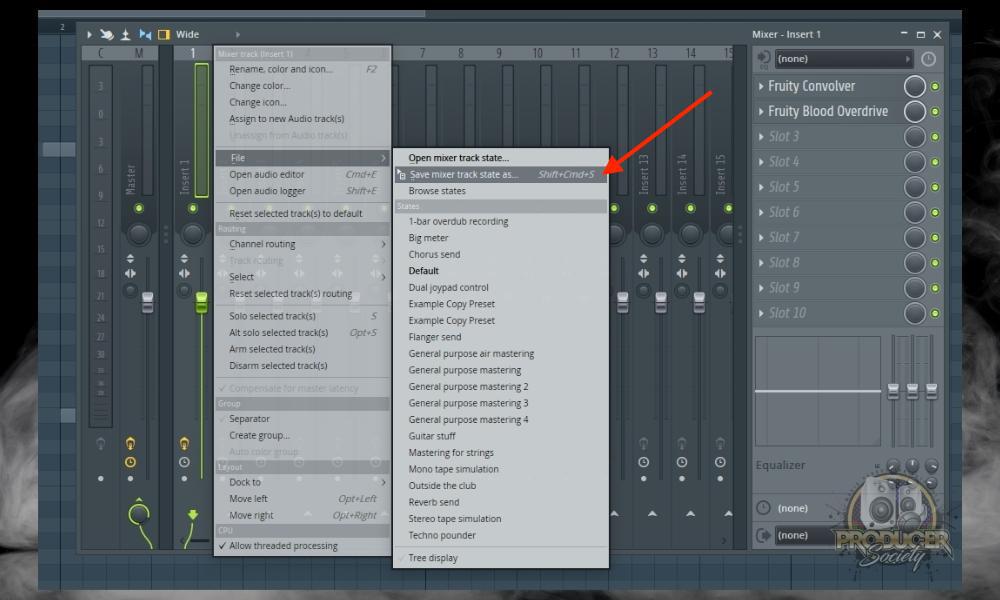
After you’ve brought up the settings, choose “Save Mixer Track State As..” which is just another way of saying “Save Preset.”
You can also use the keyboard shortcut, (Shift + Command + S) to automatically bring up the preset naming window. This is for macOS. For windows, Use (Control + S)
3) Choose Your Preset’s Name
4) Right-Click the Desired Insert and Then Select the Preset from the “States” Menu
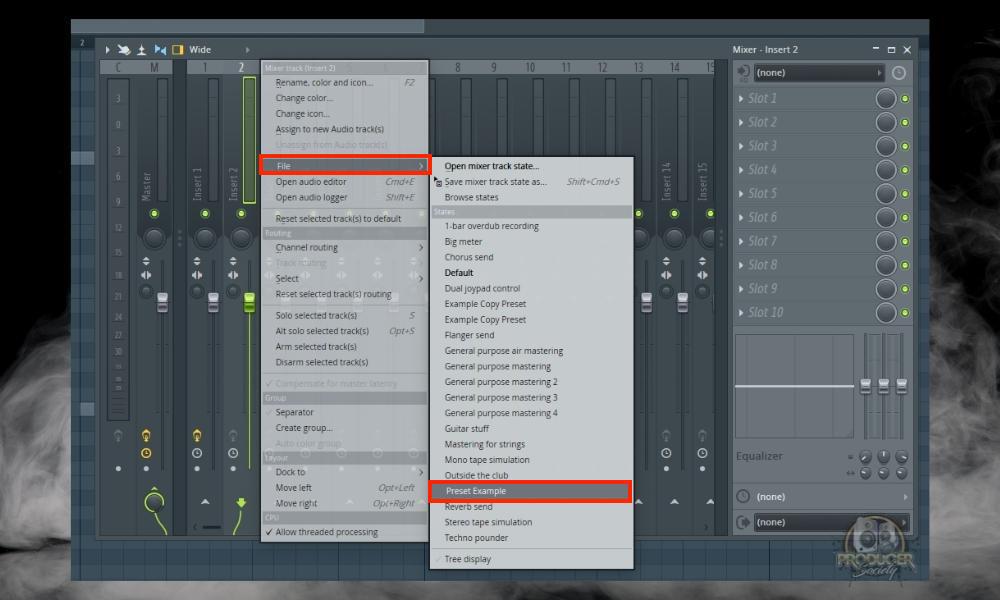
You can see why I chose a name that’s identifiable. There are already quite a few presets sitting there. As time passes and you’ve created dozens or potentially even hundreds of presets, you’ll want things organized.
Some of them, including the one I just created for the article, will have to be deleted. I’ll show you how to permanently erase presets in a moment. But first, I’m going to show you how to recall the plugin back to its original state.
5) Use “Default” To Recall the Plugin Settings Back to Their Default State
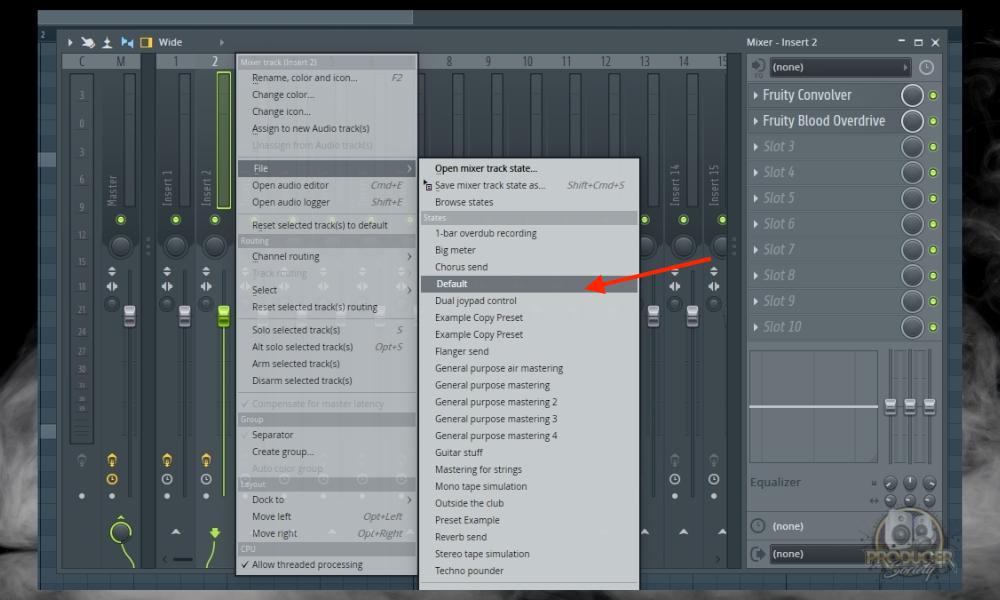
To bring the plugin back to as it was in its original state, just click “Default” as the image above shows.
But what if you want to eliminate your presets? As I said before, you’ll pile presets on top of each other, and eventually, you’ll have to clean house. There are a couple of ways of doing this, but I’ll show you the easiest way first.
How to Delete Mixer Presets in FL Studio
1) Click “Plugins Database” in the File Browser
2) Select “Mixer presets”
3) Right-Click the Preset and then “Delete File”
This is the easiest way to delete your presets in FL Studio. Another way to do it is to do a Spotlight Search and then choose “Mixer presets.”
Your computer’s directory will show all of the possibilities and you can scroll through them, select Mixer presets, then go inside the folder and delete the preset. If – for whatever reason – it doesn’t work, you may have to reboot FL Studio to have the software re-scan everything again. I find this doesn’t happen often in FL Studio though.
Other Articles You May Be Interested In
Important Things to Note About Using Presets in FL Studio
1) You Can Find Free (And Premium Presets) to Use Online
FL Studio has a decent number of presets that you can choose from, however, there are many others you can find online. Some users give them away for free while others charge money for them.
I bought the Fruity Edition from Plugin Fox but I believe the Producer Edition has more of this kind of thing. Most DAWs do come with a bank of presets, including GarageBand and Logic Pro X which have some of the best that I’ve seen.

 Written By :