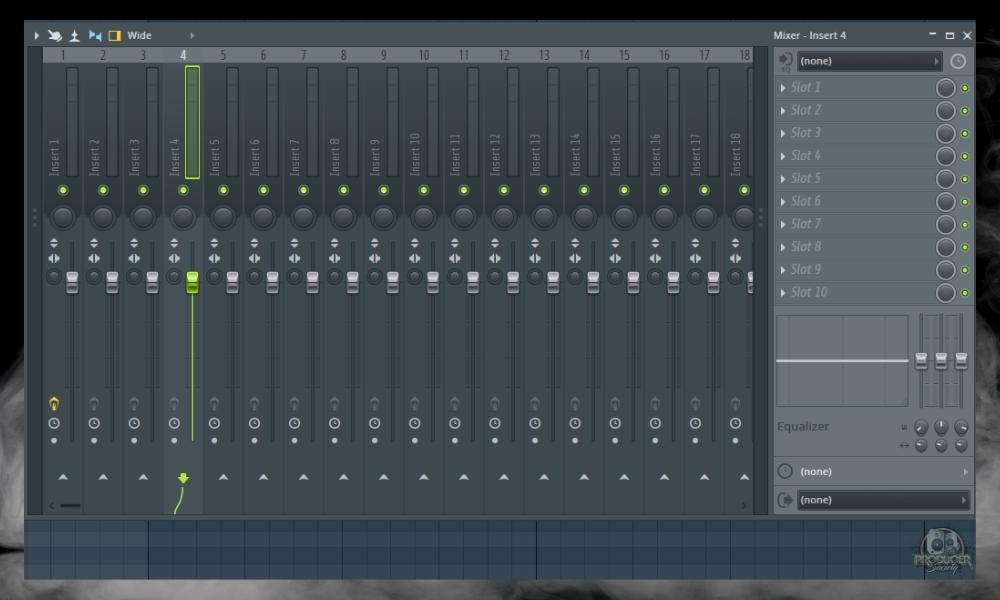
Turning off the plugins is one such example of the learning curve of a new program. It took me a bit of Google searching and then some experimentation to figure out how to turn off plugins in FL Studio. Unlike a simpler DAW such as GarageBand, the plugins are loaded on a separate interface that you have to pull up.
To turn off plugins in FL Studio
1) Bring up the mixer with the (F9) keyboard shortcut (fn + F9 for macOS)
2) Select the Insert/Instrument
3) Click the green dot next to it to mute it
4) You can also click the drop-down arrow on the left side of the plugin slot to Delete or Replace it
Turning Plugins On And Off in FL Studio (Muting, Solo, and More)
The nice thing about FL Studio is the user has a lot of control over what plugins process instruments, and vice versa. With the mixer, you can easily solo or mute the processing. Or, you can quickly shift between different instruments with the plugin turned on for experimentation.
One of FL Studio’s greatest features that I noticed after buying it from Plugin Fox is its user experience and workflow. I appreciate the piano roll layout, specifically, how you can see other instrument tracks’ notes in context.
Additionally, the mixer is easy to use too, as is turning off or muting the plugins. The first thing you have to do is bring up the mixer using a keyboard shortcut.
For FL Studio on Windows, it’s just F9 on your keyboard, however, on macOS, you have to press the small “fn” first on the right side of the keyboard. This seems to be the case for all keyboard shortcuts in the macOS version of FL Studio.
Like I said in my guide on adding drumkits to it, the macOS shortcuts are always fairly similar to Windows, it’s just that you have to add the “fn” first.
Take note that many of the keyboard shortcuts can be seen when you hover the mouse over the various functions in the top toolbar. Reddit has a great compilation as well.
![Mixer Button - How to Turn Off Plugins in FL Studio [ANSWERED]](https://producersociety.com/wp-content/uploads/2022/01/Mixer-Button-How-to-Turn-Off-Plugins-in-FL-Studio-ANSWERED-1.jpg)
Moving on. I’m going to show you what you came for.
1) Bring Up the Mixer with F9 (fn + F9 for macOS)

After you’ve brought up the mixer, you can adjust the plugins on the right side of the interface. You can also apply each plugin to every instrument track. Make sure to appropriately label your instruments so you have a better idea of what you’re doing.
2) Select the Insert/Instrument in the FL Studio Mixer
![Select Insert - How to Turn Off Plugins in FL Studio [ANSWERED]](https://producersociety.com/wp-content/uploads/2022/01/Select-Insert-How-to-Turn-Off-Plugins-in-FL-Studio-ANSWERED.jpg)
The “Inserts” on the left-hand side represent the instruments and the plugins are on the right. Select which plugins you want to use on the right side using the slots, and then apply them to whichever instrument you want.
With the FL Studio mixer, you can also choose whether you apply plugin processing to the master track or individual “inserts.” (Kind of unrelated, but I have to admit that it feels weird to call them “Inserts.” I’m used to talking about GarageBand).
3) Click the Green Dot Next To The Plugin to Mute It
![Turning Off Plugins in FL Studio - How to Turn Off Plugins in FL Studio [ANSWERED]](https://producersociety.com/wp-content/uploads/2022/01/Turning-Off-Plugins-in-FL-Studio-How-to-Turn-Off-Plugins-in-FL-Studio-ANSWERED.jpg)
The kick is the instrument I’ve selected in the image shown above. As I said in the caption though, clicking the green dot will just mute the plugin, it won’t necessarily delete it. To delete it or replace it, you have to click the drop-down arrow to the left of it.
4) You Can Also Click the Drop-Down Arrow on the Left Side of the Plugin Slot to Delete or Replace It
![Replace or Delete Plugins - How to Turn Off Plugins in FL Studio [ANSWERED]](https://producersociety.com/wp-content/uploads/2022/01/Replace-or-Delete-Plugins-How-to-Turn-Off-Plugins-in-FL-Studio-ANSWERED.jpg)
Once you’ve deleted the plugin, it’ll return back to how it was before: an empty slot. The image down here shows what it looks like once it’s gone.
![Slot 1 - How to Turn Off Plugins in FL Studio [ANSWERED]](https://producersociety.com/wp-content/uploads/2022/01/Slot-1-How-to-Turn-Off-Plugins-in-FL-Studio-ANSWERED.jpg)
And really it’s as simple as that. Both FL Studio and Logic Pro X also have a mixer in a way that GarageBand does not, and I think that’s one of the upsides of using premium software.
How Do I Remove A Plugin from the FL Studio Mixer?
To remove a plugin from the FL Studio mixer, use the F9 keyboard shortcut to bring up the mixer (fn+F9 for macOS users), and then click the drop-down arrow next to the plugin slot you want to delete. Then, press “Delete” to remove it, or “Replace” if you want to add a new plugin in its place.
Important Things to Note About Plugins in FL Studio
1) Instrument Tracks Are Called “Inserts”
As I alluded to before, GarageBand and Logic Pro refer to tracks as instrument and audio tracks, whereas FL Studio calls them inserts. This can be a bit confusing to someone who’s used to one of the former DAWs so it’s worth mentioning.
2) FL Studio Effects Often Go By Different Names
Another thing I’d like to point out is how FL Studio processors and effects often go by weird names. For instance, the default reverb plugin isn’t called “Reverb.” It goes by the name, “Fruity Convolver,” instead.
Keep this in mind when deleting plugins because the title may convince you it needs deletion when really it’s performing a task you’d rather keep.

 Written By :