Using Apple Loops is the easiest way to quickly create background music using Garageband. Not only is it easy but it’s also royalty and copyright-free (something we’ll talk about later), so you don’t have to worry about any negative repercussions. Here are the basics of getting it done:
To make background music in Garageband
1) Open Apple Loops
2) Choose a Loop like 80s Ballad Chords 01
3) Drag it into the Workspace with a rhythm section like 80s Back Beat 01
4) Click Share
5) Export your project as an AIFF
6) Drag the audio clip into the video editor along with your video
What You Need to Make Background Music in Garageband
1) Garageband (or Logic Pro X)

If you’re reading this article, chances are that you already own either Garageband or Logic Pro X. Any iOS or macOS device can get Garageband for free simply by downloading it from the App Store which I show you how to do in my guide.
It functions the same way on an iPad or iPhone – you just go into the App Store and search for Garageband and it’ll come right up. Some people prefer using an iPad like this one for tasks like this, and I explained why that’s the case in my other article on the best device for Garageband.
Regardless of the device, however, the nice thing about both Logic and Garageband is that you gain access to the Apple Loops which I’ve written guides on how to use before.
On the right-hand side of the workspace, there is a Loops icon that looks like a hose. You click on it and you have a massive library of sounds and music to choose from.
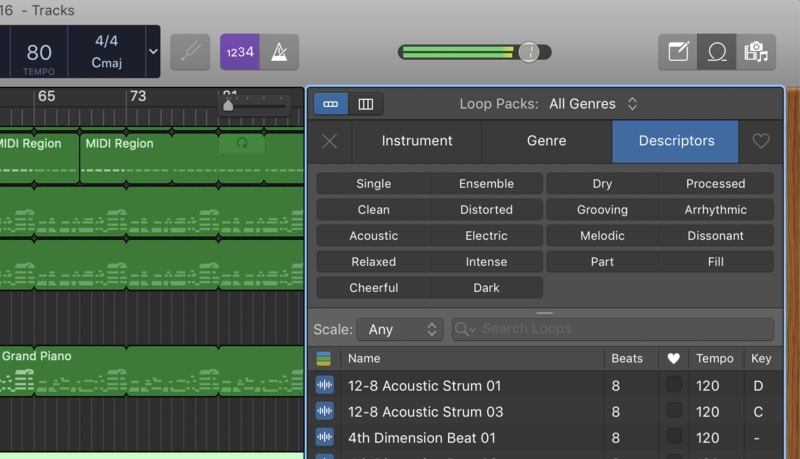
It’s worth stating that Garageband has the ability to act as a very limited video editor, which is great and I’ll show you how to do it in the second part of the article, but I prefer using it for just one part of the process.
And that process is to create the music. Once it has been created, you can then load it into a video editor which we’ll talk more about now.
2) A Video Editor like iMovie or Screenflow Editor

Both iMovie and Screenflow Editor function in a similar way in the sense that you have your audio clip and video clip on top of each other in the workspace. Now that I think of it, they are both very similar to each other in that regard.

I used iMovie almost exclusively when I first started creating videos but these days I use Telestream’s Screen Flow Editor, which I find is a far superior video editor.
Screen Flow is a lot more intuitive and easier to use than iMovie and it’s definitely a worthwhile investment, although, investment is a misleading term because it’s not even that expensive, to begin with. If you’re serious about making videos, I couldn’t recommend Screen Flow Editor enough – I use it daily.
Other Useful Tools For Making Background Music
3) Audacity

You’d know this if you’ve already read my guide on Audacity vs Garageband, but Audacity is strictly an audio editor and not a DAW like Garageband. In other words, Audacity is a tool you use to edit or manipulate pre-existing audio whereas GarageBand is a tool that use to create audio from scratch.
Audacity doesn’t have loop libraries, software instruments, or VSTs because it’s just an editing tool. That said, it’s very good if you want more tools for editing and changing your audio. You can drag and drop your file into Audacity, edit and export it, and then slip it into GarageBand or your video editor after.
A Step-By-Step Guide to Making Background Music in Garageband
For this section, I’ll show you a more in-depth way of using Apple Loops to quickly make background music, although, I won’t talk about the songwriting aspect that much simply because a tutorial on how to make background music isn’t terribly different from any other type of music that you would make.
I’ve made tutorials on how to make beats, how to make trap beats, how to quickly write songs, how to make backing tracks, songwriting tips for beginners, etc, so you can take a look at these if you want a detailed guide on how to create music.
I imagine that if you’re into making background music for a video clip or a podcast, you just want to quickly make some music for the sake of the video, rather than trying to become a music-maker. So with that said, let’s get into it then.
I’ll show you how to quickly create a song and then slip it into your video editor afterward along with video footage so you have background music. So obviously, the first thing you want to do is open up Garageband and open a new project.
1) Open Apple Loops by Clicking on the Loops Icon on the Right-Hand Side
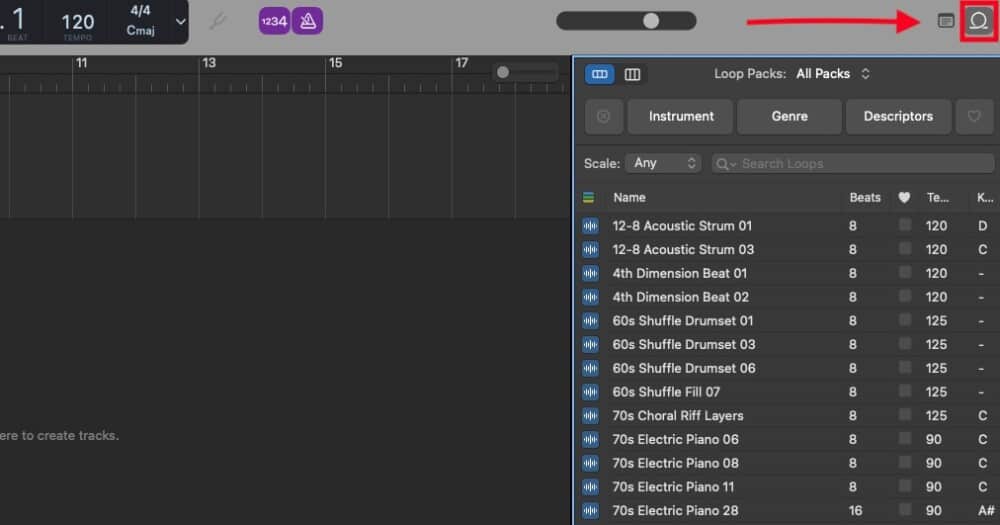
Apple Loops are organized pretty well by instrument, genre, and descriptors, so you can move through quite a few loops quickly. If you want a piano loop, for example, you just have to click on the Instrument category, and that’ll give you the ability to choose whatever instrument you want.

The same thing goes for the genre and descriptor categories. The loops are also organized by the tempo and key signature as well so you know what you’re working with, and all of them are adjustable by their tempo and key as well, which is nice.

2) Choose a Loop like “80s Ballad Chords 01”
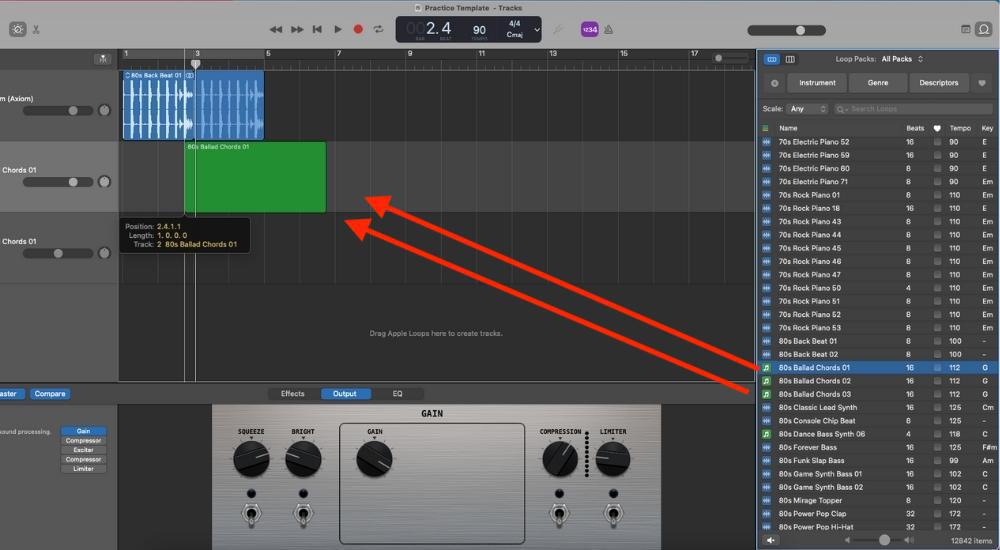
Once you’ve chosen your loop, all you have to do is drag it into the workspace like what’s shown here and the importing process will be done automatically. It has to be done in an empty track region or with an Audio Track open, rather than a drummer track or software instrument track.
If you try to pull it into the wrong type of region, it’ll give you a warning sign that you’re not doing it properly. It’s not hard to figure out though so don’t worry.
3) Drag it into the Workspace Along with a Rhythm Section like “80s Back Beat 01.”

Once you’ve chosen your melodic loop, you can then drag in a matching rhythm section loop. It’s often not a bad idea to just choose one with the exact same name because then they go really well together. Obviously, though you can get more creative than this by combining loops and samples that aren’t necessarily made for each other.
4) Click Share and then Export your Project as an AIFF
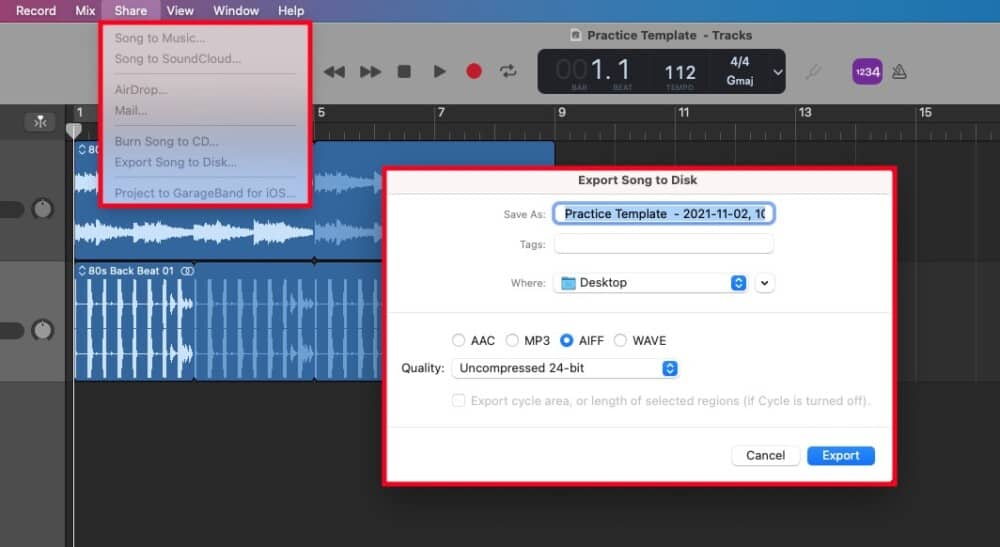
Optional (But Recommended)
5) Mix the Background Music For Maximum Volume and Effects
Unless you’re trying to get this done as quickly as possible, you’ll probably also want to adjust the volume and maybe do a bit of mixing that way the background music you’ve created is loud enough for whatever project you’re using it for.
I’ve written countless guides on this kind of thing, including my article on why your songs are too quiet, and how to mix in Garageband. That said, I think a few things can be done very quickly to increase the quality of your background music project.
A) Panning

As I’ve explained in my guide all about it, panning is the act of changing the position of the sounds in the stereo image. In other words, you can make the sounds appear as if they’re coming from a different direction or as if they’re sitting in an entirely different place.
A lot can be done with panning because, essentially, you’re able to carve out room in the mix for all the instruments. You wouldn’t want all of your instruments jam-packed in the center for instance, because then it’ll sound far too crowded.
To pan a sound in Garageband, you just have to turn the knob on the track header according to a numerical value. It goes from -64 to +63. You’ll know the panning effect is there because it’ll turn green as you’re turning the knob.
How you pan a sound depends on how many tracks there are and what kind of instrument you’re using in the mix. In the case of a simple two-track background song, I would just pan one to around -10 and one to +10. But you can experiment with other sounds.
Another factor to consider is the audio of your video for which you’ve created the background music. You may have to experiment with where the background music sounds the best, at what volume, and where it should come from in the mix. This is one way that Garageband’s innate video editor comes in handy. We’ll talk about it in a moment.
B) Adding Compression
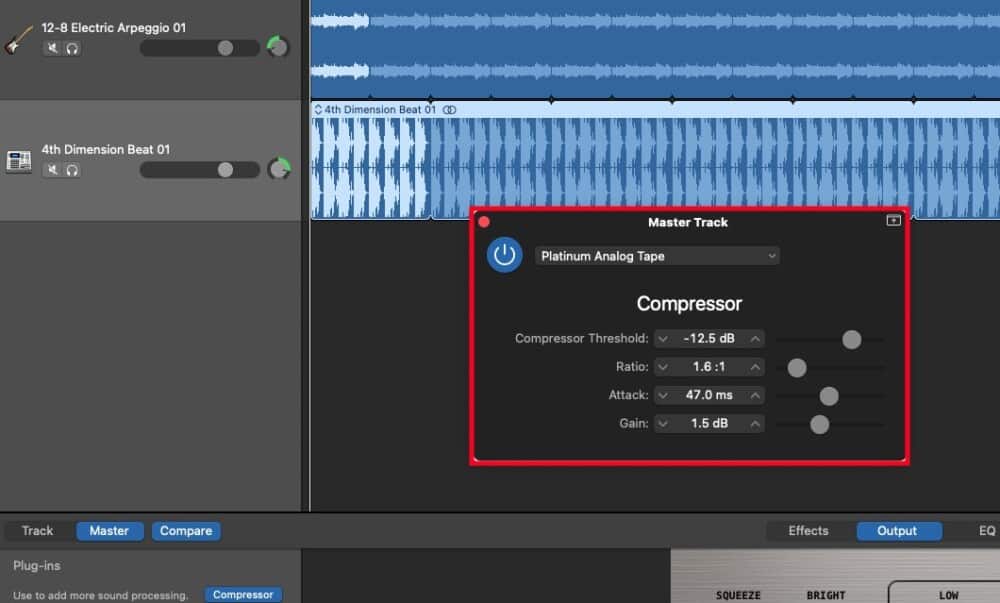
Compression is the act of increasing the quiet sounds and decreasing the loud sounds, which, in effect, tends to balance out the audio or “flatten” it out as people like to say. Some people like to say that compression glues everything together as well.
I’m not an expert at using compression although I definitely know how to use it, so I’ll often just use presets and then adjust them after the fact. Platinum Analog Tape is a great choice and really it’s probably my favorite preset to use.
C) EQ

The EQ is more optional because we’re using Loops. I imagine they’re already mixed and EQ’d. That’s why I would use the compression I mentioned earlier on the master track, and not on the individual instrument tracks. The same thing goes for the EQ though in the sense that a Mastering preset would probably be the best like “rock” or “pop.”
D) AUPeakLimiter

The AUPeakLimiter is the last step of the process and I use it to really crank up the volume while also limiting it so there isn’t any nasty distortion or anything like that on top. You can also imitate this effect by increasing the gain on the compressor, but the limiter is different because the ratio is very high.
Increasing the gain on the compressor won’t limit the loud peaks in the same way that the AUPeakLimiter would. In other words, you can crank up the gain on the compressor to +25dB so your music is incredibly loud in the DAW, but once you export it, you’ll notice there is distortion all over the place.
As for how I like to set up the AUPeakLimiter, I typically keep the VU meters of my tracks low, like around -10 to -15dB, and then I adjust the AUPeakLimiter so the gain is at +10.4dB. This is a good rule of thumb, although, I’ll usually try and get it as loud as possible the same way everyone else does.
Sure, this contributes to the “loudness war” as they call it, but the fact of the matter is that if your song is on a playlist, you want it to be comparable to other tracks on the playlist. No one wants to turn up the volume when your track comes on.
6) Export the Audio File as An AIFF File

Once you’ve mixed the audio to your liking, I would export the file as an AIFF and then get it ready for insertion into your video editor along with the video clip. I prefer doing it this way because then the audio file is wrapped up nicely into one file.
7) Drag the Audio Clip into Screenflow Editor Along with your Video

With your video editor open, drag both clips, the audio, and video, into the workspace together and then adjust the volume of each so they fit. In this case, I had the volume of the video turned up to 200% and the background music down to 10%.
In other cases, it wouldn’t have to be so extreme. I quickly made a video with a phone and without a microphone so the audio of the video needed a boost. If you wanted to adjust the volume of each part individually, you would just have to cut up the audio where you wanted and then adjust the volume of one part specifically.
Once you’re done with the audio/video editing, click File > Export and save it to your desktop. Make sure to give it a good name so it’s easily recognizable, and another great thing is to make sure you’ve chosen the proper resolution. 100% of the original is always a good choice.
7 B) Drag the Audio Clip into iMovie Along with your Video
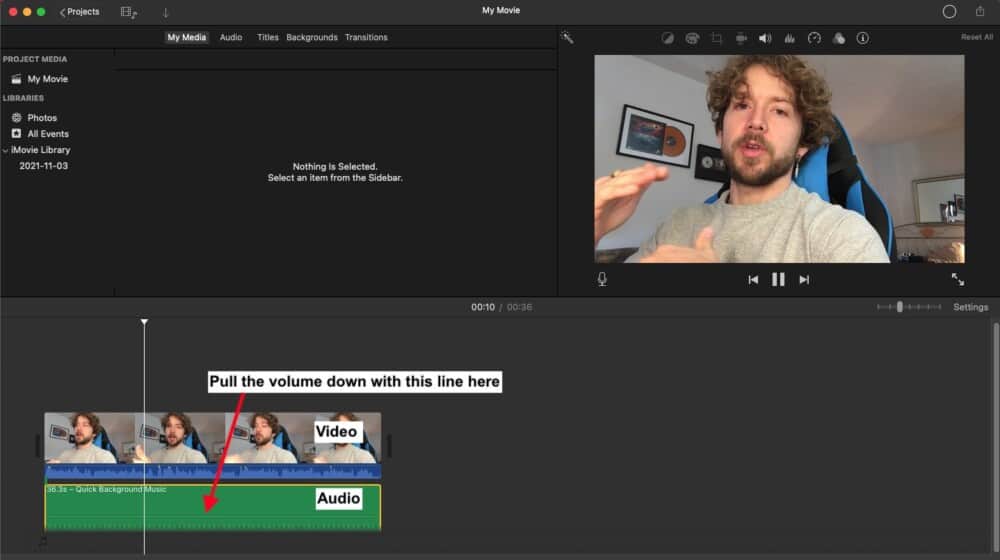
If you’ll recall what I said earlier about this, the audio and video formats stack on top of each other in both iMovie and Screenflow Editor in a very intuitive way. These are the two video editing software that I have experience with so I can’t say for certain, but I think this is how many of their workflows are set up.
Either way, this is how it’s done. Now, if you wanted to export this project, you just go up to File > Share > File > Next, and then make sure to name the file before exporting it to your project. I find exporting things to your desktop like this is the best way of doing it and it’s how I operate with every other type of file as well.
Here’s the finished result:
How to Add Background Music With Garageband (Only)
For this section, I’ll only be covering the video editing part, because we’ve already gone through how to actually make the background music. Additionally, this is for the people who want to use Garageband and only Garageband, rather than a third-party video editor like iMovie or ScreenFlow Editor.
In recent updates, Garageband has added a feature whereby you can actually add audio recordings to video. To add background music with Garageband, drag your mp4 or video recording file into Garageband which will automatically bring up the Movie Track and you can add loops and sounds from the Loops library or from previous projects right alongside the movie clip.
Earlier I said that I liked using Screenflow and other programs, but as a matter of fact, there’s nothing wrong with using Garageband’s video editor either. Garageband’s interface for adding music to video clips is quite intuitive and easy to use.
What I appreciate about it is the ability to automate the volume and add other mixing effects to the audio right alongside the video clip (by the way, you can apply my automation guides to it as well). It works great. Here’s how to do it.
1) Drag Your .mov or mp4 File into An Empty Garageband Workspace

For this step, it’s as simple as drag/drop always is. Just drag the movie file into an empty project and Garageband should have no trouble at all with recognizing it unless it’s some kind of weird video file. If it is, you can probably find a video converter like this one online.
2) Drag Your Finished Background Music Into the Workspace

It’s the same story for the finished audio recording which you just have to drop into the workspace as well. An empty track region or an audio track region will work just fine.
3) Click on the Video Icon to See How the Video Looks and Sounds

One of the nicer things about Garageband’s video editor is that you can click on the preview tool which looks like what I’ve highlighted in the above image. Once you click on it, it disappears but then the movie will pop up like what you can see down here:
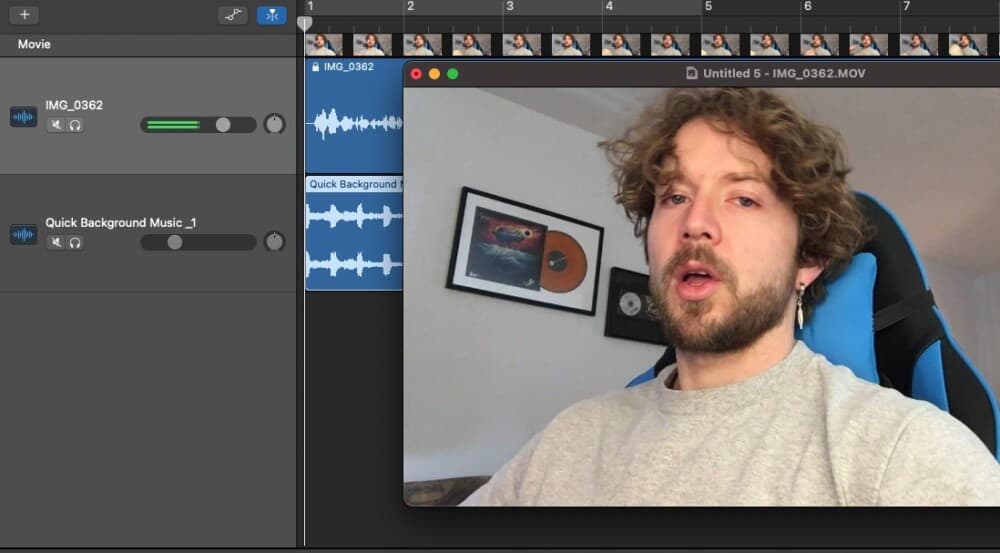
And the video preview works great in the sense that you can customize the size of it in any way that you want. I was impressed when I first started to use it.
4) Lower or Increase the VU Meters of the Audio to Match the Video
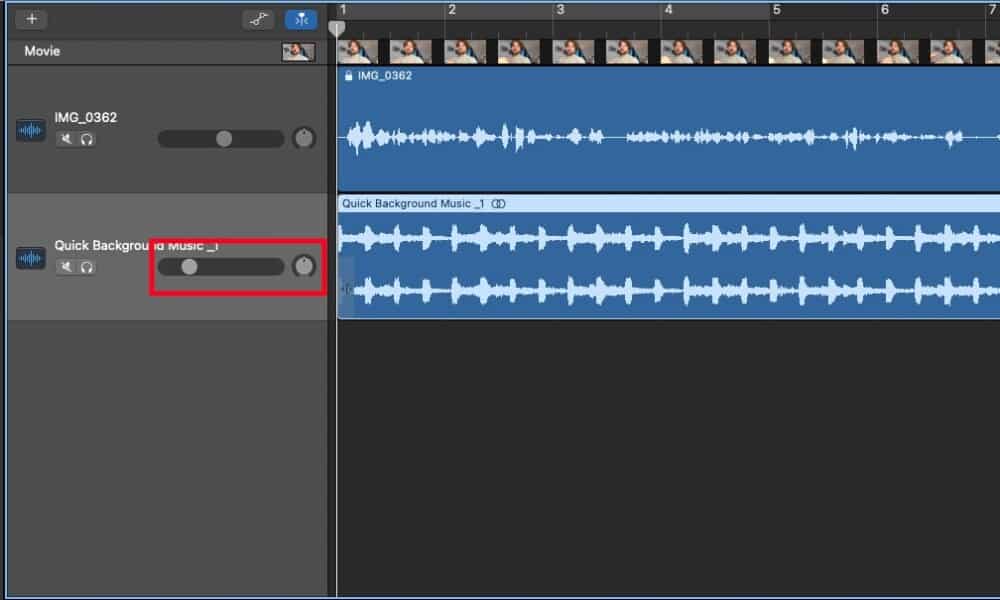
The primary parameter you’ll adjust will be the VU meter which is highlighted in the image above. You’ll likely have to drop the VU meter down considerably to make it so the content of the video isn’t overshadowed by the background music, but it depends on what you’re doing.
Also, it’s a good practice to give lower the volume of both to -10dB that way you have plenty of headroom. If it’s -5dB that’s fine too. The point is to ensure that you don’t have clipping audio at any point in the recording (audio or video).
5) Use Volume Automation And Other Automation To Match Loud and Soft Peaks

The next great aspect of using the video editor is the automation track. I like using it because it’s the same as automating any other effect in Garageband, which I have plenty of experience with. In this regard, I find that Garageband is superior to iMovie.
And you can get really creative with this as well. Here are just a few of the effects you can do with Garageband’s video editor:
- Automate the volume in any way you want
- Add dynamics processors like EQ, Compression, and any other dynamics processor
- Fade outs and fade-ins
- Pan the audio or convert it to and from Mono or Stereo
- Add processing to the audio and not the video’s audio
- and the list goes on
I imagine that for most of us though, merely changing the volume throughout the project will be enough. Let’s export it now as a completed file.
6) Click File > Movie > Export Audio to Movie > Preset > Full Quality

Now, if you want to export the completed video file, don’t use the Export function as you normally would if it were a regular Garageband project. Click File and then Movie to export the audio and video together. I choose to export it to the desktop like usual and in “Full Quality.”
And once you’ve done that, that’s it. You’ve officially added background music to your video file with Garageband as your sole editor.
How to Add Background Music to Your Podcast in Garageband?
A great way to add background music to your podcast in Garageband is to take an mp3 file of your background music and place it in the workspace alongside the audio recording of your podcast. Keep the volume of the background music low and use a ducker so the music doesn’t interfere with the audio.
That’s the easiest way to add background music to a podcast. It’s really the same thing as what I’ve shown you above with the other methods. You just have to add the audio in a different track region and adjust the volume from there with or without volume.
There are other methods for getting this to work really well, including automation which I have a guide on here. Automation points allow you to increase or decrease the volume of certain parts of the recording, and to your choosing.
Put simply, you can adjust the volume (and other effects) at very specific points and in a very specific way, rather than relying on a ducker to do it for you.
Where to Find Free Background Music?

To find free background music, install Garageband on your computer to gain access to Apple Loops, a massive library of loops, sounds, and instruments. Make sure you have about 15GB of free space on your computer because the library is large.
There are a few ways to get your hands on free background music, but the tutorial above is undoubtedly the best way of doing it. The issue with other services is that you commonly have to pay for it, or the quality of the music isn’t that great because it tends to be cheesy. That isn’t a problem with Garageband though.

 Written By :