There are a couple of reasons why Garageband songs can be too quiet. One has to do with a setting in Garageband’s ‘Settings,’ within the ‘Advanced’ tab.
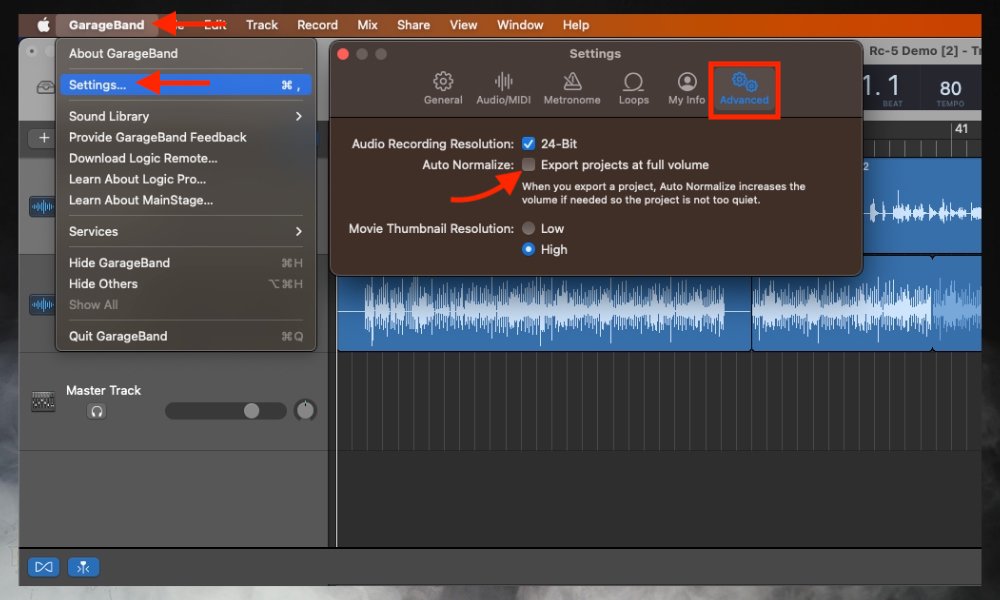
Generally speaking, GarageBand songs are too quiet after export because the Auto-Normalize function is enabled in Settings. To fix this, open the project, click GarageBand in the toolbar, choose Settings, Advanced, and then uncheck the box that reads “Export projects at full volume.“
Another commonly cited reason for GarageBand’s suffering from insufficient audio quality is due to the fact it uses 24-bit audio from 44.1kHz to 48kHz for recording when the modern standard is 96kHz with a 24-bitrate. Professional DAWs like Logic Pro X and FL Studio are capable of these higher sampling rates.
For a more detailed explanation of how to fix the first problem, have a look at the steps shown below:
1) Open Garageband.
2) Click on “Garageband” in the top-left setting in the Toolbar.
3) Click on “Settings.”
4) Then, click on “Advanced.”
5) From here, you should see a setting that says, “Auto-Normalize,” and there is a check box located next to it with the setting, “Export Projects at Full-Volume.”
6) Go ahead, and unselect this box.
You’ll notice that if you have this function turned on, Garageband will export music at a relatively low volume. I’m not sure what the function of this is, however, the effect is that it uploads your tracks to various platforms without any distortion or clipping.
While this is good, the function goes a bit overboard because the music will pretty much always be too quiet. Now that you’ve figured out how to eliminate this problem, you’ll likely run into more hiccups along the way, which I’m going to help you solve today.
When I first started using Garageband, I found it difficult to upload music that was as loud as the competition, as well as without clipping and distortion during the loudest parts of the song.
Obviously, this is super annoying, so I’ll help you work through this if you’re struggling with the same issues I once had.
Auto-Normalize Function Off
First things first, is to always have the auto-normalize function turned off, as I just mentioned.
The next step is to ensure that none of your clips are clipping, or going into the red.
Avoid Clipping Instruments
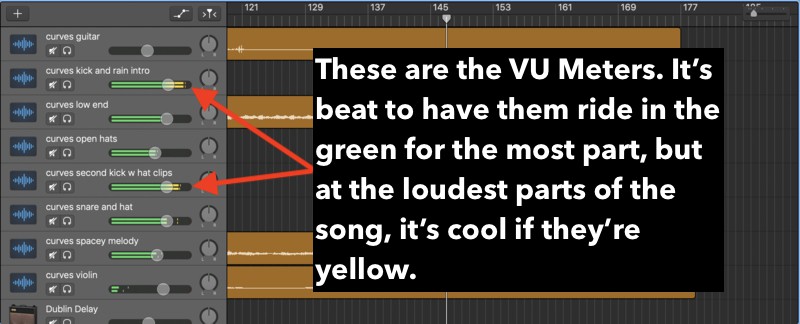
In other words, there are little VU meters beside each software instrument track in your Pre-Mastered mix, and you don’t want any of these going into the red.
Typically, you want your tracks to either float around in the green or at least go into the Yellow during the loudest parts of the song, additionally, you can use the YouLean Loudness Metering Tool to help you understand just how loud your track is.
Set The Master Volume To +0.0dB Before Exporting The Song As An AIFF
The next thing to keep in mind is that when you’re exporting the track and getting ready to master it, you want to have the Master Volume level set at +0.0dB, nothing more and nothing less.
I’ve never heard anyone else recommend this, but I find it definitely makes a difference in how your mix will sound (my guide on mastering).

Compression Can Help Reduce Loud Peaks
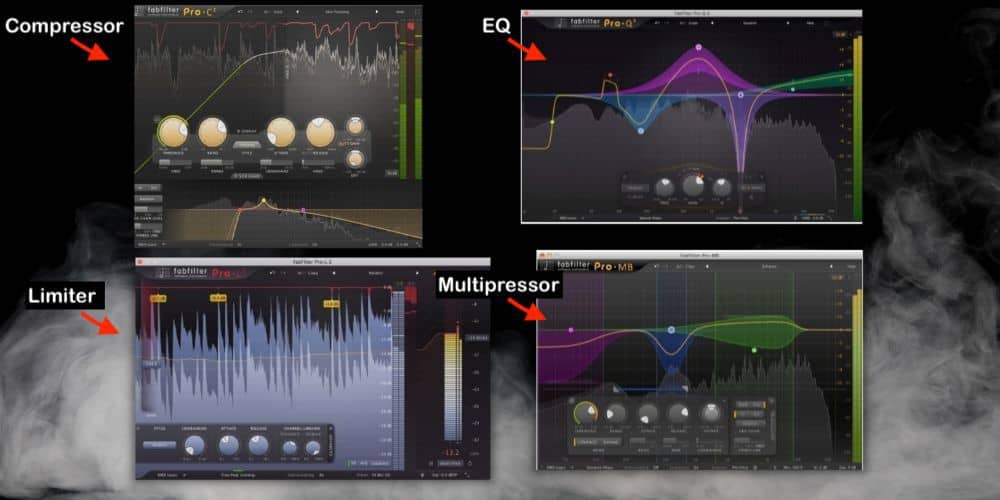
Another great way to increase the volume of the song, although professional engineers won’t recommend thinking of this tool in this way, is to use a bit of compression.
Compressing the final product will reduce the volume of the loudest parts of the song and increase the quietest part of the song.
Quick Tip:
One of my favorite parameters to use in the compressor is the “Platinum Analog Tape” preset, which, as I explained in my compression guide, I find works great for pretty much everything.
I use it for rock songs, hip-hop songs, and pretty much any song that I’ve made. I think it works well.
I like to think of compression as a function which “squeezes” the size of the audio file.
Once it has been minimized, because the peaks of the audio have been reduced, the effect is that you can turn up the gain on the compressor and thus, make the song much louder.
Quick Tip :
A personal tip of mine for the perfect amount of volume while mastering is to increase the total Master volume by +2.0dB to +2.5dB, as well as having a bit of compression set up on it in the Master channel, the aforementioned “Platinum Analog Tape.”
***Remember, I mean turning up the master volume of the FINAL track after it’s been exported as an AIFF file, and re-inserted into a new Garageband Project for mastering purposes.
Limiter Can Also Be Used For Loud Peaks
Another tool you can use is the limiter (my tutorial as well). A limiter is, essentially, a compressor with the ratio turned all the way up.
In other words, for every signal that increases a certain threshold, the limiter will reduce that signal to almost nothing, rather than merely minimizing it as a compressor would do.
The higher the ratio, the more the signal is being reduced, and the lower the ratio, the less the signal is being reduced beyond a certain point.
Furthermore, you can also increase the total volume of your tracks by being careful with what instruments are turned up loud in the mix.
For instance, typically, the snare drum is quite loud, so you can either turn down the volume of the snare, or you can adjust the velocity of the note manually to make it so it doesn’t hit quite as hard.
Usually, the setting I use for the stock Limiter is +2.0 for the Gain and the Output level set to -0.1dB, however, I’ve since switched to using the Fab Filter Limiter which comes as part of their mastering bundle on my Product Page (probably one of the best things I’ve bought in years).
Reduce Velocity Of Notes That Are Too Loud Or “Strong”
To adjust the velocity in Garageband, you just have to go into the Smart Controls beside the Piano Roll, on the left-hand side, and you can see a bar that says, “Velocity.”
You slide the bar from left-to-right according to how hard you want the note to hit. I can’t emphasize this last point enough, you’d be surprised just how loud a snare drum is. Cymbals such as the crash can be pretty loud as well.
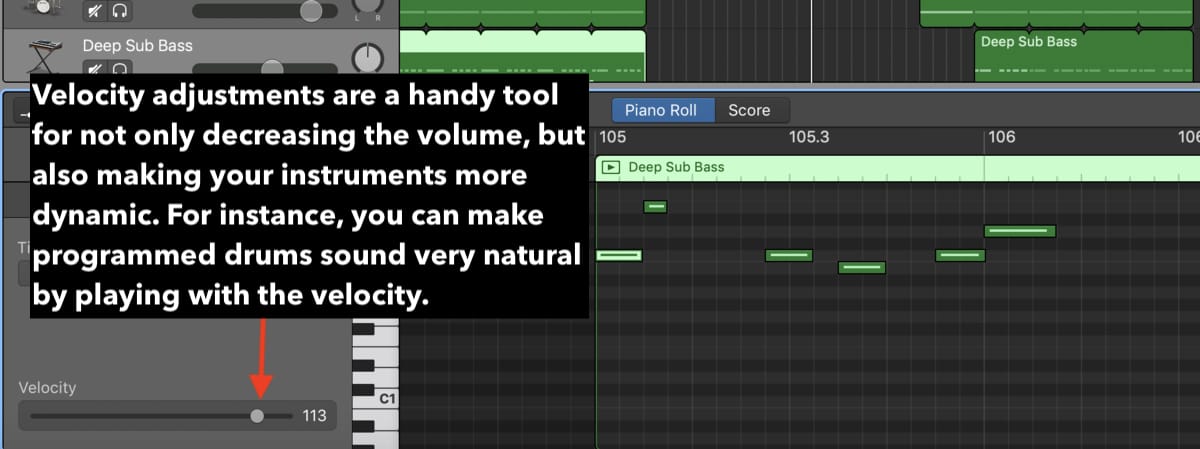
The snare tends to hit quite hard, so you’ll find that sometimes, the volume of it has to go down in order for you to get the volume of the total track where you need.
Before moving on to the next point, I want to add that the aforementioned tip is just a way to decrease the volume of specific and intrusive sounds.

The reason why this is relevant to getting your mixes louder is some instruments, for example, the drums, have a particular section that is much louder than others, therefore, when you got to mix the final track, you’ll notice clipping on the loudest parts of the instrument.
This also happens with other fairly dynamic instruments like the piano which is the foundation on which the MIDI keyboard is created (the main reason why I recommend buying PianoForAll from their site to learn the keys better).
Explained simply, changing the velocity of some parts of the drum kit will allow you to avoid messing with your total volume-levels. In other words, you can be more specific and eliminate the problem right at the source, rather than just turning down the volume on the instrument entirely (more on this in my drum editing tutorial).
Watch For Clipping At The Loudest Parts Of The Song
Another common problem that I run into as well, is that whenever the bass and the kick hit together, the sudden boost in volume will cause clipping, so once you’ve exported your music into iTunes or wherever there might be a bit of annoying distortion every time the bass and kick hits.
To combat this, you can’t fix it in the mix or in the mastering stage. You simply have to go back to the original mix and decrease the volume by a dB or two to get it quieter.
An important point to mention when it comes to mixing is that It’s always best to fix things in the initial mix, rather than in the final stage.
If you’re struggling with getting the volume level right, there is one trick you can employ that allows for continuous testing, without constantly having to export a new track every three seconds and open a new file after you’ve exported the track and re-inserted it back into the DAW.
What you do is this:
1) Export the song as an AIFF file to your desktop, that way you can easily find it.
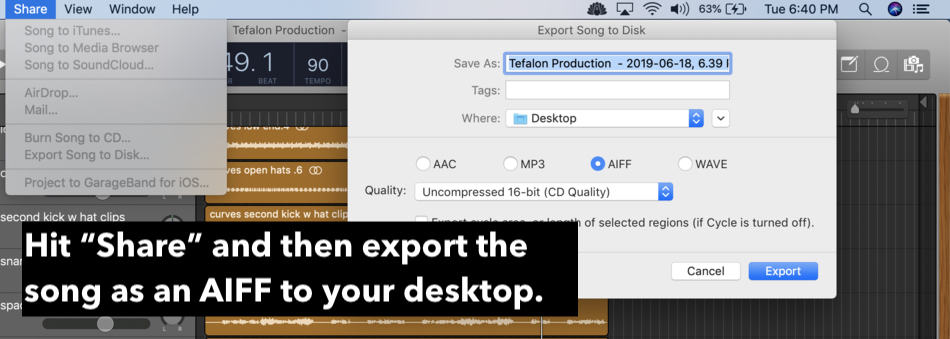
2) Rather than opening up a new file for the final mastering stage, you can just insert the track as a new Software Instrument track beneath all of the other software instrument tracks.
3) Hit the ‘Solo’ button on the AIFF file, that way it stops all of the other tracks from playing.
4) Then, you can adjust the plug-ins on the individual AIFF file. This will save you time. Adjust the plug-ins on the single track, rather than the mastering track.

Quick Tip:
Remember to save the settings for your compressor, channel EQ, limiter, etc, that way when you actually do the final master, you can just put those pre-sets back on without fooling around with the parameters again.
***A key thing to remember when doing this is that if your AIFF file is already clipping and going into the red without the use of any plug-ins, that means there is a part of it that is simply too loud. You’re going to have to turn down some of the instruments.
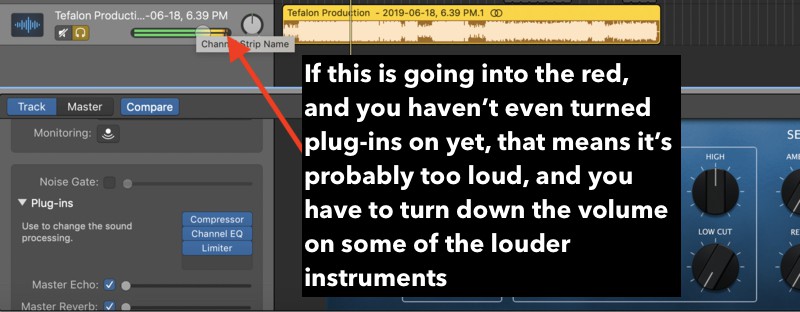
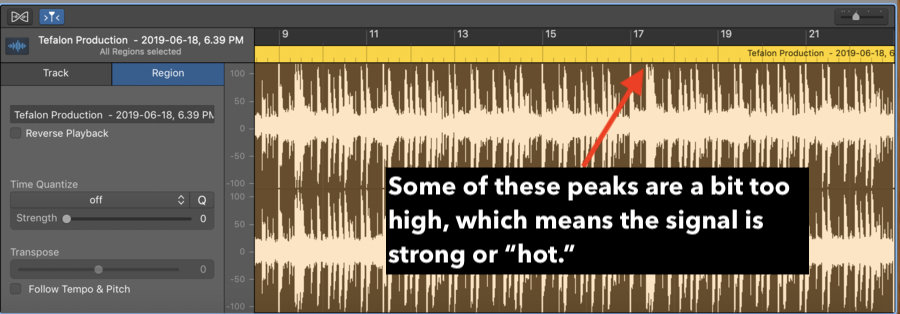
Another important thing to remember, and this applies primarily to those of us who are using an audio interface such as the Focusrite Scarlett 2i2 (which is my favorite), is that if your signal is too hot, it means the signal is far too strong and there likely will be some clipping.
A good audio interface will have a meter on it that signifies how hot the signal is, for instance, in the case of the Focusrite interface as well as the iRig HD 2, the signal will go into either the yellow or the red if it’s too hot.
In the case of the iRig HD 2, you want your signal to go into the yellow only during the loudest part of playing. If it’s going into the red, it’s too hot – or too strong – and you need to turn it down. I would recommend getting an audio interface.
If you’re a guitar player, grab the iRig HD 2, and if you’re looking for more options, say you want to play the guitar and record vocals at the same time, grab the Focusrite 2i2, both of which I’ve written about in my article.
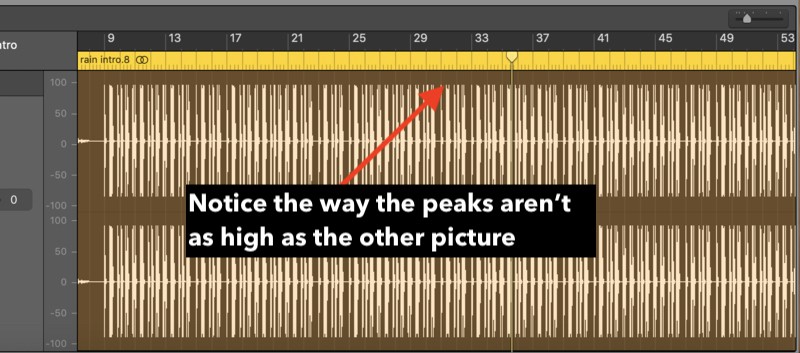
When recording using a guitar or another instrument, a good way to also check if you’re coming into hot is to take a look at the size of the audio file. If it’s smaller, like what you see in this image below, that means it’s not too hot.
However, if it’s much hotter than it needs to be, it’ll look like the image here.
YouTube Video
Conclusion
That’s all for this article today. I hope this was helpful to you. If it was, share it on your social media, it would be greatly appreciated.


 Written By :
lifesaver thanks so much. I thought my headphones were getting worse!
Anytime.