Making backing tracks with Garageband is a very simple process and how much time you spend on it is up to you and your idea of complexity. Here are the steps:
How To Make Backing Tracks With Garageband
1) Create your riff, loop, or sample
2) Use Garageband’s Drummer Track
3) Fill out the song with arpeggiators, synths, and other instruments, using the copy/paste function.
4) Pan the instruments to create room for the instrument you want to jam with
5) “Master” the track
1) Create the Riff, Loop, or Sample
For this part, what type of file to use is really up to you.
You could approach it in a number of ways. You could track a riff with your guitar (my personal favorite these days is the PRS SE Custom 24 on ZZounds) or another instrument; you could use a sample, or you could go into Garageband’s loops and choose one from there. You could also use a MIDI keyboard to make it.
Using Loops
If you’re really strapped for time, I think the best choice to make would be to go into Garageband’s loops and choose one from there. In the case of the backing track that I made as an example, I used one of Garageband’s loops.
One of the great things about the loops is the fact they come with a few different crucial pieces of information, including the tempo and the key signature. With this information, a lot can be done, especially when adding accompanying instruments.

Essentially, what you want to do is pick a Loop (my guide) that suits your musical style and taste.
For this track, I chose the Alternative Acoustic Guitar sample. You can select your loop using a number of parameters, including instruments, genres, descriptors, and so on and so forth.
Hypothetically speaking, if you choose to go a different route, for instance, creating a guitar riff on your own or another MIDI file, make sure your music is on time, which – as I demonstrated in my quantization guide – can be done either manually or with the quantizer function.
I would recommend using the 1/16 note option because I find it normally works best for most melodies.
Time quantizer settings at a level any higher than that, and you risk not snapping the notes to the grid as necessary, and any lower than 1/16, you’ll end up pulling notes too far away from their original position.
Before moving on to the next section, take note of the key signature of the loop or melody that you used. This part is going to come in handy when it comes to filling out the track a little bit more.
Using A Sample
My sampling article will show you exactly how to select a song from YouTube, cut out the part that’s necessary, and load it into Garageband’s sampler (if you don’t already know how to do it on your own).
When it comes to using a sample to create a backing track, the most important thing to remember is that you want the sample to fit within a particular number of bars.
For instance, I want the entire sample to be around 8 bars, or 4 bars, or 16 bars.

You want to be able to loop the sample over and over again that way the song stays in the same time signature the entire time, otherwise, you’re going to wind up with a sample where you can’t add drums underneath it.
Using MIDI or Tracking An Instrument
For this part, you’re going to need to know how to do a number of things, including tracking an instrument and creating your own melodies using a MIDI keyboard. In that case, I couldn’t recommend PianoForAll (from their site) enough because it’s a great way to learn the keys for music production.
It’s really not that difficult as I’ve shown in my guide on making a song in less than 10 minutes.
2) Use Garageband’s Drummer Track to Add the Rhythm Section
This is arguably the most complicated part of creating the backing track, because you may find it challenging to get the drums to play along exactly on tempo with the rest of the music, although, it depends on what type of melody you created and the time signature that it uses.
The drummer track, like Garageband’s Loops, comes with a cornucopia of options, including different drum kits, different styles, and so on and so forth, however, my guide does a great job of breaking everything down.
To sum it all up though, just select a drum kit that sounds good to you and match the number of bars of the drummer to the rest of the music.
Three Important Settings for the Drummer Track
1) Match the drummer’s style with the type of tune you’re creating
I would say one of the three most important things for creating the drummer track is to match the style of the genre with the type of music that you’ve just created.
For instance, if you’ve created an alternative-rock style acoustic guitar part, and you use the Punk Rock drummer, it may sound quite a bit weird.

Truthfully, this could be a great tactic for the purpose of unique compositions, however, we’re creating a simple backing track, not trying to create an entirely new genre.
2) Match the time signature of the drummer with the other music
As I mentioned above, the second part of the drummer track that’s important is ensuring your drummer is playing in the same time signature as your riff/loop/sample.
For instance, if your acoustic guitar riff is 4 bars, just go ahead and make the drummer track 4 bars, or some divisible of 4, for instance, 8 bars, 12, bars, or 16 bars.

In the case of the backing track that I created for this tutorial, I actually made the drummer track 8 bars. I found that it sounded the best with the rest of the track. Go ahead and experiment with this option to find what works best.
Sometimes, I find the drummer track will go a little heavy on the fills, even if you’ve turned them down in the interface.
This will make the drummer work a little more in synchrony.

3) Use the Follow Button to determine which instrument the drummer track follows
For the third part of the drummer track, decide whether or not you want the drummer to follow the main riff, sample, or loop. Go ahead and go into the Drummer Tracks’ “Configure Track Header,” and turn on the Groove track.

Once you’ve selected the option to turn on the Groove Track, you can decide on which instrument you’d like the drum kit to follow, simply by hovering your mouse over the left side of the Track Heading. You should be able to select the track by adding a star to it.
It’s worth mentioning that this function works best with the bass guitar. For instance, getting the drummer track to following the acoustic guitar or the lead guitar, in my experience, doesn’t sound that great.
Drums and bass typically work together but make sure to experiment.

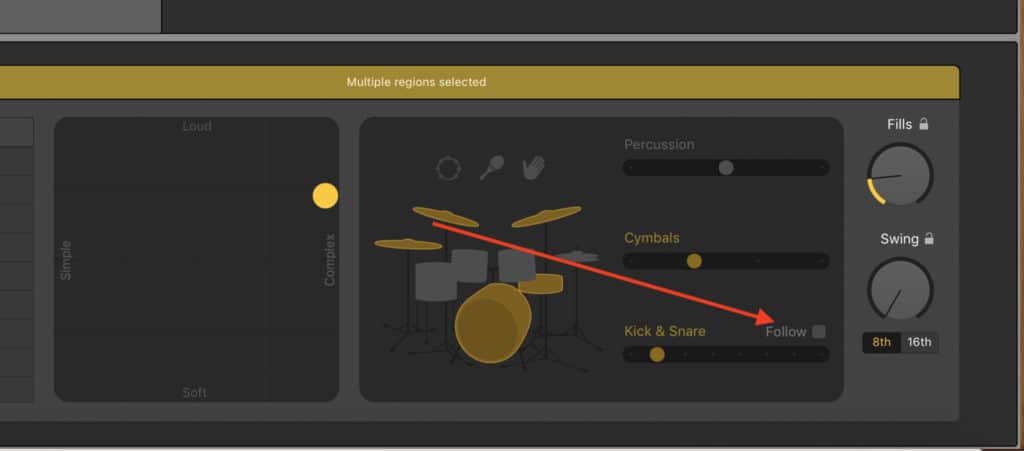
You can also get the Drummer Track to follow one of the instruments by selecting the “Follow” option at the bottom of the Drummer Track interface.
Go ahead and select and unselect the option, and you’ll notice the way that the drummer track changes its sound to either go along with the primary instrument or not.
Another thing that you can do with the drummer track, is that you can actually take the track region, copy it, and then paste it into a new software instrument track and edit the notes of the drummer track on a note-by-note basis to really customize it and get it to sound the way that you want.
This has the added benefit as well of helping you understand what the programming of a drumming sequence actually looks like.
3) Fill out the song with arpeggiators, synths, and other instruments, using the copy/paste function.
Earlier in the tutorial, I stated it was important to take note of the key signature of the song that you used, and it’s for this part of the tutorial here. If you know the key signature of the song, you should have a good idea of what notes are going to sound good with the rest of it.
For example, in this particular case, the Acoustic Guitar loop is in the Key Of B Major, so I know the notes of the B Major scale will probably sound quite good.
My music theory knowledge is intermediate, however, I know what the B Major scale looks like on the guitar. If you don’t know, just go ahead and Google-search the notes of the particular scale you need to use.
For instance, if the song is in the Key of D Major, look up what that scale looks like.
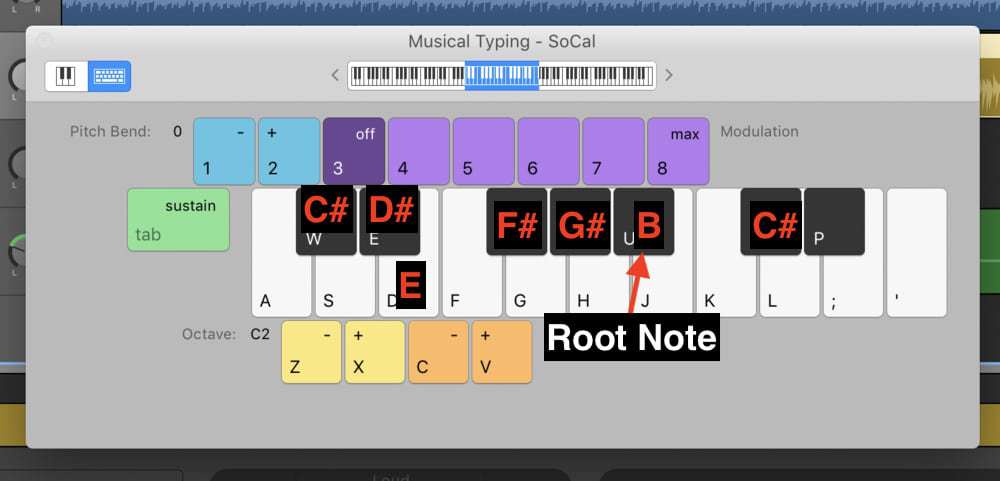
In my case, I used the B Major Scale, whose notes are the following:
B, C#, D#, E, F#, G#, A#
I know it looks like this on Garageband’s Musical Typing.

As long as I play one of those notes, the lick will likely sound quite good.
In the case of this backing track, I used two different instruments for the song, including the flute and the guzheng. I would say they are some of my favorite instruments to use. They sound great and do the job well.
For the flute, I just did a nice little hammer-on and pull-off in the beginning and descended down to the low F#.
You can see what the MIDI Region for this looks like in the image below:

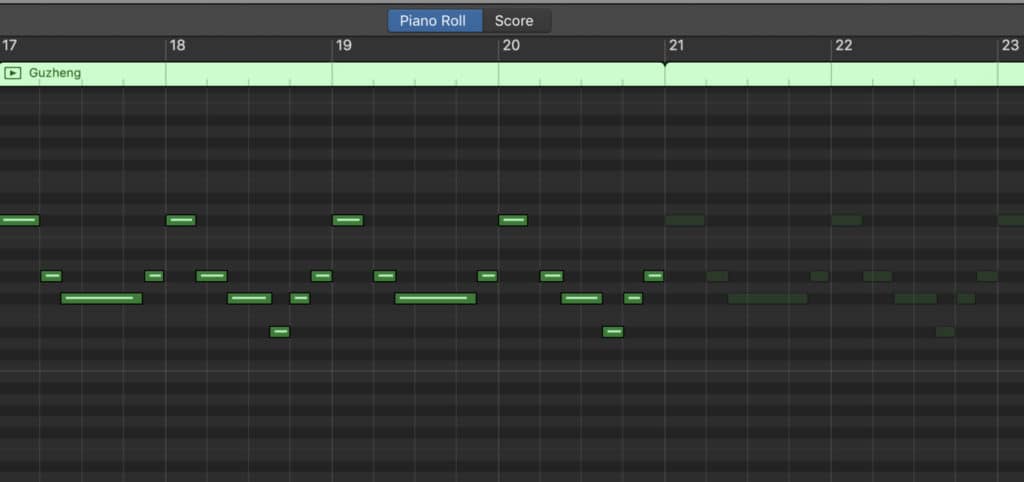
For the guzheng, I used a similar idea, except it’s performing even more of a back-up function, rather than as a primary melody. It was created just to add a little bit of flavor to it, and that’s about it.
Check out the image below of the MIDI Workspace to get an idea of what I did.

4) Pan the instruments
This final step is probably the least important, but it’s going to make for a more spacious mix, that way everything comes from the right place and sits in the right spot of the mix.

Moreover, if you pan the instruments in such a way where everything is spaced out using my guide as a reference, you’re going to have a lot more room for the instrument you intend on jamming with, whether it’s the bass guitar, guitar, flute, or whatever instrument you play.
When it comes to panning, I try to put every part of the instrument in a slightly different spot, sometimes I might even pan the drums ever-so-slightly to the left or right, and the primary melody, in this case, the guitar, to the left.
For the complementary instruments, the Guzheng and the Flute, I pan them much harder to the left and right. Just a tip for panning: make sure that you don’t accumulate all of your instruments in one spot. That is a great way to make a weird-sounding mix.
5) Put the song through a “Mastering” phase
I already have a very in-depth article on mastering and how to go about it, however, we’ll explore some of the key things that need to be done right now.
a) make sure none of your instruments are clipping (going into the red) or exceeding +0.0 dB, which is the point of distortion. Leave lots of headroom, usually around -10dB is perfect.
b) Don’t have any plug-ins running on the master track channel. It’s ok if there are plug-ins running on each individual software instrument track, however.
c) Have the Master Volume fade of the track set at +0.0dB
d) Export the track as a .aif file.
e) Open a new Garageband Project File, and then drag and drop the new track into the interface.
f) Put on the following plug-ins on the master channel of the track, Compressor, Channel EQ, and a limiter.
Compressor setting: Platinum Analog Tape
Channel EQ: Rock/Pop Setting
Limiter: Output = -0.1dB and Gain = +2.0
g) Turn up the Master Volume Fader on the track to around +2.0dB. I find this is the perfect amount of volume.
h) Share it to iTunes or export it as an mp3 to your desktop, and when you’re finished.
And voila! You’re done with the backing track.
Make sure to check out the YouTube video tutorial to hear the final product.
YouTube Video Tutorial
Now, we’re going to explore how to go about doing this in Garageband’s iOS.
How To Make A Backing Track Using Garageband in iOS
There are a few differences between Garageband on Mac and on iOS but the functionality is ultimately quite similar, and the principles behind creating a backing track are essentially the same, so it’s not that big of a difference.
For that reason, this section is much shorter.
To make a backing track in iOS, you don’t have access to the drummer track, however, you can still use Drum Loops which sound great.
- Choose Loop
- Use Another Instrument to Fill Out the Song
- Choose the Drum Loop
- Export the File for “Mastering”
1) Choose a Loop.
For this section, I chose the Cheerful Mandolin Loop. I just kept it at 2 bars.
2) Use another instrument to fill out the rest of the song.
At this point, I just used a very simple piano melody consisting of 4 notes in the key of C Major.
3) Choose the Drum Loop that you want
I used the Bar Band Basic Drumset 01 loop.
If you want to hear what this sounds like, make sure you check out the YouTube video above.
Conclusion
That’s all for this tutorial today. As you can see, creating a quick backing track to jam over is pretty easy. Ultimately, the backing track you created can also be an actual song.
It would be great if you shared this on your social media, cheers.


 Written By :