Because MIDI has been around for almost 40 years now, a lot of the very old keyboards and drum pads that use it from the 1980s work just fine today. Moreover, the basic process of creating MIDI is generally universal across most DAWs and hardware, however, there is one simple way to summarize how it’s done.
To make MIDI
1) Use a DAW that can create, edit, and modify MIDI files
2) Select a software instrument
3) Draw notes using the piano roll or a MIDI controller
4) Use playback to hear what you’ve made
Another way is the MIDIEditor application (for Windows/Linux), or an online conversion tool.
1) How to Make MIDI Using A Digital Audio Workstation
A) How to Create MIDI With Just the Piano Roll in FL Studio
To create MIDI, the first thing you need to do is download a DAW. If you’re using an Apple product (iOS/macOS), then check out my article on how to download GarageBand for free. Logic Pro X is the premium version of GarageBand, and the price reflects that.
Another DAW you can get that’s actually compatible with both Windows and macOS is FL Studio – Fruity Edition. The Fruit Edition is honestly quite limited though, so I’d recommend dropping the extra $100 and buying the Producer’s Edition instead.
Once the download has been completed, install the application onto your computer and then open it so you can get started. The first way of creating MIDI we’re going to explore is with FL Studio, so let’s do that right now. Pay attention because the core concepts detailed here are applicable for most DAWs, so it’s worth reading through.
i) Create an Empty File in FL Studio
The first thing you need to do is create a new empty file. In FL Studio, select File > New from Template > Minimal > Empty.

I generally start with an empty template regardless of the DAW, for instance, I use empty templates with GarageBand as I also do with FL Studio as well.
The next thing you want to do is add a VST (virtual software technology) which is just a computer imitation of a real-life instrument.
ii) Use The (F6) Shortcut to Bring Up The Channel Rack
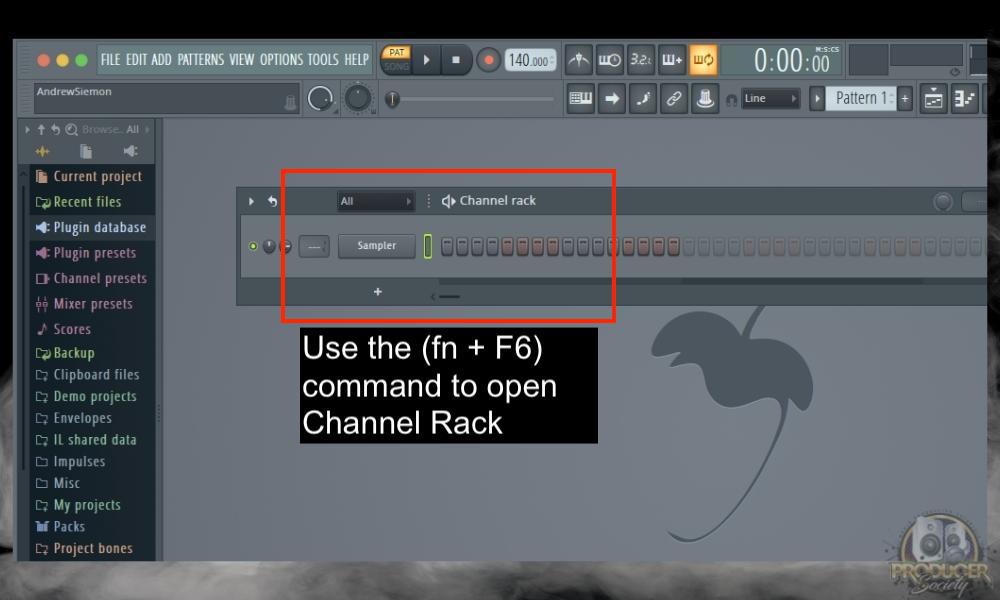
Use the (fn + F6) command shortcut to bring up the Channel Rack (just F6 for Windows). Once it has appeared, you can add a VST or a plugin of some kind to the Channel Rack in a couple of ways.
The first way is to click the “+” button like I’ll show you in a second. The other way is to right-click the plugin slot > click on Replace > Open Plugin Picker/More Plugins > then choose what you want from the list. But for the sake of simplicity, we’ll just use the first one for now.
iii) Add A VST to the Channel Rack by Clicking Add New Channel
Add a VST instrument to the channel rack by clicking the Add New Channel button. It’s the icon that looks like the little plus “+” symbol.
To keep things simple, just select FL Keys for now which is like the stock VST piano that FL Studio comes with, similar to GarageBand’s Steinway Grand Piano (I actually think GarageBand has a better stock piano than FL Studio).

You should now see something like the image below. Go ahead and close the FL Keys VST window for now if you want.

IV) Click on the Default Pattern (Pattern 1) in the FL Studio Playlist
Next click on the default pattern in the FL Studio Playlist. It will become highlighted at this point, which means it’s selected. It’s the part that says “Pattern 1” and is highlighted with a yellow rectangle.

V) Right-Click the FL Keys Channel in the Channel Rack to Bring Up The Piano Roll
Now you’ll right-click the FL Keys channel in the Channel Rack. In the menu that appears, select the first option, Piano Roll. This will open the Piano Roll for the VST instrument that is assigned to Pattern 1.
Another super simple way of opening the Piano Roll is to actually use the (F7) command. If you’re using macOS, use the command shortcut (fn + F7).

At this point, you should see the Piano Roll. Notice the piano keys and the grid. These piano roll components are pretty standard across DAWs including GarageBand which I also have a guide on. The cells are where you’re going to draw the piano notes.
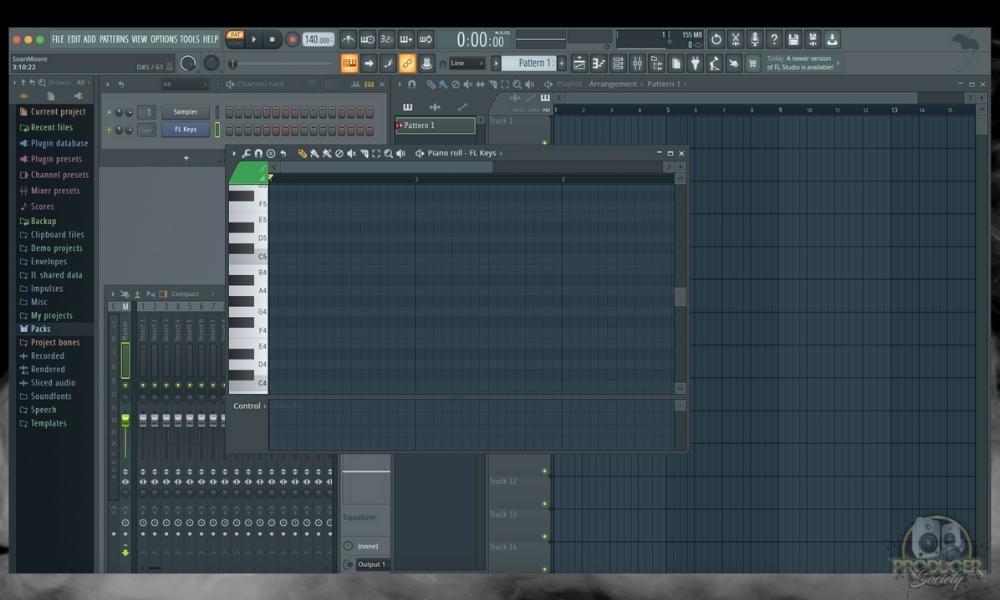
There is a toolbar along the top of the Piano Roll window. FL Studio automatically selects the Pencil tool, so you can simply click a grid cell to create a note as I just mentioned a second ago.
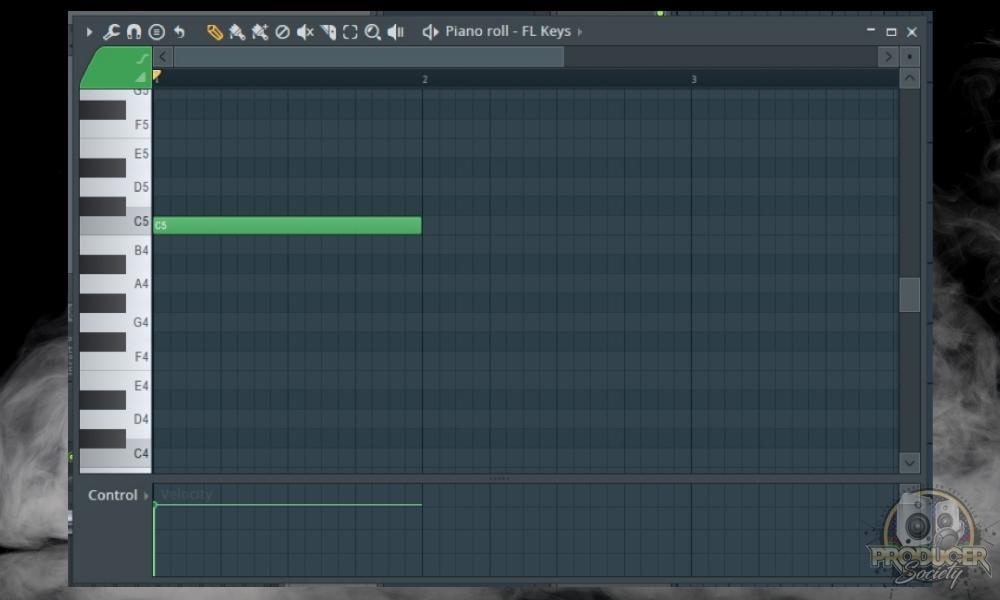
The note that you draw will play once as you click the mouse. Press the space bar to hear all of the notes played in order as a loop. Editing MIDI is as easy as changing the lengths of the notes and moving them around the grid. To delete a note, simply right-click it once.
As mentioned, this process is pretty universal across DAWs. For instance, it’s practically the same thing in GarageBand, it’s just that you have to use different shortcuts and commands to make it happen. For instance, to bring up the pencil tool, you have to use the (Command + Click).
B) How to Use A MIDI Keyboard to Create MIDI
Using a keyboard is a quick and expressive way to create MIDI. The two main components are the DAW and the MIDI keyboard. Refer to the How to Create MIDI With Just the Piano Roll section above to obtain a DAW if you haven’t already done so.
This article assumes you’ve already connected your MIDI keyboard to the computer and got it communicating with the DAW. If you haven’t done that, use my guide on how to connect a MIDI keyboard or watch this short video tutorial down below – it’s for GarageBand, but the same concept works regardless of DAW.
For this section, I’m going to show you how to do it in FL Studio just to stay consistent with the rest of the article.
i) Create A New Empty Project

First, create a new empty project in your DAW the same way that I showed you before.
ii) Open A Virtual Software Instrument
Next, add a VST instrument to the new project. In FL Studio, you do this by bringing up the Channel Rack with (fn + F6) and then clicking on the “+” symbol.

After that, you’ll want to choose a plugin from the list or use the “More Plugins” button on the menu. You can do it with the File Browser on the left-hand side as well.

iii) Connect A MIDI Keyboard
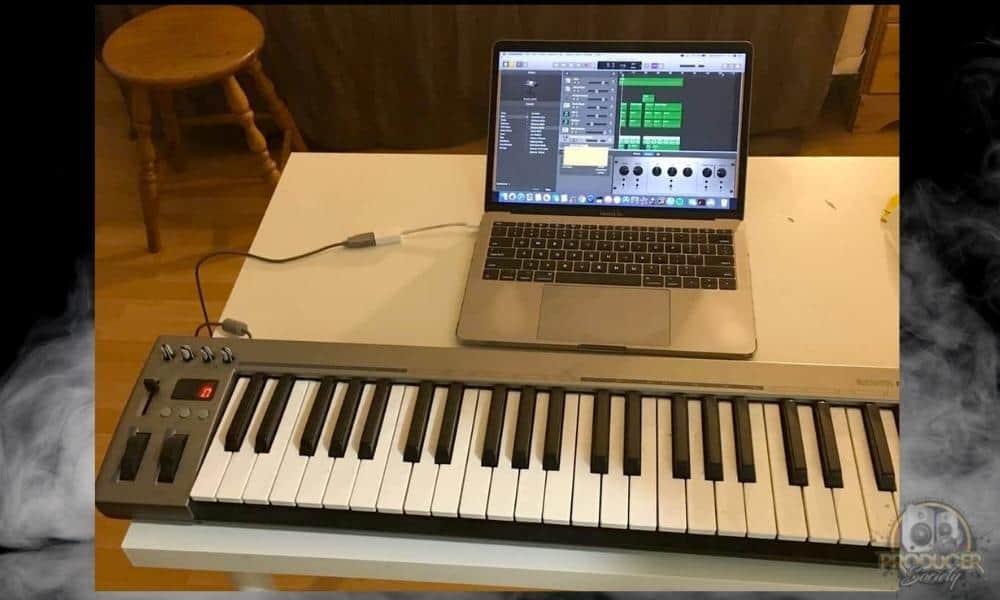
Assuming you buy the right type of MIDI keyboard, there shouldn’t be any problem getting FL Studio to recognize the keyboard. However, if you run into issues, go into the FL Studio settings and set everything up the way that I’ve shown down below:

This time instead of using the mouse to create MIDI notes you’ll use the MIDI keyboard. The easiest and most simplistic way to accomplish this is by recording the MIDI as you play it in real-time. That’s if you actually know how to use a keyboard anyway.
For some people, they might actually prefer to draw the notes in one at a time, but then this wouldn’t be with a keyboard, however. I know people like Deadmau5 prefer to do it this way.
IV) Press Record and Start Playing The MIDI Keyboard

Locate the main record button in the DAW. Select the VST. Press record and begin playing the MIDI keyboard. As you play the keys on the MIDI keyboard corresponding notes are written to the Piano Roll. When you’re done playing the keyboard press the stop button.
The keys that were played are automatically drawn to the grid in the Piano Roll by the DAW. To hear the MIDI notes click the play button in the DAW. The MIDI will usually loop by default.
V) Use the Space Bar Or Click the Red Record Button to Stop Recording
In GarageBand, you use the space bar to stop recording. The same thing works for FL Studio, although, you’ll have to press the red Record button to stop the recording. In FL Studio, it will play the clip back again when you press the space bar.
Unless you’re a great instrumentalist, the MIDI pattern that was recorded will most likely require some editing and clean-up. This is usually done using the mouse, however, quantization (which I have a guide on here for GarageBand) is a super-fast way of doing it.
I’ll be sure to make one for FL Studio soon enough. One thing I will say about recording MIDI in FL Studio is that it takes a minute to get used to if you’re used to a DAW like GarageBand or Logic Pro X.
C) How to Use A Drum Pad to Create MIDI
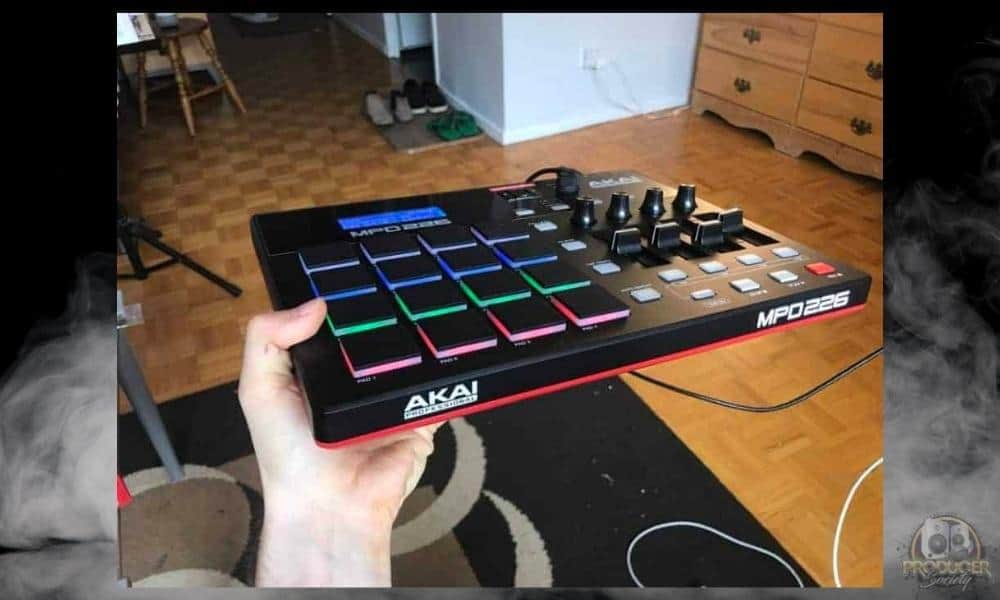
MIDI can be created with drum pads that are on a standalone unit or a keyboard. For instance, I use the AKAI MPD 226 (which I got on Amazon) and the keyboard I currently have is the Acorn Masterkey 49, although, I’d recommend getting something like this instead of the Oxygen Pro Series 49 (on Amazon).
As I said before, connecting a drum pad is the exact same process as connecting a MIDI keyboard, so it’s not really worth diving into. You just need a USB 2.0 cable – or a thunderbolt cable if you have a brand new MIDI keyboard that just came out in the last couple of years.
That said, if for whatever reason, you’re unable to get the drum pad to work, there could be a few issues that are hard to figure out at first. This advice applies to the MPD226 specifically, but I imagine it’ll be the same for other devices. If you’ve properly connected your device and it’s not triggering notes:
- Use a different Preset on the drumpad to see if it changes what notes are
- Use a different Pad Bank
- Try a different VST or plugin
Simply put, some VSTs are programmed differently than others, so the first kick may be on C1 on one plugin, but on another it’s C3. In GarageBand, for example, C1 is usually the first kick, but in the Drum Pro plugin, most of the notes start in the 3rd octave (C3 – C4)
i) Launch the DAW and Create a New Empty Project

First, launch the DAW and create a new empty project. This is the same process as shown above, although, we’re going to use GarageBand this time.
ii) Create A New VST Instrument in the Project
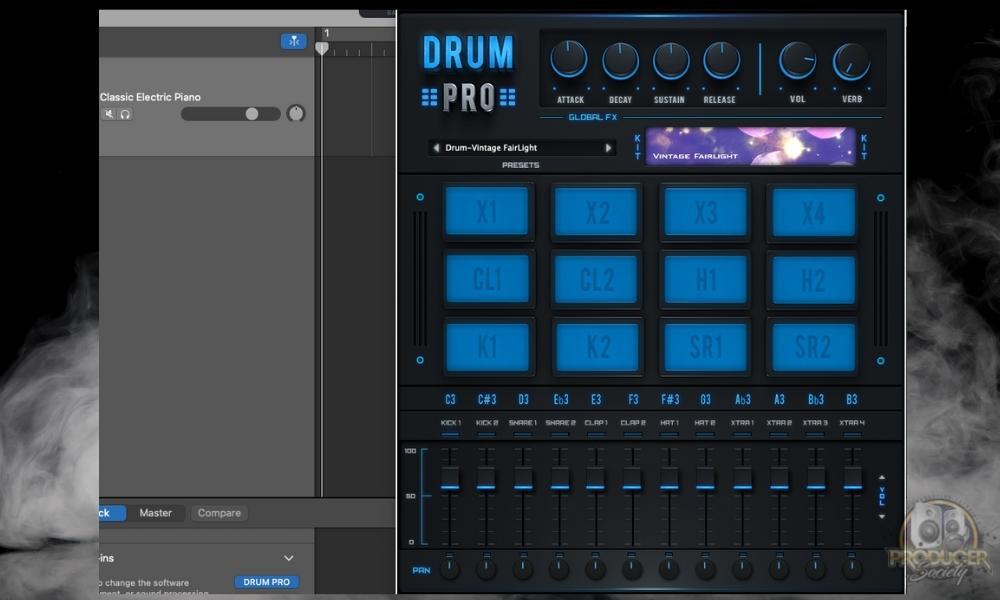
Then, create a new VST instrument in the project. Again, take a look at the process above for how to do this in FL Studio.
Make sure to select a VST instrument that’s specifically designed for drums, although, a drum pad is just a MIDI instrument so you could use it to play other instruments if you wanted to.
As a matter of fact, this is precisely what people do when they load chord samples and other melodic sounds onto the drum pad. Let’s show you how to create MIDI notes by assigning samples onto the drum pad as well.
(Optional) – Assign Samples to the Keyboard in GarageBand
A MIDI Drum Pad like the AKAI MPD 226 works pretty well with GarageBand. Moreover, if you know how to assign samples with the sampler as I showed in my guide, then you can program it to do all kinds of things for you. It’s really not too hard, you just have to use the AUSampler.

(Optional) – Assign Samples to the Keyboard in FL Studio
There is at least one stock drum machine VST in each DAW. FL Studio has two that are pretty cool: DrumMaxx and FPC. Both of these have similarities to each other and also to the ones found in other DAWs. Use FPC to keep things simple. My guide here will show you how to program it as well.
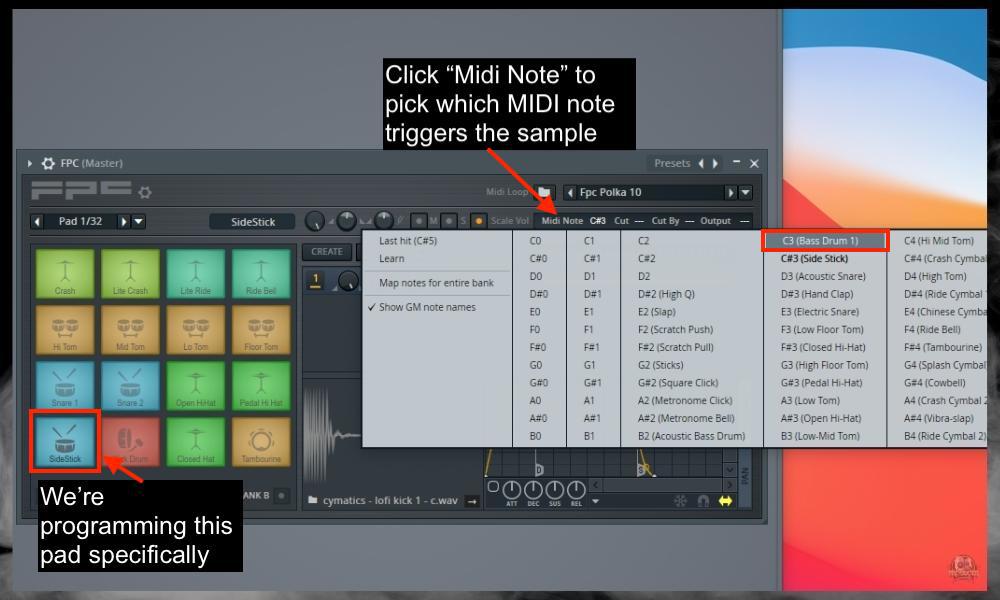
The individual drum sounds are grouped together into kits. Each button on the drum pad will trigger a different drum element in the kit. This setup essentially models a hardware drum machine or loosely a drum set.
(Optional) – Using the AKAI MPD 226 Editor To Change CC Programming
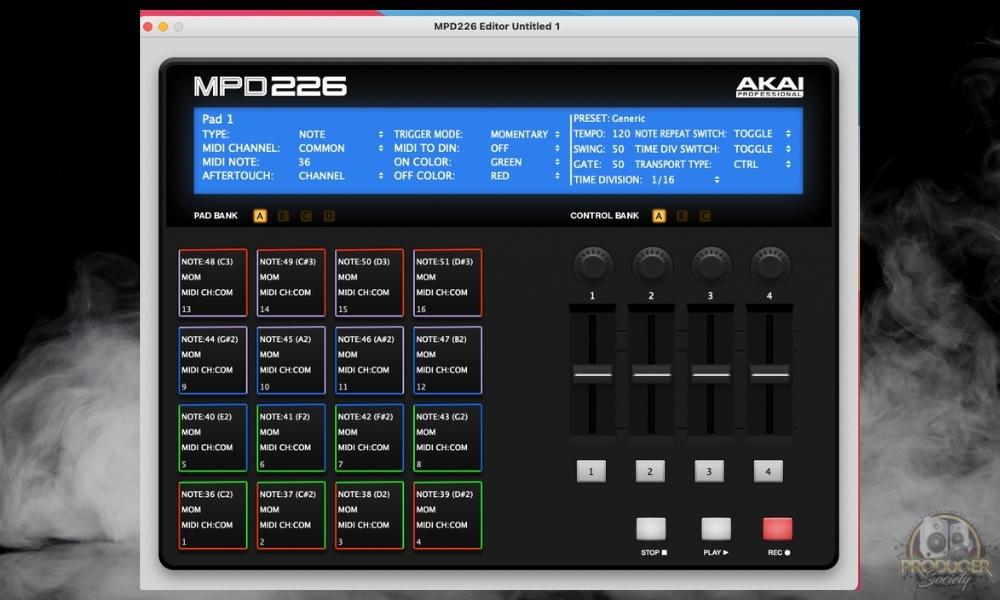
In simple terms, you can change what notes are triggering what sample with the MPD 226 Editor. As I said in the image’s caption, most drum pads will come with a tool like this in case you need to change things around.
Admittedly, I haven’t used this much because I find it’s easy to get around having to program it, just by using either the Sampler or by using a different Pad Bank or Preset on the Drum Pad.
iii) Press the Record Button and Smack the Drum Pads
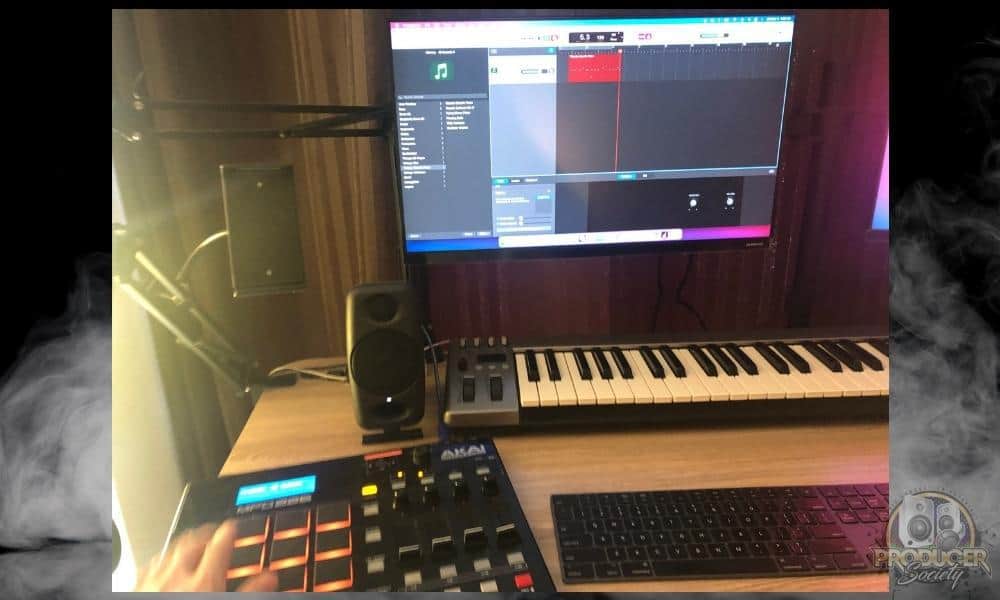
Next, click the record button and start playing the drum pad. When you’re done playing, click the stop button.
To hear the drum loop you just created with the drum pad click the play button in the DAW.
You should hear the notes you recorded playing back as a drum loop. Because MIDI is just a packet of instructions rather than a recorded sound (like I explained in my guide to the pros and cons of MIDI), you can change the drum kit for pre-existing patterns.
Most of them contain similar drum kit parts for each button. It can be a quick way to change the vibe of a track, and it’s something I do all of the time, as many others do as well.
D) Using the MIDI Guitar 2 Or Alternative MIDI Controller
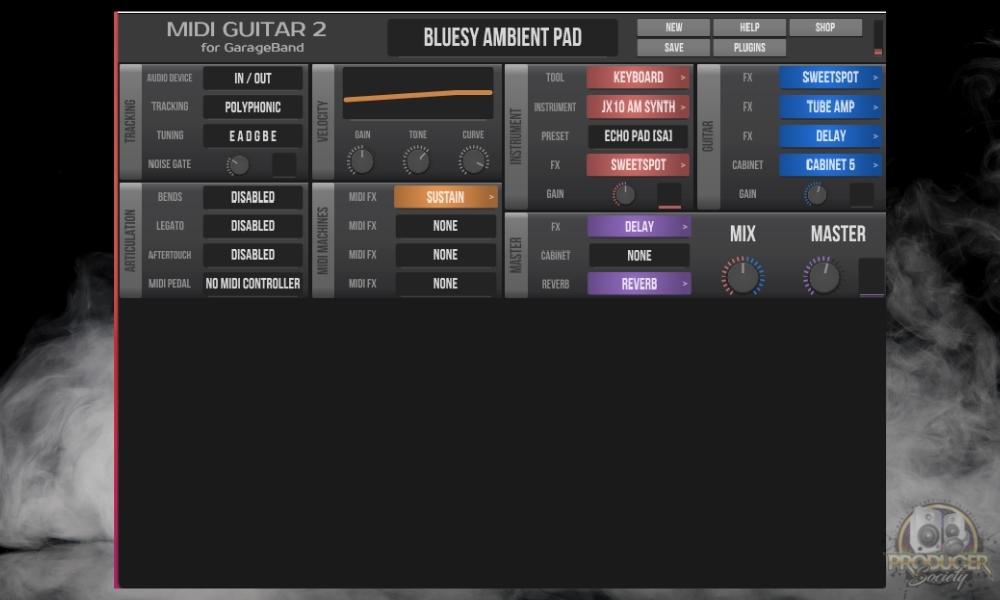
There are other kinds of MIDI controllers beyond keyboards and drum pads. Some of them are modeled after real-world instruments and others are a brand new design. The JamStik MIDI Guitar, for example, is a cool new device.
Another super cool one is the MIDI Guitar 2 for GarageBand that’s shown in the image above, but there are many others too. There’s also a MIDI Guitar 2 – from the same company – that’s designed for use in all major DAWs.
Although, MIDI Guitar 2 for GarageBand seems to work with most DAWs too. For instance, I’ve seen people use it with Ableton, I’ve used it with FL Studio, and it obviously works with GarageBand too. If that’s true, Logic shouldn’t be a problem either.
How to Use the MIDI Guitar 2 for GarageBand (Ableton, FL Studio, GarageBand, Logic)
- Note: The MIDI Guitar 2 I linked is also a great option. They have a free trial on their website.
i) To get the MIDI Guitar 2 for GarageBand, you just have to download it from the App Store
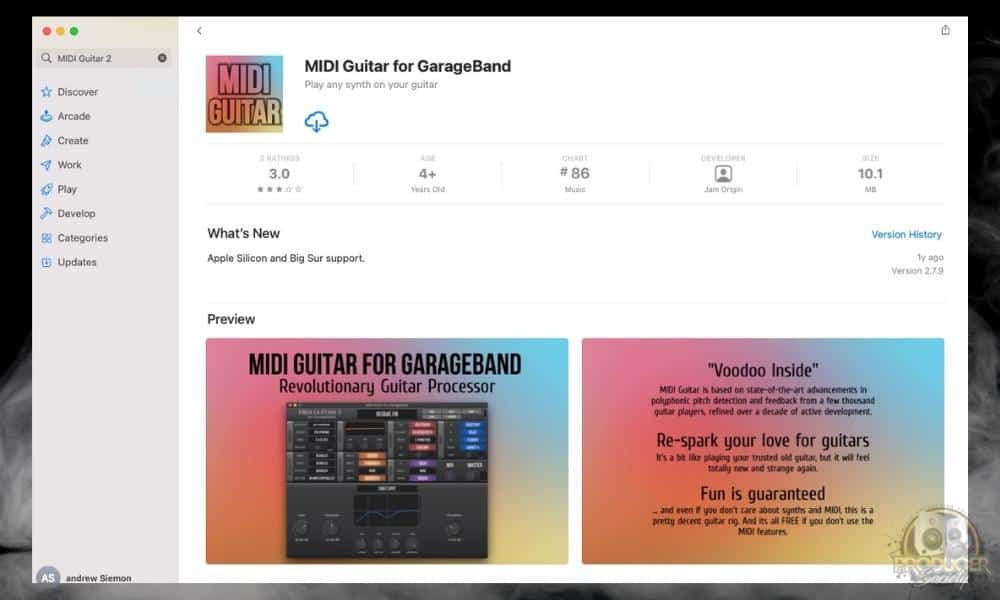
The first thing you want to do is go to the App Store and then download MIDI Guitar 2 for GarageBand. Pretty self-explanatory.
ii) Connect Your Guitar to Your Audio Interface
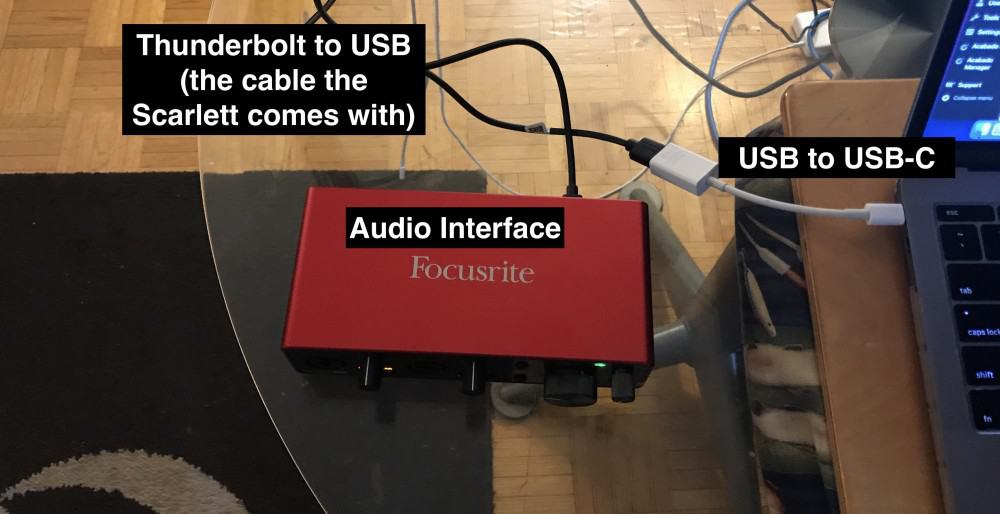
Then, connect your guitar to an audio interface like the Scarlett 2i2 (on Amazon). I won’t turn this tutorial into how to connect a guitar, so just have a look at the image below and follow the steps.
iii) Open Your DAW and Choose Your MIDI Instrument
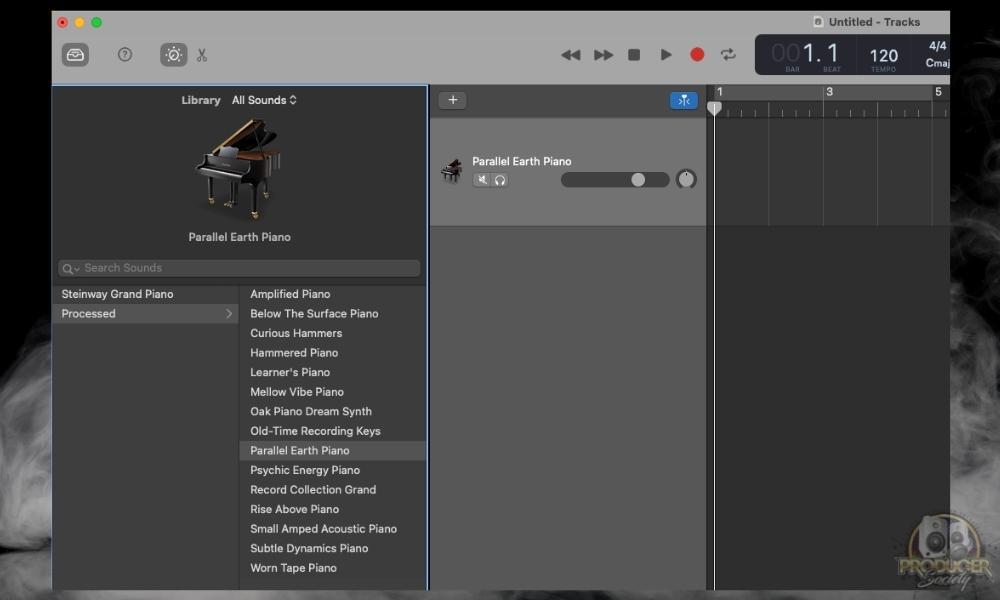
After that, go into your DAWs settings and set it up so the audio interface is your input and your speakers are your output device.
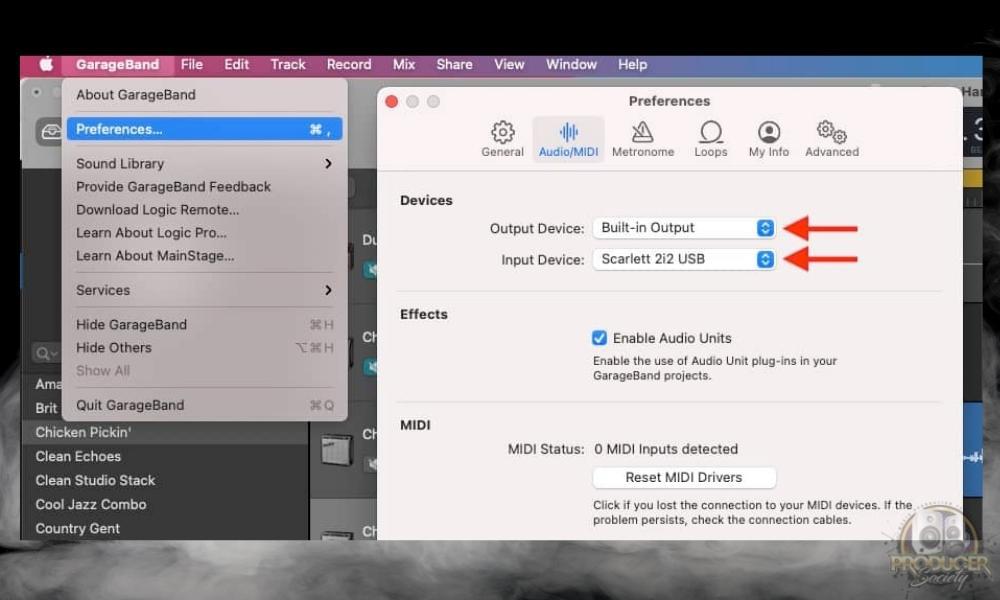
For FL Studio, it’ll look something like what’s shown down below instead. Although, I would open MIDI Guitar 2 before you connect your guitar if you’re using FL Studio. For some reason, it makes a weird noise when you switch on MIDI Guitar 2 for GarageBand with your guitar connected and FL Studio already configured.

IV) Open MIDI Guitar 2 and Select “External MIDI Output” from the Presets
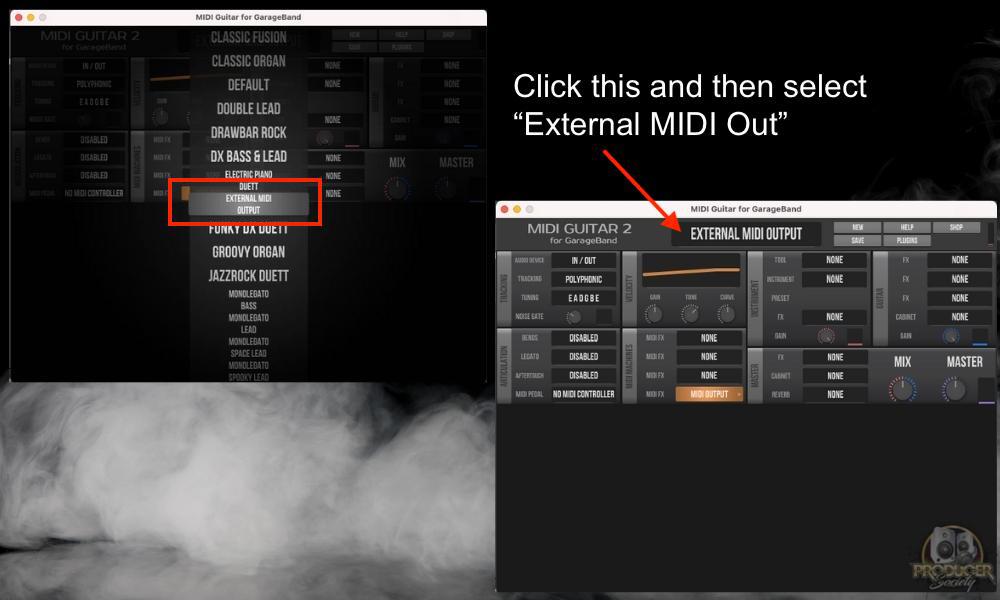
Again one of the most amazing parts of MIDI is the notes that were recorded can be mapped to just about any VST instrument. An amazing guitarist could hear what the MIDI they recorded sounds like as a Piano, Cello, or Piccolo. The possibilities go on and on.
What I just showed you are the 3 most common ways of making MIDI in a DAW. The first is just by drawing notes in with the piano roll, the second is with a MIDI keyboard/controller, and then the third is with some other kind of controller like a MIDI guitar.
There are actually other ways of making MIDI though, including the MIDI Editor website, conversion tools that transform audio to MIDI, and more. Let’s get into that now.
2) Use The MIDI Editor Application (Windows/Linux)
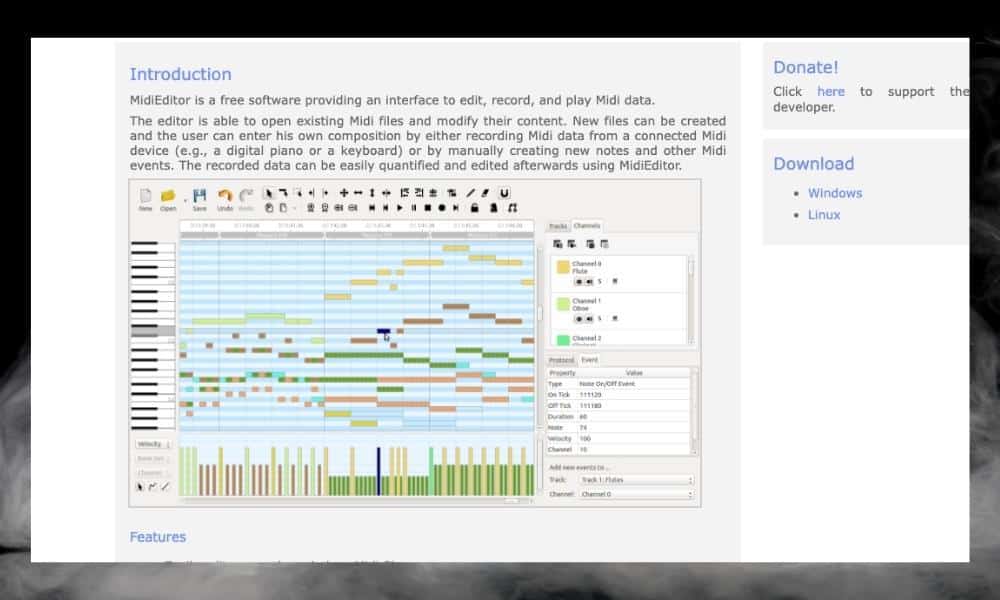
MIDIEditor is a lightweight, free application for Windows and Linux (unfortunately, not for macOS). But don’t be fooled by this little app. It’s a great way to begin exploring and working with MIDI. You can get your hands on it through their website and It’s a relatively quick download.
How to Create MIDI with the MIDIEditor
Once you’ve installed the application, open it up and take a moment to look around. You should definitely see the pattern between all of these MIDI programs at this point. As I’ve explained in great detail in my article, MIDI is used across many audio workstations and devices because it’s a technological standard that everyone has adopted.
i) Open The Application and Use Your Mouse (Pointer/Track-Pad)
The easiest way to create MIDI with MIDIEditor is to use the mouse. Once you’ve created a MIDI note the instrument can be changed using the Channels tab on the right side of the interface. This is a bit different than the way DAWs work with VST instruments (here’s a brief YouTube tutorial on how to use it by the way).
ii) Use the Piano Roll, MIDI Keyboard or a MIDI Controller
Editing MIDI using this software is similar to a DAW. Changing the length of notes, adding, and removing are all basically the same. MIDIEditor also works with MIDI keyboards, so you’re not limited to a mouse.
iii) Click the Play Button to Hear What You’ve Recorded
Next, click the record button and begin playing the MIDI keyboard. The notes that you play will be drawn into the MIDI editor grid. Click the play button to hear what was just recorded.
Important Tip: Make Sure Your Audio Interface And Controller Are Configured
If you want to try your MIDI keyboard ensure that your sound card is set up properly. Go into Settings and then check under MIDI I/O. You should see your sound card listed; make sure the checkbox next to it is checked.

3) Use Melodyne 5 to Convert Audio to MIDI
Melodyne 5 is a very useful piece of technology. Technically, it’s a “pitch correction software” application and it does that for sure, and extremely well, I might add. You can also use it as a standalone application or a VST.
I’d recommend getting the Studio version from Plugin Boutique because it can do everything (my guide on Melodyne). The standalone version is useful for extracting MIDI data from pre-existing audio files, although, the plugin version can do it just fine as well.
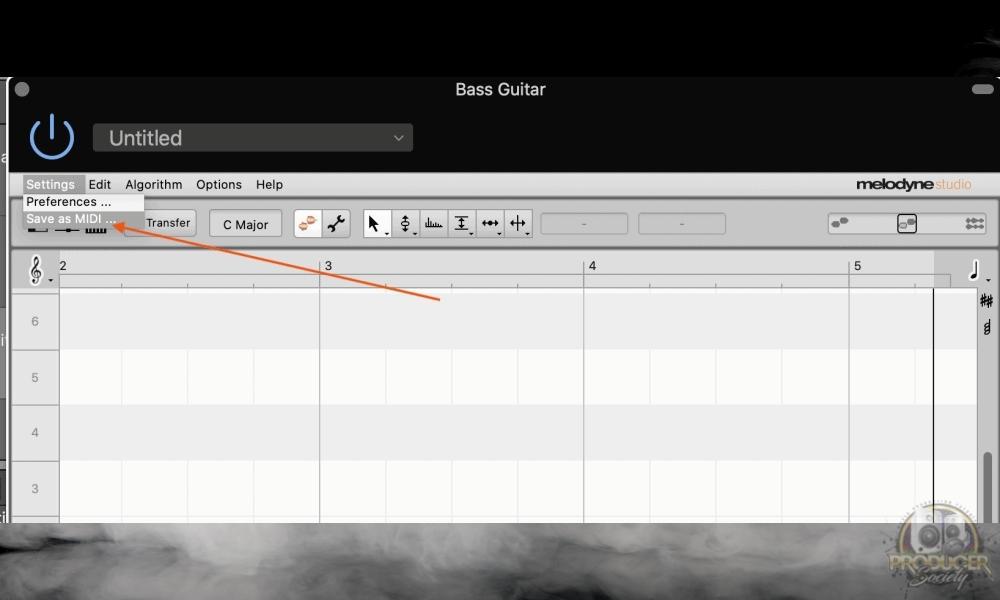
Let’s say that you just need a tool to convert audio files into MIDI, however. If that’s the case, I’d recommend downloading the trial version from their website and using it for 30 days until it expires. Go ahead and do that, and then follow the tutorial shown below to convert audio into MIDI.
How to Use Melodyne 5 to Convert Audio files into MIDI
i) Open Melodyne 5 On the Audio Track
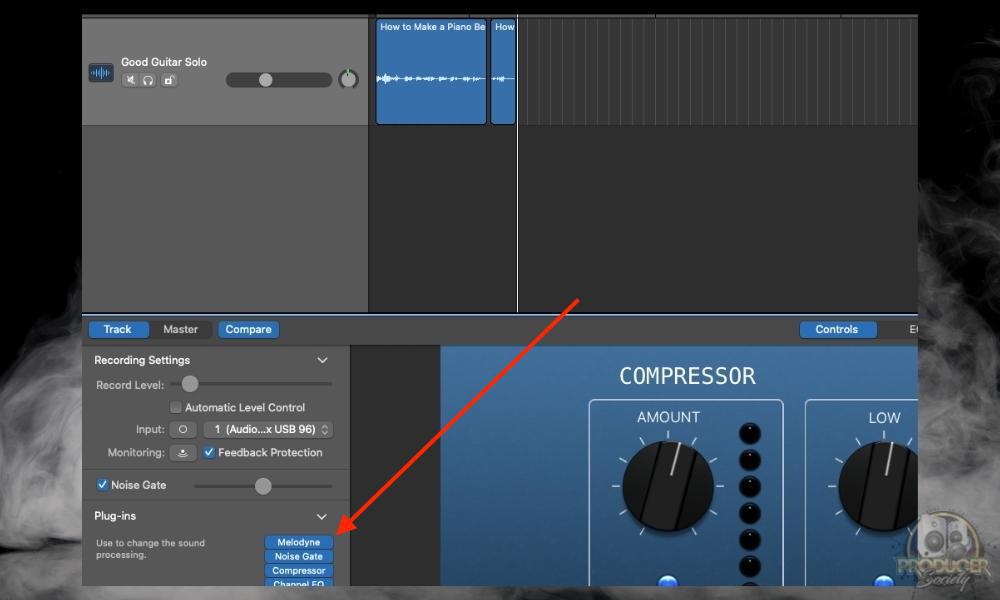
The first thing you want to do is load up the plugin in your DAW. In this case, I’ve chosen GarageBand because that’s normally where I use Melodyne. It works just fine in FL Studio though.
ii) Hit the “Transfer” Button and Record the Audio Into Melodyne 5
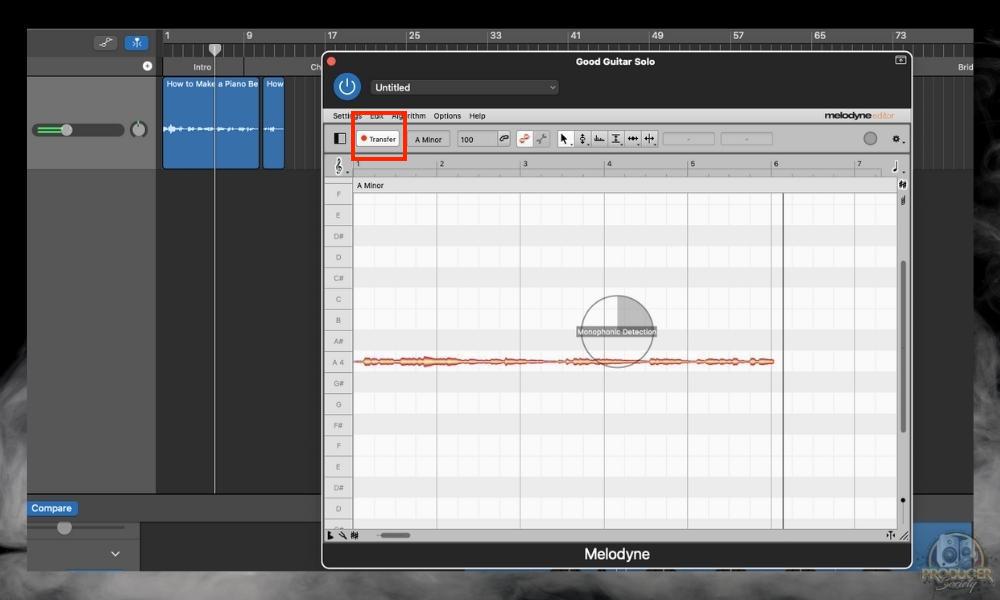
You have to actually press the Transfer button and then press “Play” in your DAW. This will literally transfer the information into Melodyne. Once you’ve finished transferring the audio into Melodyne, press “Stop” in your DAW to stop the transfer and playback process.
iii) Click “Settings” > “Save As MIDI”

Press on Settings as is shown in the image above, and then select “Save as MIDI” to start this process. Very simple stuff.
IV) Choose A Name for the File and Save It To Your Desktop

Make sure you save it somewhere like your desktop because you don’t want to have to search all over your computer later to find it.
V) Find the File on Your Desktop

Important Tip: Many premium DAWs like FL Studio and Logic Pro X actually have the ability to export files as MIDI, so you don’t necessarily need to use Melodyne or another external software. Here’s one tutorial on how to do it with Logic and I have a section down below where I show you how to do it in FL Studio.
4) Create MIDI With Code

For those who have programming experience or want a deeper understanding of MIDI, it’s possible to go to the code level. This is a complex topic but very interesting and useful for technically-minded musicians.
The details far exceed the depth of this article but this one here could maybe help you. I have no idea how to do this kind of thing, but I’m sure there are many people who know how to do it at this level.
5) How to Convert Audio to MIDI With An Online Resource
Just as there are ways to convert midi to audio, there are also ways to do the opposite with online conversion tools. Let’s take a look at the first one which is the Bear File Converter – Audio-Convert is also a great one.
Bear File Converter
This tool which can be found on their website will convert an MP3 file into MIDI. My writer and researcher found Bear File converter, however, I actually prefer Audio-Convert because it can turn AIFF into MIDI.
i) Open the Bear File Converter Tool
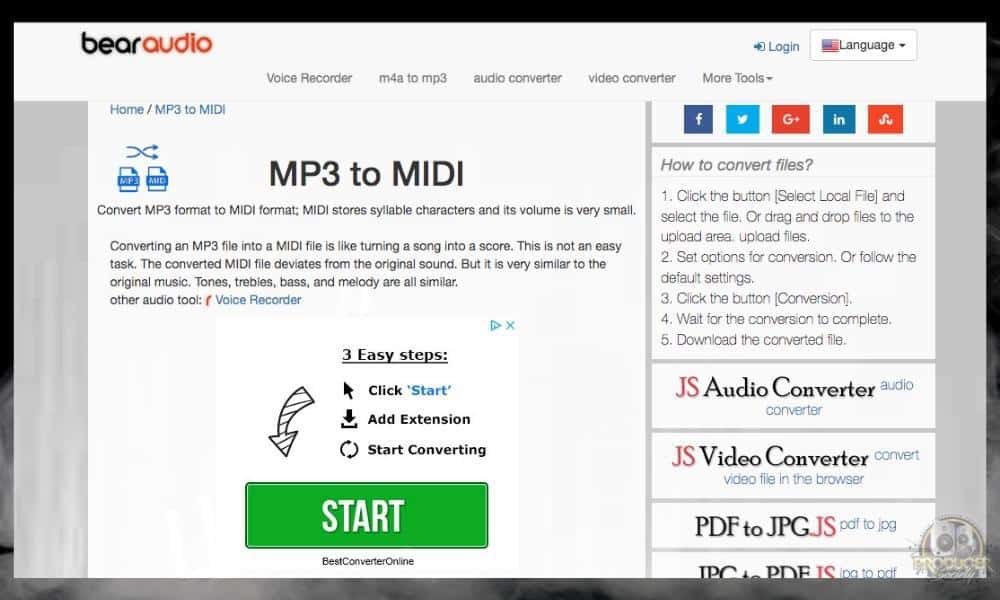
Open up Chrome and navigate to the URL shown above.
ii) Locate the Conversion Tool User Interface

Ignore the area with the giant green button. It’s just an advertisement. Scroll down the page until you see the box that says “Drag and drop files here.”
iii) Select the Audio File to Convert
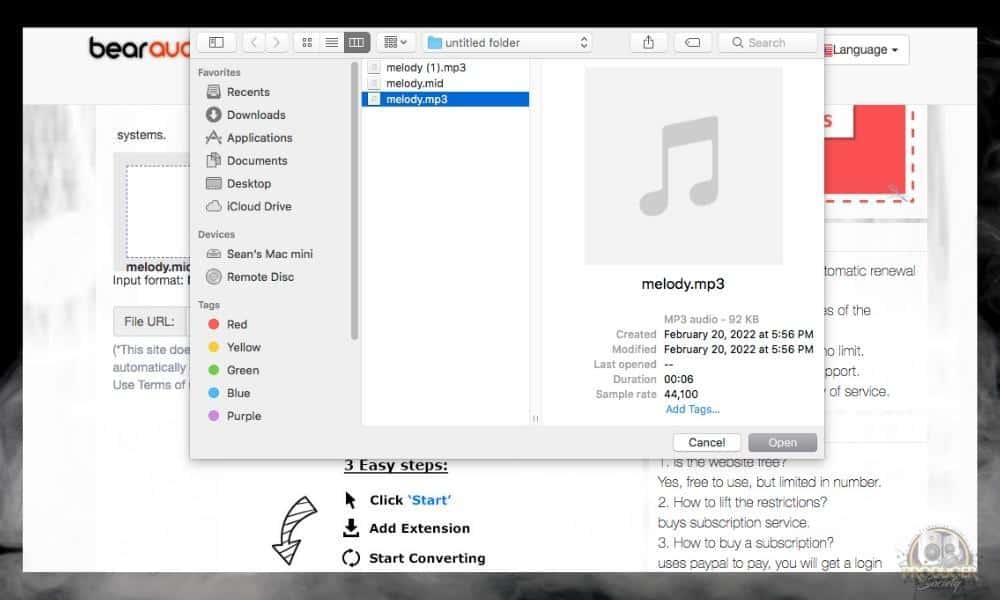
Navigate to the directory with the MIDI file using the operating system file explorer. Or, just click the “Select a local file” button.
IV) Convert the Audio to MIDI
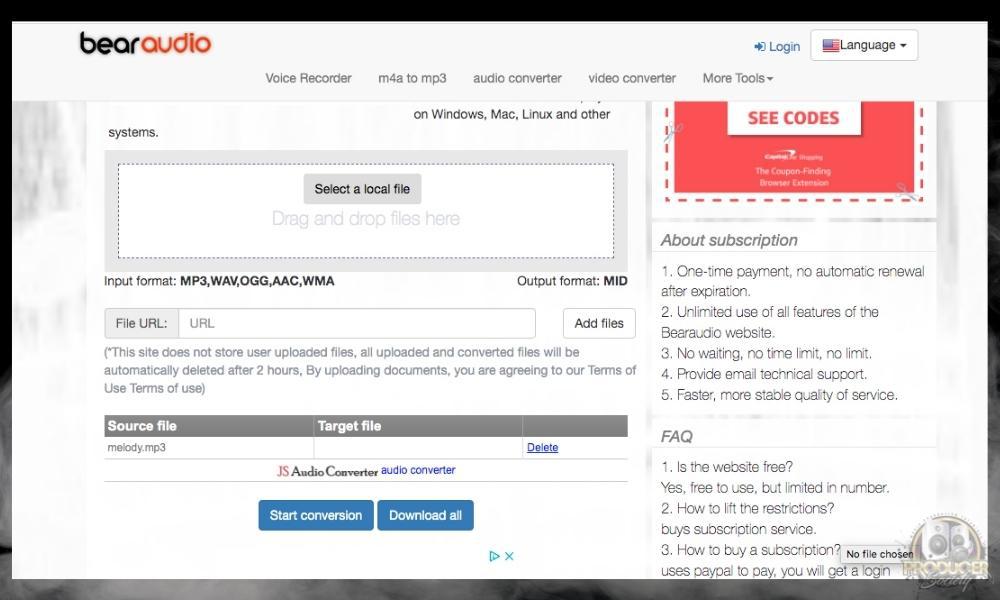
Once the MP3 has completed uploading click the “Start Conversion” button. This will begin the audio conversion process.
V) Wait for Conversion to Complete

After the conversion is finished you’ll see a “download” link and file name appear on the screen.
vi) Download the Converted MIDI File
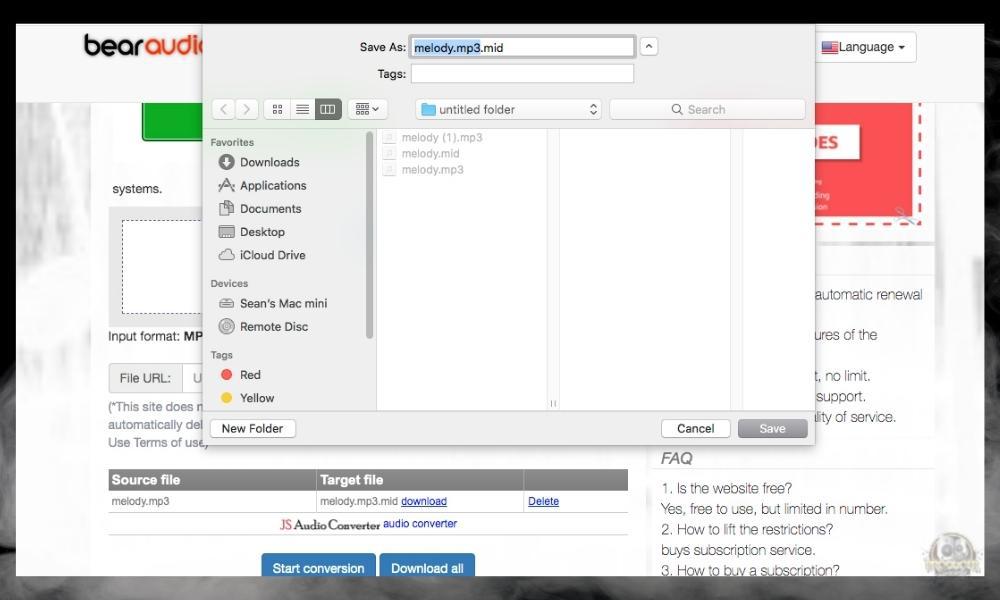
Click the “download” link and save the converted file to your computer.
vii) Open the Converted File
In case it wasn’t obvious, the file you downloaded is usable in the same capacity as any other MIDI file. There have been several methods shown in this article all ready to open, edit and play MIDI files. Refer to one of them for further information if you’re stuck.
How to Convert MIDI to Audio Online
So what if we wanted to do it from the opposite direction, ie, MIDI to audio, instead of audio to MIDI? There are many VSTs, standalone applications, and online tools to convert audio to MIDI and vice versa. Let’s walk through a few of these tools.
A) Online-Convert Website
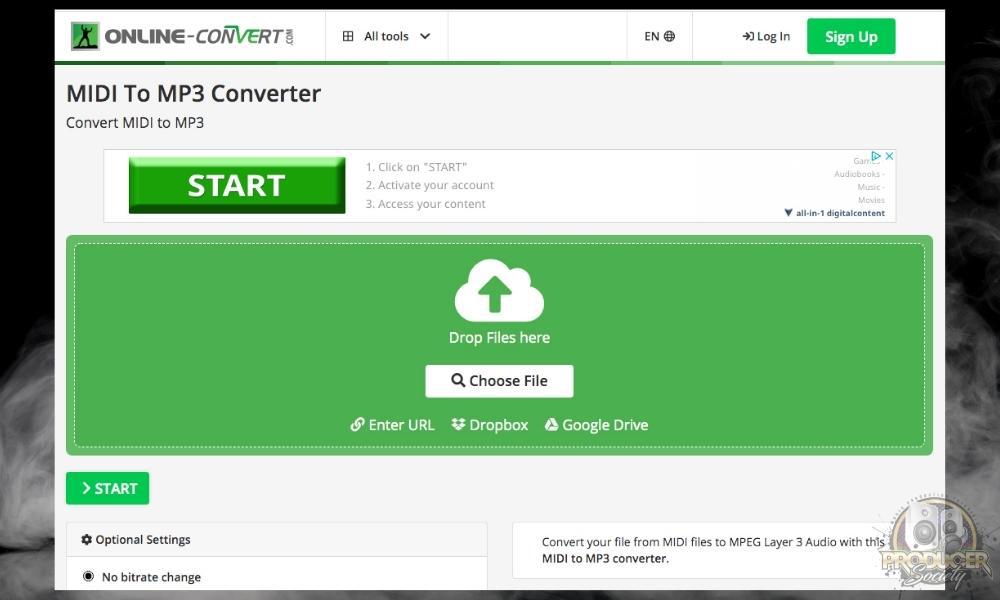
Here is a nice, simple web-based tool for easily and quickly converting MIDI files to MP3. There isn’t a huge library of sounds you can map the MIDI notes to like with a DAW but it’s still useful.
i) Open the Conversion Tool
ii) Select the File to Convert
Open a file explorer on your operating system. Navigate to a directory containing the MIDI files you’d like to convert. Alternatively, click the browse button and navigate to the .MID file.

iii) Upload the File
Drag one of the .MID files into the large green box on the screen and drop the file. A visual indicator below the green box will display the status of the .MID file upload.
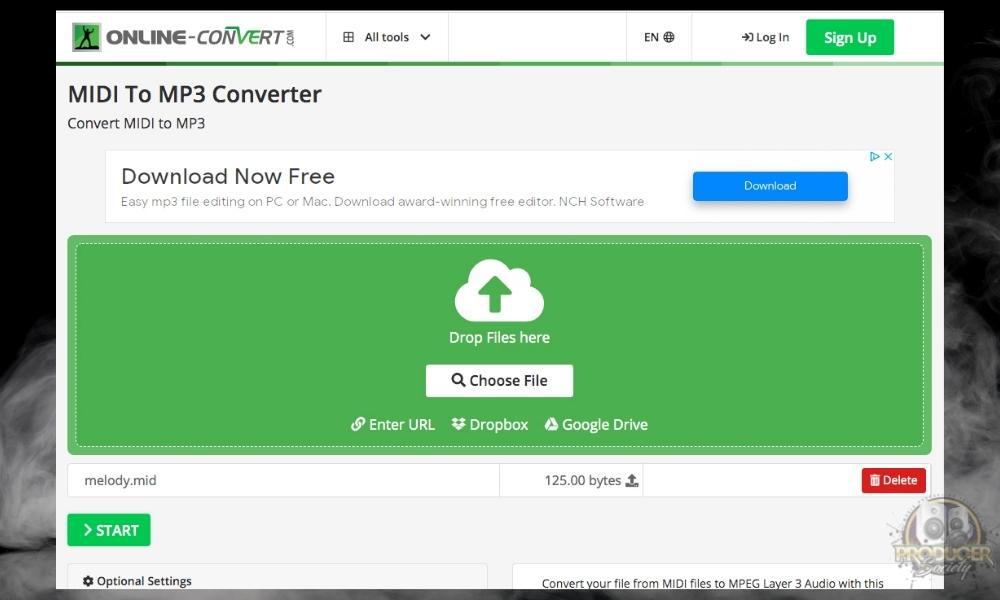
IV) Convert the File
Click the Start button to begin the conversion process.
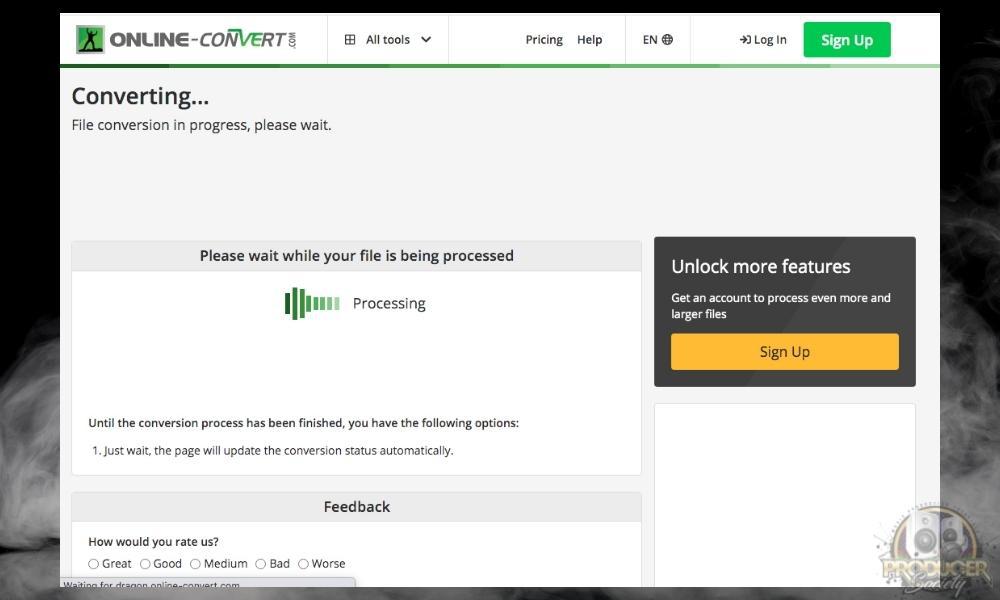
V) Save the File to Your Computer
When it’s completed you’ll be prompted to save the converted MP3 to your computer. Navigate to a familiar directory on your file system (like the desktop) and click the Save button.

vi) Open the Converted File
Open the file you saved in any application capable of playing an MP3. You’ll probably notice the sounds used by the tool aren’t as robust as a DAW, but they’re decent.
B) Online Converter
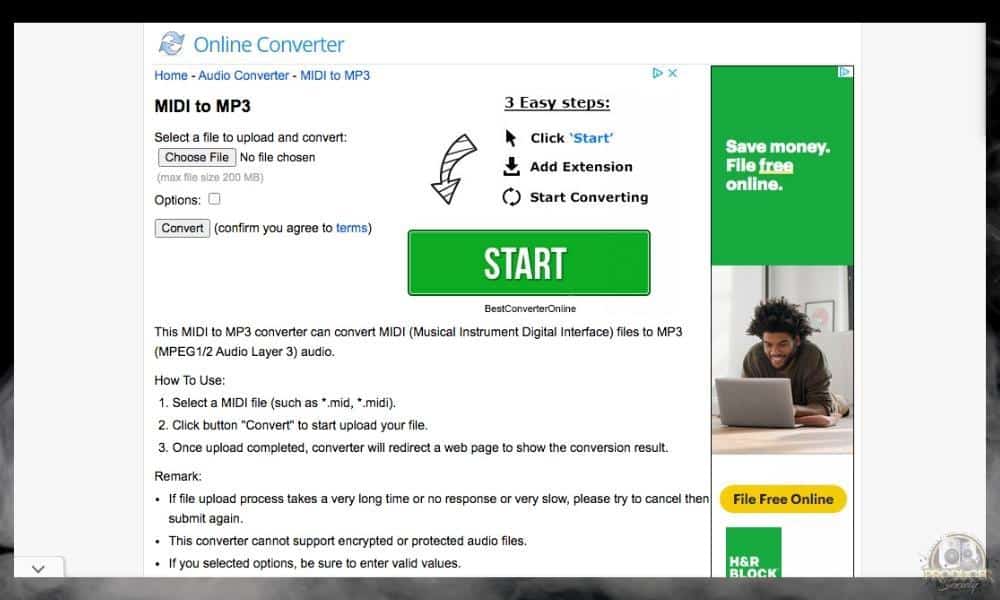
Another great free online tool for MIDI to audio conversion is the Online Converter. It’s quite similar to Online-Convert.com, shown above, but a little simpler.
i) Open the Online Converter Web Tool
ii) Select the MIDI File to Convert
Open a file explorer on your operating system. Then navigate to the directory with the MIDI file to convert. You can also click the “Choose” button and navigate to the file.

iii) Set Audio Quality
Online Converter provides the option to select an audio quality. Click the Options checkbox and then choose a bit rate from the drop-down menu that appears. 192 (kbps) is a good choice for high quality without a hefty file size.

IV) Begin the Conversion Process
Click the Convert button to start the conversion process. It’s relatively quick, although, this depends on the size of the MIDI file and your internet connection speed.
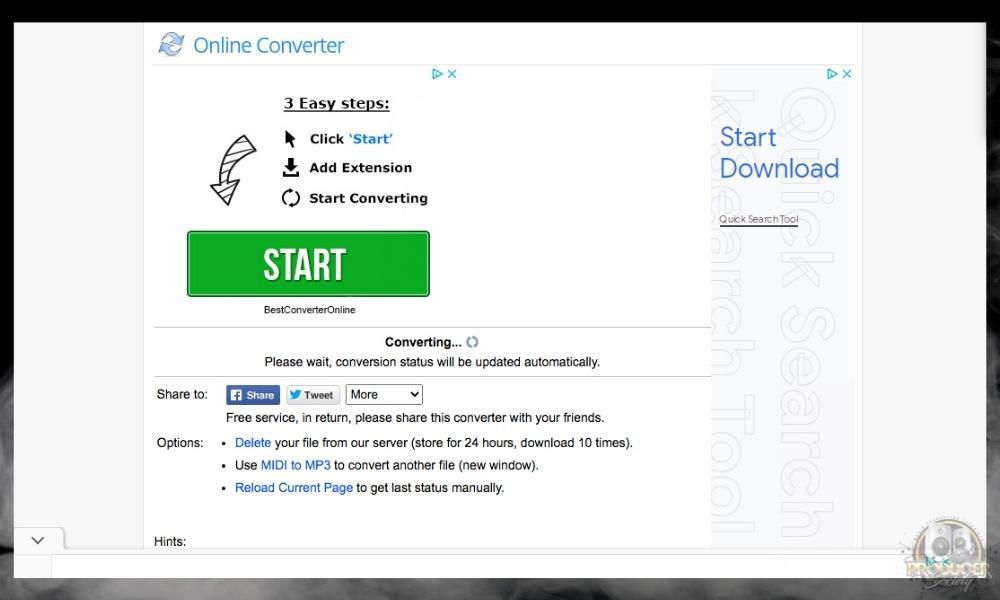
V) Wait for Conversion to Complete

vi) Download the Converted File
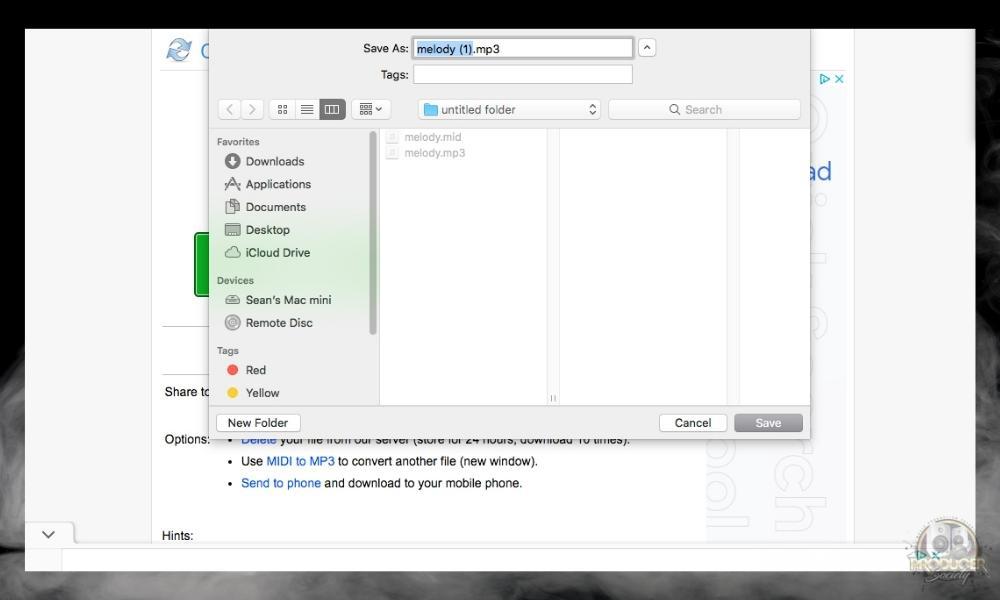
vii) Open the Converted File
Just as with Online-Convert above, open the file in any application capable of playing an MP3.
How to Export MIDI Out Of FL Studio
Most of the major DAWs – ie Ableton, FL Studio, Logic Pro X, and Pro Tools – offers a way to export MIDI out of them. Some of them offer more options and a fuller experience than others.
FL Studio offers a couple of different options for exporting MIDI. Individual MIDI patterns can be exported through the Piano Roll. Full songs containing MIDI data can also be exported from the main DAW user interface. It’s a bit more common to export single MIDI patterns.
That said, I’ve created a little video for you here that shows you how to do it if you’d prefer it that way. There’s a step-by-step, illustrated guide right after.
Note: For the tutorial down below, I’m going to show you how to make MIDI from scratch first. Although, I imagine if you’re reading this you just want to export MIDI out of FL Studio that you’ve already created. Skip to #5 if you want to get right to exporting the midi out of FL Studio.
1) Open FL Studio and Create a New Empty Project

Launch FL Studio and select File > New from Template > Minimal > Empty. See the screenshot above if you’re having trouble. It’s the same one from the start of the article.
2) Add a VST Instrument to the Project

Open the Channel Rack with the (F6) shortcut or (fn + F6 for macOS) and then choose your MIDI instrument after clicking on the “+” symbol.
3) Select Default Pattern “Pattern 1” and Open Piano Roll

Click the default Pattern 1 to select it. Then, open the Piano Roll with (F7) or (fn + F7 for macOS). This is the fastest way to open the piano roll.
4) Create MIDI Notes In the Piano Roll – Or Use Your Existing MIDI Pattern

You can either make MIDI notes by just drawing in a bunch of notes, or you can use the pattern that you’ve already created before you came to this article.
5) Export the MIDI From Piano Roll

The FL Studio Piano Roll has its own File menu located to the top left of each Instrument Insert. It’s accessible by clicking the small arrow. Click the arrow to access the menu and then select the “Export as MIDI file…” option. If you’re using macOS FL Studio, just use the command, “Shift + Command + M”
6) Save the MIDI File
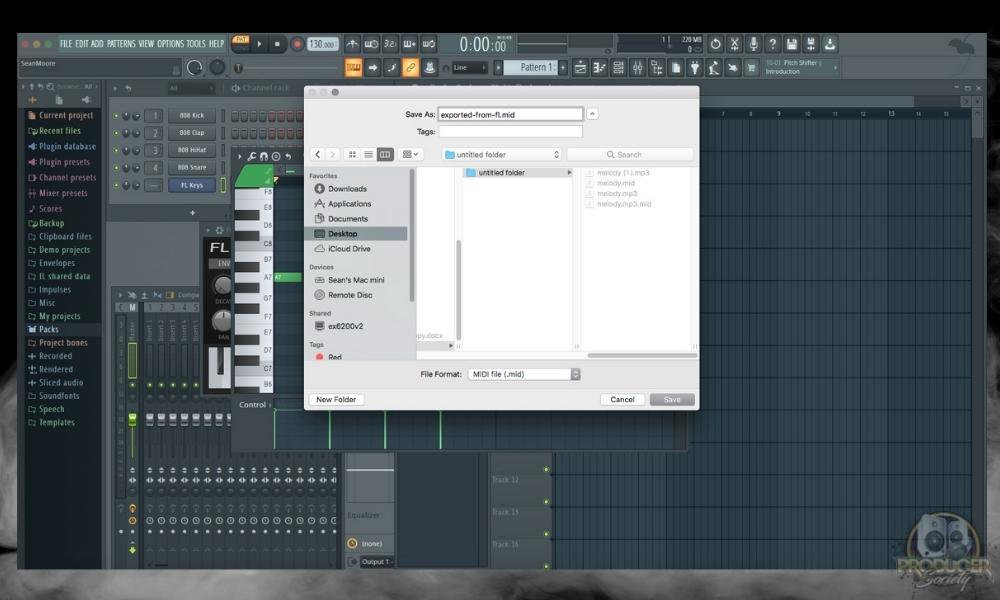
Once the file has completed exporting a system window will appear allowing you to save the .MID file to your computer. As I said in the image caption a moment ago, send it to your desktop that way it’s easy to find. This little tip will save you a lot of annoyances.
How to Export MIDI From GarageBand
You can actually use Melodyne – within GarageBand – to export MIDI out of GarageBand. As a matter of fact, that’s precisely what I did earlier. In my article on this very subject, I explained that all you had to do was export the information as a loop, and then use an online to midi converter. Here’s my video on how to do that:
There used to be an online converted called aif2midi, but for whatever reason, it no longer works. Instead, you have to use Convert AIFF to MIDI on this site – and thankfully it works just as well. So again, here’s an updated version of what you have to do if you’d like to export MIDI from GarageBand without using Melodyne 5.
“To export MIDI from Garageband, first save the MIDI file as a Loop with the (Control + Shift + o) command. Find the loop on the computer’s hard drive: Library/Audio/AppleLoops/UserLoops/SingleFiles. Drag the file to your desktop, and then convert it to a MIDI file with an .aif to MIDI converter.“
That’s the brunt of how it’s done, however, there was one user on my YouTube channel who said that you just had to change the file name to .mid from .aif and it would work. That wasn’t the case for me. It just made a .mid file that neither of my DAWs were capable of understanding.

All-in-all, these are the most common ways of creating MIDI. Most people use a DAW to create MIDI, although, as I said earlier and as I showed you throughout this article, you could easily use an online conversion tool, MIDIEditor (Windows/Linux), code, or a plugin like Melodyne.

Other Articles You May Be Interested In
Important Things to Note About Making MIDI
1) The Best Way to Make MIDI Is With A DAW
As we’ve seen there are many ways to create MIDI. Using a DAW is the most full-featured approach. Combining a MIDI keyboard and DAW is really the powerhouse solution.
2) MIDI Is Portable Across DAWs and Hardware
The purpose of MIDI is hugely related to interoperability between systems and devices. There are a few key concepts with MIDI but the portability of MIDI data is paramount.
MIDI files can be created in one DAW, or even on hardware and then the MIDI note information can be reused by another application.

 Written By :