The set-up for this on both macOS and iOS devices is comparable. The key is to configure the track headings with “Record Enable” and then select the correct input channel for each instrument.
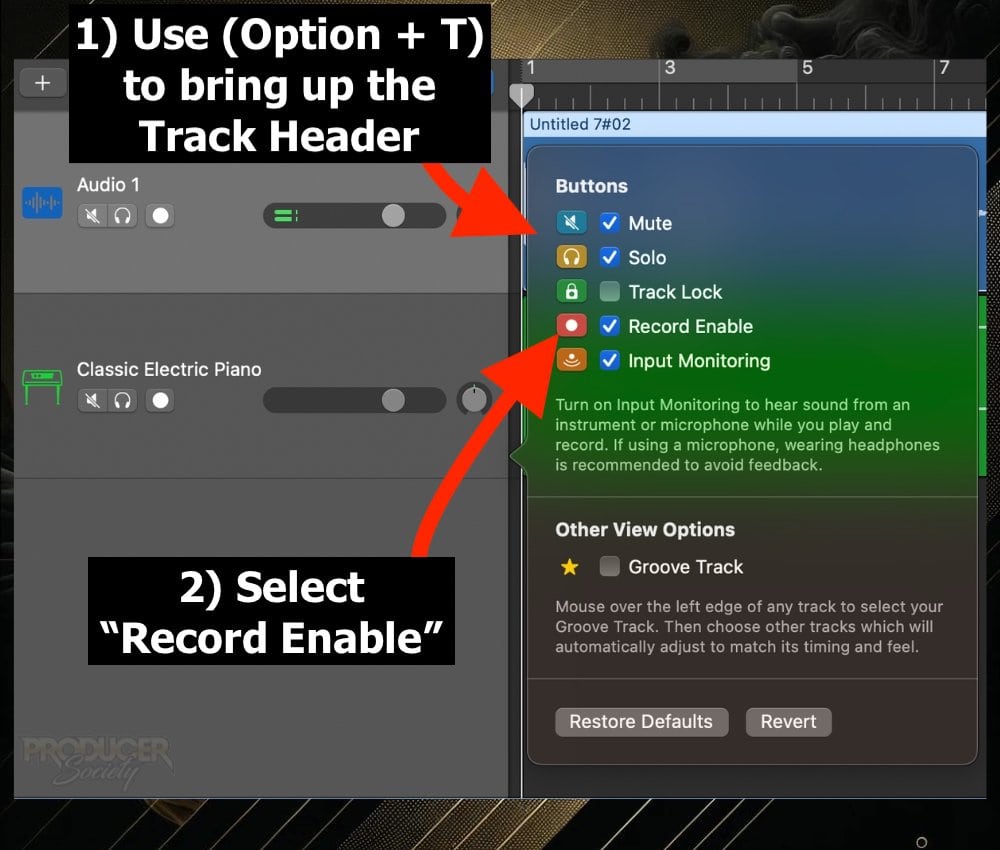
Select, “Record Enable” and then press the red record button on each of the track headers.
On iOS, click the Gear icon > Advanced > Multitrack Recording. Then press the red button to record.
How to Multitrack Record in GarageBand (macOS)
1) With Your Track Selected, Press (Option + T)
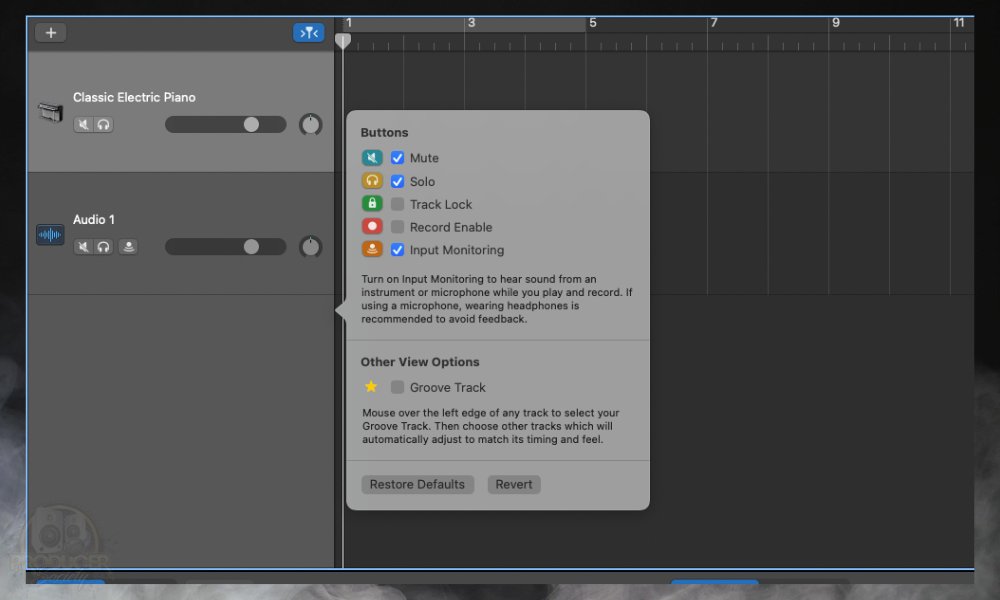
The other way to open this window would be by going up to the Toolbar on the top center, pressing the “Track” button, and then clicking on the “Configure Track Header” option.
2) Check the “Record Enable” Box
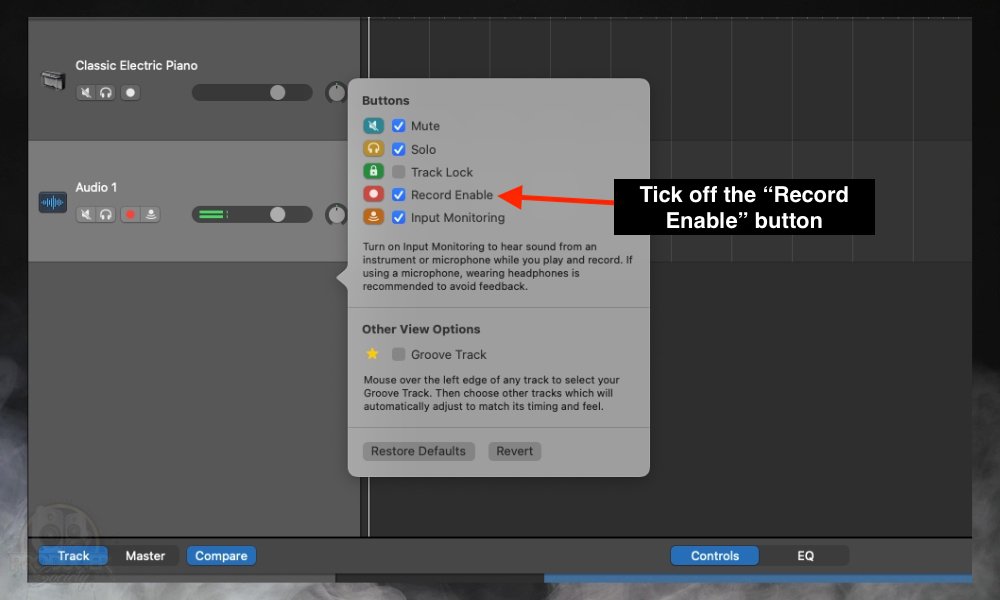
3) Set Your Audio Interface Inputs in the Smart Controls
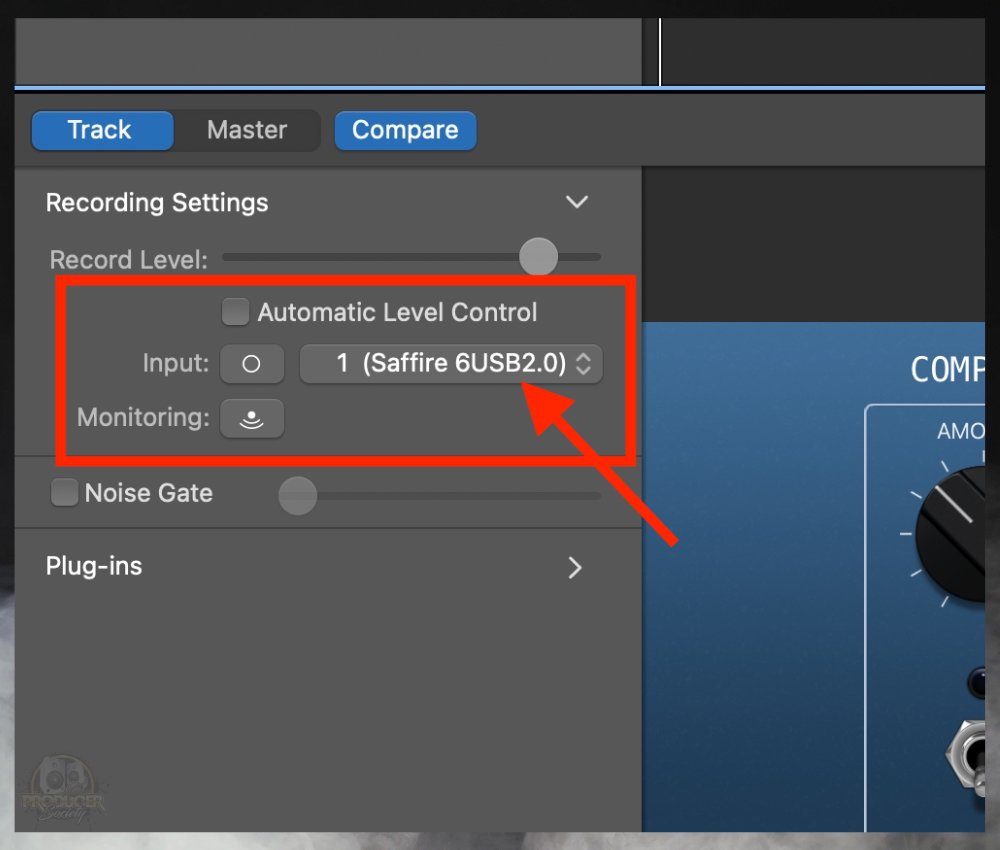
if your audio interface has three ports on it, you need to ensure that the track is correctly connected to the corresponding input on your device.
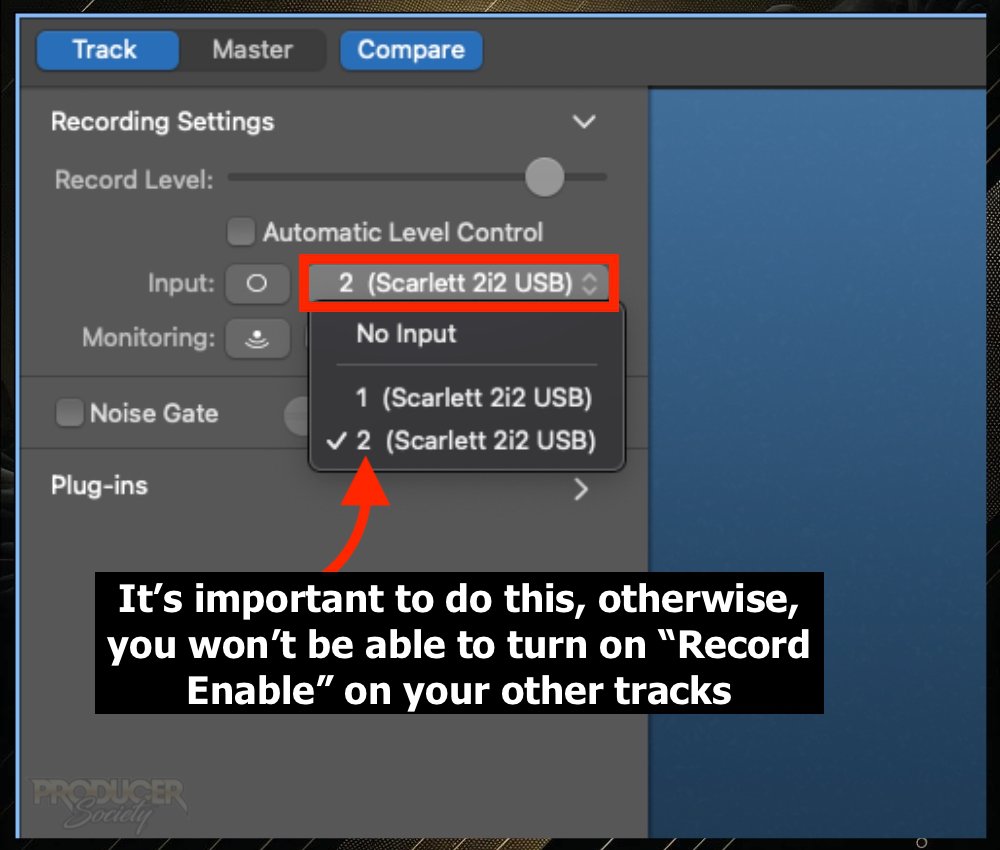
For example, on your 3rd input, you would set that up to “3 (Saffire 6USB2.0)” in the Smart Controls. If the Saffire had more than 2, anyway. I’m just using it as an example.
4) Click the “Record Enable” Button on Each Track
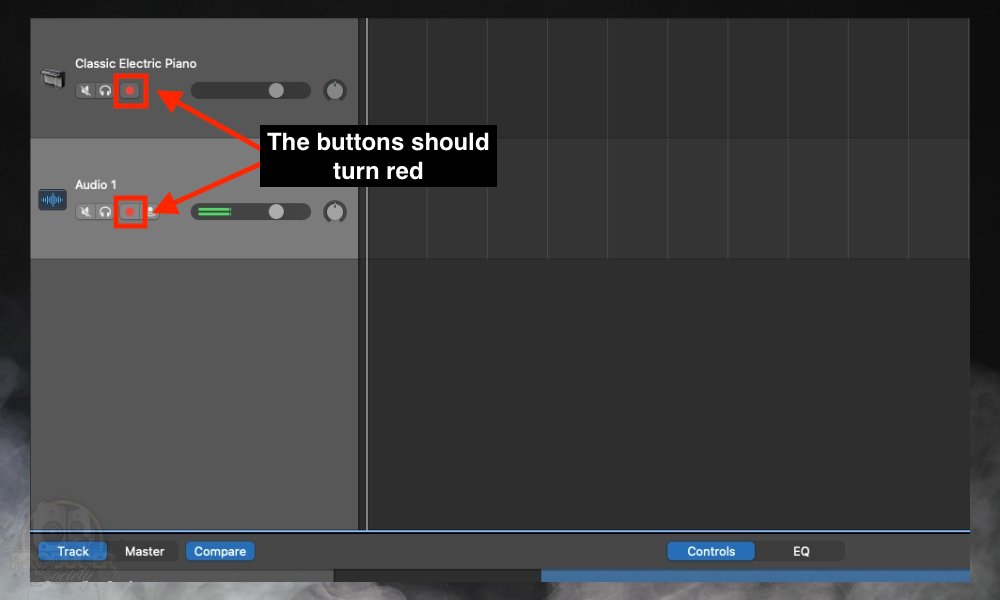
However, you do have to actually click the button once you’ve brought up the Record Enable option.
5) Hit Record and Start Recording On Both Your Tracks
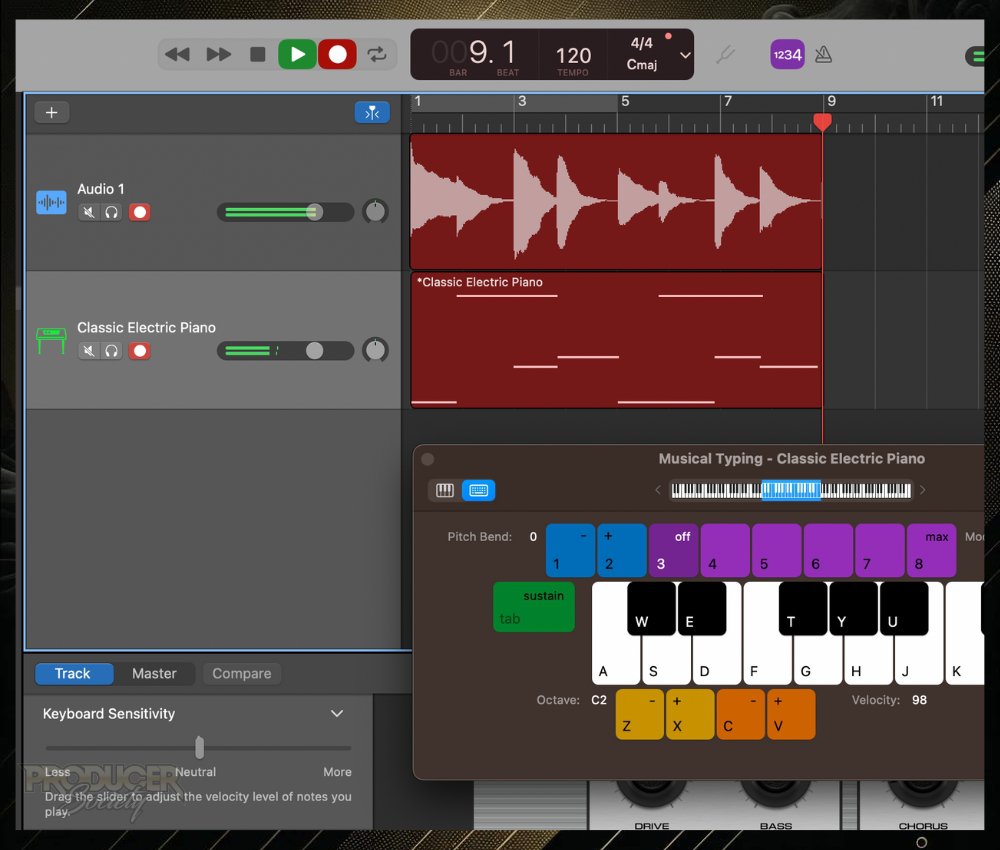
And that’s pretty much it for GarageBand macOS. I’ve got some tips and other troubleshooting solutions toward the end of the article. But first, let’s take a look at how to do this in GarageBand iOS.
How to Multitrack Record in GarageBand (iOS)
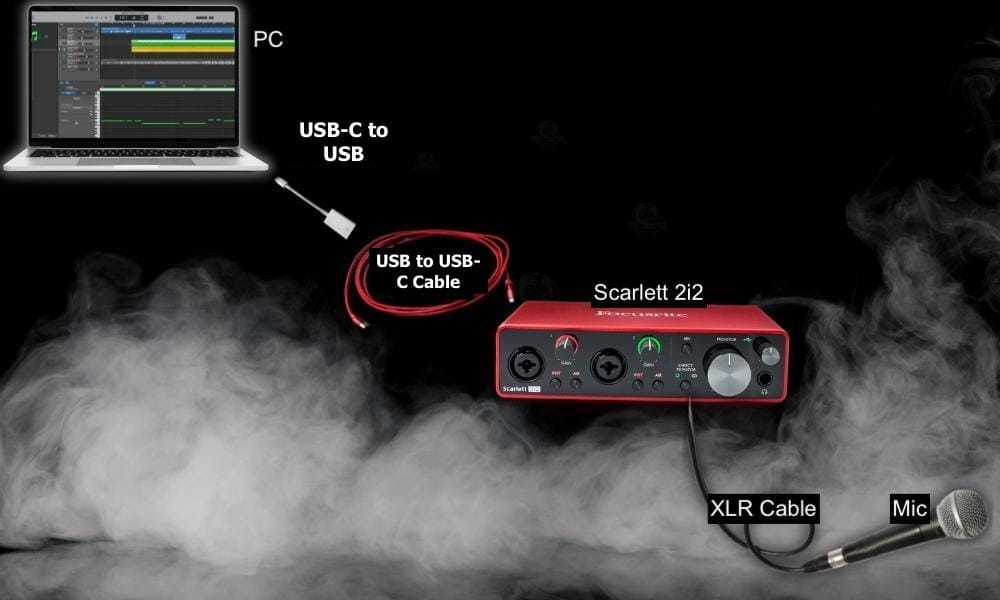
The same rule applies for multitrack recording in GarageBand iOS. You’re going to need an audio interface like the Scarlett 2i2 or 4i4. If you’re unclear, I have an entire guide on this.
![Connecting Scarlett 2i2 to an iPhone - How to Use the Scarlett 2i2 With A Microphone [EXPLAINED]](https://producersociety.com/wp-content/uploads/2022/06/Connecting-Scarlett-2i2-to-an-iPhone-How-to-Use-the-Scarlett-2i2-With-A-Microphone-EXPLAINED-1.jpg)
If your devices are relatively new, a USB-C cable should be fine, but if they’re older, you can get some adapters on my product page. Older devices will likely need a Thunderbolt to USB-A or Thunderbolt to USB-C.
1) Create a Separate Track for Each Instrument
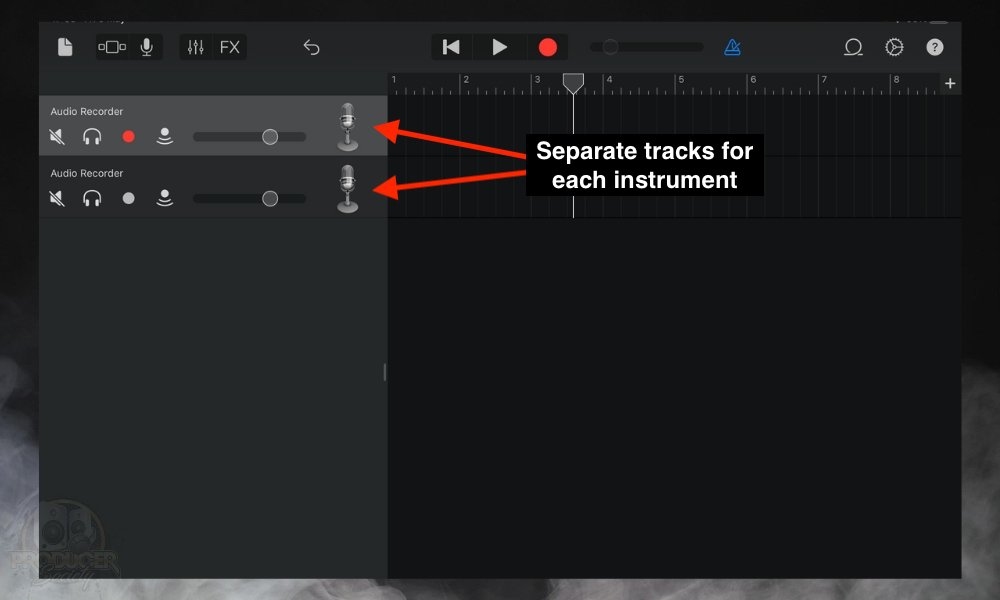
2) Select the Right Channel Input for Each Track
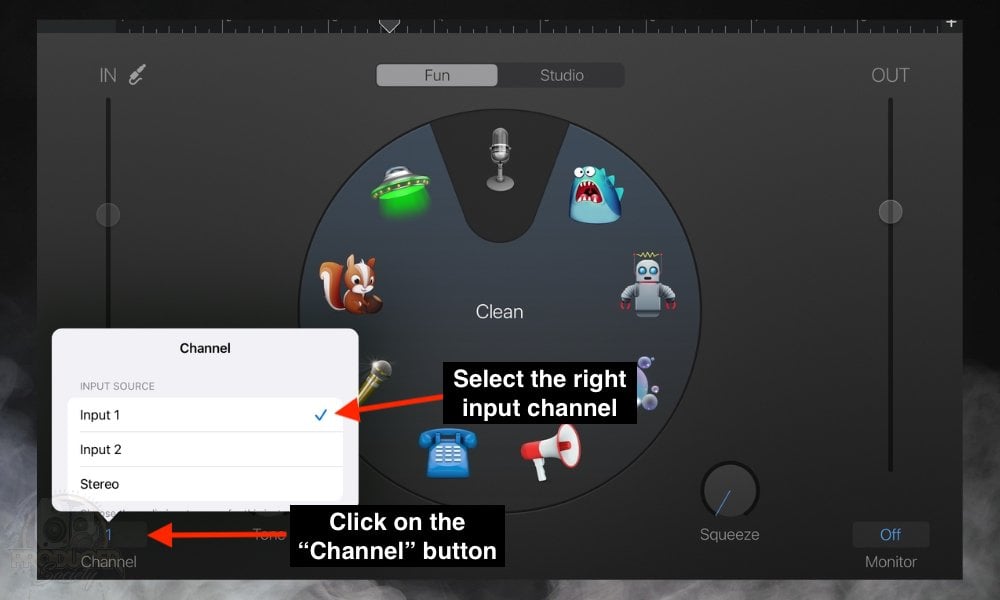
Each of your plug-ins should have its own input channel. For example, if your microphone is going into input 1, the guitar should be going into channel 2.
Keep in mind that you may need to adjust the monitor levels for each instrument that you’re recording (on the right of the screen).
3) Turn On “Multitrack Record” In The Settings
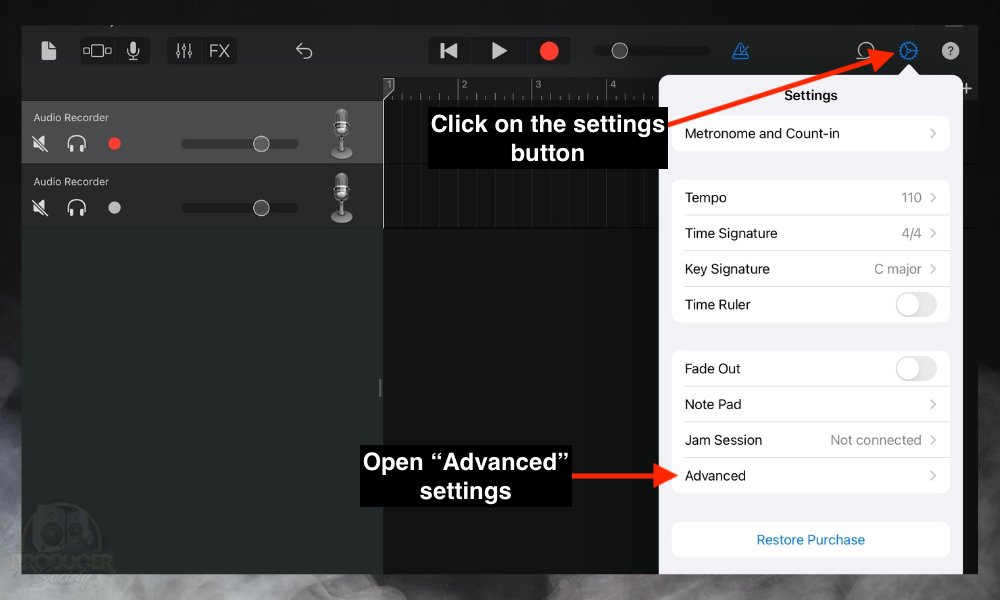
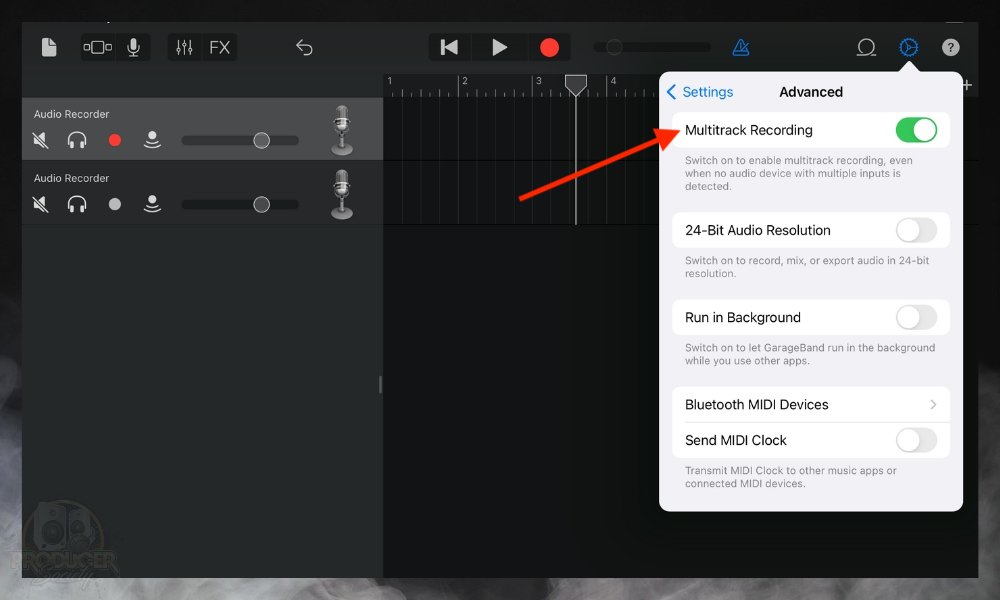
This should show the “Record Enable” buttons next to each of your tracks.
4) Select the “Record Enable” Button
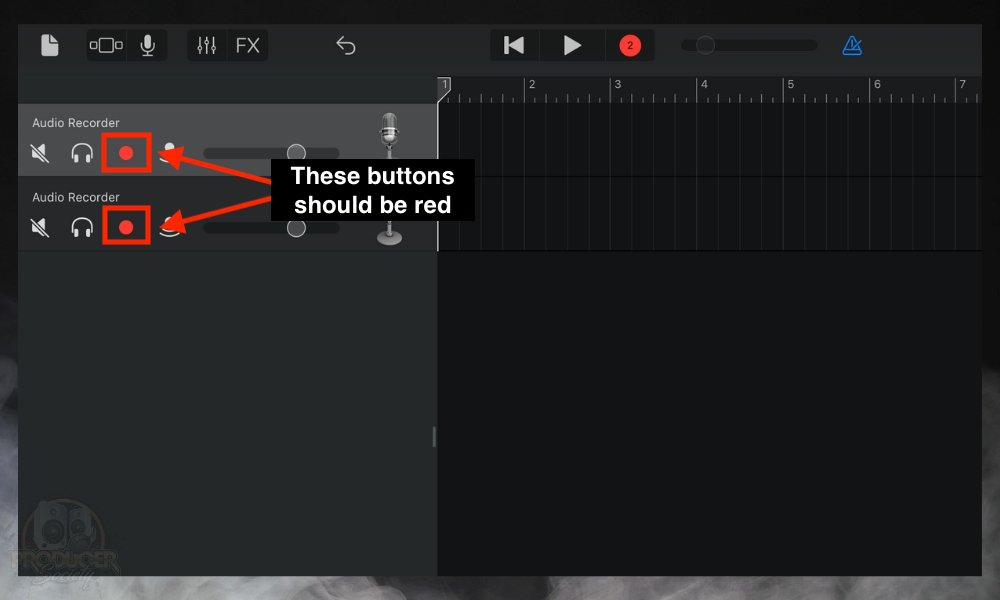
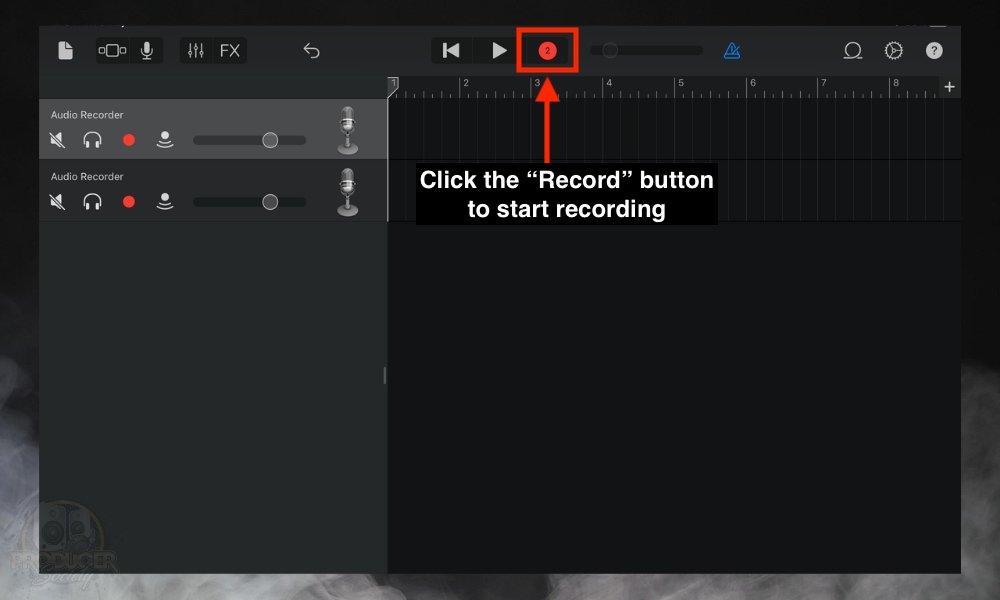
5) Click Record & Start Recording On All Your Chosen Tracks
A helpful tip for multitrack recording on GarageBand iOS is to save the input setup configuration as a separate project that you can access later.
This is going to save you a lot of time in the future since you won’t have to set everything up again.
That all said, recording in GarageBand iOS comes with limitations. The first – and arguably the biggest one – is that you’re not able to assign different output channels.
This might become a bigger problem if you are looking to mix or master a song in GarageBand on your device with sophisticated inputs, outputs, and buses.
The macOS however does constrain the option to assign different output channels for your tracks.
But if you’re using GarageBand, you already know that the lack of a proper mixer is one of its limitations.
9 Tips for Multitrack Recording in GarageBand [macOS/iOS]
1) You’ll Need An Audio Interface With More Than 1 Input
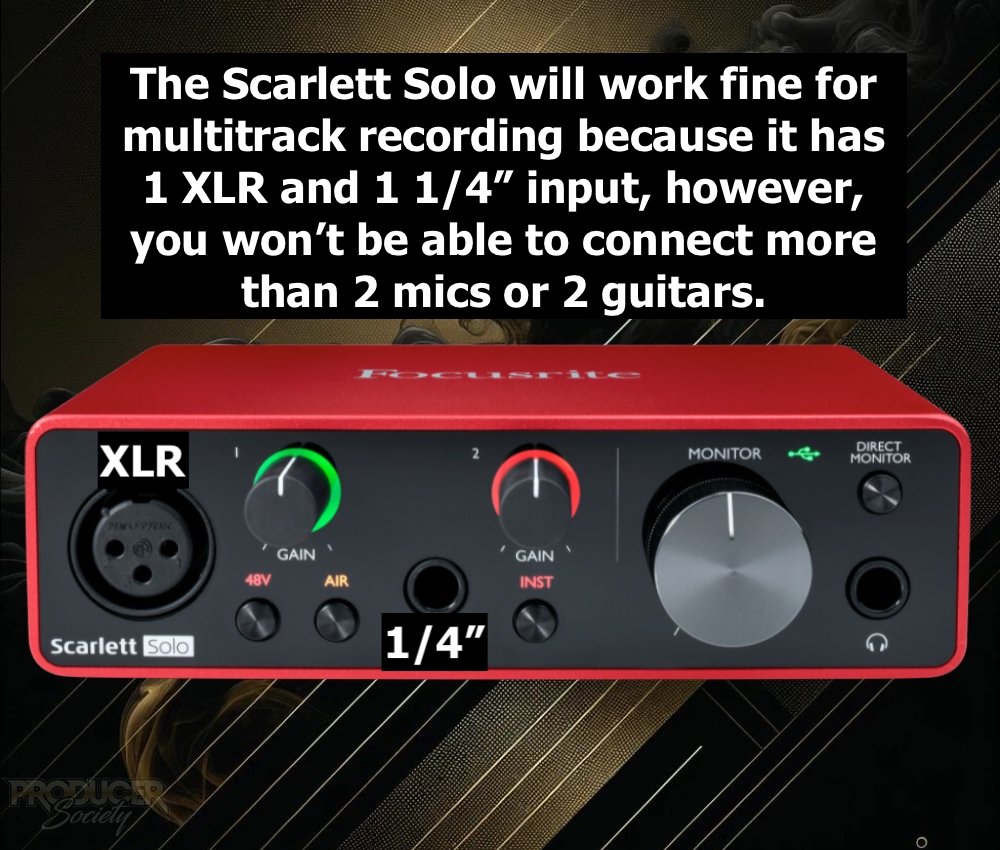
Each of your instruments should be going into their own input channels in order to be able to record them at the same time.
The more inputs your audio interface has, the more tracks you can record at once.
2) This Works for Software Instruments & Audio Tracks
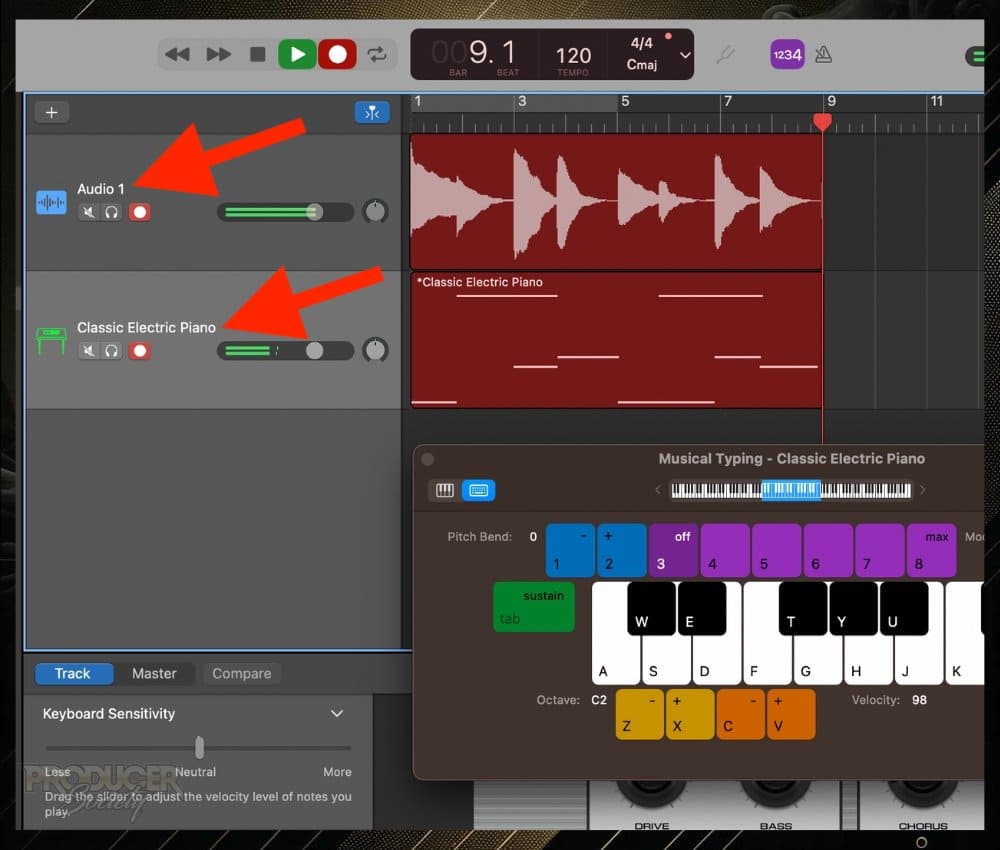
You can record any instrument you want in GarageBand with the exception of Drummer Tracks. This is because Drummer Tracks don’t require you to record them, instead, they come as their own separate track.
3) You Can Control Multiple Tracks With Musical Typing/MIDI Keyboard
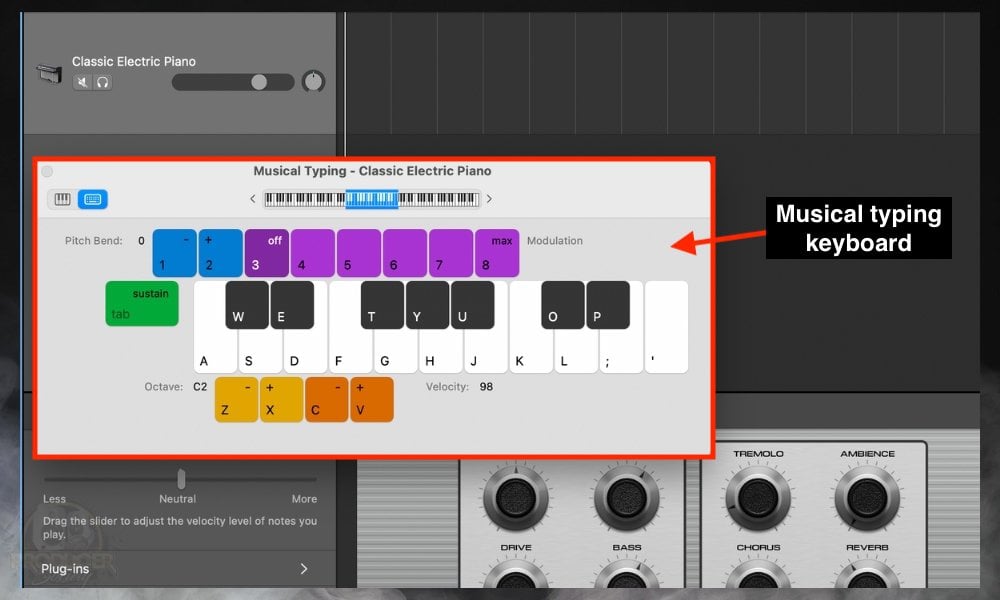
You can record tracks using a MIDI keyboard or using the stock GarageBand keyboard (it’s also called musical typing).
To open the stock keyboard, use (Command + K), and a keyboard will appear (more on keyboard shortcuts here).
4) This Is How You Record One Instrument With Multiple Mics
Additionally, you can use different microphone techniques in order to record one instrument with multiple microphones.
For example, you can use the XY technique to record the guitar, or the OH technique to record the drums.
The one that always comes to mind for me is one mic on the 12th fret of the acoustic guitar and another on the soundhole.
Having one in the back of your amplifier and another in the front speaker is cool too.
The key here is to either use different microphones or place them in different positions.
5) This Is Also How You Record Podcasts
Most podcasts that have multiple people on them are done through multitrack recording. So you’ll set things up pretty much in the same way.
You have an audio interface or mixer with multiple inputs, connect your microphones to each input, and then map each input to a track in GarageBand. Hit record and then you’re done.
One of these days, I’ve got to update my podcasts with GarageBand article because it could use refurbishing.
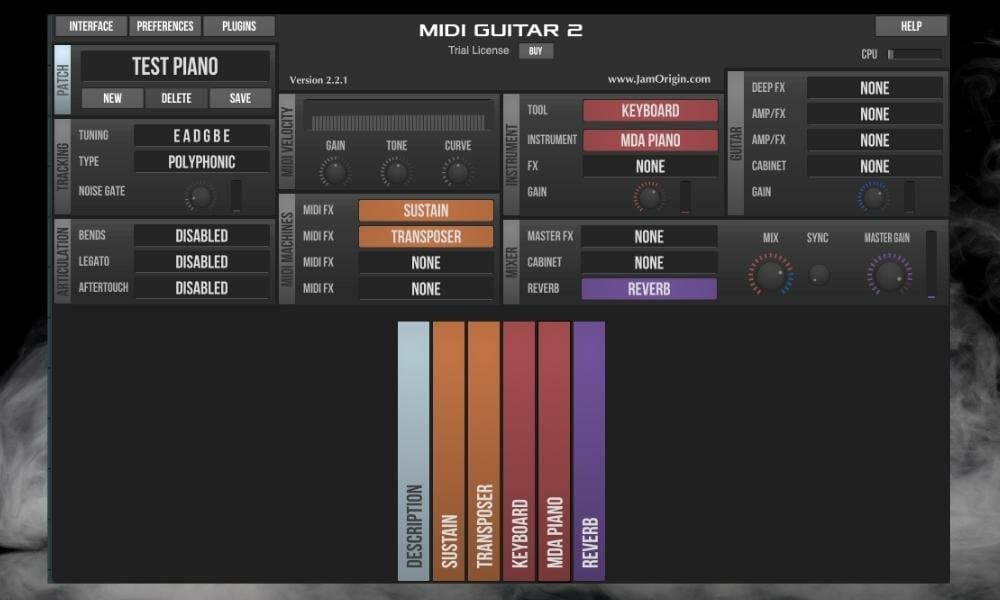
6) Multitrack Recording Is Also How You Use MIDI Guitar 2
A MIDI Guitar 2 is a guitar-to-MIDI converter. In simple terms, you have to set up your guitar on the audio track and then a software instrument track on another.
With MIDI Guitar 2 enabled, you’ll be able to control the software instrument with your guitar. It’s super cool. I have an article about the MIDI Guitar 2 specifically, as well as one on MIDI guitars more generally.
7) Ensure You’ve Exported Individual Tracks As Separate Files for Mixing
This is done because you don’t want to find yourself in a situation where you spend a lot of time recording multiple tracks separately, then exporting them as one big file.
Isolate the track > Click “Share” > Export Song to Disk > Select the “Export cycle area or length of selected regions” > Export. I showed you how to do this in my article on creating stems for all DAWs.
8) You May Need A Much Stronger Computer
There might be a few problems associated with multitrack recording in GarageBand. The first, and the most common problem, is that your computer may lack sufficient processing power and RAM.
The CPU is usually the root of the issue when it comes to older computers. In that case, it might be more difficult to record multiple tracks at the same time, and might be worth considering recording each track separately.
My chart below gives some ideas on what you need for production:
| Specification | The Novice | The Intermediate | The Professional |
|---|---|---|---|
| RAM | 8GB | 16GB | 16GB (all you need, but 32GB is great) |
| Processor | Dual-Core Processor (i5 or i7) | Quad-Core Processor i5 or i7 | Quad-Core Processor i7 or i9 |
| Storage | 512 GB | 1TB | 5TB and Beyond |
| SSD or HDD | HDD | SSD | SSD |
| Recommended Computer | Don’t even bother with a MacBook Air. | MacBook Pro (my favorite one to recommend) | iMac Pro (if the MacBook isn’t enough for you) |
For example, I’m running a 2017 MacBook Pro with 8GB of RAM and an i5 processor and it’s not nearly powerful enough for what I’m trying to do with it every day.
I’d recommend a much newer MacBook Pro with the M1 chip and at least 16 GB of RAM and 512GB of storage. I’ve linked to one on my products page. 32GB would be better, but 16GB will work.
9) Latency Can Also Be A Problem. Here Are A Few Solutions
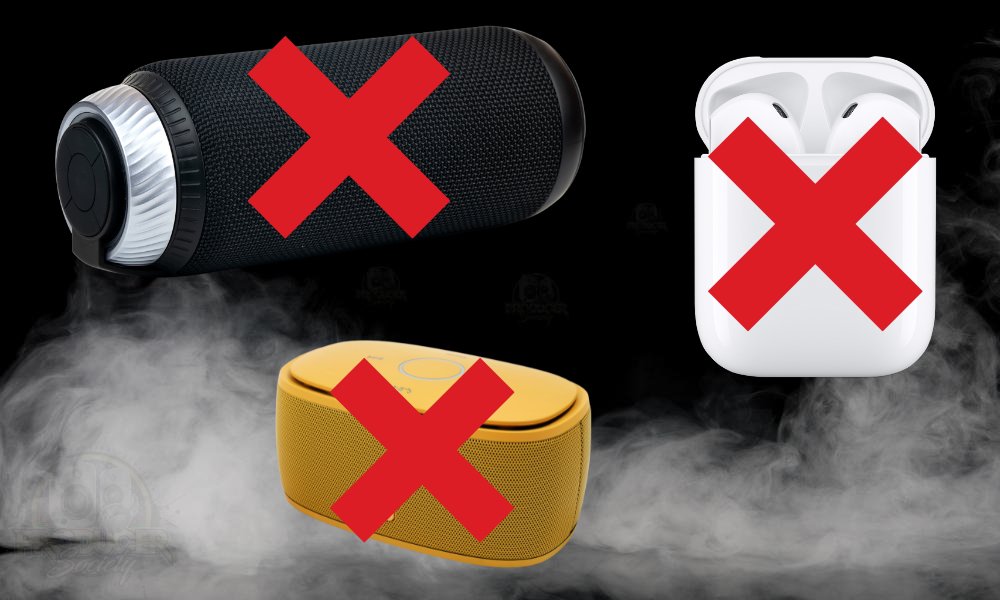
You might also find yourself running into some latency problems. Latency is the delay in time between when the note is played and when it’s heard.
I explained latency in greater detail in this article and covered different ways for how you can fix the issue.
There are a few ways to fix or at least address this problem and most of them I’ve addressed in the aforementioned article, but here are just a few of them:
- Turn off energy-intensive browsers and programs in the background.
- Close all other applications that are not in use
- Empty your PC’s trash
- Save your project and restart your computer before trying again
- Freeze tracks in your GarageBand project
- Have all your instruments, loops, and sounds stored on SSD (my guide on this)
- Make sure any CPU-heavy plugins are turned off
- Ensure you’ve turned off monitoring on all of your other tracks
Questions or concerns? Let me know what you think of GarageBand’s multitrack recording feature in the comments below. I’d be curious to know how you use it most.
Other Articles You May Be Interested In
- How To Record Acoustic Guitar in Garageband
- How to Record Guitar in FL Studio Mobile [Step-By-Step]
- How to Record A Seamless Loop in GarageBand [macOS]
- How To Record Computer Audio in Garageband


 Written By :
