To record a perfect loop in GarageBand
1) Watch your timing (metronome/click-track)
2) Start exactly on the 1st beat
3) Make 1 bar of space at the start & end of your loop
4) After, cut the space at the start and end
5) Record multiple takes for more material
6) Use Flex Time/quantization
If you’re new to recording, you’ll find yourself running into a situation where there is a dead space or a click at the start of your loops. I used to run into this problem all of the time and I hated it. After some practice though, I was able to figure it out and now my recordings are much smoother.
How to Record A Loop in GarageBand [macOS]

First things first, I’m going to show you the basics of how to record a loop. Later in the article, I’ll walk you through what I believe are the most important tips and tactics to use if you’re trying to record a perfect and seamless-sounding loop that doesn’t click or sound weird.
1) Configure Your Audio Interface And Your instrument [ie, Guitar/Vocals/Piano]
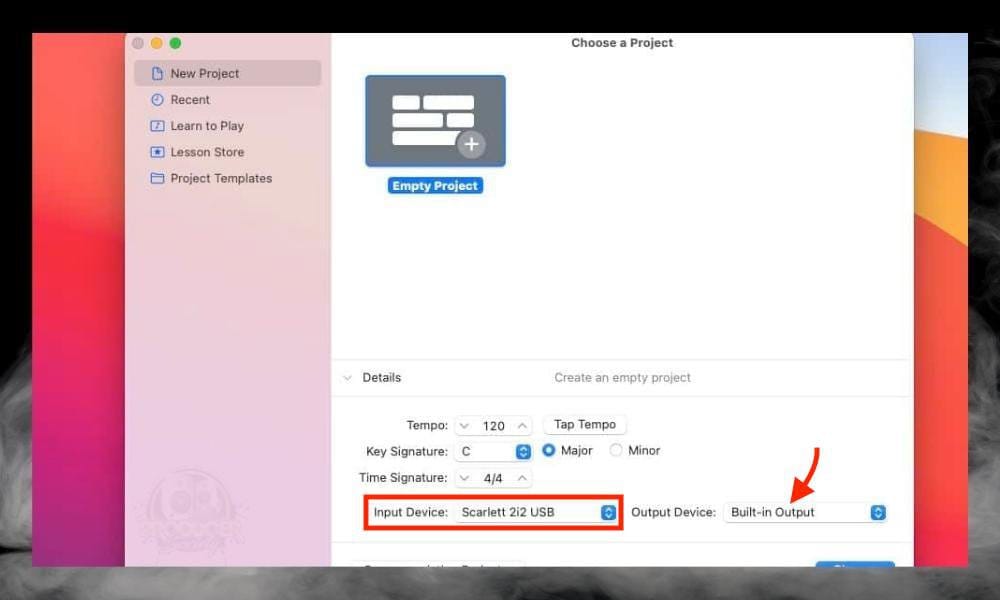
Choose your “Built-in Output” or your audio interface again if you’ve got your headphones connected. If I’m recording at night, I’ll often use my Etymotic ER4SRs (on my Page) because they have a really convenient clip which keeps the cable out of the way of my guitar playing (more on the headphones here).
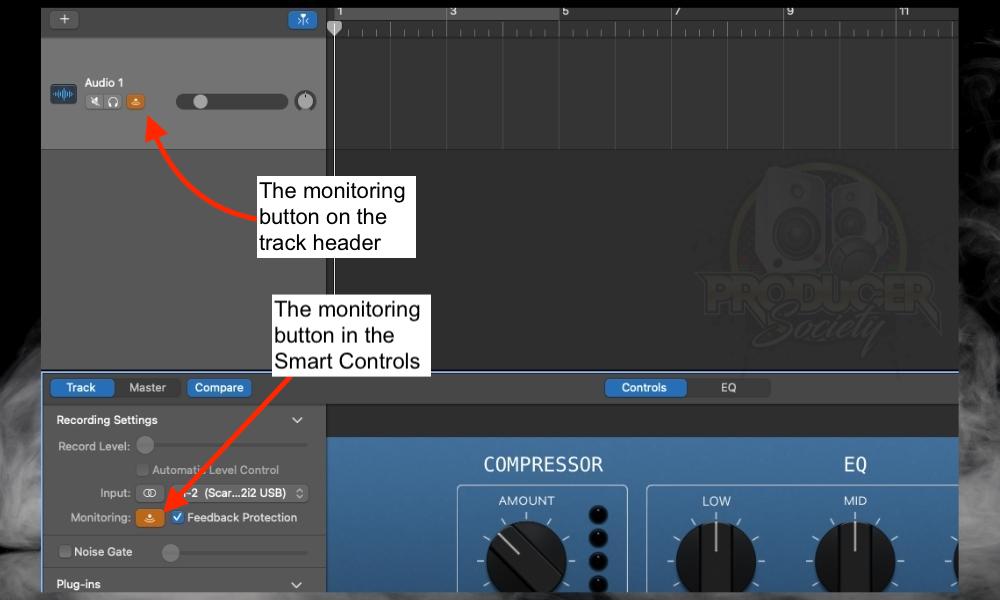
I find it’s often a good practice to turn down the volume on everything first. This will safeguard against the aforementioned horrible feedback and other problems. I talked about this a little in my guide on why you can’t hear yourself recording in GarageBand.
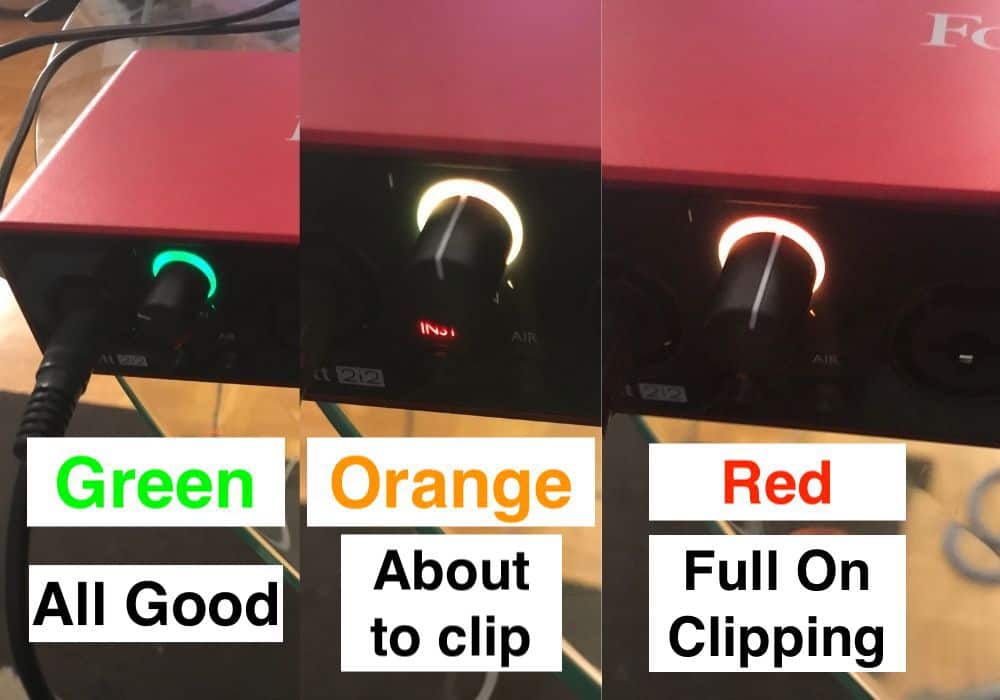
The perfect way of determining proper gain is to strum your guitar fairly hard. If you’re still in the green, then you’re probably good, but if you’re in the yellow or red, then it’s probably too hot. For vocals, it’s a similar concept. Yell into the mic and see if you go into the yellow or red.
If you scream into the mic or play the guitar as hard as you can and you briefly go into the yellow, this might actually be the perfect amount. Because let’s be real, you won’t be strumming or singing that hard. The next thing you’ll want to do is turn on the count-in and metronome buttons.
2) Turn On The Count-In and Metronome Buttons
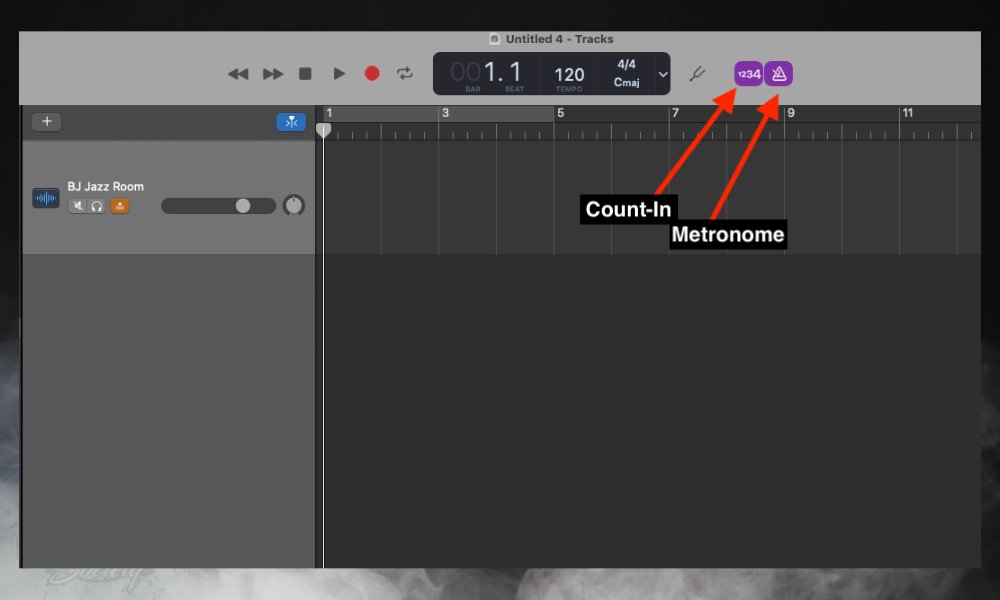
Personally, I don’t know how it’s possible to even record the simplest loop if the count-in button isn’t on. I need at least a couple of seconds to get myself comfortable and ready to start playing. Also, do your absolute best to start playing exactly on the first beat.
3) Hit the Record Button and Begin Recording Your Loop
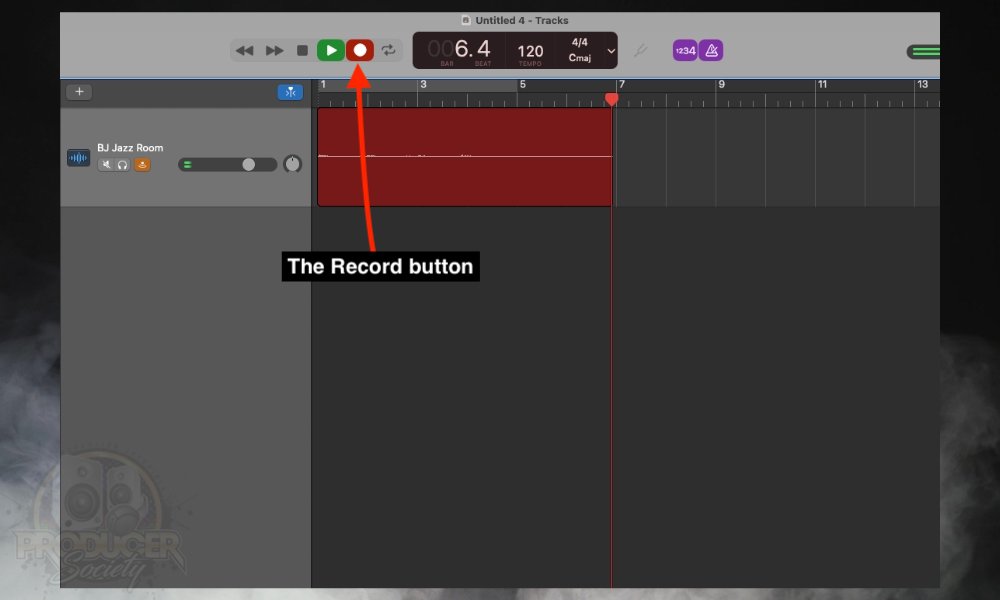
As I’ll explain to you in a moment, it’s wise to give yourself at least 1 bar of space at the beginning and end of your loop, that way you can maneuver things around after the fact.
Additionally, it wouldn’t hurt to turn on the cycling option and record more than one take, that way you have more to work with. You could also let your notes ring out in the end just in case you don’t want your recording to sound like it has ended too abruptly.
4) Use Your Pointer To Bring The Region To The Desired Length
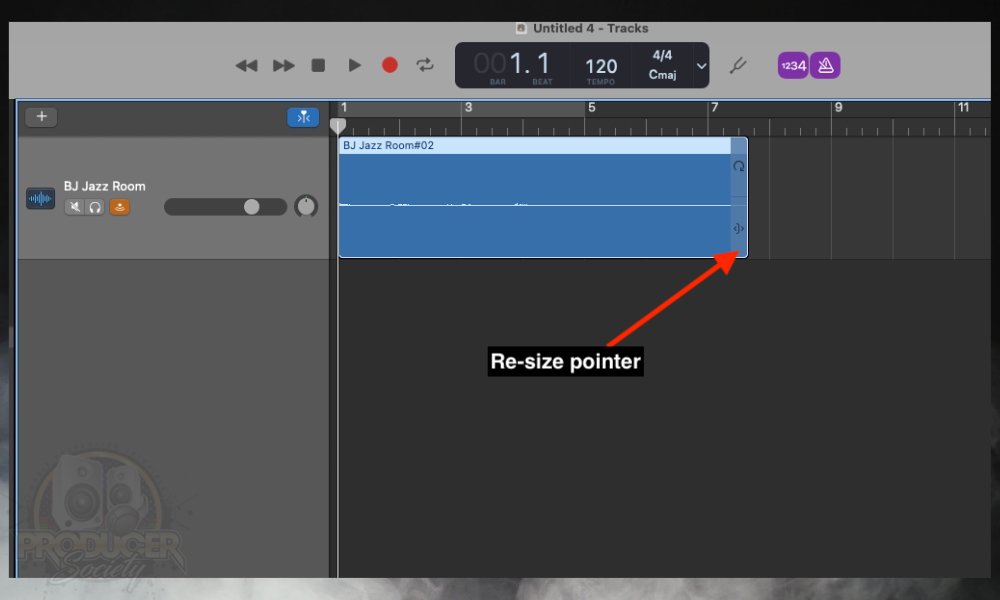
You can see there is the loop icon on top of it too.
5) Grab the Loop Icon At The End of the Region And Loop It As Much As You Need

And that’s it, but we’re not done yet. I’m also going to walk you through the cycling option because, in my view, it’s extremely important for really nailing a good take and thus creating a perfect and seamless loop.
How to Record Multiple Takes [The Cycling Option]
The cycling option is a really handy tool for recording more than take. I use it all of the time, especially if I’m trying to nail a guitar solo. It can also be used for getting a rhythm section down just right too. Here’s how to engage it.
1) Hit the Cycling Button [Or ‘C’ On Your Keyboard To Engage It]
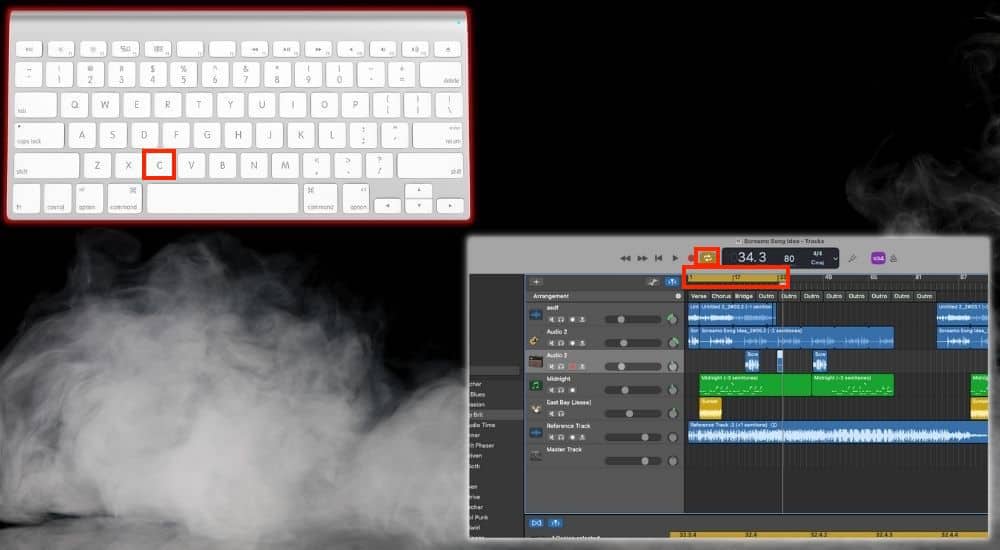
You can also press the ruler on top of the region to turn on the cycling option while at the same time determining the length of the cycle/loop.
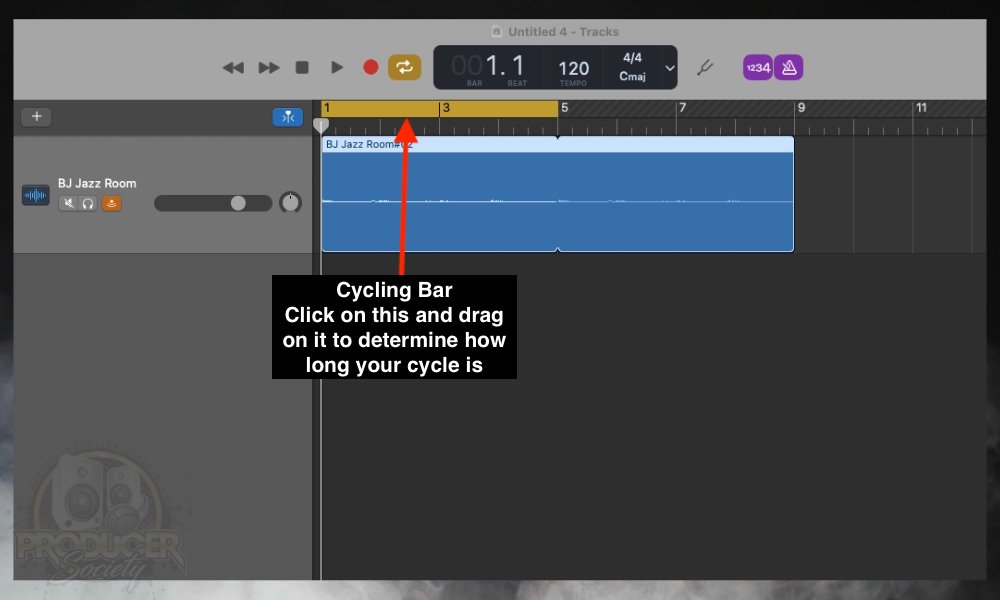
I usually make it so that there is one bar of extra space at the beginning and one extra bar of space at the end. This ensures I have enough breathing room to prepare and get ready for the second take. We’ll talk about this in more detail in a second.
2) Press The Record Button And Record As Many Takes As You Want
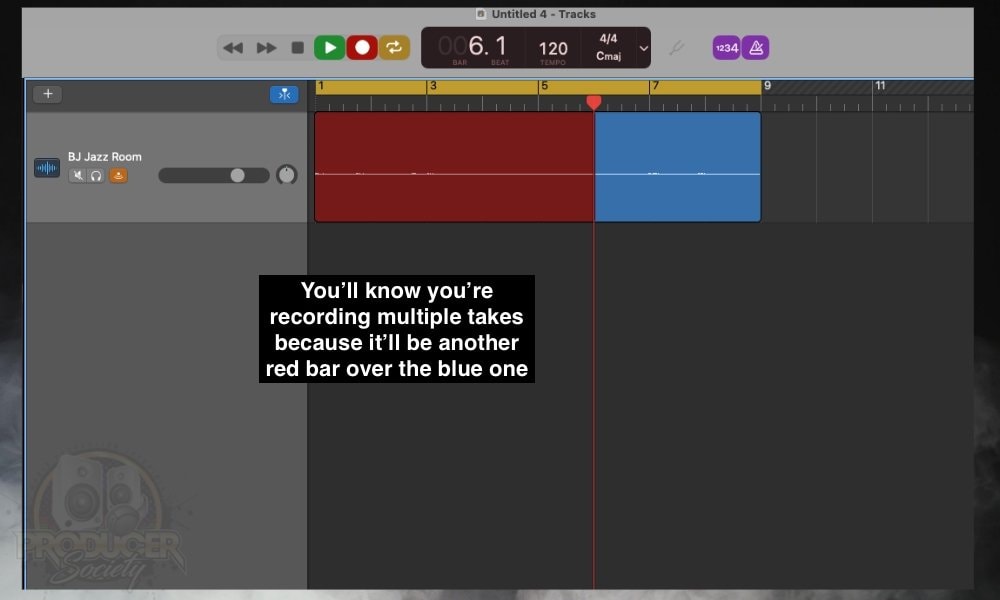
If you really feel it’s necessary, you could even slow down your song with the BPM option and then try and record it slower. I don’t usually do this, but you can do it if you wanted to.
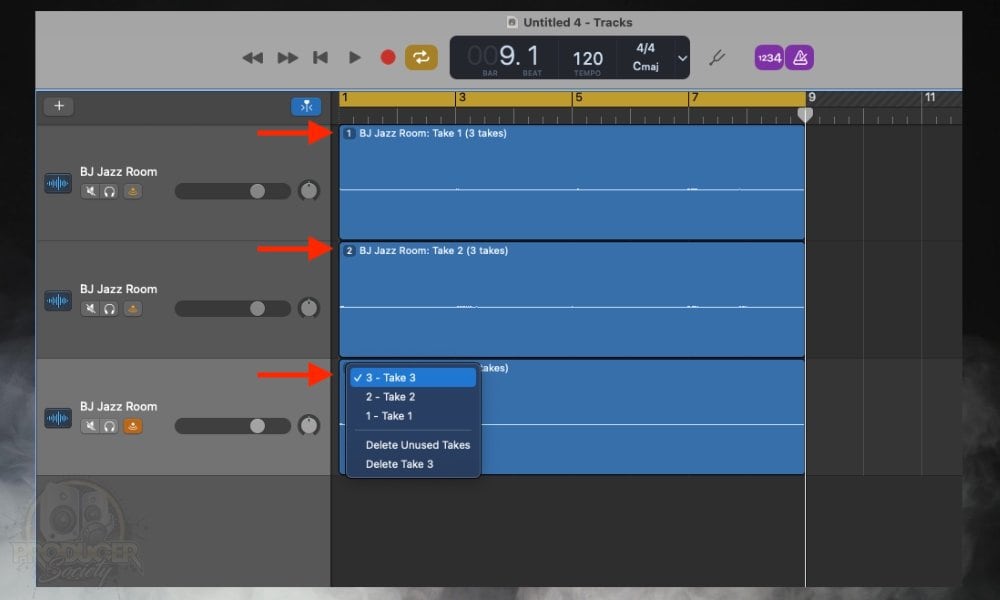
3) Click On The Number On The Region And Choose Which Take You Want
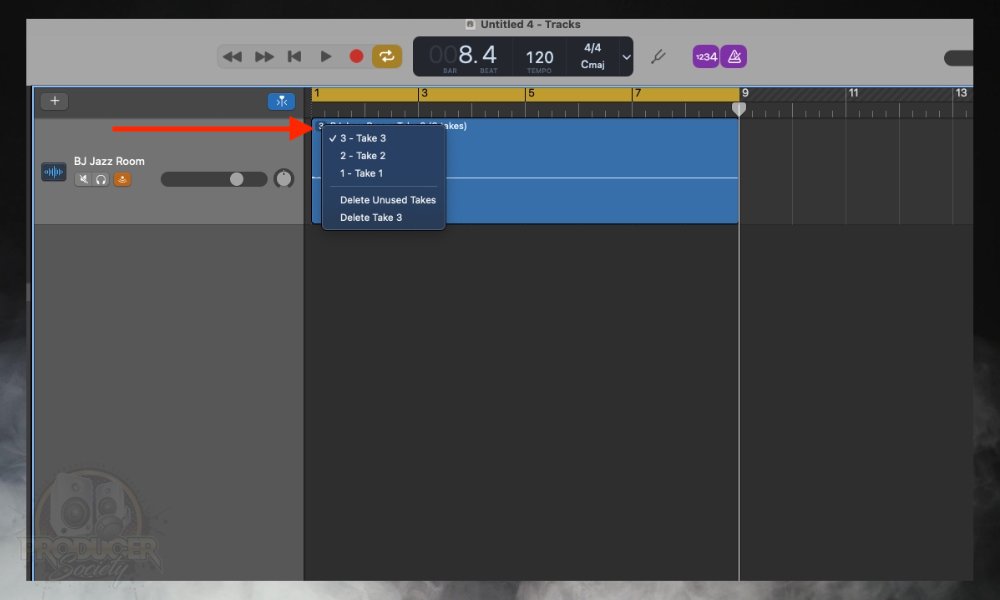
4) Delete The Unused Takes If You Want
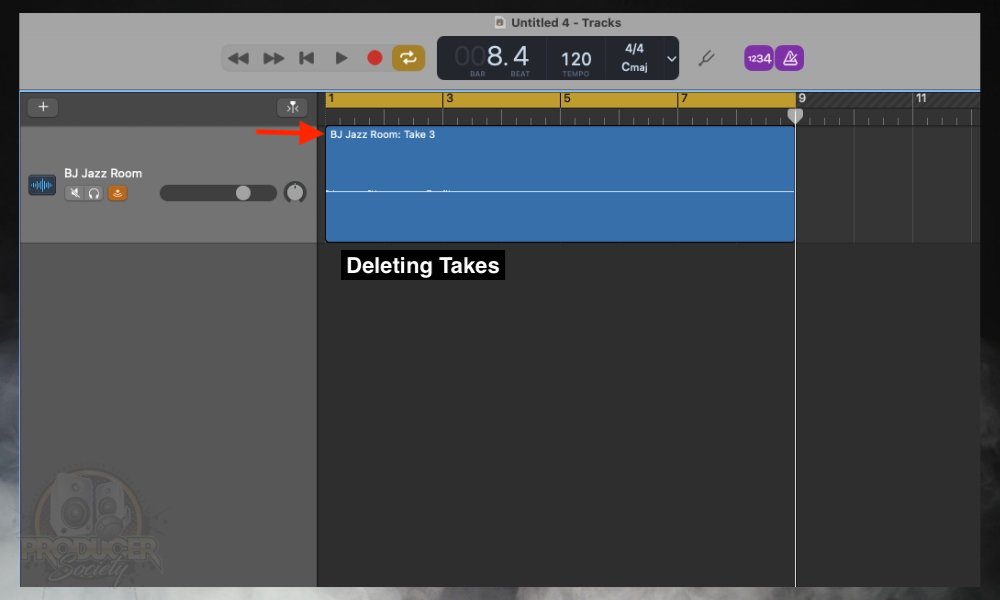
You could keep them though. There is no reason why you have to delete them if you don’t want to, other than if your computer is really slow or crashes a lot (my guide on fixing this, btw).
How to Patch Separate Recordings Together
Another thing you can do is actually record multiple takes and then patch them together after the fact. In other words, maybe your 1st take is perfect at the start but you messed it up at the end.
In this case, it might make sense to take the other take that has the perfect ending, and match it up with the 1st take that had the perfect beginning. I’ll show you how to do this.
1) After Recording Multiple Takes, Open Corresponding New Audio Tracks

I would turn off the monitoring button on everything at this point, by the way. This will help you avoid annoying feedback and buffering problems.
2) Copy the Takes And Paste It Into the New Audio Regions
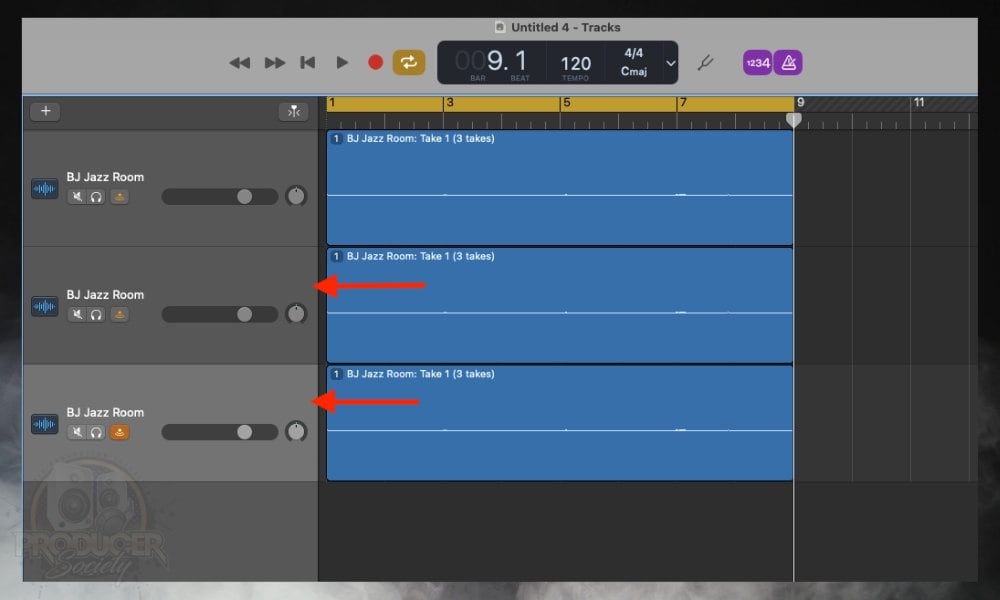
You can then go into each take and change it to #1, #2, #3, or whichever one you’re trying to use.
3) Select Each New Region
4) Isolate The Part Of The Recording You Want to Use
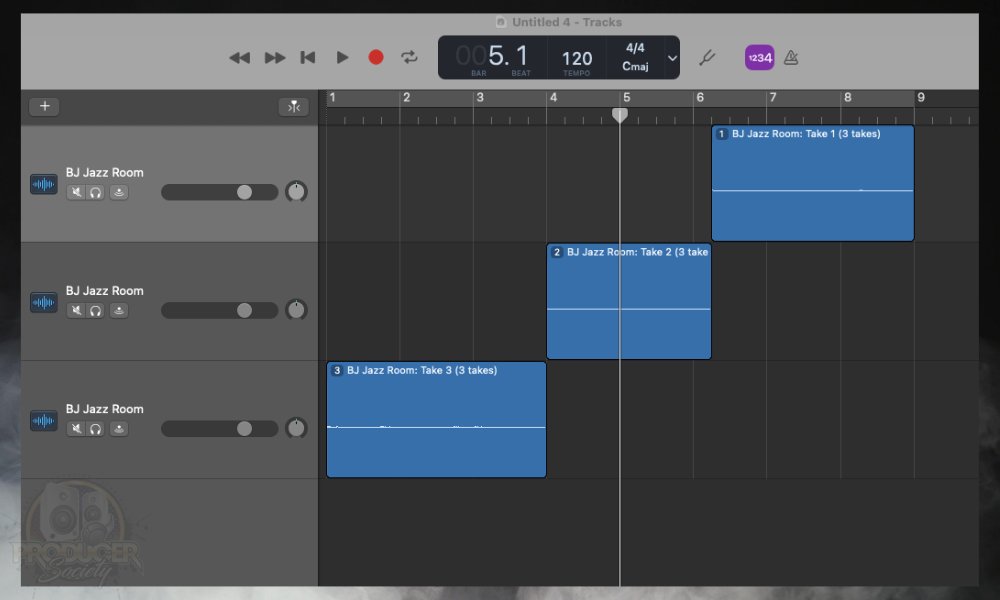
5) Copy and Paste The New Take Into The Old Space
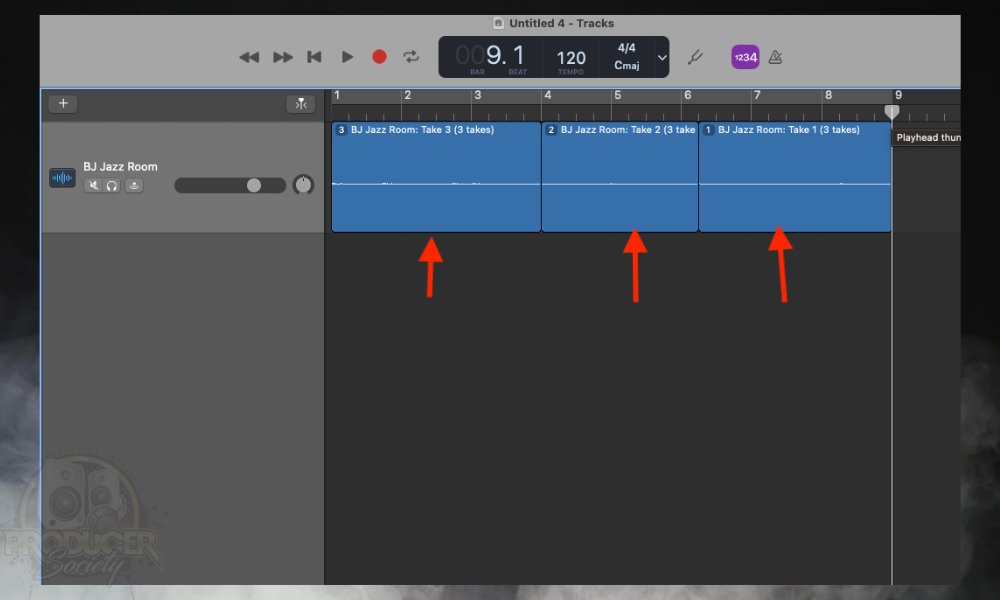
When I was making this tutorial, I was unable to use the Command + J feature which will join non-contiguous audio files as one region. I’m not sure why I wasn’t able to do it, but I think this is normally something that’s possible. Once you’re done, go ahead and see if you can join the files with Command + J.
How to Make Your Own Loops
So now you’ve got your perfect loop created. What if you want to use it in some other capacity in another project? Well, you can actually save it as a loop if you wanted to. I’ll show you how to do that now.
1) Select The Region You Want To Loop
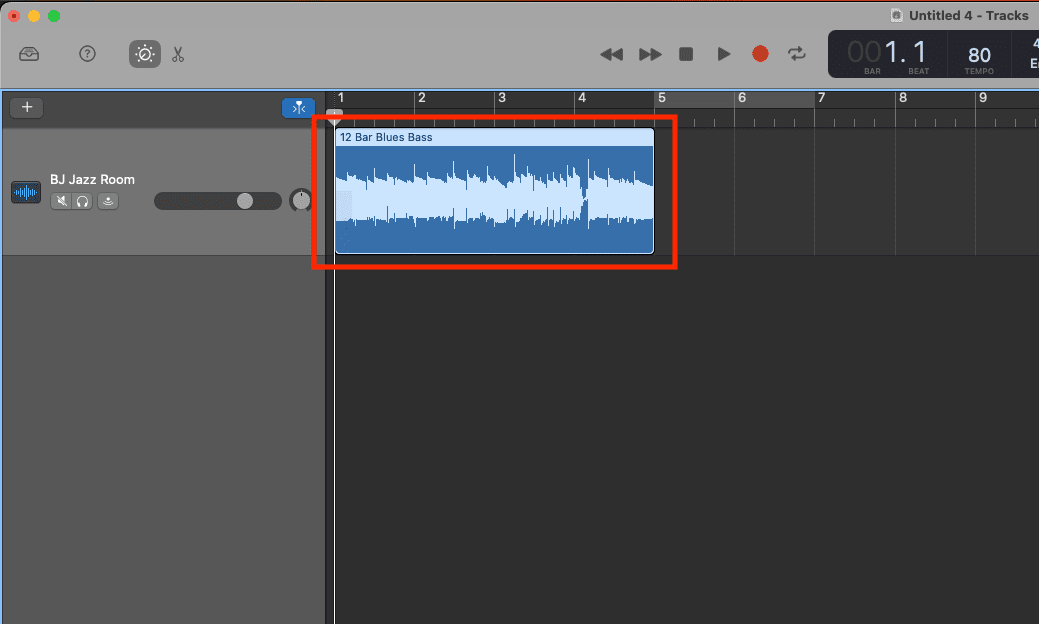
I actually just used an Apple Loop for this simply for time and convenience’s sake. The same rule applies whether I made it on my own or used GarageBand’s loops.
2) Use The Command (Control + Shift + o) to “Add Region to Library”
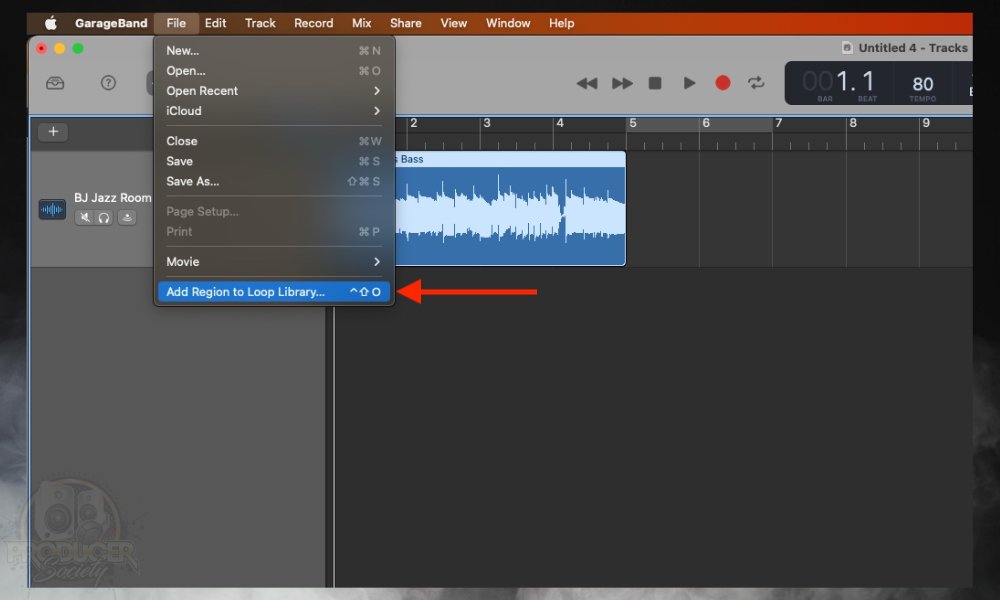
You could also use “File > Add Region to Loop Library” after having selected the loop. I prefer using the commands because they’re faster.
3) Choose A Title For Your Loop Then Select “Loop” or “One-Shot” > Then Create
![Add Loops to the Library - How to Record A Seamless Loop in GarageBand [macOS]](https://producersociety.com/wp-content/uploads/2022/12/Add-Loops-to-the-Library-How-to-Record-A-Seamless-Loop-in-GarageBand-macOS.jpg)
The difference is the one-shot will ignore tempo and BPM. The Loop option will confirm your project’s tempo and beats-per-minute setting. Choose whatever you want. Now that I’ve shown you the basics, let me talk about a couple of tips in a bit more detail. I’ll also mention a few that I didn’t discuss earlier.
6 Tips For Recording Seamless Loops in GarageBand [macOS & iOS]
1) Pay Close Attention To Your Timing/Use A Metronome Or Click-Track
![Drums, Metronome, and Click-Track - How to Record A Seamless Loop in GarageBand [macOS]](https://producersociety.com/wp-content/uploads/2022/12/Drums-Metronome-and-Click-Track-How-to-Record-A-Seamless-Loop-in-GarageBand-macOS.jpg)
Having a good sense of timing is incredibly important for recording. In fact, a much better way of saying it is that it’s absolutely essential. The thing about this is there is no way around it.
You have to practice either playing to a metronome, to a drummer, or in a band, every single day, or you have to record every single day to get plenty of practice.
I spent years of my time, for example, playing guitar without a metronome and just messing around. I made progress during this time, but when I finally started to get into recording, there was a tremendous learning curve in terms of actually playing on time and getting my recordings to sound good.
2) Start Exactly On The 1st Beat
![Exactly on the 1st Beat - How to Record A Seamless Loop in GarageBand [macOS]](https://producersociety.com/wp-content/uploads/2022/12/Exactly-on-the-1st-Beat-How-to-Record-A-Seamless-Loop-in-GarageBand-macOS.jpg)
A simple tip for playing exactly on the 1st beat is to count in your head, or maybe even out loud to yourself. Say out loud: “1, 2, 3, 4,” and then when you hit “1” again, start playing right at that moment.
I probably should’ve made this tip #1, but I think playing along with a time-keeping device of some kind is super important for learning how to record. Anybody can noodle around with their instrument.
What’s difficult is making actual music which is done by playing harmoniously with other sounds, instruments, and musicians.
3) Make 1 Bar of Space At The Beginning and End of Your Track To Create Leeway
![1 Bar of Space - How to Record A Seamless Loop in GarageBand [macOS]](https://producersociety.com/wp-content/uploads/2022/12/1-Bar-of-Space-How-to-Record-A-Seamless-Loop-in-GarageBand-macOS.jpg)
Generally speaking, you want to give yourself plenty of room between when the recording actually starts and when it finishes. There are a couple of reasons for this.
The one reason is it’s just a whole lot easier to edit the track afterward and ensure everything is on time if you’re able to cut a bit off the end and the beginning.
Another reason is that you want to let your notes ring out at the end of the recording because if you don’t do this, you’ll find your recordings sound as if they’re ending far too abruptly.
Explained another way, it’ll sound as if your recording has been cut too short, sounding somewhat awkward as a result. This directly relates to the following point.
4) Cut the Dead Space At The Beginning & End Of The Loop To Fit It Perfectly Within 4 Bars
![Finished Loop - How to Record A Seamless Loop in GarageBand [macOS]](https://producersociety.com/wp-content/uploads/2022/12/Finished-Loop-How-to-Record-A-Seamless-Loop-in-GarageBand-macOS.jpg)
Now that you’ve given yourself plenty of space at the beginning of the first bar and the ending of the last, you’ll be able to crop and edit the recording so it fits neatly within four bars. Going about this is relatively easy, it just involves zooming in on your track.
Select your audio track and then hit “B” on your keyboard to bring up the Smart Controls and the audio region. From here, you want to zoom as close as possible onto your track and get really precise in terms of where you want your loop to begin and end. Ensure the track starts on the appropriate grid lines.
5) Record Multiple Bars/Takes So You Have A Lot Of Material To Work With
![Multiple Takes - How to Record A Seamless Loop in GarageBand [macOS]](https://producersociety.com/wp-content/uploads/2022/12/Multiple-Takes-How-to-Record-A-Seamless-Loop-in-GarageBand-macOS.jpg)
I already showed you how to record multiple takes in GarageBand. It’s dead simple because if you just use the cycling option, it’ll automatically record more than one take. There are no extra steps necessary, except afterward when you want to select which one you want to use.
It’s also not a terrible idea to record multiple takes of the same recording because, as the subtitle suggests, you’ll have a number of options to work with in case your primary recording didn’t work out as planned. It’s also possible to take a bit of one recording and match it with another if you need to.
6) Use Quantization or Flex Time to Fix Timing Mistakes That Affect the Loop
![Flex Timing - How to Record A Seamless Loop in GarageBand [macOS]](https://producersociety.com/wp-content/uploads/2022/12/Flex-Timing-How-to-Record-A-Seamless-Loop-in-GarageBand-macOS.jpg)
Using quantization is as simple as going down into the Smart Controls of the track you’ve selected and dragged the bar all the way to 100. But first, you’ll need to Enable Flex which will, as the title suggests, enable the Flex Time option. You can either quantize the entire recording, or you can move things around manually.
When it comes to using quantization for recording, I’m actually not a big fan despite having a tutorial on how to use it here.
Maybe it’s better in more professional DAWs like Logic Pro X and FL Studio, but I don’t really like it in GarageBand. I find it tends to make the recordings sound choppy and weird, especially if you’ve got a lot of effects on the track.
Other Articles You May Be Interested In
- How to Loop in Garageband iOS [3-Min Read]
- How To Make Your Own Loops In Garageband
- How to Use A Looper Pedal On A Keyboard [SIMPLE]
- How to Connect A Looper Pedal To Your Computer [SIMPLE]
- Are Apple Loops Legal & Royalty Free?
Important Things To Note About Recording Seamless Loops
1) This Is What I Know Thus Far
I’ve been recording a lot more than I used to lately, so I’ll probably come back to update this list again sometime soon.

 Written By :