To loop in Garageband iOS
1) Have your workspace open and your track regions visible.
2) Tap on the track region with your finger to bring up the menu
3) Select the option, “Loop,” from the editor menu to extend the loop to the end of the screen
It’s as easy as that. But there are other things that you can do including adding more bars so you can extend the loop much further than the original distance. The length of the loops depends on how many bars there are. The same thing goes for Logic Pro for iPad.
Step-By-Step Guide to Looping in Garageband iOS
1) Have Your Workspace Open and Your Track Regions Visible
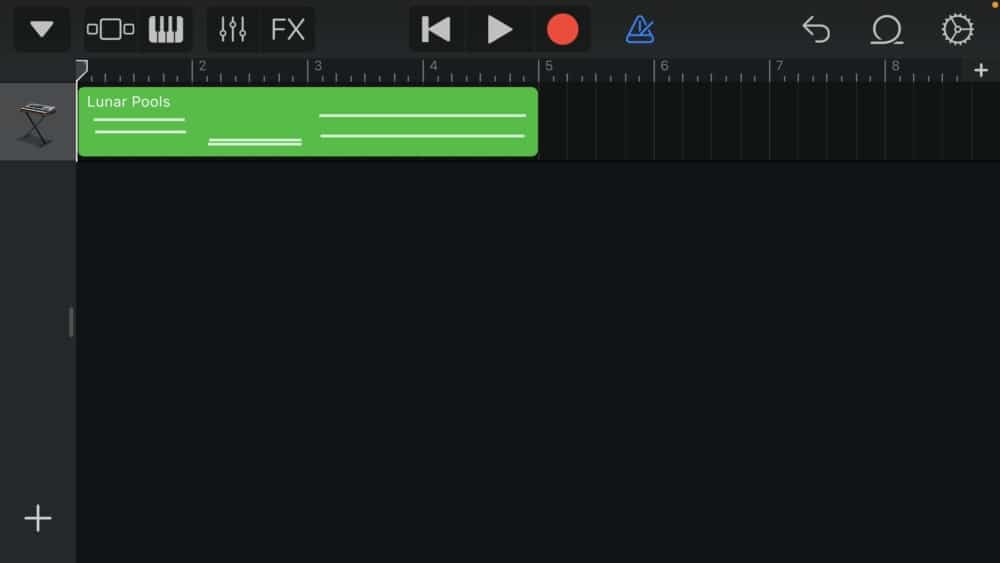
To get to this screen, you just have to click on the little bars on the top-left-hand side of the interface. And, as we mentioned earlier, it doesn’t matter what kind of region you’re trying to loop. It’s the same principle for each, whether it’s audio, MIDI, or a drummer track.
2) Tap on the Track Region With Your Finger to Bring Up the Menu
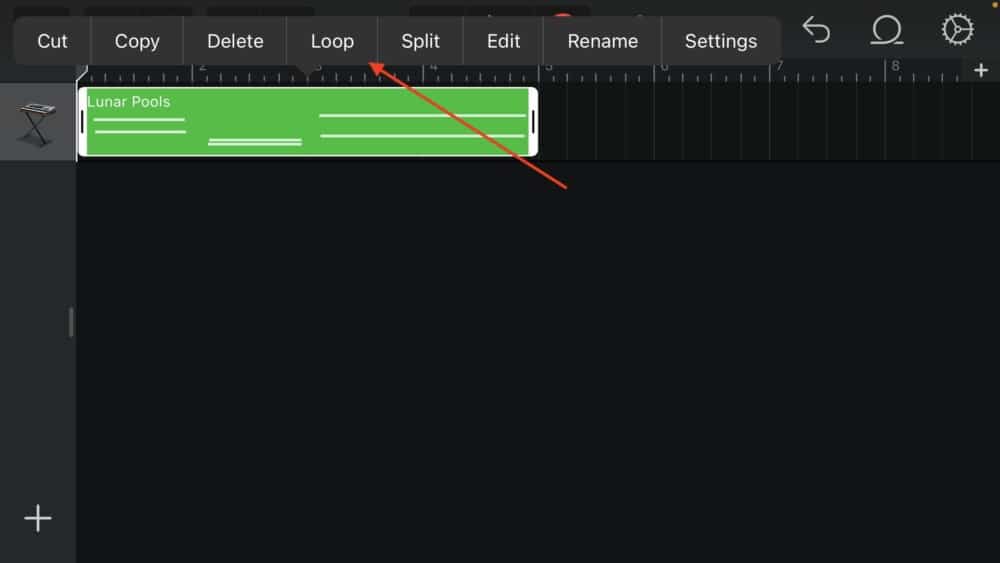
To bring up the editor menu, you just have to tap on the region with your finger and you’ll see all of the options shown above.
3) Select the Option “Loop” from the Editor Menu to Extend the Loop
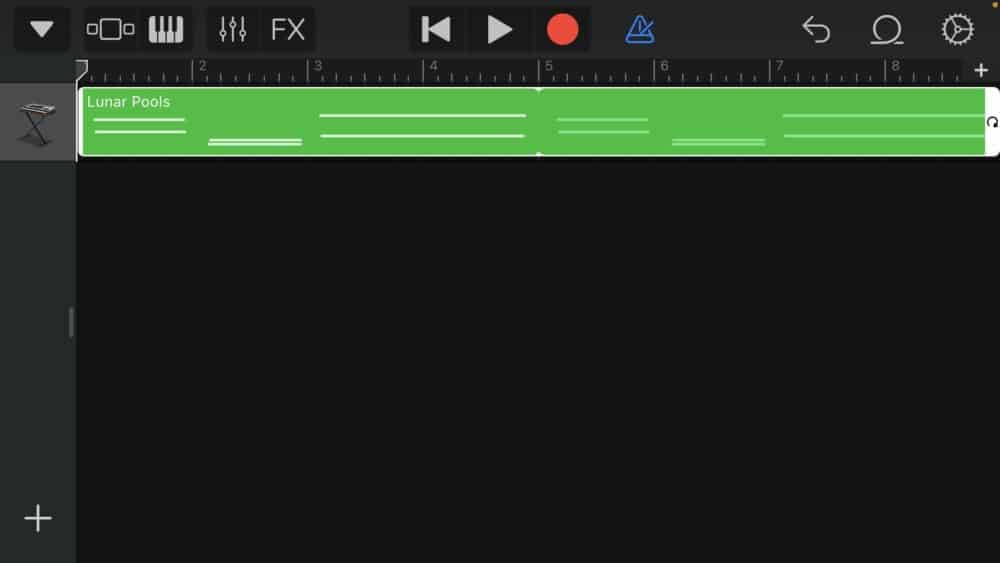
Once you’ve tapped on the Loop option, it’ll look something like this, but what if you want this loop to be much, much longer? In order to do that, you have to first extend the length of your song with the “+” symbol that you can see on the top-right-hand side of the workspace.
How to Make Your Loop Longer in Garageband iOS
1) Press the “+” Symbol to Add More Song Sections
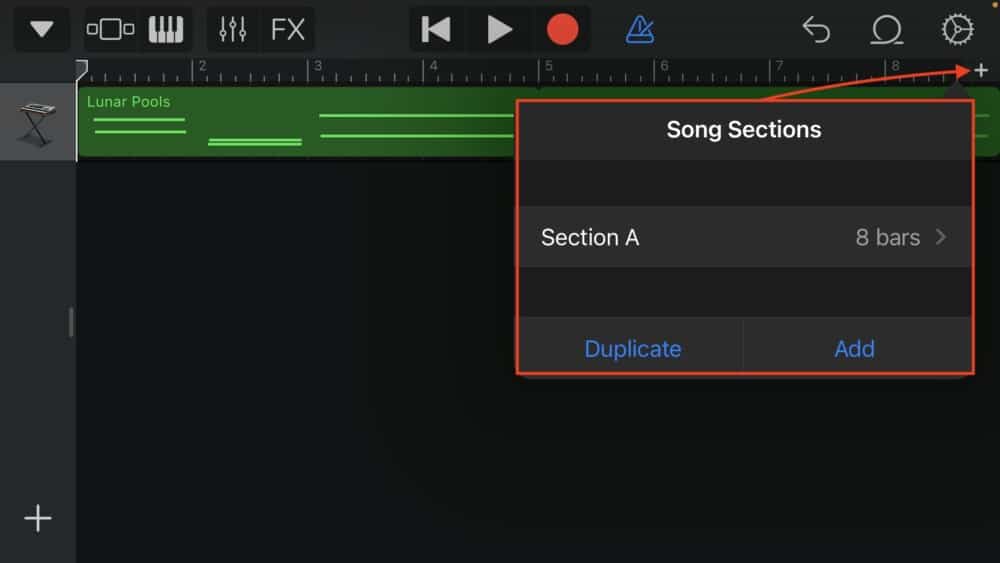
By adding more song sections, you’ll be able to extend the length of your song and also your loops. This is how you get around the annoying problem whereby the song seems like it’s not long enough.
The loops will automatically go to the end of the song. You can adjust how long it is from there manually by selecting the loop and pulling it to where it needs to be.
2) Choose How Many Bars You Want the Song (and Loop) to Be
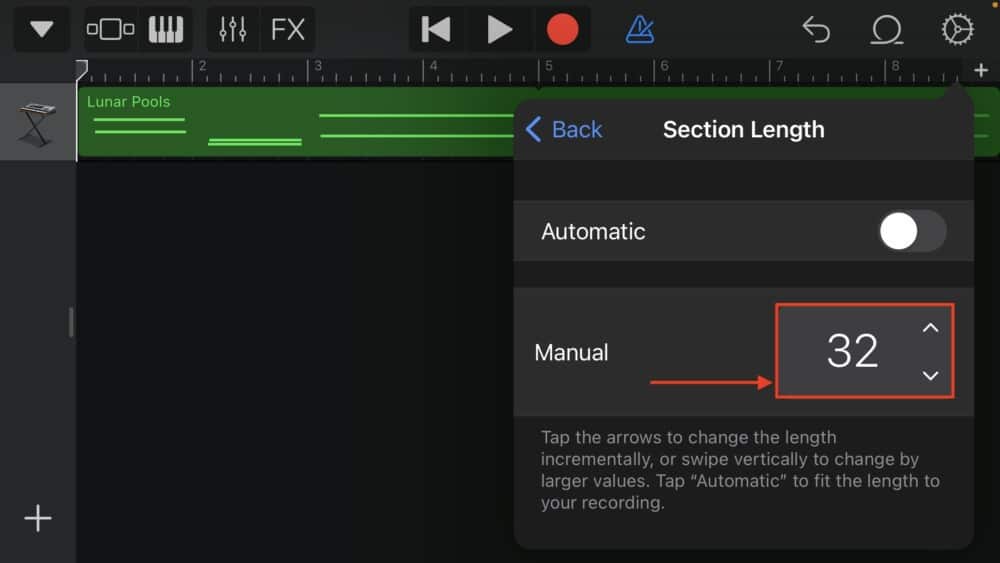
If I want to add more bars, I just double how many there are currently are, or I’ll add how many I think there will be. In this case, I chose 32 bars.
3) Press on the Screen Outside of the Section Length Box to Make the Changes
Once you’ve selected the number of bars and then you select out of that screen (you don’t have to press anything other than the other part of the interface to exit that screen), the loop and the rest of your song will be much longer. You can see the results of this with the image shown below.

How to Save A Loop in Garageband iOS (iPhone and iPad)
One of the disadvantages of iOS Garageband compared to macOS (by the way, I’ve written a whole article on their difference), is that it takes a lot of tapping around and moving from screen to screen in the iOS version.
The macOS version has its own issues, but ultimately, I prefer the intuitiveness of Garageband for desktop. But I digress, let’s talk about how to actually save a loop now.
To save a loop in Garageband iOS
1) Click the drop-down menu icon
2) Tap and hold the file
3) Click ‘Share’ and ‘Song’
4) ‘Uncompressed AIFF’ and ‘Share’
5) Click ‘Save to Files’
6) Choose ‘Garageband File Transfer’
7) Open a project and click the loop icon
8) Drag the loop to your tracks
The bolded section above is how to save loops, however, let’s walk through more of a guided tutorial now so you can see every step of the way.
1) Press on the Drop-Down Menu Icon

Pressing on the drop-down menu is how you get out of the Tracks region and to your interface where you can find all of your projects and saved files. This is the place where you go to switch from file to file or share a project.
2) Tap and Hold the File

Once you see the project that you want to turn into a loop, you have to press and hold on to the file until you’re brought to the screen where you’re given an option on where to go next.
3) Click Share

Click on ‘Share’ as what’s shown in the image here.
4) Then Choose Song

For this stage, you can choose how you’ll share your project. If you’re trying to make a loop, it makes a lot more sense to choose the ‘Song’ option that way you’ll have access to the mp3, .wav, or .aif file. Choose ‘Ringtone’ if you want to create a ringtone for your iPhone as I showed in my guide to making ringtones.
5) Choose the Uncompressed AIFF and then Share
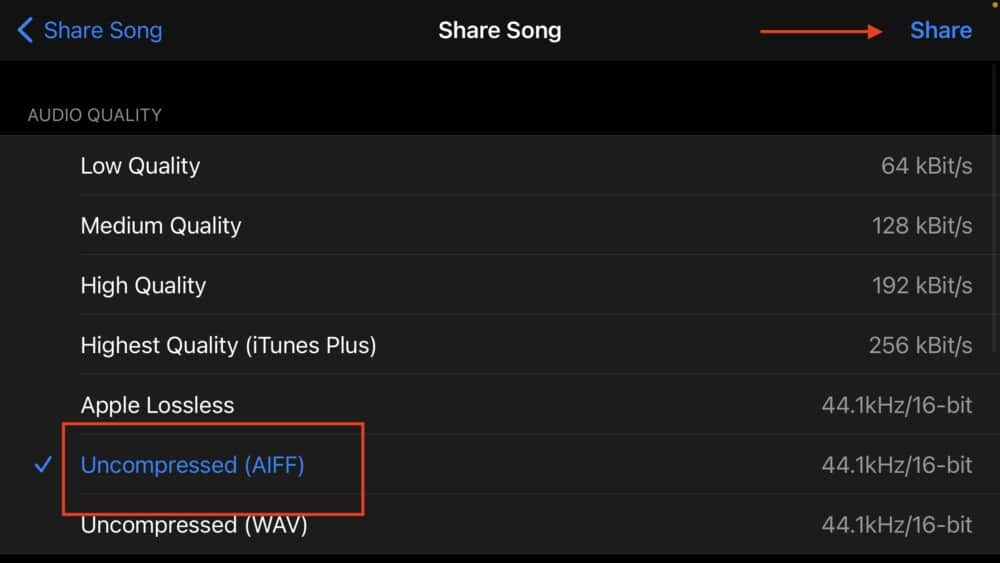
It’s up to you to choose what kind of file format to use, but an ‘Uncompressed (AIFF)’ is the highest quality format that you could possibly have, which means it’ll have the least amount of data loss during the file transfer process. ‘Apple Lossless’ and an ‘Uncompressed (WAV)’ would be just fine though too.
6) Click Save to Files

Save it to your files like what’s shown here and you’ll be given an option in terms of where you should save it to.
7) Choose Garageband File Transfer

I’m not entirely sure if this is the same for everyone, but I imagine that if you don’t have the ‘Garageband File Transfer’ option, you could just choose somewhere on your iPhone with ‘On My iPhone.’ If I had to guess, I would say the Loop Library will have access to these files.
8) Open a Project and Click the Loop Icon

Open up a new project or one of your pre-existing ones and choose the Loop icon on the top-right-hand side. It should say a number on it which indicates there is a new loop there waiting for you.
9) Touch, Hold, and Drag the Loop to Your Tracks

When you’re in the Apple Loops section, choose ‘Files’ and then select the loop you just created. Touch it, hold it, and then drag and drop it into your Tracks.
The final product looks like the following:

How to Select Only One Part for Looping?
This is all great, but what happens when you want to save a loop from a project that has a bunch of other instruments and sounds in it? If you only want to save one part of the project as a loop, that means you’ll have to go about it in a slightly different way.
To select only one part of your project for looping, you’ll have to save your project as it is, duplicate it, and then go into the copied version and delete all of the other parts of the project that you don’t want to loop. From there, you just follow the same process as normal.


 Written By :