GarageBand users can work seamlessly with FL Studio users, but you have to go about it in a certain way.
To open a GarageBand project in FL Studio, separately export all the tracks to your desktop as WAVE files using GarageBand’s “Solo” feature and Share > Export Project to Disk. Open FL Studio, then drag and drop all of the files to import them.
The Best Way To Export GarageBand Files for FL Studio
As I explained in my first guide on this very subject, the process of exporting files from GarageBand is a bit different from other DAWs because you can either export the entire thing as a whole or do everything one by one manually.
In other words, while most DAWs offer the option to export separate tracks simultaneously, GarageBand requires you to export each track individually. Here’s how:
1) Solo The First Track And Export It
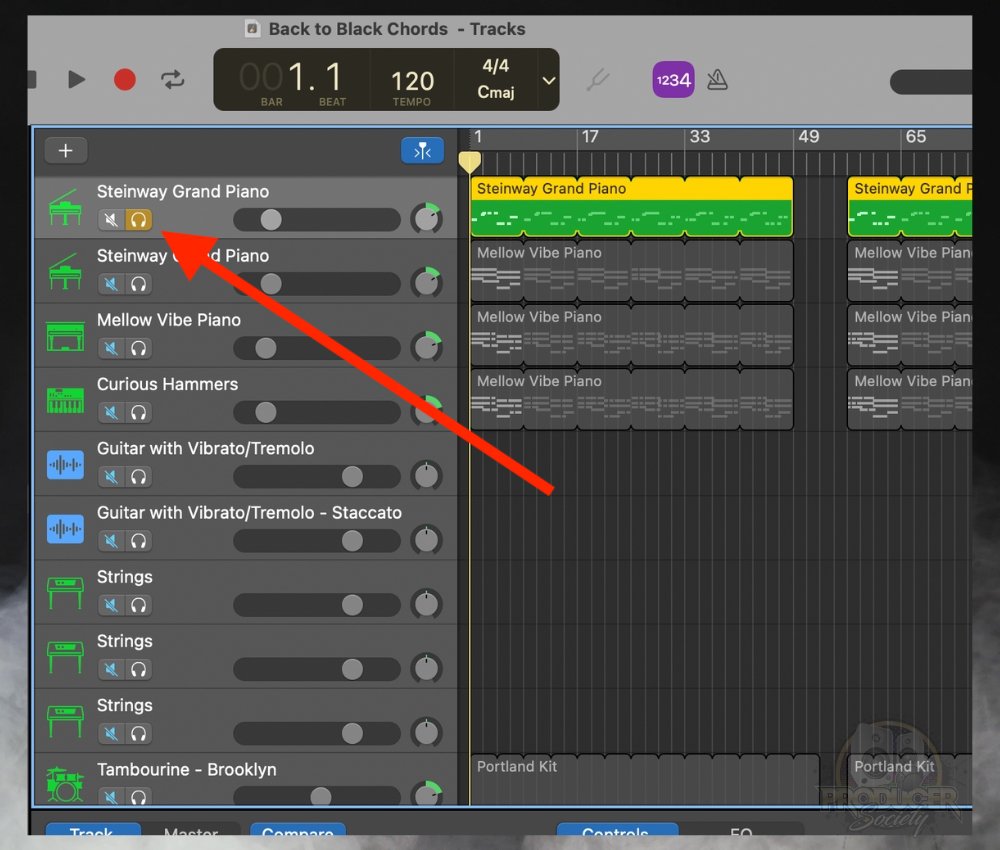
Let’s start with the first step. Begin by soloing the first track, and then export it as an audio file to your computer. This method ensures that only the soloed track, and not the entire song, is exported.
By including the muted tracks, you retain essential elements like the tempo information, empty spaces, and other timing components of the project.
2) Click “Share” > Export Project to Disk
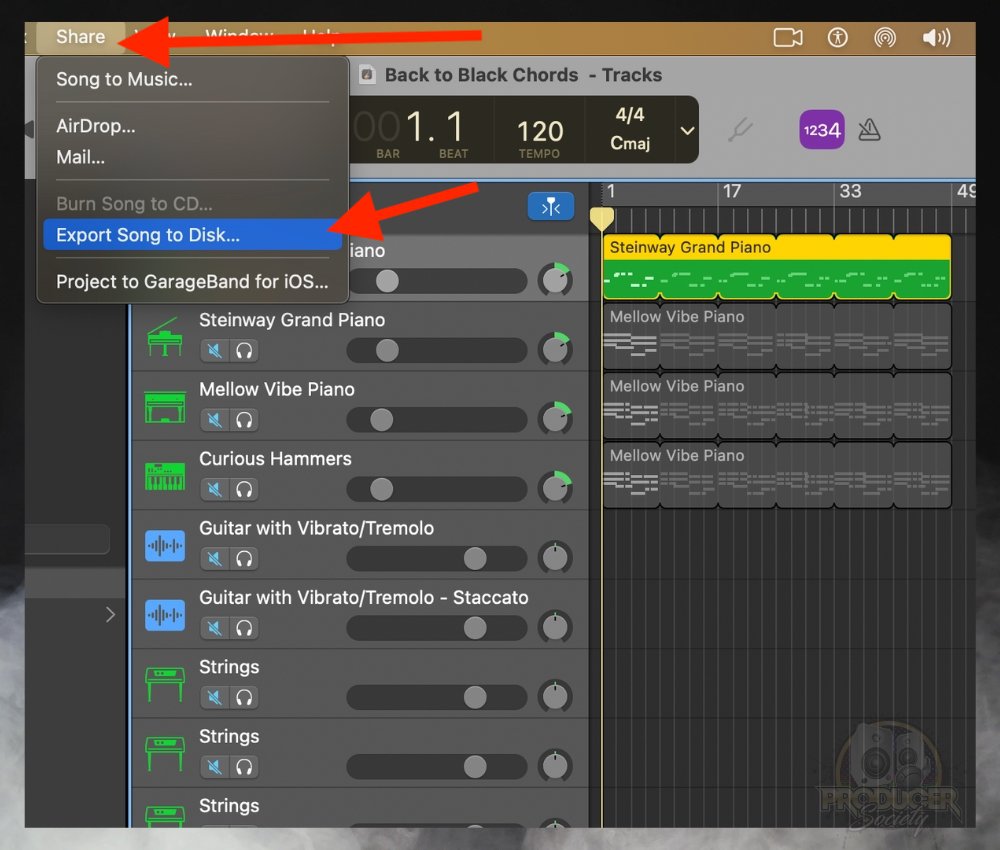
This will open the export window where you can choose how you want to export your song.
3) Give The File A Memorable Name
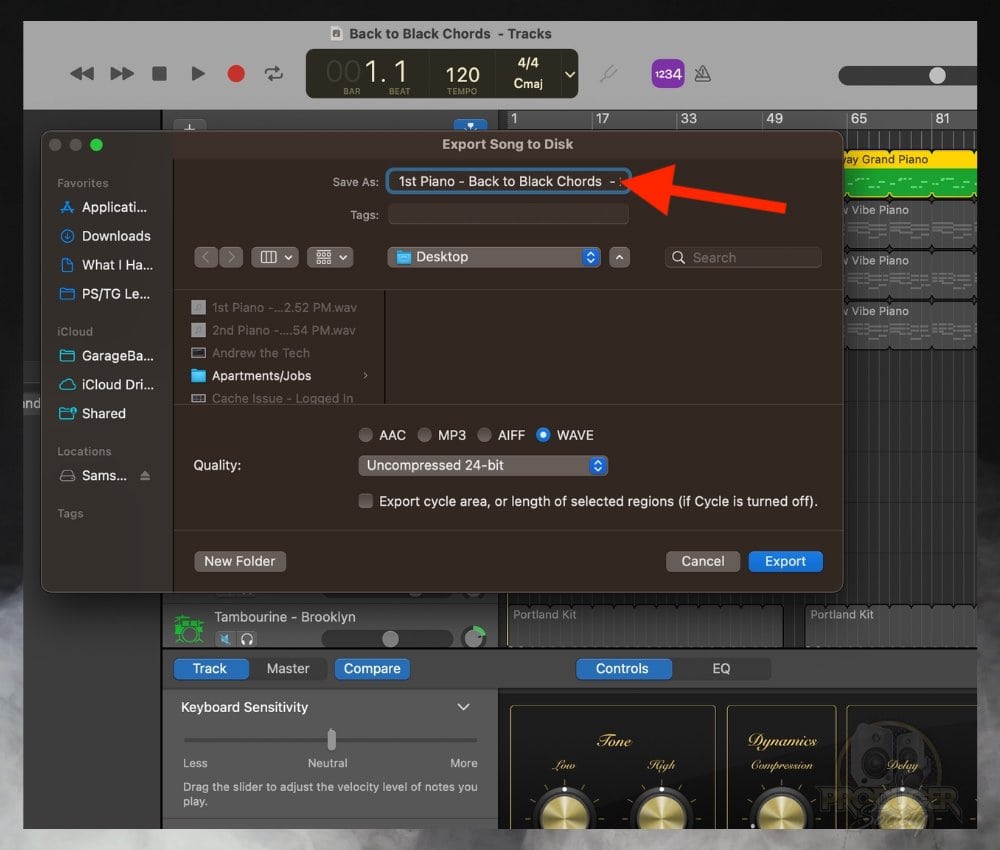
When you name each of the tracks appropriately (e.g., Guitars, Bass, Keyboard, Synth, Drums, etc.), it’ll help you identify each track easily. For example, “Left Clean Guitar – Verse,” is a good way to go.
Put yourself in the other person’s shoes when thinking of how the files should be named.
When collaborating with another producer, properly naming each exported track makes it easy for them to identify the audio files and make creative tweaks, which will assist the mixing engineer during the mixing and mastering process as well.
4) Export As WAVE (.wav) File
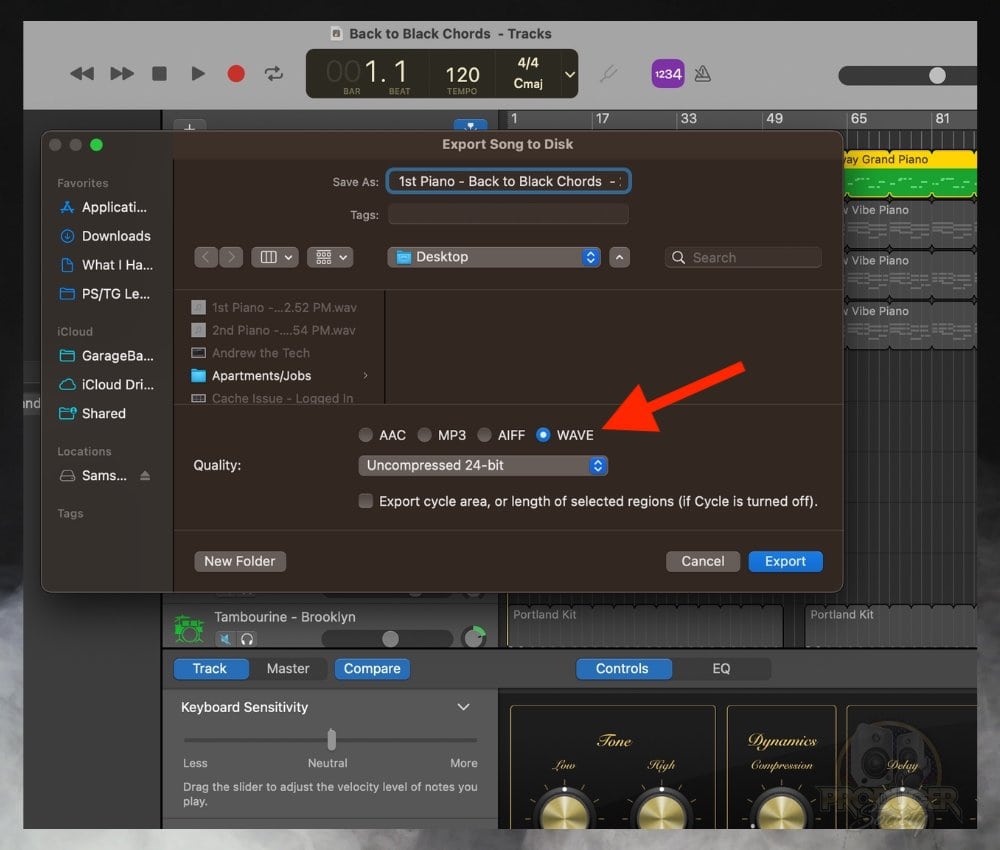
Moving on to the format selection, Wave (commonly known as WAV) is the most preferred audio format among the available options (ACC, AIFF, MP3, and WAVE). Its high-quality, uncompressed nature ensures that there is minimal loss in track data during the rendering/exporting process.
It (WAVE) is widely recognized and compatible with all DAWs. Although larger compared to MP3, the size is worth it because of the audio quality.
Once you select the audio format, decide where you want to export the track. I recommend creating a new folder on your desktop for ease of access.
Alternatively, you can browse and choose an existing folder, or even export directly to your desktop if you prefer. Now click Export and your track should start exporting.
5) Repeat The Steps For The Other Tracks

Once you have completely exported the first track to the destination you chose, move on to the next track. The steps are the same:
- First, solo the track.
- Then open the export window
- Give the track a name
- Choose an audio format,
- Select the file destination.
- Then click on the Export button.
Repeat these steps until you’ve exported each of the tracks you want to export. This might take a little while (depending on how large your project is).
You have to thoroughly go through each step illustrated above with each track you choose to export so that you can successfully open the project on FL Studio.
If there are effects (e.g. a reverb or compression) you have used on any track in the project, and you do not want to have these effects in the exported tracks, ensure you disable those effects before exporting the track.
Effects used on any of the tracks will be processed and exported in the audio file If not disabled before export.
6) Collect The Exported Files To A Folder

If you’ve not already created a new folder during the exporting phase, then I think this is the time to do so. Create a new folder where you will store all the exported tracks. This is for easy organization, you want to avoid searching for individual tracks when importing the audio files into FL Studio.
When collaborating with other producers, it’s good practice to communicate the tempo of the project. It also helps with recording when the tempo of the project is known, so you can record with the metronome.
7) Compress the Folder & Send It By Google Drive, DropBox, or WeTransfer

It’s very important to reduce the file size if you’re trying to send a large number of tracks and instruments.
This might mean splitting your project into multiple file folders for easier transmission. Google Drive is a good option for this, but WeTransfer and Dropbox are also viable alternatives.
For this part, it can vary in terms of what email service you choose to use. I like Google Drive, but WeTransfer works great as well. I don’t have much experience with DropBox.
A) Choose “New” on Google Drive and then “File Upload”
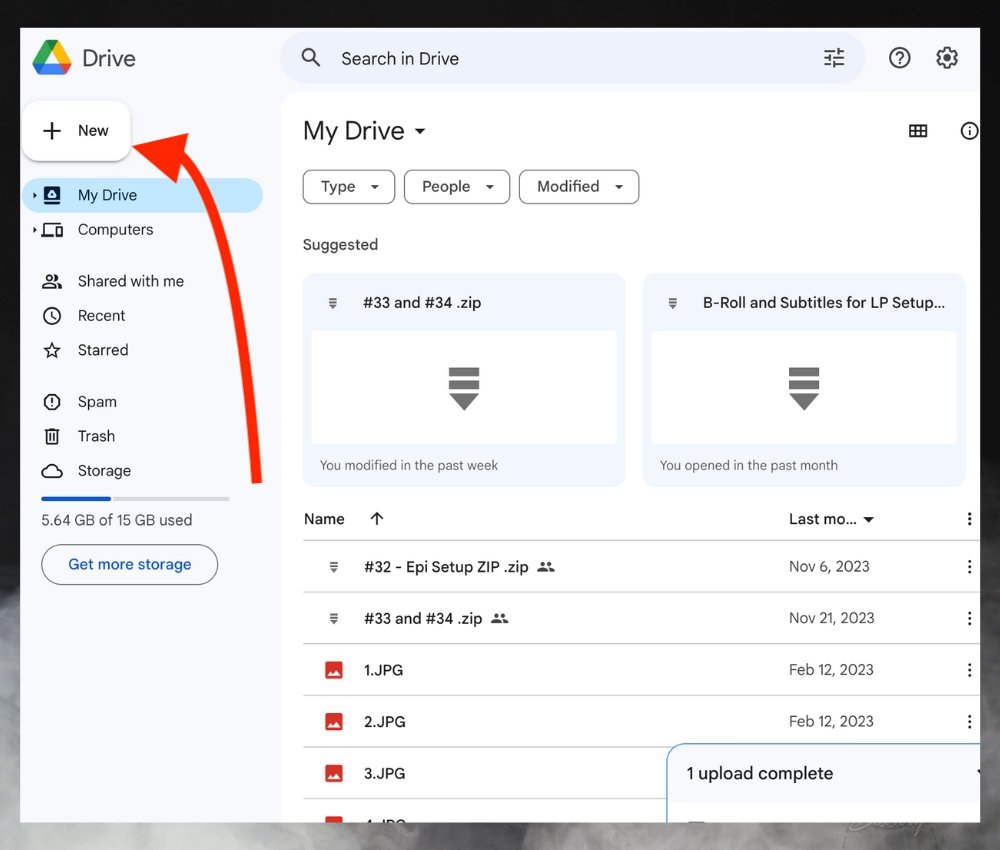
Because it’ll be a zipped file, just choose the “File” option instead of the folder.
B) Share the File Either with Email or With “Copy Link”

8) Open FL Studio

If you’ll be using FL Studio on the same computer, then just go straight ahead and open it up. In FL Studio, open an empty project.
You’ll start on a clean slate without any instruments or channels. To open an empty project, go to the menu panel. Click on “File” and select “New (Basic 808 with limiter)”.
9) Change the Tempo to that of the GarageBand Project

Once you’ve opened an empty project in FL Studio, the first thing to do is to change your FL Studio project tempo to the exact one you used in GarageBand.
10) Import The Track Files To FL Studio
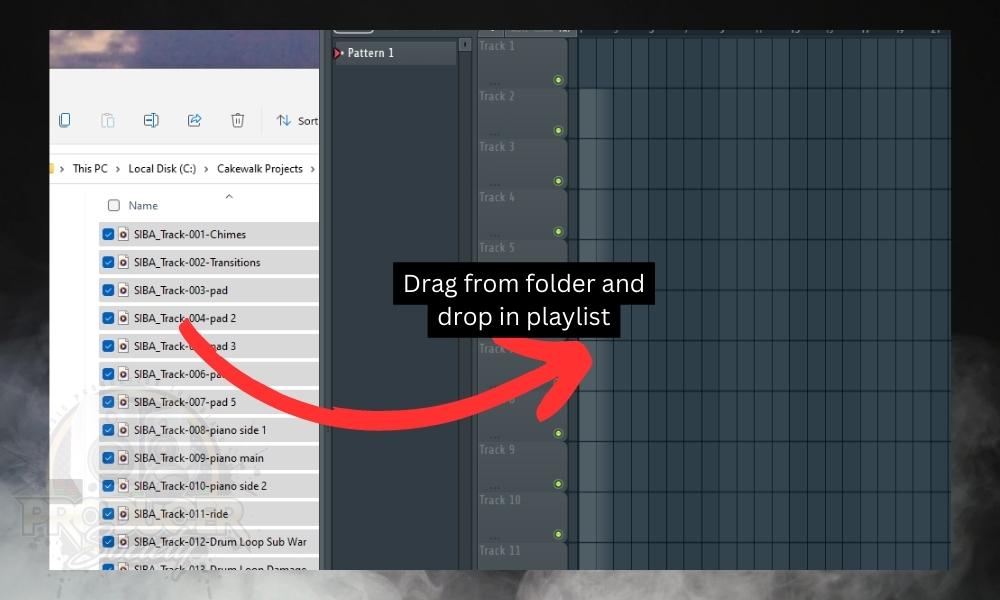
After exporting from GarageBand, the next step is to bring your tracks into FL Studio. You can do this simply by selecting all the exported files and dragging and dropping them into the FL Studio playlist.
This method saves time as it avoids the need to import each track individually. After successfully importing all the tracks into FL Studio, your next step is to ensure they are aligned both to the grid and with each other.
11) Align The Tracks And Listen to Ensure It’s Correct
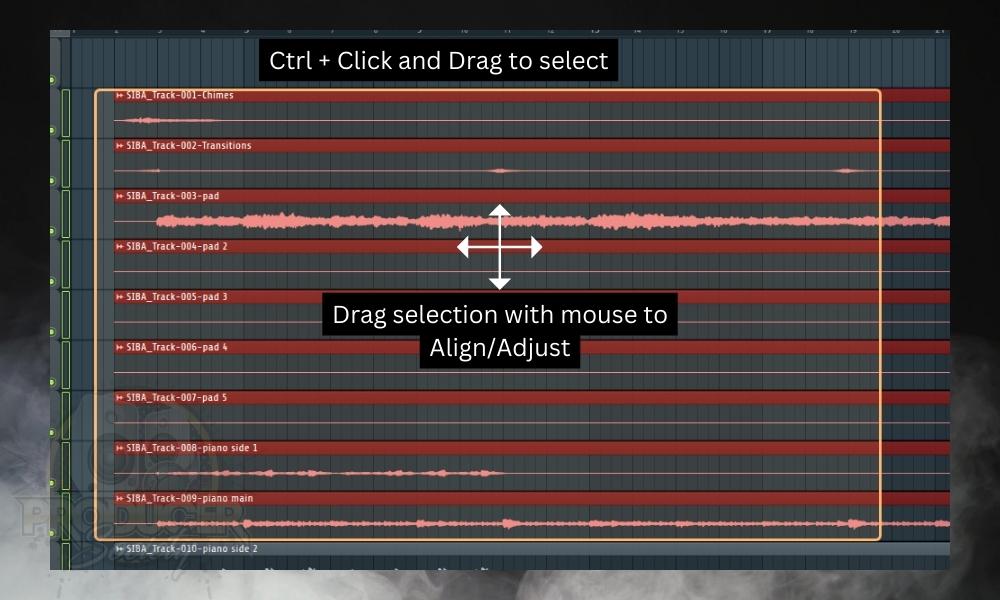
Finally, ensure that all the tracks are properly aligned. Play the song in FL Studio with the metronome on to check if everything is synchronized. Also, use the grid lines as a guide.
It’s crucial to align the tracks accurately since each track is exported from the beginning of the timeline in GarageBand.
When exporting, each track gets exported from the beginning of the timeline, Therefore, make sure the tracks are properly aligned to fit the grid. This successfully opens a GarageBand Project in FL Studio.
Important Things to Remember
1) Don’t Forget About the Master Track and Other Plugins
Before exporting your project, make sure you do or don’t have plugins on the tracks, depending on what your goal is. For instance, I usually have master track plugins running while I’m working just to get the volume up. I try to remember this before exporting.
Other Articles You May Be Interested In
- How to Import/Export Audio To & From FL Studio (MP3s & More)
- How To Collaborate With Other Music Producers
- How To Export Out Of Garageband Without Normalizing


 Written By :