It’s a quick and easy process that’s accomplished with just a few steps (there’s more than one way too).
To import audio in FL Studio:
1) Create New Project
2) Add An Audio Clip Channel to Channel Rack
3) Click Audio Clip > Folder Icon
4) Load the Audio File
5) Open Playlist to Add the Clip
To export:
7) Export > File > .wav
8) Choose File Name & Location
9) Select File Format & Quality
10) Start
5 Different Ways of Importing Audio into FL Studio + How to Export
I’ve outlined really detailed infographics for how to import audio into FL Studio in 5 different ways. I’ve done the same thing for exporting audio from it as well, however, if you’re more into video, I’ve got that for you too. Check it out down below. Without further ado:
1) How to Import a File Using an Audio Clip In the Channel Rack
A) Open FL Studio
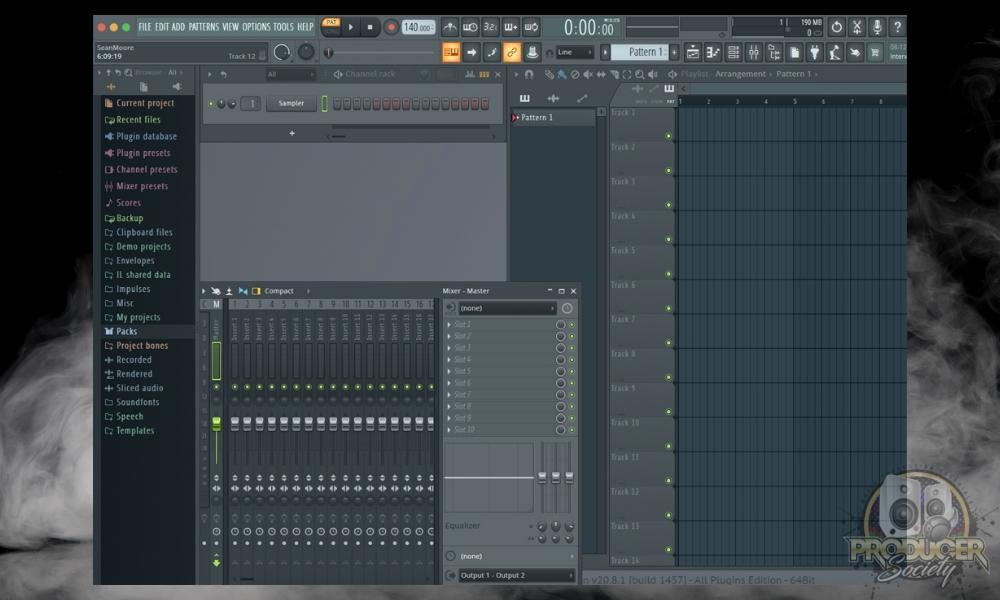
Locate the FL Studio application launcher icon and double-click it to start the program.
B) Create A New Empty Project
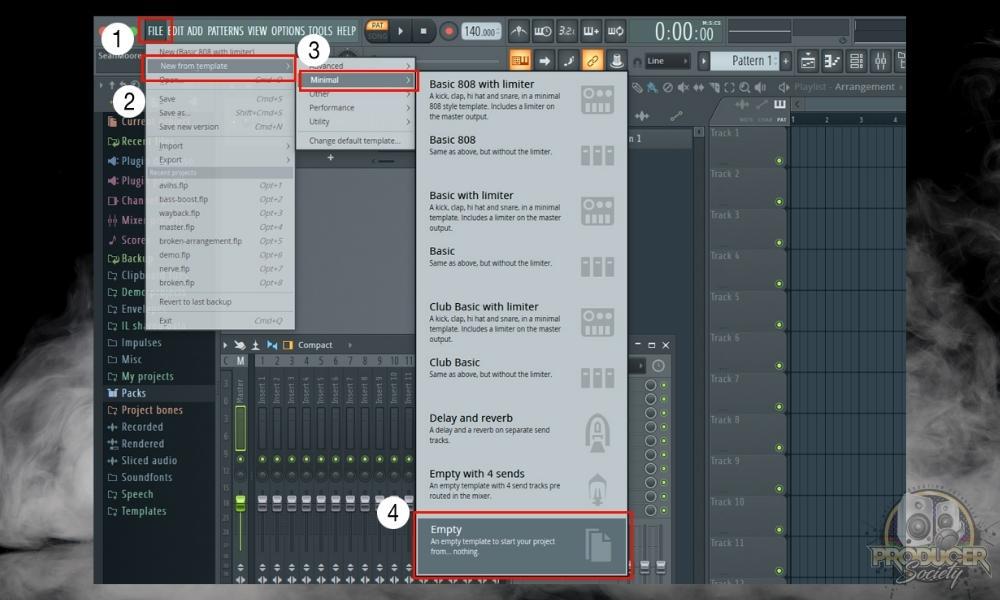
In FL Studio select File > New from Template > Minimal > Empty. This process will be repeated a few times throughout the article.
C) Add a New Audio Clip to the FL Studio Channel Rack
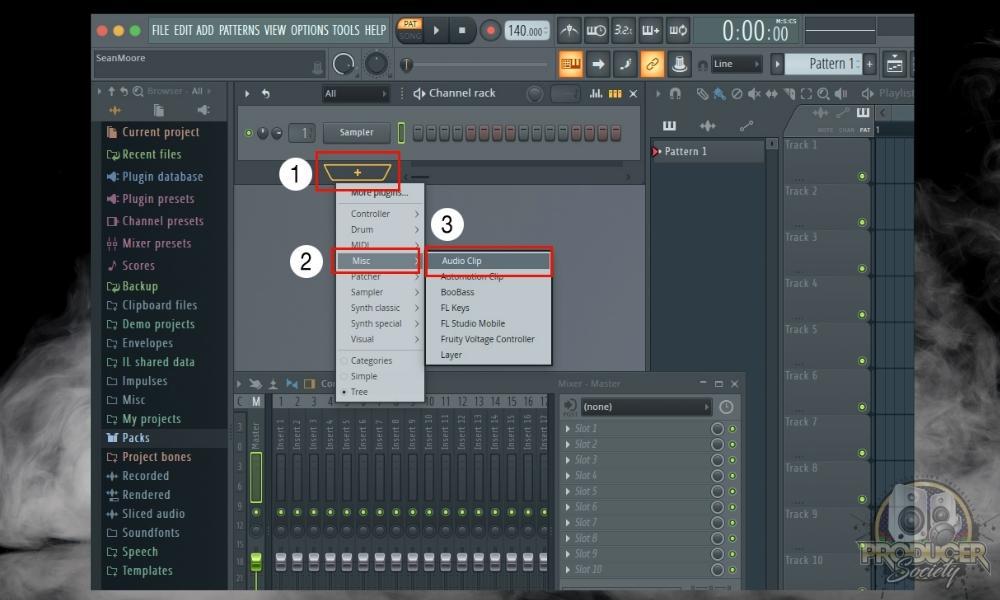
Click the plus icon in the middle of the very bottom of the Channel Rack. To add the Audio Clip, use the fourth sub-menu labeled Misc. The Audio Clip is the first choice available, at least in the Windows version. In the macOS version, it’s organized a bit differently. Either way, it’s easy to find.
D) Open the File Chooser for the Audio Clip
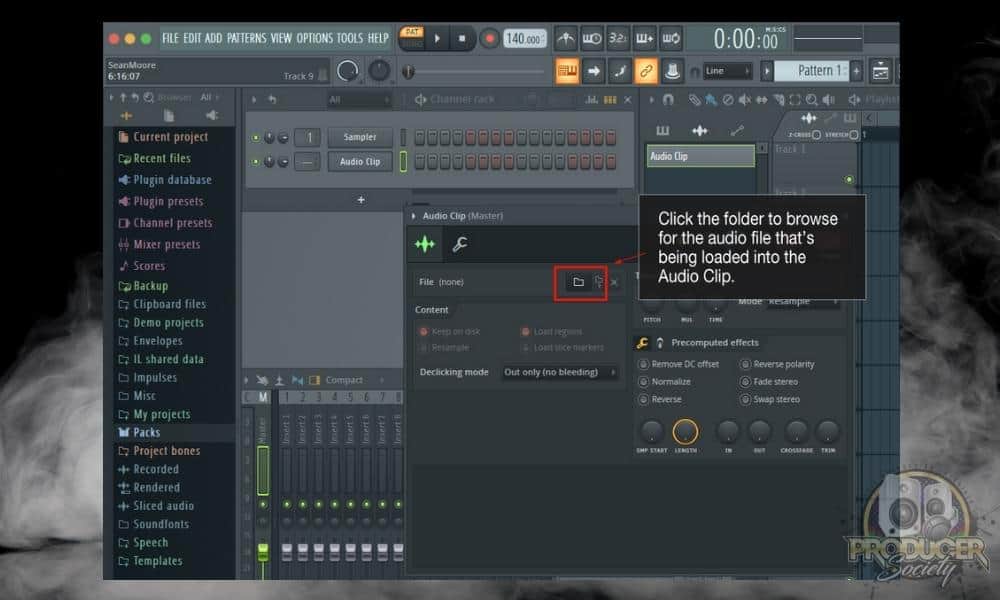
To load the audio file, first, click the Audio Clip that was added to the Channel Rack in the previous step.
From the window that appears click the folder icon to the right of the label that says File. Finally, browse your operating system to find the audio file to import into FL Studio.
All supported audio file formats will be available as an option to import. Formats include WAV, AIFF, DS, DWP, FLAC, MP3, OGG, SF2, and Speech. I prefer either WAV or AIFF, and I think these are the most common.
E) Select the Audio File to Load Into the Audio Clip
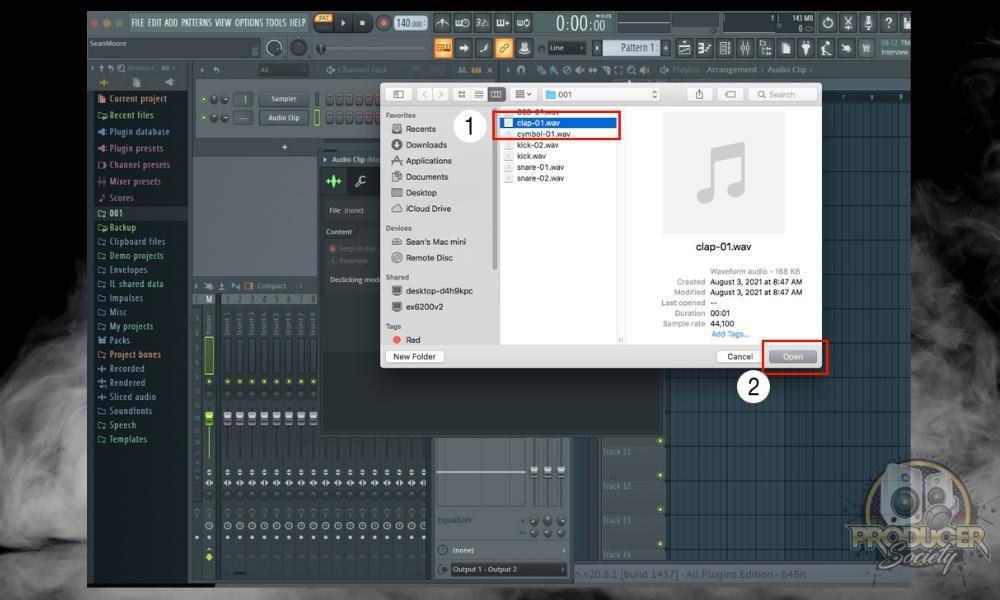
Using the standard operating system file directory, locate the file on your computer. Click the file and then click Open. There’s an even quicker way to accomplish this step, we’ll take a look at that later.
F) Draw or Paint the Clip to the Playlist
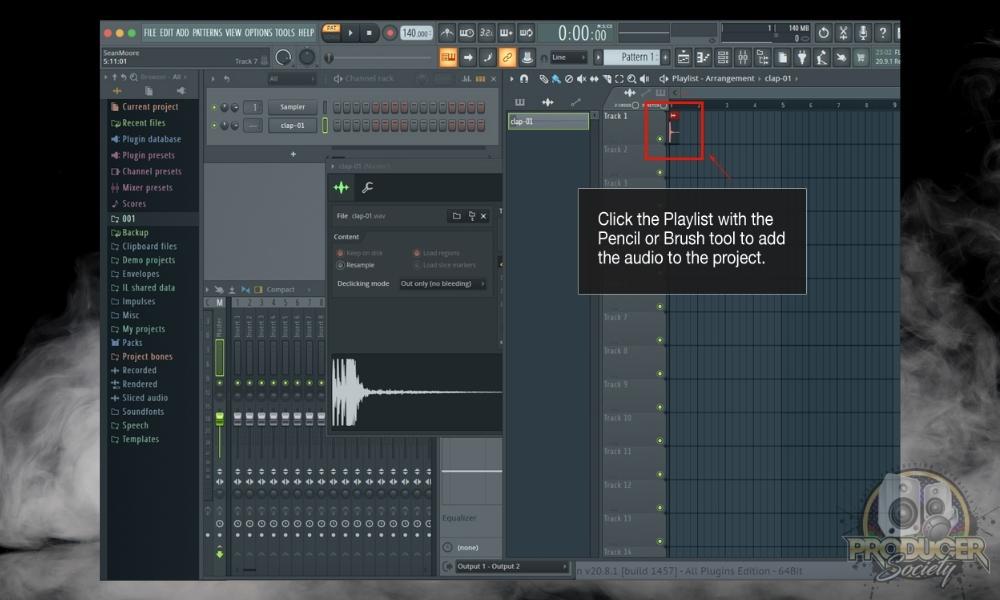
The Brush tool should be automatically selected by default when you created the new project. Simply click the Playlist anywhere once to add the audio. Click again to create another instance of the audio.
2) How to Import Audio into FL Studio (The Fastest Way)
A super-fast way to add audio to FL Studio projects is to simply use the operating system’s file explorer. There isn’t a whole lot to it but here are the steps to quickly import audio into FL Studio. In simple terms, you just have to drag the file right into the FL Studio interface – it’s not hard.
But like I explain at the end, you need the Producer Edition for this which costs a bit more money. You’ll need to get it eventually, so you might as well just buy it from Plugin Fox and not even bother with the Fruity Edition.
A) Open a File Explorer (Finder on Mac)
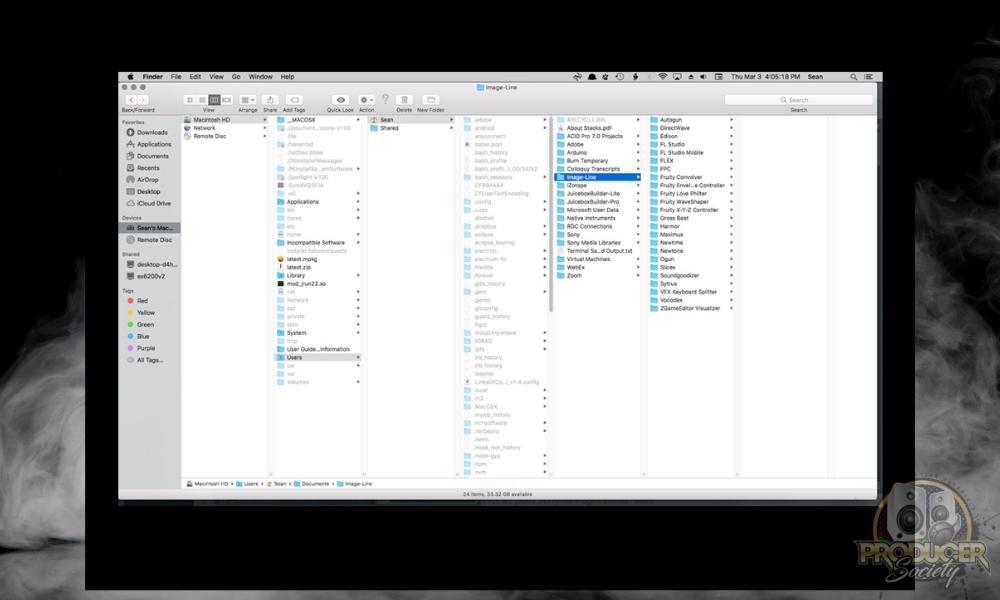
Launch the file explorer application for your operating system. This is File Explorer for Windows and Finder on Macintosh.
B) Resize Explorer Window
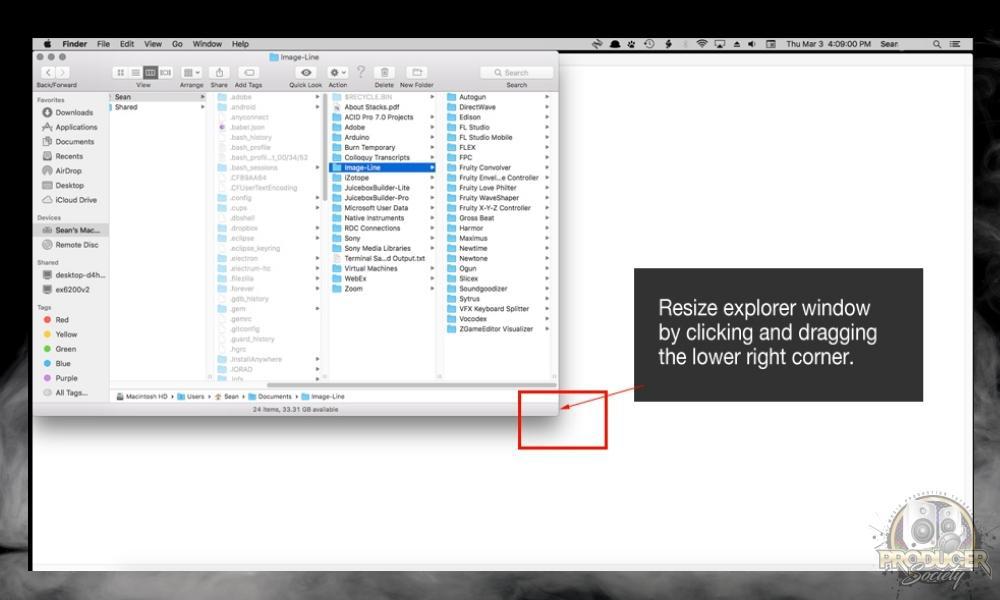
Click the bottom right-hand corner of the window. Drag up and to the left until it’s roughly 1/3 of the size of the total screen. This will enable you to see FL Studio behind it in just a moment.
C) Open FL Studio & Create A New Empty Project
Refer to step two above for detailed instructions for opening FL Studio and getting a new empty project set up.
D) Go Back to File Explorer
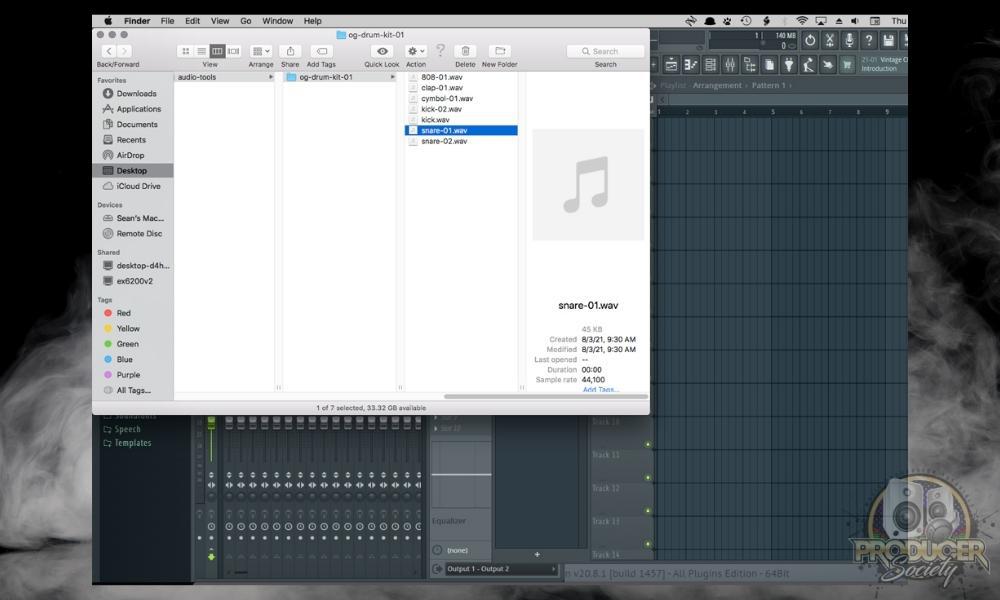
Using the operating system of the computer, navigate back to the file explorer. Once you’ve switched back to the explorer application you should still see FL Studio in the background.
E) Drag Files From Explorer Window Into FL Studio
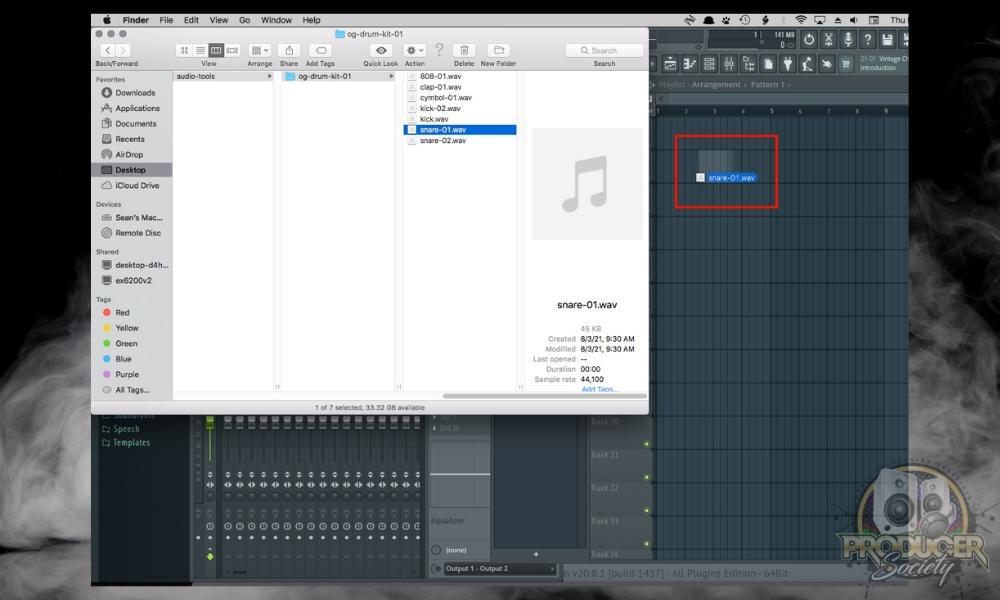
Next, locate an audio file you’d like to import. Click the file and while continuing to hold down the mouse button drag the file into FL Studio. In a normal project, you might drag it to the general area in the Playlist it will be used.
This method is technically the same as the one introduced in this article. It’s good to understand what’s going on under the hood when you’re working in a DAW.
So, to review quickly, dragging and dropping the file also adds an Audio Clip to the Channel Rack. This will automatically establish the link to the file on the computer rather than you having to do it through the chooser dialog window.
3) How to Import Audio Into FL Studio Using Slicex
The thing about FL Studio is that you have to access it with a tiered system. There is the Fruity Edition, Producer’s Edition, Signature Bundle, and then the All-Plugins edition (all on Plugin Fox).
Each one is more expensive than the other while the Fruity Edition is the least expensive among them – but also the most restricted.
As a result, some of them have limitations, including the ability to save projects, import and export certain files, etc. That said, there are usually ways to work around limitations albeit in a way that’s not the best, but it’s an alternative solution at least. Let’s take a look at one of those right now.
The first way of importing audio into FL Studio is with the Slicex plugin, which is just another type of sampler. Here’s how to use this useful tool.
A) Open FL Studio

B) Use the Command (fn + F6) to Bring Up the Channel Rack (just F6 for Windows)
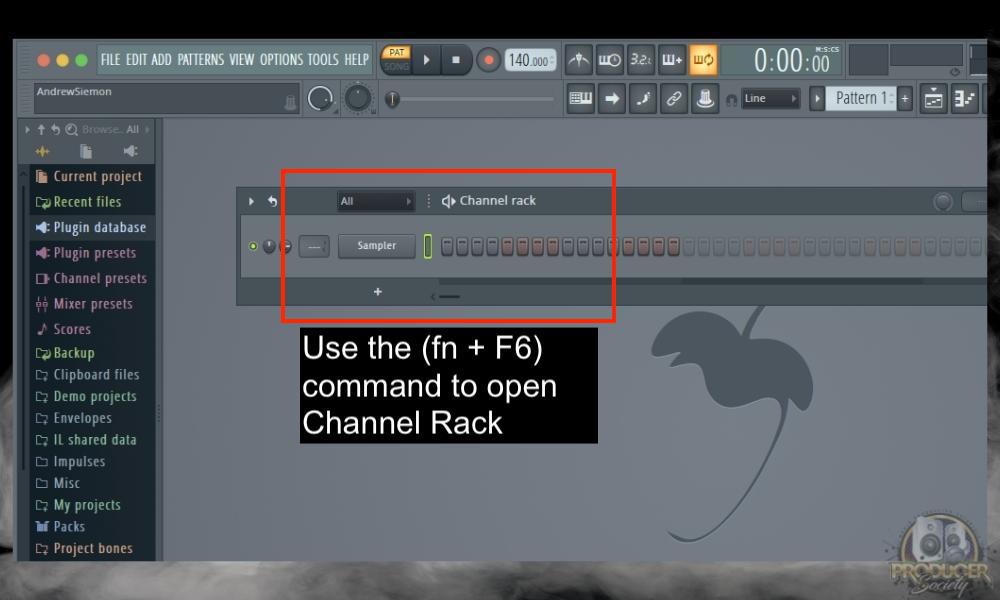
C) Type in Slicex in the Search Bar On Top of the File Browser
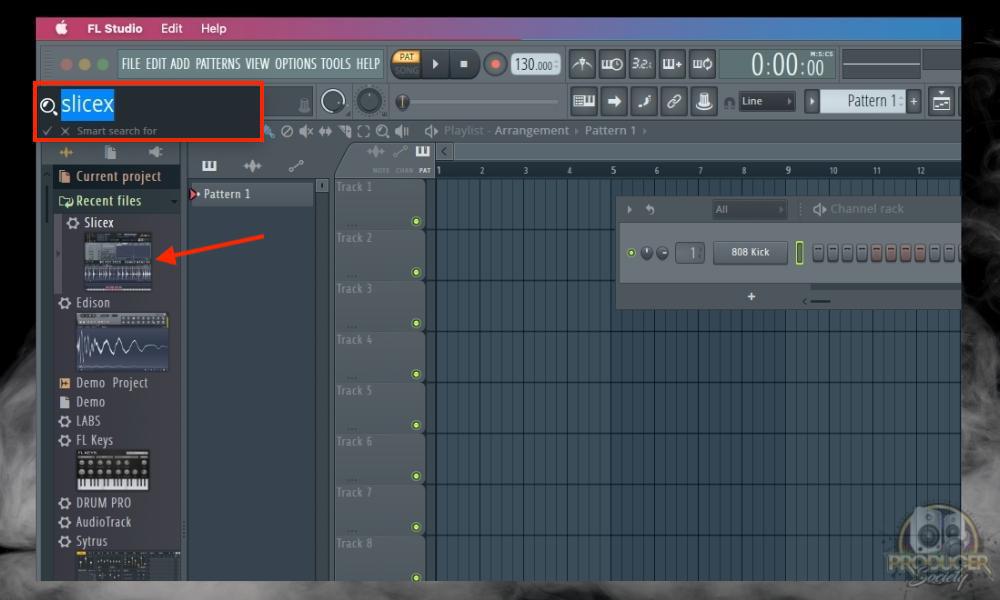
What you want to do next is go to the top of the File Browser like what’s shown in the image above and then type “Slicex” into the Search function.
The nice thing about FL Studio is that the Search bar actually works. If the plugin exists in the directory, FL Studio will find it.
D) Select the Slicex from the Menu and Drag It Into the Channel Rack
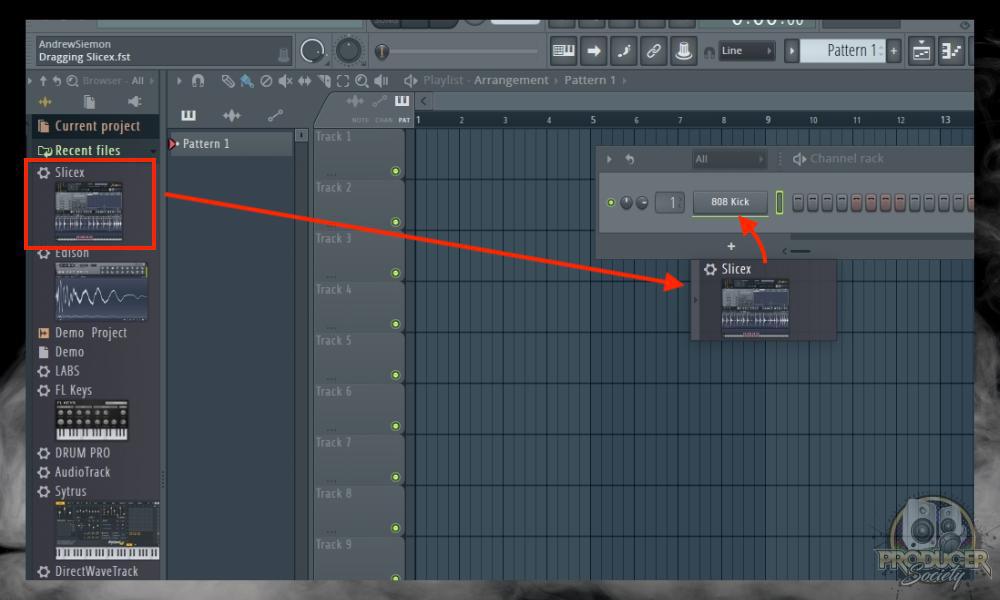
E) Open Slicex by Clicking On It
This is pretty self-explanatory so I don’t think you need an image. Just click on the plugin in the Channel Rack to open its interface.
i) Drag Your Audio File Into Slicex to Import the Audio
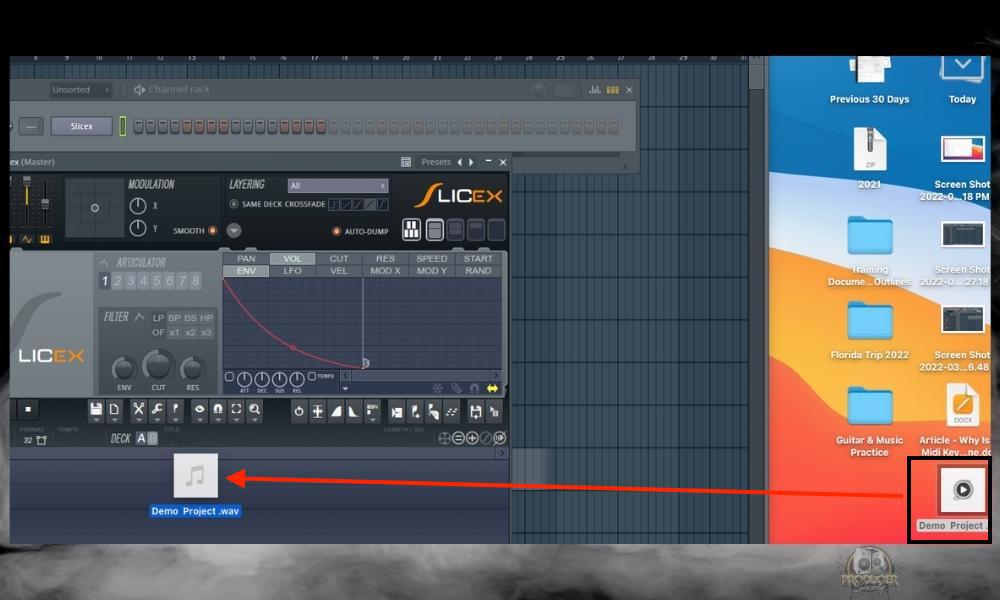
Select the file on your desktop (or wherever you have it) and then simply drag it into the Slicex interface. It seems like you can pretty much drag the file anywhere onto the sampler and it’ll take it.
ii) Alternatively, Click the Floppy Disk Icon To Open the Directory And Import the Audio That Way
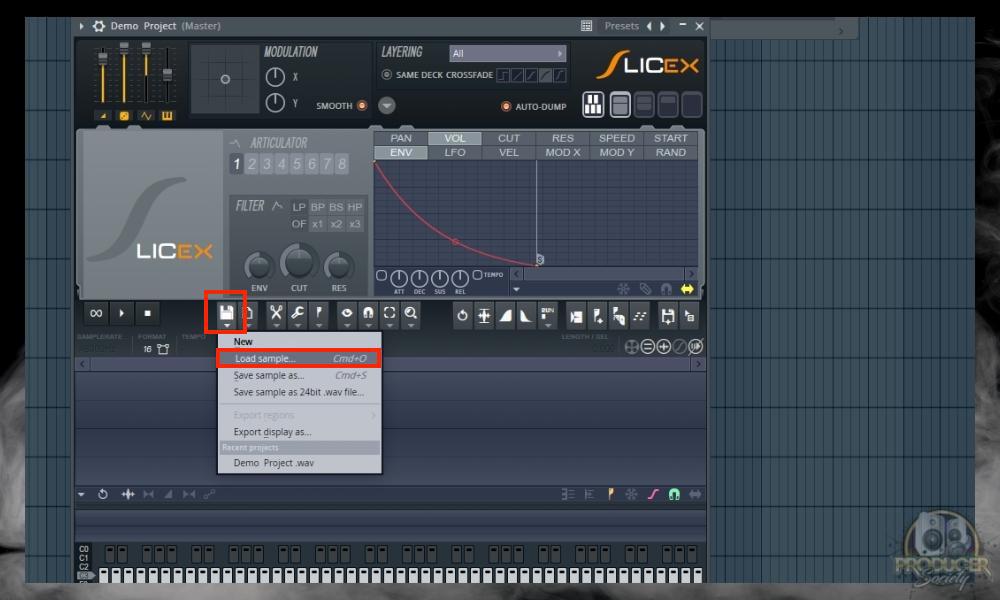
Once you’ve clicked on the Floppy Disk and clicked the “Load Sample” – alternatively you can just use (command + O) – then you’ll be able to import the audio file using the computer’s file directory.
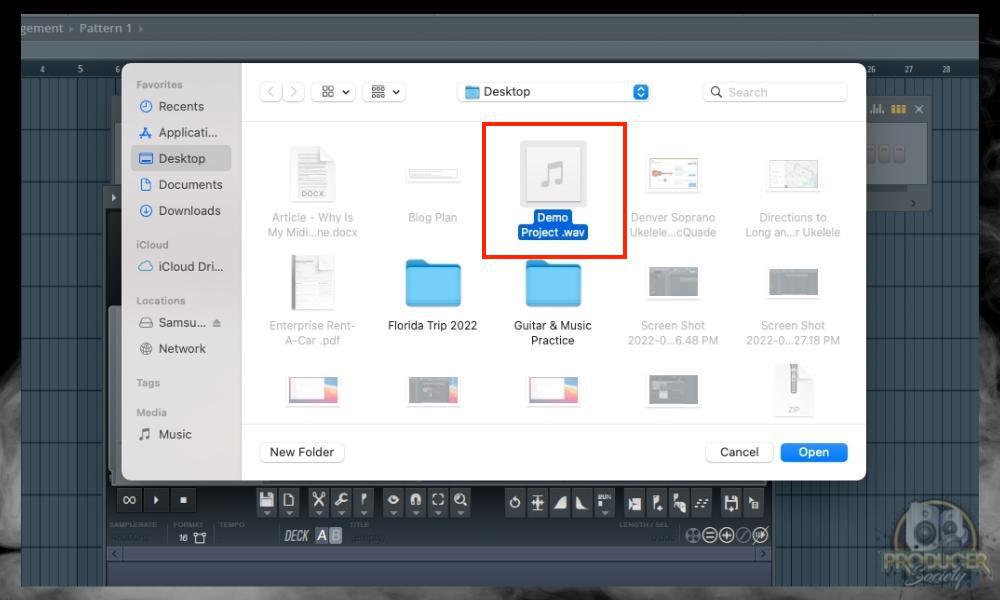
And then we have one more step which involves actually painting the audio into the Playlist.
F) Click the Import Button In the Slicex and Drag the File Into the Playlist
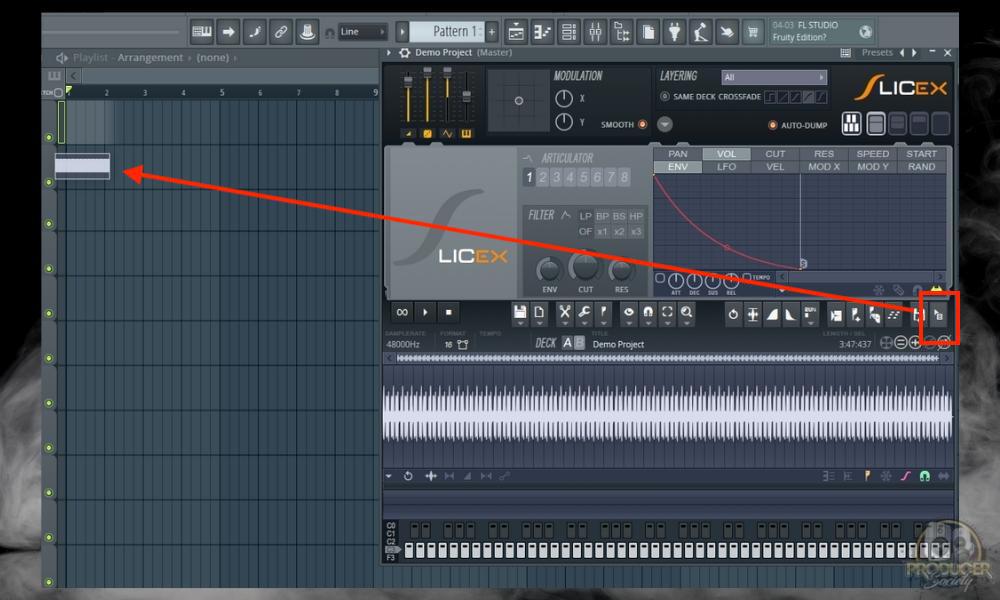
After you’ve imported the sample, if you want to get it into the Playlist, you just have to click the icon that I’ve outlined in the image above, and then you drag the file into the Playlist.
4) How to Import Audio Into FL Studio Using Edison
Using Edison to import audio into FL Studio isn’t that much different, to be honest with you. It’s essentially the same process, however, it’s just that the plugin looks a bit different. Without further ado, let’s get into it.
A) Open FL Studio and Bring Up An Empty Project

B) Use the Command (fn + F6) to Bring Up the Channel Rack (just F6 for Windows)

C) Type in Edison in the Search Bar On Top of the File Browser
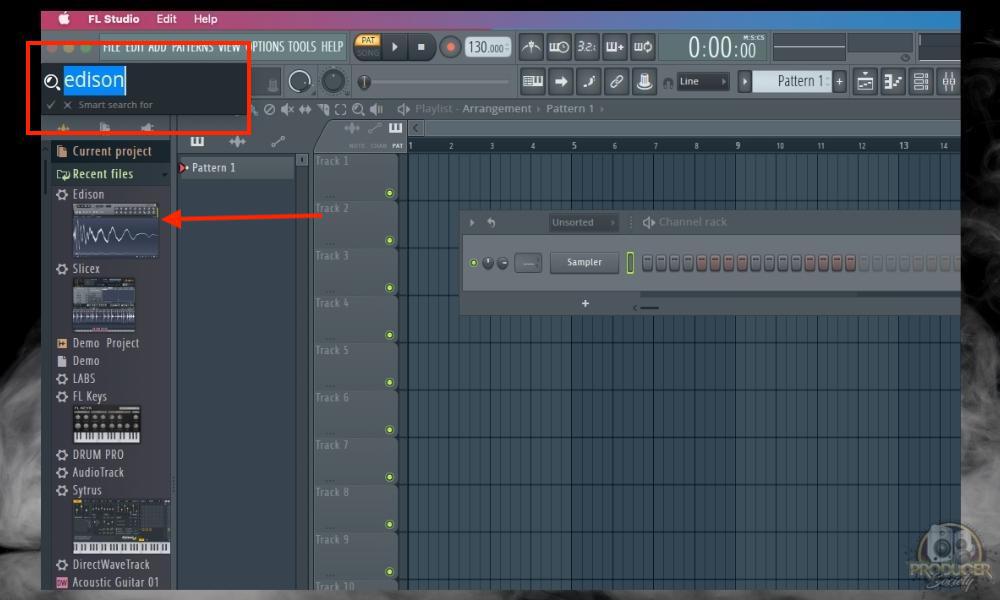
Unlike macOS and iOS products, I find that FL Studio’s search bar is incredibly effective. If you search for something with the search bar, you’ll definitely find it in there if it’s there.
D) Select the Edison from the Menu and Drag It Into the Channel Rack
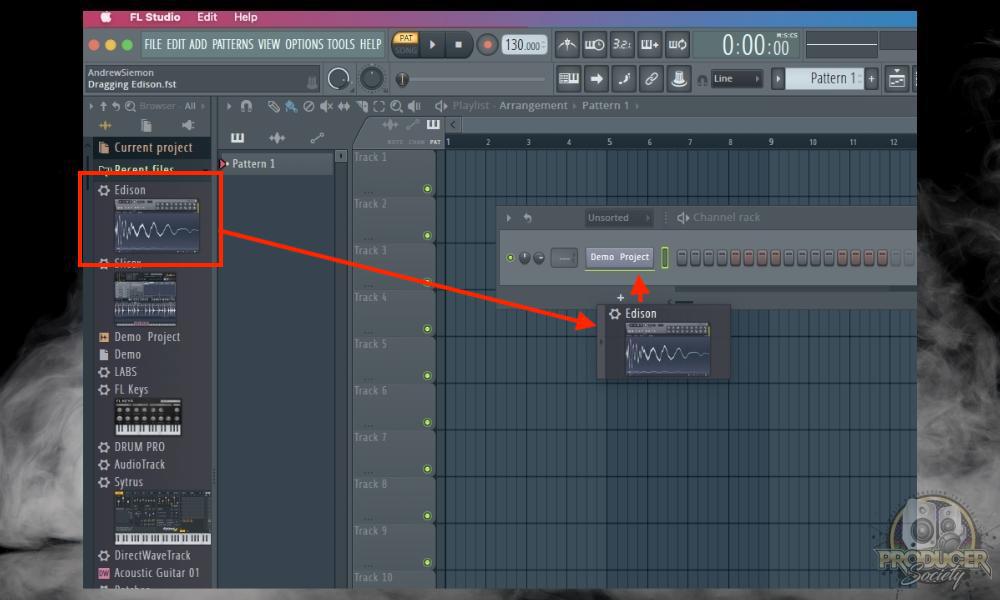
Once you’ve found the Edison sampler, just drag it and pull it into the plugin slot as I showed you earlier. It’ll light up green.
E) Open Edison by Clicking On It
As I said in the section above, clicking on the plugin is self-explanatory. Onto the next part.
i) Drag Your Audio File Into Edison to Import the Audio
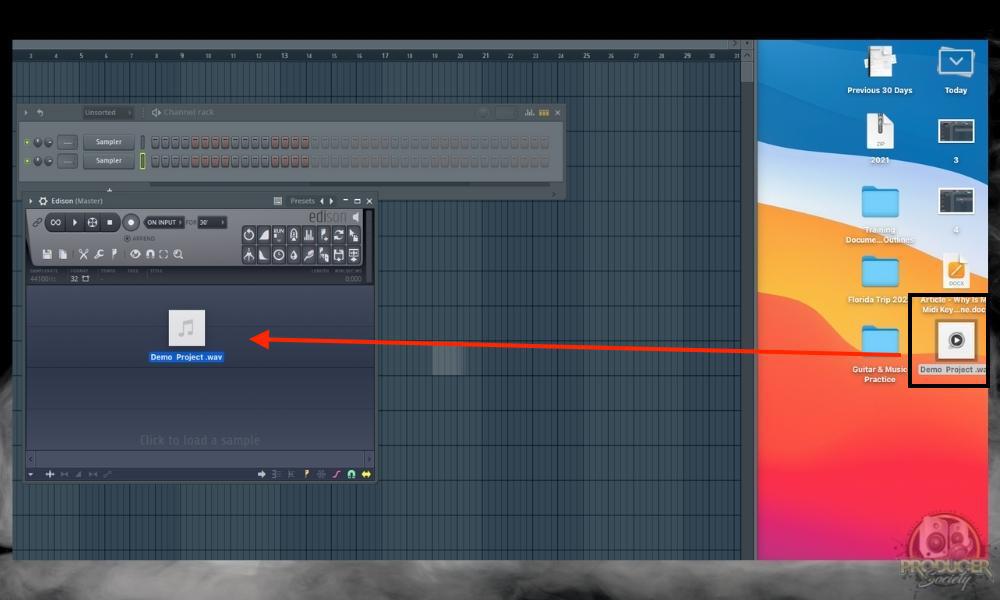
Just drag and drop the audio file into the Edison and it’ll automatically take it.
ii) Alternatively, Click the File Folder To Open Your Directory And Import the Audio Using Folders
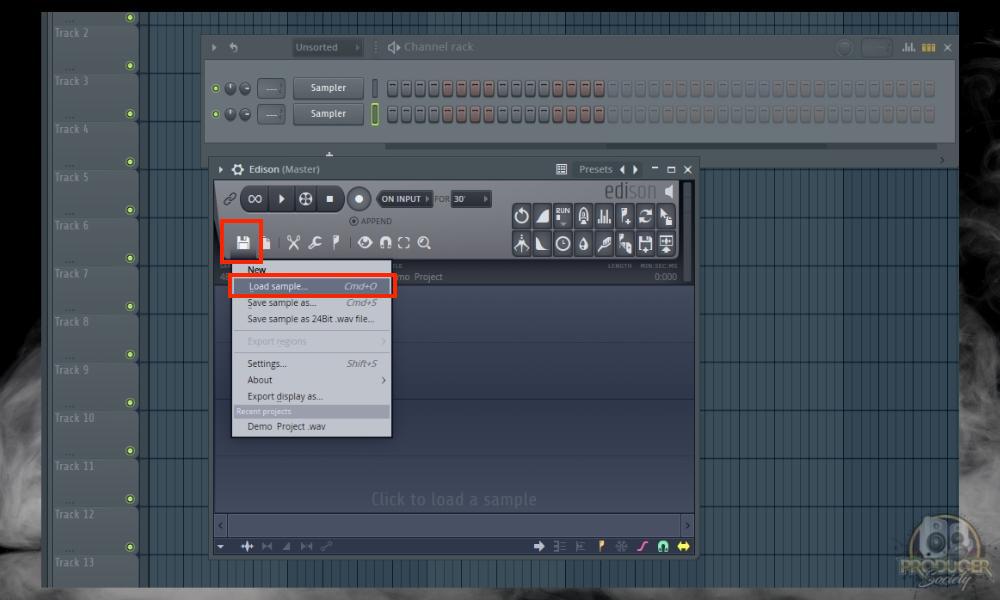
This is another way of loading a sample into the Edison, which is essentially by loading files in from your directory. You’ll have to do this when the files in question aren’t neatly sitting on your desktop.
Once you’ve done that, now you just have to choose the file from your director and load it by clicking “open.”
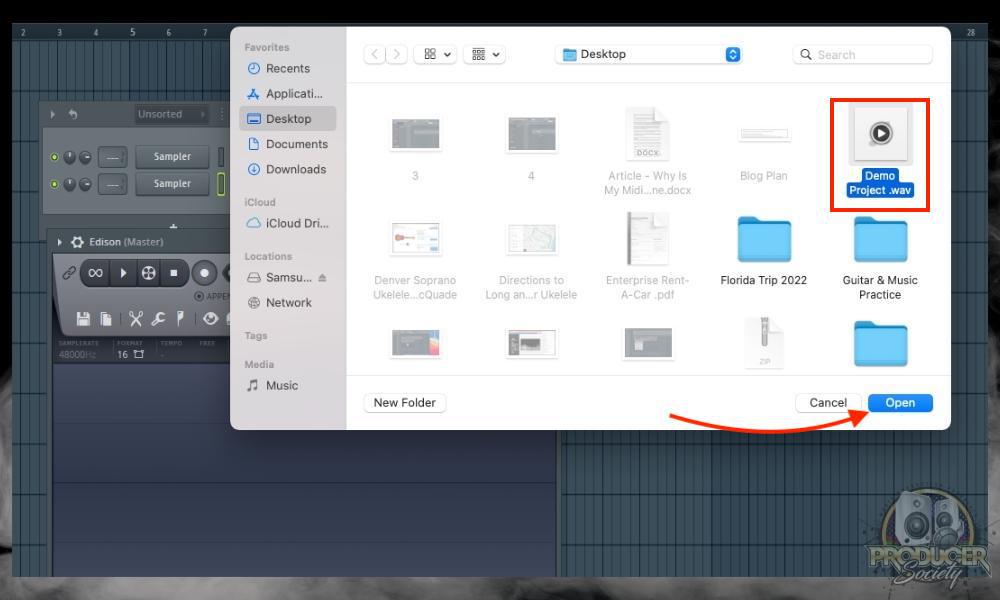
F) Click the Import Button in the Edison to Put the File Into the Playlist
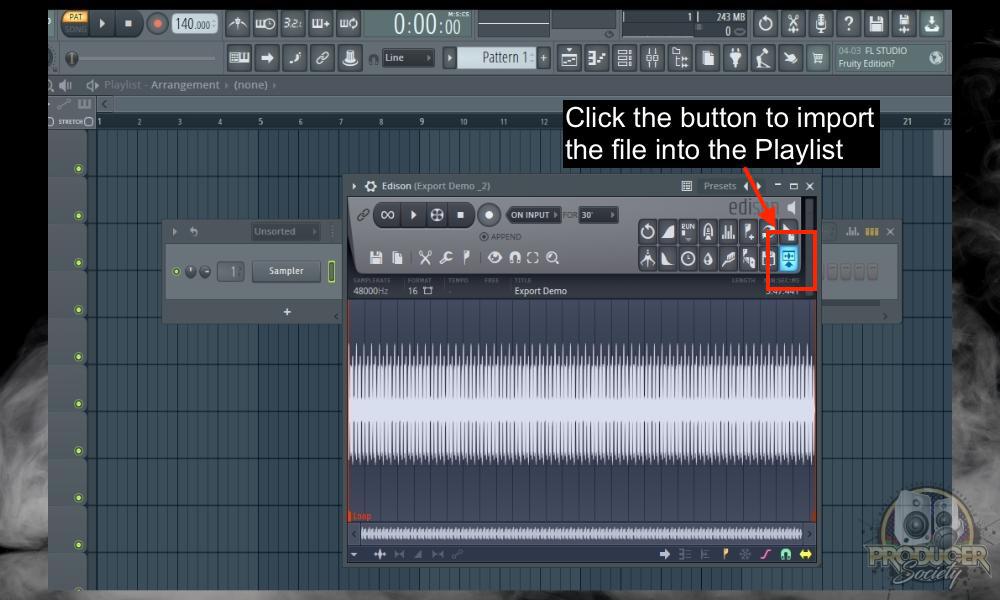
It took me a hot minute to figure this out, so I hope this helps you. If you want to actually import the audio into the playlist, you have to click on the button that’s shown in the image above. I tried inputting the audio into the Playlist with the Piano Roll, but you have to do it with the button.
And that’s it for importing audio into FL Studio using Edison and Slicex. Now we’re going to use a third-party VST or plugin. I’ll show you how to do that now.
5) How to Import Audio Into FL Studio Fruity Edition (With A 3rd Party Sampler)
Essentially, this is a method that I learned from this Reddit thread. Just a short recap: you can’t import files easily into FL Studio Fruity Edition, so this is a purported workaround.
Unfortunately, I no longer own the Fruity Edition of FL Studio because I recently upgraded to the Producer’s Edition so I can’t fully test if this option will work. But the Reddit user in the aforementioned thread said it worked, so I’ll show you what the users there recommended.
What we’re going to use is a third-party sampler, and that is the AUSampler that comes with a download of Logic Pro X and GarageBand (primarily GarageBand, if I’m not mistaken). I’ve written guides on it before like this one, and this one, but it’s essentially the same idea as the Edison and Slicex, although, less advanced.
If you don’t have the AUSampler, then just use a different third-party plugin that also has a sampler. One that comes to mind is Initial Audio’s 808 Studio II Synth which is a great one.
I’d recommend just buying it, but they also have a free trial at this link here if you don’t want to. I can’t guarantee the sampler will work on the free version though.
It’s important to note that the steps are pretty similar, it’s just the plugin that’s different. Also, replace “AUSampler” with whatever 3rd party sampler you intend on using.
A) Open FL Studio

Open a new empty template just like before, and then you’ll have to use the Channel Rack shortcut again.
B) Use the Command (fn + F6) to Bring Up the Channel Rack (just F6 for Windows)

You can also click on the Channel Rack icon on the top of the interface, but I think the shortcut is world’s better.
C) Type in “AUSampler” in the Search Bar On Top of the File Browser
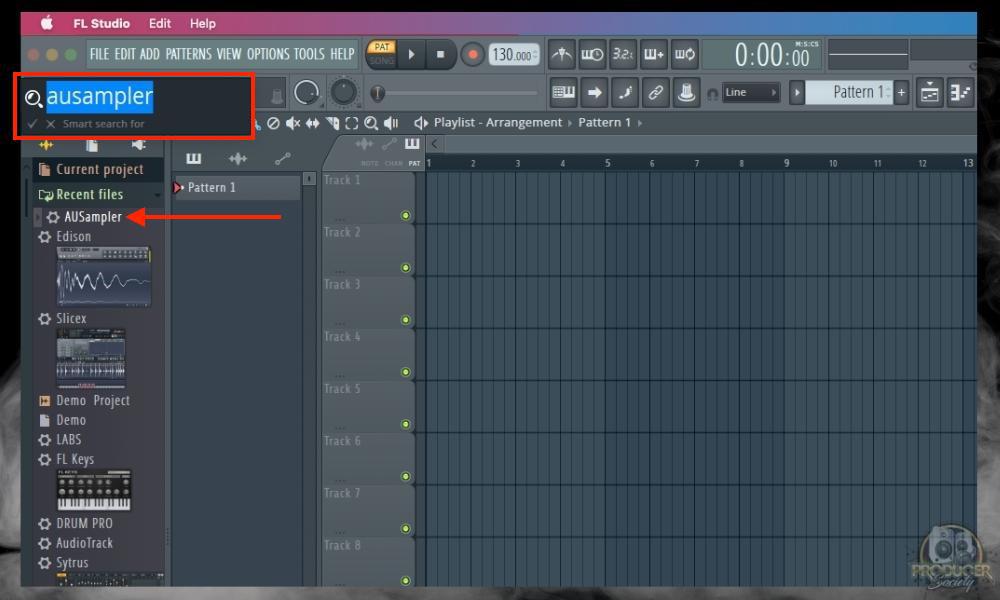
Again, use the trusty search bar to quickly find whatever plugin you need in FL Studio. Just be careful that you don’t accidentally pull the wrong plugin. It’s easier to do than you think.
D) Select the AUSampler from the Menu and Drag It Into the Channel Rack
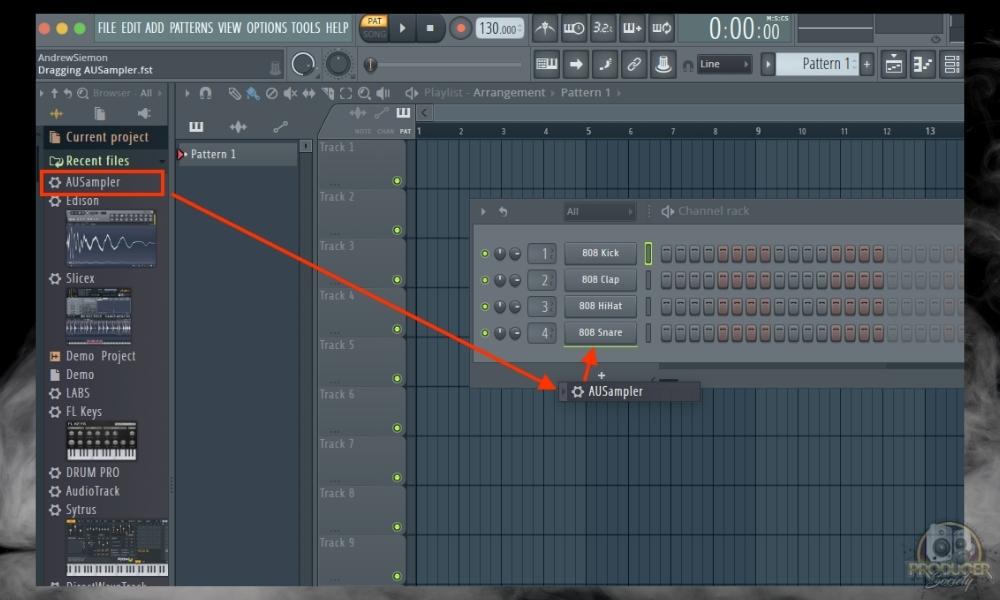
Drag the plugin right into the Channel Rack until it lights up green again.
E) Open the AUSampler by Clicking On It > Click the Gear Icon > Add Sample
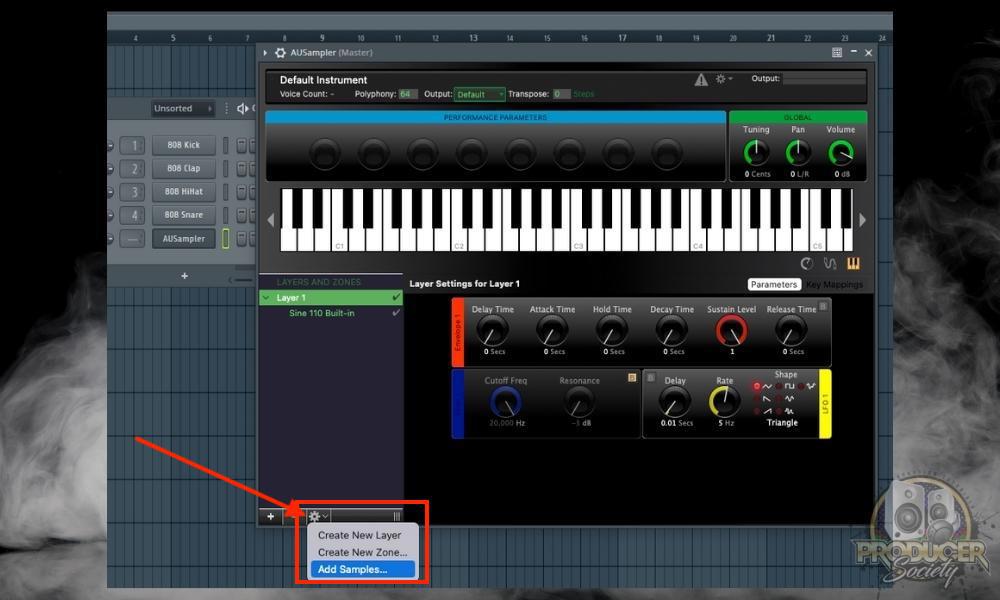
If you’ve read my guide on how to sample in GarageBand, you’ll recognize this sampler. Interestingly, all of the AU plugins work great with FL Studio which is awesome.
i) Choose The Sample > Then Open the File
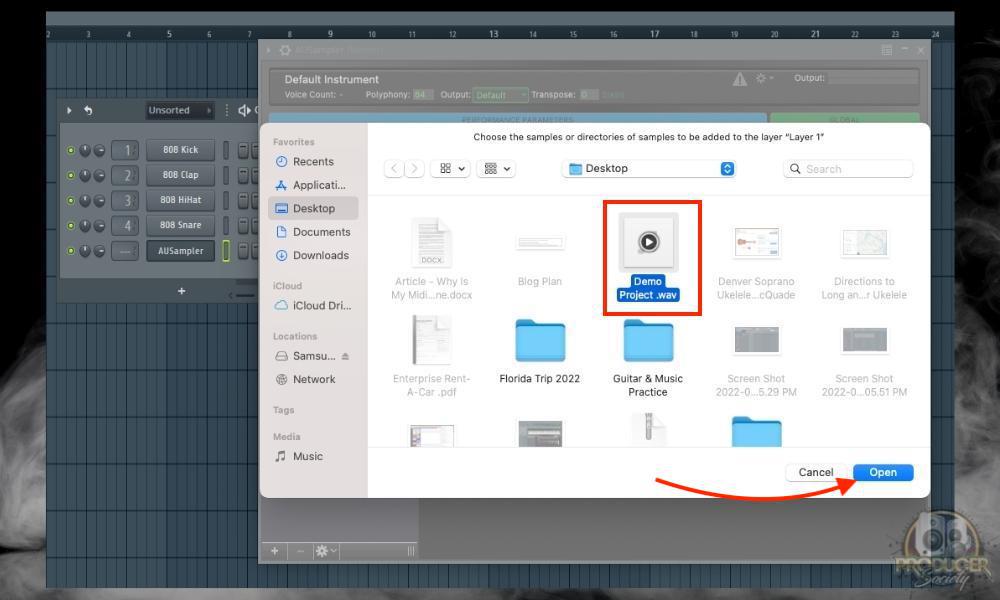
Select the file and then click open to push it into the AUSampler.
ii) Select the Sine Wave 110 Built-In > Then Subtract “-”
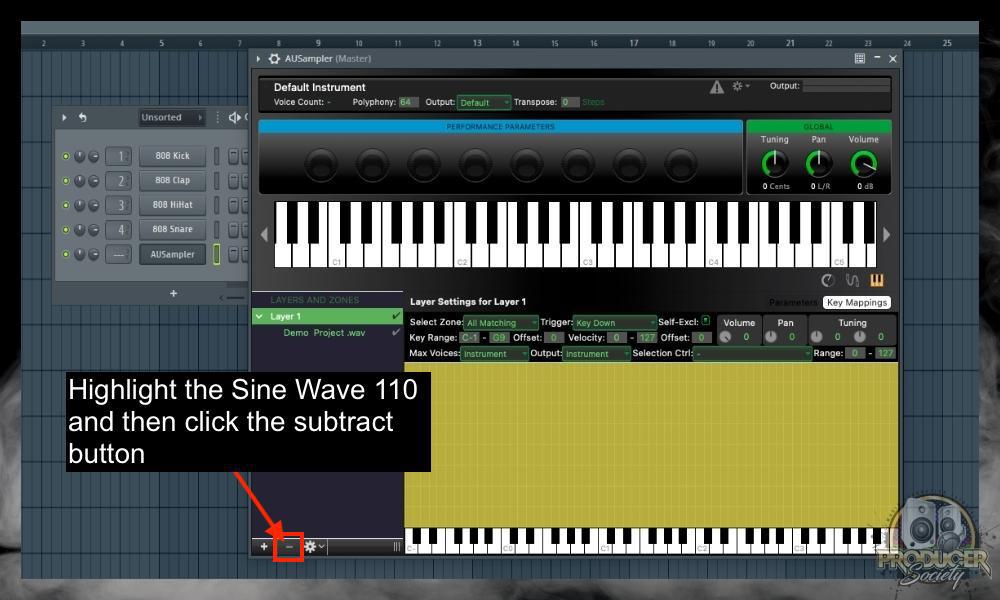
You have to highlight the Sine Wave 110 instrument first, and then press the subtract button. You could bypass it, but I find that’s an annoying way of doing it. Might as well just get rid of the sound altogether.
F) Paint the Audio Into the Playlist with the Piano Roll
After that, all you need to do is open the Piano Roll with (fn + F7) and then paint a note. It’ll last as long as the length of the note. You’ll also have to figure out at which octave the note is imported. For instance, in this case, it was “C4.”
How to Export an Audio File From FL Studio
1) Export the Audio File Using the File Menu
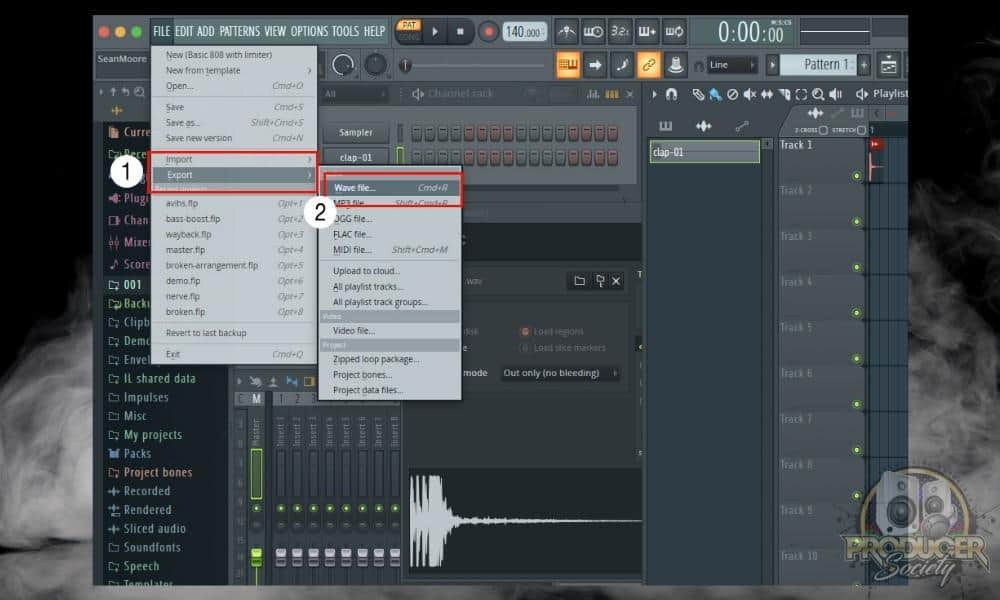
From FL Studio, Select File > Export > Wave file… (or another format if you want).
2) Name and Save the Audio File
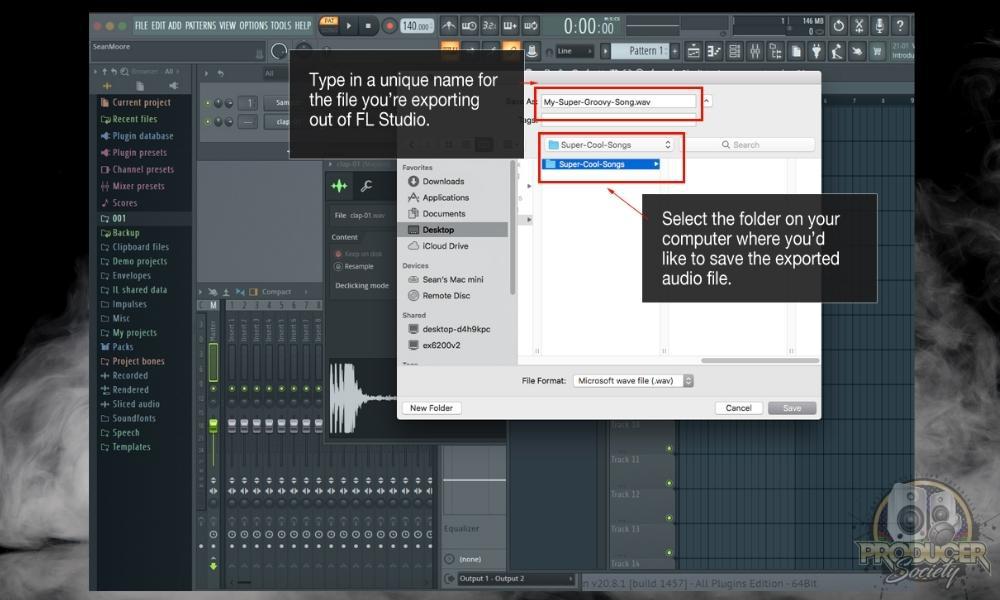
Navigate to the directory you’d like to save the file to on your computer. Then type in a name and click Save.
3) Choose Desired File Format, Settings, and then Export
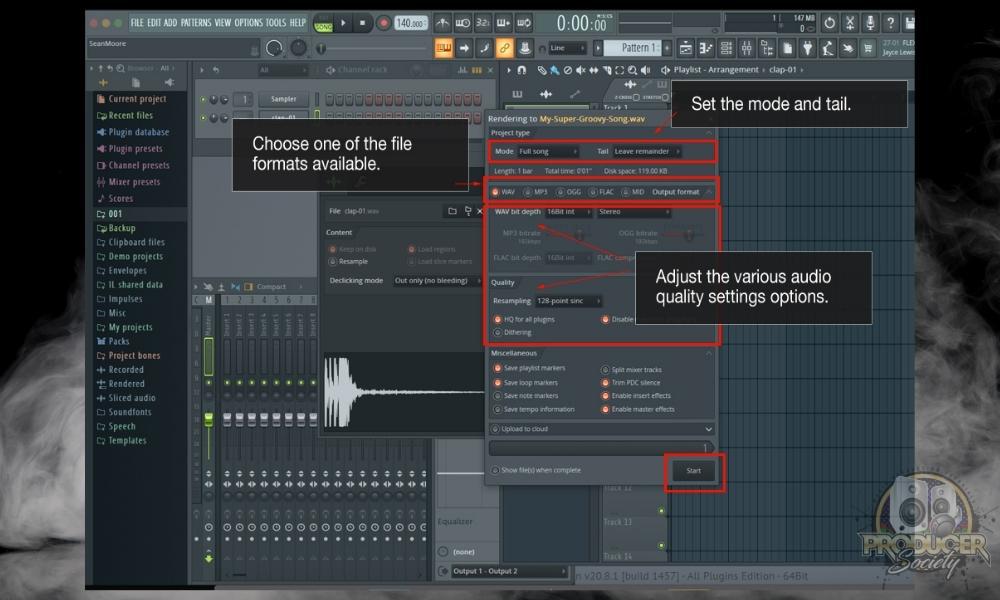
The way FL Studio handles exporting audio might feel a little strange the first couple of times you do it. Typically applications will present the window to choose the file name and location last. Don’t worry, what you’re seeing is normal for FL Studio.
To render or bounce the whole song choose Full Song as the Mode. Patterns can also be exported, but for now, just focus on the full song. For the Tail select Leave remainder. These are the standard settings for exporting songs out of FL Studio.
Notice that the file format you choose to export in step seven is selected. It’s possible to render multiple formats at once, but now for just leave the file type the same as you originally selected.
There are quite a few options for quality. To keep things simple leave the default settings. Remember for later, this is where you can begin increasing the bit depth and resample rate for higher quality if needed.
Click the Start button to begin the export process. Depending on the complexity of the file you’re rendering it can take a good amount of time. The rendering speed is also related to the power of your computer and its processing speed. FL Studio will ring a chime when the export process has been completed.
Important Things to Note About Importing/Exporting Files in FL Studio
1) You Need The Producer’s Edition To Import/Export Whatever Files You Want
Something I learned the hard way is that you have to have the Producer’s Edition to access some of the abilities present in this article. It’s not that big of a deal though, because going from the Fruity Edition to the Producer’s Edition isn’t a terribly expensive upgrade.
Knowing what I know though, I think it would’ve been much better to just start with the Producer’s Edition right off the bat. What good is a DAW if you can’t import files into it?

 Written By :