Recording guitar in FL Studio Mobile works the same way as any other DAW but with a few differences due to the way the user interface is set up.
To record guitar in FL Studio Mobile
1) Connect an audio interface with a USB Cable and USB Adapter
2) Plug in your guitar with a 1/4” jack
3) Open FL Studio Mobile
4) Select the ”+” Button > Choose ”Audio Record”
5) Open the Rack > Add Input 1
6) Turn on Monitoring
7) Press Play to record
Necessary Equipment
- Thunderbolt to USB or USB to USB-C adapter
- USB-C Cable
- Headphones
- 1/4″ TRS Adapter
- Audio Interface (Scarlett 2i2 or iRig Pro I/O)
- Guitar Cable (Ernie Ball Right Angle Cable)
What Gear You Need to Record Guitar in FL Studio Mobile
![What Gear You Need - How to Record Guitar in FL Studio Mobile [Step-By-Step Guide]](https://producersociety.com/wp-content/uploads/2022/08/What-Gear-You-Need-How-to-Record-Guitar-in-FL-Studio-Mobile-Step-By-Step-Guide.jpg)
The gear you need to connect your guitar to FL Studio Mobile is pretty much the same across most smartphones with the exception of the adapters.
The adapters you’ll need to wire up your rig will vary depending on the type of your phone or tablet, but chances are if you’re reading this, you already have an idea of what adapters your device necessitates.
For this tutorial, I’m going to presuppose you’re using an iOS product like the iPhone or the iPad. Let’s talk about what adapters you need to use first.
1) Thunderbolt to USB Adapter or the USB-C Adapter (iPhone/iPad)
![The Adapters for the iPhone/iPad - How to Use the AKAI MPK Mini Without A Computer [Guide]](https://producersociety.com/wp-content/uploads/2022/07/The-Adapters-for-the-iPhoneiPad-How-to-Use-the-AKAI-MPK-Mini-Without-A-Computer-Guide.jpg)
The Thunderbolt to USB Adapter, also called the USB/Camera Adapter, is a great one to get if you’re using an iPhone or a similar smartphone. As I explained in my guide on how to connect a Scarlett 2i2 to your mobile device, some smartphones don’t have the battery to power an audio interface like the Scarlett.
The same thing can be said for MIDI keyboards like the AKAI MPK Mini which are almost always buss-powered from your device. Simply put, the USB/Camera Multiport adapter has one port for the USB-C cable and then another for either a block charger or a power bank.
This means that if you need it, you’ll be able to connect an external power source if your device is unable to power the audio interface on its own.
One thing I should say though is that you’d be better off to get a more versatile multiport adapter if you intend on getting serious about mobile production. For instance, I have 2 multiport adapters that has at least one of all the most common connectors.
I have a multiport adapter that is very similar to the Kramer Kdock4 but it’s pretty expensive. If you want something a little more affordable, you can get one like this on my Product Page instead. These will come in handy someday when you want to add multiple MIDI devices to your mobile DAW.
Regarding the audio interface, I would recommend either the iRig Pro I/O or the Scarlett 2i2 which we’ll talk a bit more about now.
2) Audio Interface

The iRig Pro I/O
For Versatility:
the Scarlett 2i2
Assuming you care about portability which you probably do if you’re using FL Studio Mobile on your device, the iRig Pro I/O is unquestionably the better device to use because it’s just so much smaller. It’s made for people who want to record on the road.
But the Scarlett 2i2, especially the 3rd generation model, is actually pretty small and there’s no reason why you can’t use it as well.
Because I, unfortunately, don’t own an iRig Pro I/O, I’m going to use the Scarlett for this tutorial. The price between the two devices varies depending on the retailer, so click on the links above to find out.
USB-C Cable (Included)
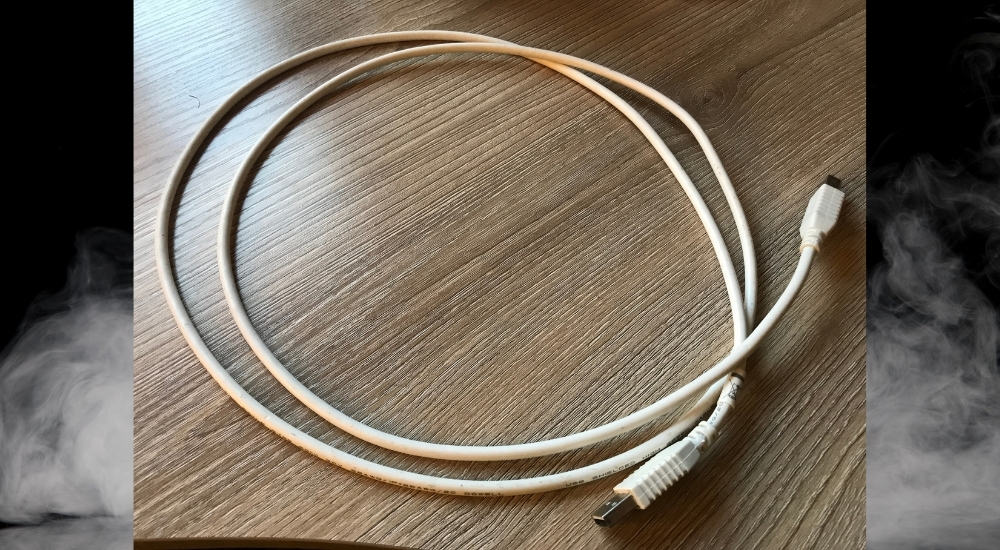
There’s not much to say about this one, but this is the exact cable that I’ve recommended in many other tutorials including in my guide on how to record acoustic guitar in GarageBand.
It’s always better to be too long than too short, and this Amazon Basics cable is incredibly sturdy. I should’ve bought half-a-dozen.
3) 1/4” Instrument Cable (Guitar Cable)

The next cable that is the best to use is a right-angled guitar jack like the one shown above. You don’t have to get the Ernie Ball cable, but this particular style is my favorite to use.
The reason why right-angled jacks are better is they’re ideal for sitting because then your cable doesn’t jam into the couch or chair. I also find they last longer as a result of this.
There’s no force or tension on the weak part of the cable like is the case with the straight ones. If you stand a lot when you’re recording, it won’t matter as much, will it.
4) Headphones or a Speaker
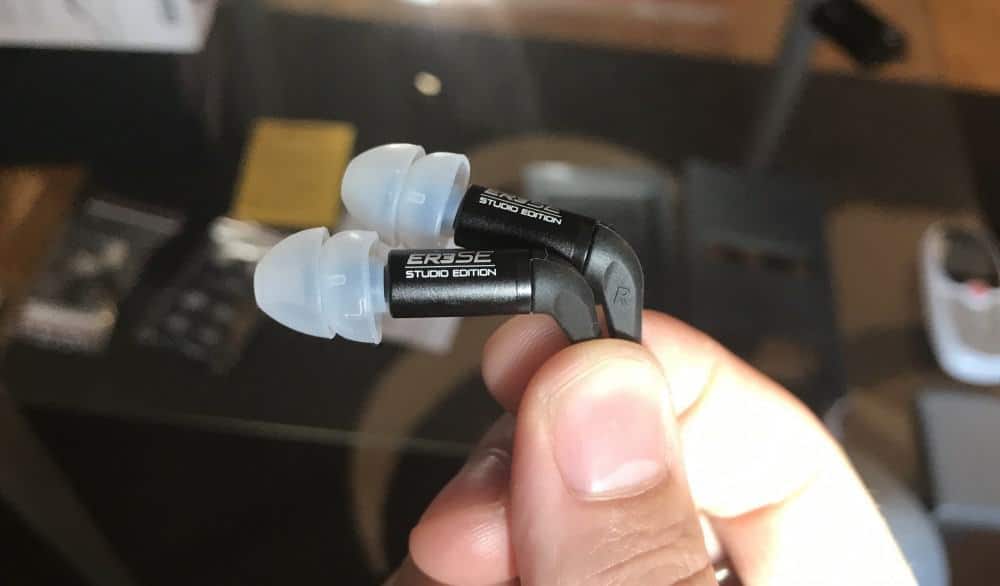
For whatever reason, iPhone and iPads aren’t able to output sound through their speaker whenever you connect an audio interface. I imagine they do this on purpose (so you have to buy more gear), but I digress.
Simply put, you’ll need either headphones or a speaker to listen to yourself playing and recording in FL Studio Mobile. And for that, you’ll also probably need a 1/4” to TRS (headphone adapter), at least if you want to connect your headphones to the Scarlett 2i2.
1/4” to TRS (Headphone) Adapter
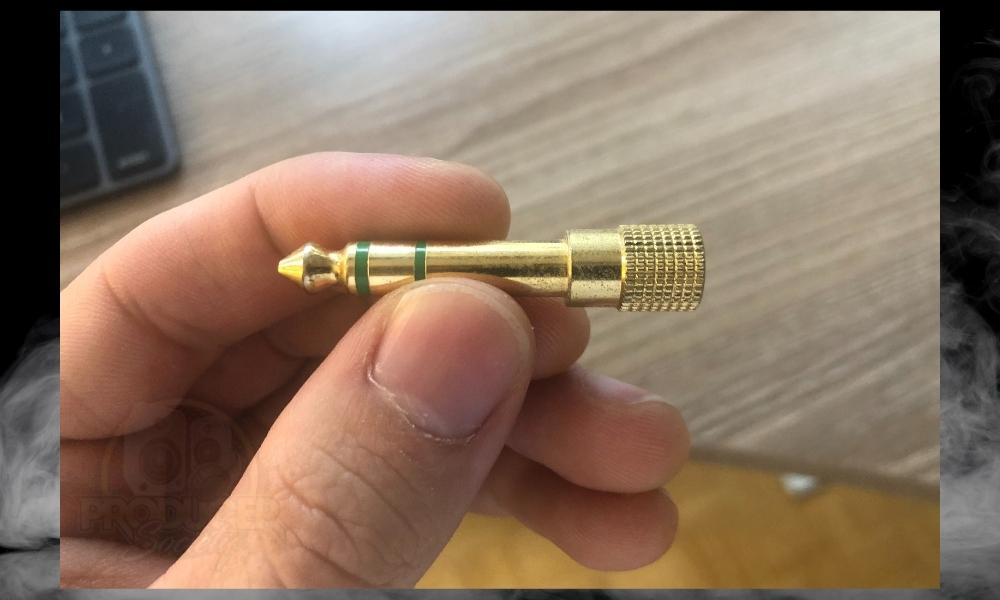
As I just said, if you want to use headphones or a speaker with your iPhone/iPad and a Scarlett 2i2, you’ll probably need one of these adapters to connect them.
The good thing is these little adapters are super cheap and you can grab like 10 of them at once on Amazon if you wanted. I would buy at least 5 of them, because if you work with people, they’re going to get stolen anyway.
How to Connect Your Guitar to Your Device (FL Studio Mobile)
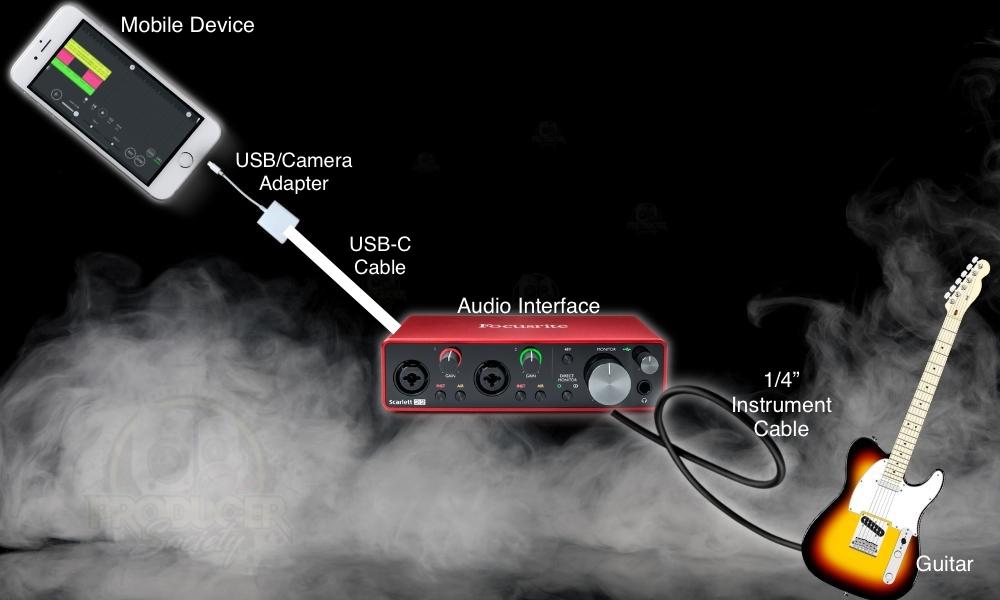
What’s shown in the image above is the long and short of how you would connect your guitar to FL Studio Mobile. If you wanted to connect your guitar to FL Studio Mobile on your iPad instead of your iPhone, you would be better to follow the diagram below instead:

How to Record Guitar in FL Studio Mobile [Step-By-Step]
Thus far, I don’t see a real difference between the iOS and iPadOS versions of FL Studio Mobile. I recommend using the iPad version, just because iPads rule and are a lot more fun to use, in my opinion. Check out how my set-up looks down below.
1) Connect Your Guitar to Your Device and Open FL Studio

Obviously, the first thing you want to do is hook everything up like I showed you earlier. Open your FL Studio Mobile project, whether old or new, and then go into what’s called the Playlist.
The “Playlist” is the equivalent to GarageBand’s ”workspace.” It’s the place where you make tracks and can see everything from a bird’s-eye-view, so to speak.
2) Select the ”+” Button and then Choose ”Audio Record”
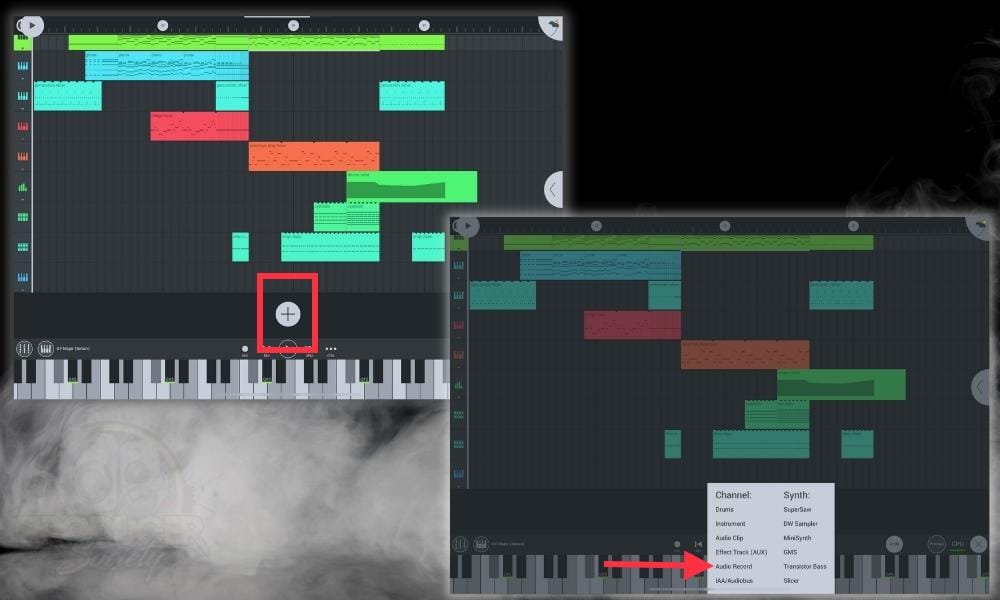
3) Open the Rack and Then Choose Input 1

The next thing you want to do is ensure you’ve actually connected some headphones or a speaker to your device, otherwise, you won’t hear anything.
4) Connect Your Headphones to Your Audio Interface
![Audio Interface Headphones Output - How to Connect An Old Keyboard To Your PC/Mobile [Any DAW]](https://producersociety.com/wp-content/uploads/2022/07/Audio-Interface-Headphones-Output-How-to-Connect-An-Old-Keyboard-To-Your-PCMobile-Any-DAW-.jpg)
5) Turn On Monitoring and Press Play to Record
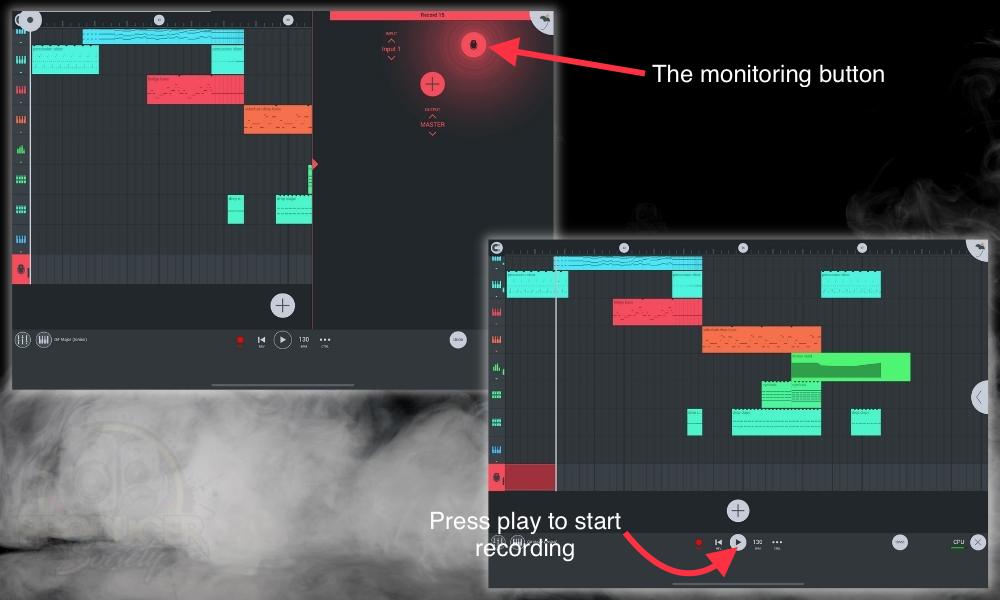
Once you can hear yourself playing, go ahead and arm the track for recording. You do that by clicking on the record button next to the play button.
Usually, you won’t even have to do this because FL Studio Mobile is good at recognizing what you’re trying to do. If you find yourself unable to record, the record enable button could be turned off, so make sure it’s on. And that’s how you record guitar in FL Studio Mobile. I’ve got a few more tips to share with you though.
6 Tips For Recording Guitar in FL Studio Mobile
1) FL Studio Mobile Will Automatically Detect the Audio Interface
In my experience, you don’t even have to set your input once you’ve connected your audio interface to FL Studio Mobile. If you turn on the monitoring button and just start playing with your guitar connected, you should be able to hear it and then record the signal just fine.
2) Make Sure to Arm the Track for Recording

As I briefly mentioned earlier, one thing that’s important to do is to ensure your track has been armed for recording. You know you’ve enabled recording on the track by the little red record button on the left-side of the main Playback button at the bottom.
3) You Have To Turn On Monitoring To Hear The Guitar [To Hear It Without Recording Playback]

The monitoring button in FL Studio Mobile is cool because after you’ve turned it on, when you strum your guitar it’ll light up a bright color. If your track is red, the monitoring button will light up and glow red, and if its yellow, it’ll light up and glow yellow. It’s kind of neat.
4) You Can Add Effects and Dynamics Processing Before or After With the Channel Rack

To add effects, reverb, delay, and other dynamics processing, you just have to open up the channel rack the same way that I showed you earlier, except you want to ensure you’ve selected the guitar track first. Click on the ”+” symbol and then you can choose whichever effects you’d like.
5) You Can Also Edit Your Guitar Recording’s Audio
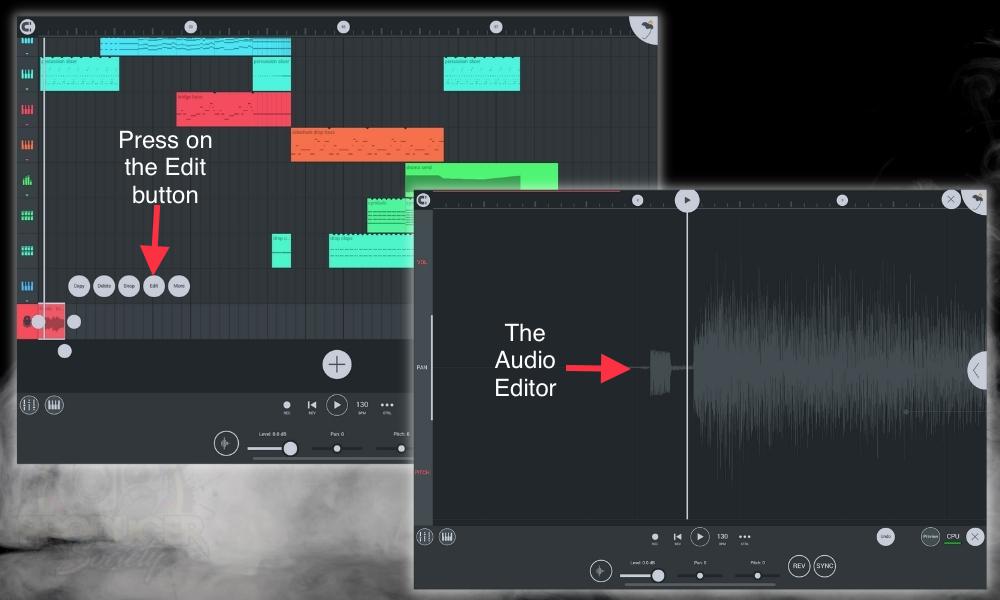
You can also edit your guitar track audio just by right-clicking or long-pressing the audio file and then choosing the ”Edit” option. From there, FL Studio Mobile will open up an editor window where you can make all kinds of changes.
6) Turn FL Studio Mobile On And Off If You Can’t Hear Or Record Your Guitar
If you’re struggling to get FL Studio Mobile to recognize your guitar after having connected it, try turning it on and off. Earlier, I had everything connected and it worked properly, but then my adapter and audio interface got disconnected.
When I reconnected everything, I couldn’t get a sound. All I had to do was reboot FL Studio Mobile and that was enough to get everything started again.
Similar Articles You Might Like
- How to Import A Song Into FL Studio Mobile [Dead Simple]
- How to Set Up The AKAI MPK Mini With FL Studio [macOS/iOS]
- How To Connect Your Guitar to Garageband iOS
- How To Plug Your Guitar Into GarageBand
Important Things to Note About Recording Guitar in FL Studio Mobile
1) You Can Also Use Bluetooth Headphones But I Wouldn’t Recommend It
I, unfortunately, left my actual headphones somewhere so for this tutorial, I had to use my AirPod Pros. If you use Bluetooth headphones or a Bluetooth speaker, you will get latency. If you don’t get latency right away, you will at some point.
I’ve explained this at length in this article for GarageBand and this other one for TikTok. There’s no question that Bluetooth is the future, but we’re just not quite there yet at this point.
You’ll need to use wired headphones for now, although, this pair of ATH-M50xBT2 are a great way to get the best of both worlds.
Gear Mentioned
1) USB-C Adapter
2) USB/Camera Adapter
3) Multiport Adapter
4) Scarlett 2i2
5) iRig Pro I/O
6) USB-C Braided Cable
7) Ernie Ball Right-Angled Guitar Jack
8) Etymotic ER4SR’s
9) 1/4” Headphones Adapter
10) ATH-M50xBT2


 Written By :