If you want to make your own, understand that making aesthetic music isn’t all that hard, even if you’re using free software like Garageband.
To make an aesthetic song in GarageBand, record a melody using a soundscape or jazz instrument like piano, electric clean guitar, or an upright bass. Add the rhythm section using a lo-fi drum kit, then fill out the song with other ambient sounds. Make sure the song has a slow BPM (70-100) too.
What Are the Common Elements of Aesthetic Music?
1) A Lo-Fi Drum-Kit
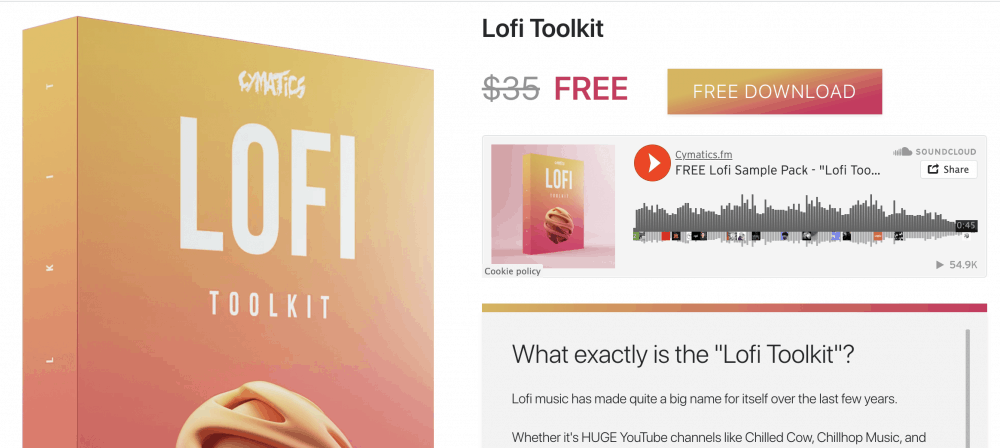
The Cymatics Lo-Fi Toolkit (Free Download)
In my particular case, when I wanted to start making an aesthetic style beat, the first thing I did was I went and got my hands on a Lo-Fi kit. While Aesthetic music and Lo-Fi aren’t necessarily the same thing, they do have similar elements, and one of them is the style of kit they use.
I would say that both lo-fi and aesthetic use the same type of kit and rhythmic patterns. For aesthetic music, I would recommend getting your hands on the Cymatics Lo-Fi kit which comes with melodic loops, drum kits, one-shot loops, melodic samples, and even pre-programmed drum loops.
Tip:
If you really wanted to make it easy on yourself, you could use one of their melodies with a stock drum loop and you would already have a song created, however, this is too easy, and you won’t really learn how to make your own music if you choose to do it this way.
I’ve included the link to the free sample pack that I downloaded from Cymatics at the top. Cymatics, by the way, is a great website with a lot of great, free, sounds that are incredibly useful for making beats (I have a guide on this, by the way) and other styles of music.
Make sure you know how to sample, and if you don’t already, don’t fret, because I have a step-by-step guide on how to do it + a short video down below.
2) Natural Minor, Lydian, Ionian and Dorian Harmonies and Melodies
Other features of aesthetic music are natural minor, dorian, ionian, and lydian harmonies and melodies which I’ve explored before in my dedicated guide. People who don’t know music theory will call them sad, chill, happy, and dreamy, respectively.
From what my ear can hear, I would say there are more Minor 7th and Major 7th chords in Aesthetic music, which naturally tend to produce a Dorian or Lydian Vibe (although it depends). I included a brief synopsis of what the modes sound like below.
| Mode | How It Sounds |
|---|---|
| Ionian | Very happy and joyous |
| Dorian | Chilled out, emotional, bluesy |
| Phrygian | Dark, malevolent, evil |
| Lydian | Spacy, sci-fi, dreamy, dazed, victorious or triumphant |
| Mixolydian | The band, AC/DC’s mode |
| Aeolian | Sad and dark, but not malevolent like Phrygian |
| Locrian | Dissonant, discordant, out of place to the point of being indescribable |
Important to Note:
Of course, there are other types of chords, modes, and melodies in aesthetic music, including the Ionian sound (regular major chords), but the point is that aesthetic music tends to sound chilled out, mellow, sad, or somewhat spacey. Dorian and Lydian are the best for this.
Minor 7th chords are known for sounding Dorian, compared to Major 7th chords which sound Lydian. If Ionian/Major is too happy, but Aeolian/Minor is too sad, then the Dorian mode is a compromise between the two; it has more of a “chilled-out” sound that’s the brightest among all of the minor sounds.
Dorian, which is characterized as a natural minor scale with a raised 6th degree, has become a lot more popular in the modern hip-hop era, probably due to the influence of the Toronto rapper, Drake.
Lydian, on the other hand, tends to sound dream-like, hopeful, ascendant, or spacey, as a consequence of the raised 4th degree in the scale. The raised fourth-degree of the mode can also sound slightly dissonant.
Tip
Dorian = 2nd mode of the Major Scale – Raised 6th degree of Minor Scale
Lydian = 4th mode of the Major Scale – Raised 4th degree of Major Scale
In case you don’t know, a Minor 7th chord is just a regular Minor chord with the seventh note added to it, whereas a Major 7th chord is just a major chord with the 7th degree added to it. For example, think of a C Minor Chord.
C Minor:
C Eb G

To make the above chord a C Minor 7th chord, you just have to add the 7th note from the root which would be the following:
C Minor 7th:
C, Eb, G, Bb

Additionally, it’s important to note that the 7th chord is not only counted up from the beginning of the chord as the root but also the scale, as well. For instance, the notes of the C Minor scale are the following:
C, D, Eb, G, Ab, Bb, C
Notice the way that the B is flat in the key of C Minor. So if you wanted to make the C Minor 7th chord, you would add the flat-seventh to the chord, Bb, making it a C Minor 7th chord.
The same rule applies to the C Major 7th chord. In the key of C major, there are no accidentals (no sharps or flats), so you just add the 7th note of the scale again but there are no sharps or flats on any of the notes of the chord.
C Major Chord:
C, E, G

To make this the C Major 7th chord, just add the B to make:
C Major 7th:
C, E, G, B

The major and minor 7th chords are commonly employed not only in aesthetic music but also in Lo-Fi, so pay attention.
Coincidentally, Drake comes to mind when I think of a popular artist whose producers commonly make beats with minor 7th chords. For instance, the song, “With You,” uses Dorian vibes, and many of his other songs do as well.
Aesthetic and lo-fi also use other tonalities, but I’m just pointing out that if you want that chilled out or dream-like sound, minor and minor 7th chords are a great place to start.
It’s worth mentioning that other chords like Major and Minor 9th chords are great for this as well, but I digress. Here’s a demonstration of the dorian mode:
3) Aesthetic Songs Commonly Use Jazz and Soundscape Instruments
When it comes to the instruments, you can get really creative and use all kinds of sounds and effects. However, I find it’s best to use instruments that are commonly associated with jazz and other similar styles of music. Some of the most ubiquitous sounds in aesthetic music are the following:
Soft or Regular Piano
I would go ahead and argue that the soft piano, or just a regular piano, is the defining instrument of Aesthetic music.
There always seems to be a piano of some kind in Aesthetic tracks, at least in some form or another, whether it’s a regular grand piano, a soft piano, or a ragtime piano. Spectrasonics’ Keyscape is the best piano library if you’re serious about getting a good piano.

But if you’re looking for something great that doesn’t cost any money, I couldn’t recommend the Soft Piano from Spitfire Audio Labs enough. It’s a fantastic piano instrument, and I’ve explained before that it’s probably the best one I’ve ever used.
More importantly, it’s free, and there are some other great features about Spitfire Audio Labs that you definitely don’t want to miss out on.
Electric Clean Guitar (with no distortion)
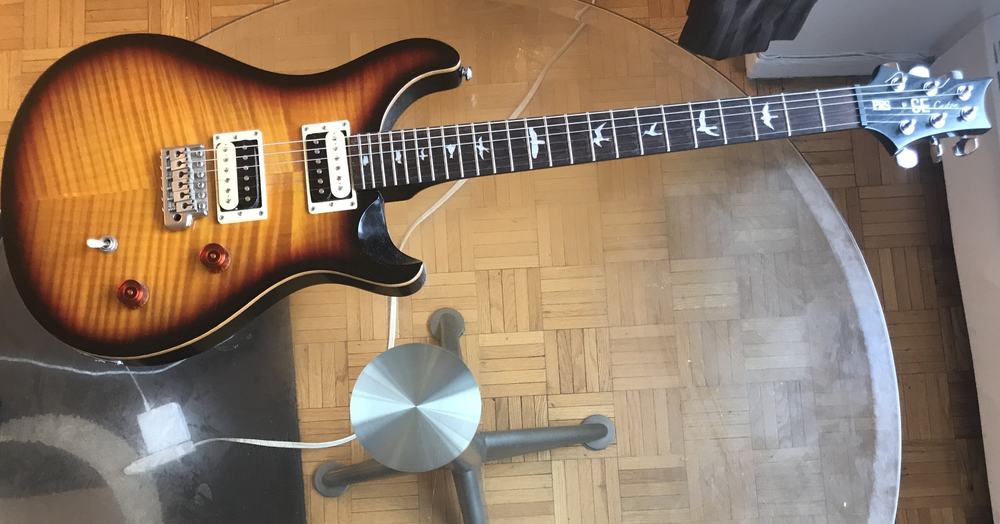
For the electric guitar – which is quite simple to connect to Garageband using my guide – I would suggest using a clean preset such as the Cool Jazz Combo, or something very similar.
Other great ones to use are Dyna-Trem, Dublin Delay, or Clean Studio Stack. Garageband’s Amp Designer has a lot of presets and features that are definitely worth exploring if you plan on using an electric guitar to make an aesthetic track.
One of the most important tips for recording electric guitar into a DAW is to use a metronome or a click-track of some kind. This will ensure your recording is actually on time, and you’ll be in a much better position to create synchronized music when the time comes to add other instruments and sounds.
Grab an iRig HD 2 for a cheap price if you want to get started with recording guitar sounds in your beats. Some guitars are better than others for recording in a DAW, and for that, I would suggest the PRS SE Custom 24 which is very versatile. It can be used for pretty much everything.
Soundscape Instruments

Garageband, thankfully, has a ton of great soundscape instruments, such as String Movements, Event Horizon, Air Bells, Delicate Bells, Antarctic Sun, and Splatter Tables.
However, in the case that you’re already sick of what Garageband has to offer, I would highly suggest grabbing Native Instruments’ Komplete 13 if you want the best instruments available (I’ve written about the free version, Komplete Start, in my other article).
Bells
Other great things to use are bells and other instruments that have an ambient vibe. Bells are a great way to add spaciousness, airiness, or even a sweet, light-hearted sound that is a characteristic of ambient music. For example, I used the Hybrid Keys from Native Instruments for this particular tutorial and song.
Some of the bells you can use in Garageband include the Delicate Bells, Splatter Tables, and more, just in case you don’t want to add any more plug-ins.
Xylophones and Marimbas
Get the Xylophone from my other article.
The same thing could be said about xylophones and marimbas. These two instruments tend to produce a very happy, sweet, or chilled out sound, and they’re fantastic to use for Aesthetic music.
GarageBand comes with a great marimba by default, however, if you want to get your hands on a Xylophone, I have an article on where to get it (linked above).
Upright Bass
The Upright Bass is another instrument that is commonly associated with jazz music. If you want a jazzy instrument, then look no further than the Upright Bass. This is a great way to add a nice, plucking, low-end with a chilled out and ambient vibe.
4) Aesthetic Songs Commonly Have A Slow BPM (70-100)
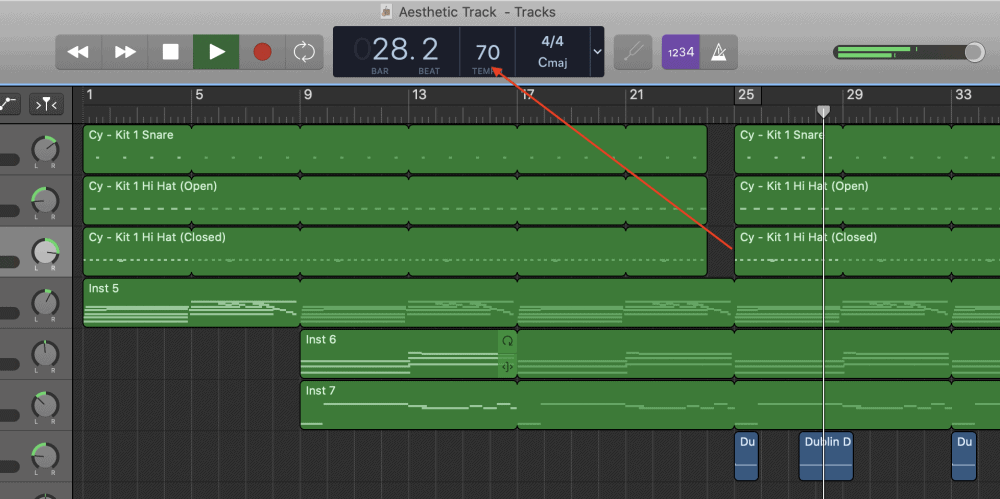
I would argue that the last thing to pay attention to when making Aesthetic Music is the slow BPM. As a general rule, aesthetic music is always incredibly slow.
Usually between 70-100 BPM, sometimes even slower. If the song was fast, it would sound completely different, like some kind of ambient house music rather than Aesthetic or Lo-Fi.
This is really quite self-explanatory. Either set the BPM around 70-100 in the top center console of Garageband’s interface or just pay attention to how you’ve spaced out the drum kit notes when creating your beat. Without further ado, let’s explore how to use the aforementioned principles and instruments to make aesthetic music.
Making Aesthetic Music in Garageband (Step-By-Step Guide)
1) Making the Drum Beat
As I suggested already above, go ahead and download the Cymatics Lo-Fi Toolkit package and read my article on sampling if you don’t know how to load these sounds into your DAW.
Once you’ve downloaded your kits and sounds, you can either do what I said and use the Drum Loops and melodies it comes with, or you can make something up on your own, which I assume is what you want to do if you’re reading this article.
Load up the instrument sounds in Garageband, including the Kick, Snare, Open and Closed Hi-Hats, and potentially a Shaker or a Ride.
Hi-Hats (Open and Closed)
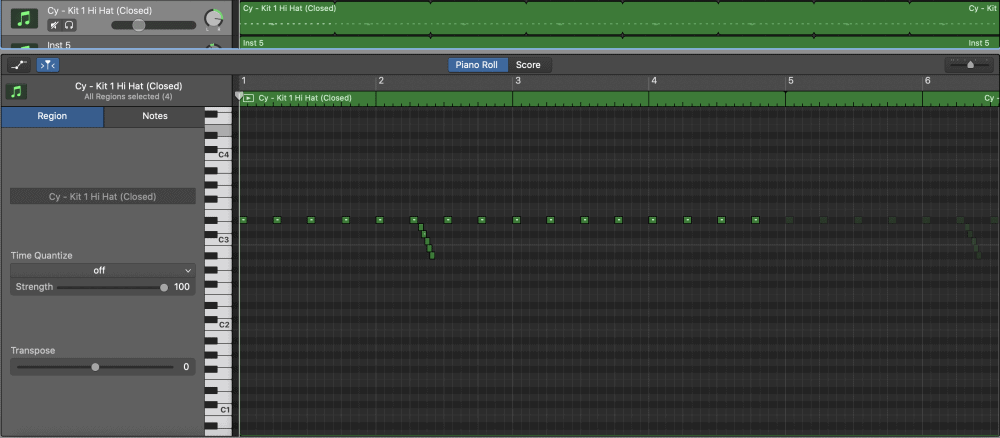
The first thing I did when I made my beat is that I made the hi-hat notes almost immediately simply because they’re the easiest to do and it’s a great way to get started.

You’ll notice how far apart the notes are spaced out from each other. This is what’s going to determine how slow they are, so pay attention to this.
I find that when using the standard BPM of 120, you want your hi-hats to be on every other grid-line to sound slow. If you set the BPM to around 70, the notes should probably be on every grid-line.
For the closed hi-hats, I made them a little faster and I also used a stylized hi-hat roll which descends down the piano roll which sets up the Snare to strike right after. Creating hi-hat and snare rolls is pretty easy and I have other tricks that you can use to add more flavor and style to your rhythm section.
Kick
As you’ve probably gathered by now, when making Aesthetic or Lo-Fi music, you want the drums to hit fairly slowly which means there won’t be many notes. For example, when I made my Kick in this particular track, you can see that there are really only around 4 kick hits per 8 bars.
That’s not a lot. And this obviously isn’t a rule, but the point is that there aren’t a lot of kicks just because if there were, it would have the effect of making it a bit faster and aggressive sounding.
You’ll also notice in the image below that I extended the kick notes so they’re very long. I did that just so they boom more in conjunction with the 808s.

Snare
The same thing can be said about the snare as well, in fact, the snare hits even less than any of the other instruments in the song, about every third beat.
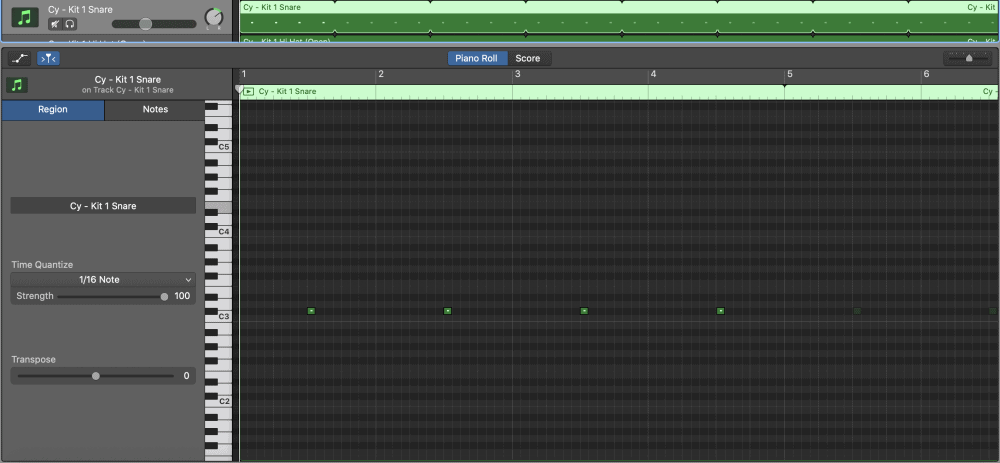
And that’s pretty much it for the drumbeat. One thing about aesthetic music drum beats is they tend to be quite simplistic and easy to recreate. They’re usually slow, and there isn’t a lot going on in that regard, although of course, there are some exceptions to this.
2) How to Make the Primary Melody In an Aesthetic Song
For the melody, note the first part of the article where I explained the use of the Major 7th and Minor 7th chords. In the track that I created for this tutorial, I was all over those major 7th sounds, because I was going for more of the happy and dreamy sound, rather than the chilled out Dorian vibe.
Truthfully, I used a C Major 9th Chord, but it kind of has the same type of vibe as the C Major 7th chord, with a bit of difference.

I also used somewhat of an arpeggiated effect, which, in simple terms, means that we’ve played each note of the chord separately (but let them ring out and mesh together to create more of a sustained effect).
I used the same principle for the G Major 9th chord as well, however, I also included a descending line down the C Major scale which hits on every gridline just as a way of spicing it up a bit and making it sound cool.

A) Use the Same Chords and Add Them to a New Instrument Track
Once I created the primary melody using two simple chords, you now have a foundation from which to build something else. For example, you can take those exact same two chords and then load them up into a different instrument to fill out the rest of the track.

You really don’t have to complicate it more than that. This is quite melodically simple, but the point of this is to just fill out the track a bit and get it to sound a bit more “complete,” so to speak. In this case, I actually used a C Major chord and an F Major chord, rather than a G Major chord like I used with the soft piano.
B) Adding Another Melody
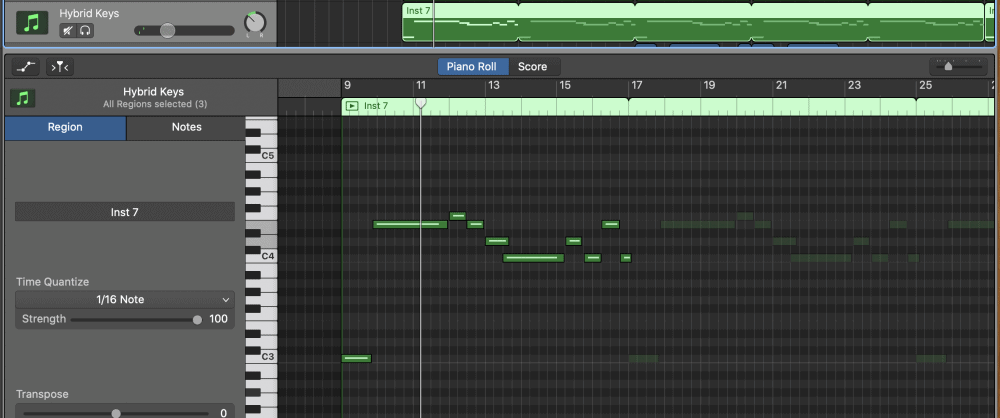
I did create another descending melody using the Hybrid Keys from Native Instruments. It’s just a simple bell melody that outlines the notes of the chord but adds a bit more “sweetness” to the track.
3) Adding More Fills to the Aesthetic Song with a Guitar
This part is more optional, but I included it here anyway. For this section, I essentially followed the same principles as the rest of the song, in the sense that I just played some chords in the Key of C Major and then added some other notes to spice things up a bit.

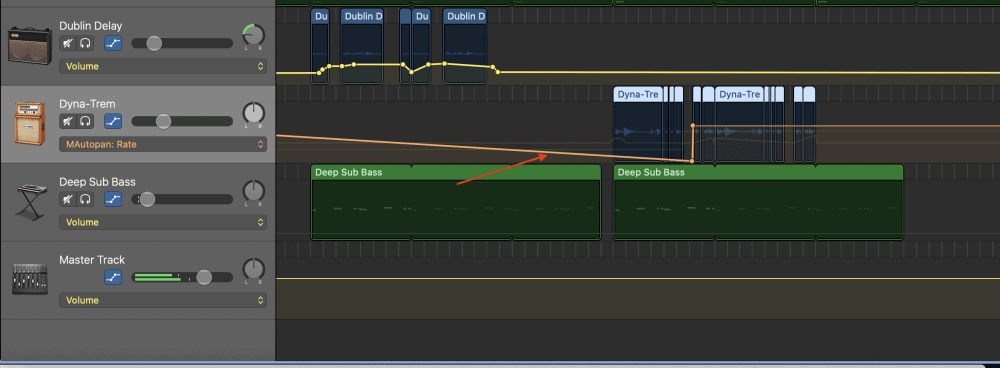
I also added the MAutoPan to get the sounds to oscillate between the left and right speakers so it sounded cool, and I added volume automation to fix the fact that I played some notes louder than others.
4) Adding the Bass
For the bass instrument, I used what I believe is the best boutique 808 plug-in on the market for the price, Initial Audio’s 808 Studio II, which you can find here on Plugin Boutique, and I made the pattern relatively straight forward. Initially, I used the Deep Sub Bass synthesizer but then opted for a much cooler sounding 808.
It sounds great when coupled with a kick drum, especially when the notes and the kick hit right at the same time. Like the other instruments, I just played notes of the C Major Scale, but I matched them so they played at the exact same time as the Kick Drum, that way they slam together and create a cool bass sound.

For the plug-ins, I threw up two different processors, including the Channel EQ and the Compressor and I also made sure there was a slide between some of the notes (I have a guide on how to do this too).
Channel EQ

I eliminated the highs and then I boosted the same frequencies that I attenuated on the kick drum.
Explained in another way, in the image you can see above, there is a slight boost around the 200Hz range, which is precisely the same range that I attenuated on the Kick drum, that way there is a room for both of them to co-exist in the mix, and then they compliment each other better.
Compressor
For the compressor, I just used the “Type R Pumping” preset, because I find that it adds some much-needed aggression and fatness to the sound of the 808.

And that’s pretty much it for the main portion of what I did to make the Aesthetic Track. Once you’ve created your song, now you just want to go ahead and mix it, which is an entirely separate tutorial (my guide).
Mixing And Mastering
For the next stage, I adjusted the panning on each of the tracks, which is definitely the easiest part, and then I adjusted the VU meters to ensure that nothing is clipping, and then it was ready for export. If you’re confused about panning, don’t be, because I’ve already explained it simply, as well as mastering too.
Gear Mentioned
1) Pro Tools Lifetime Licence
2) Spectrasonics’ Keyscape
3) iRig HD 2
4) PRS SE Custom 24
5) Komplete 13
6) Initial Audio’s 808 Studio II Synth

 Written By :