To get your hands on a xylophone for Garageband, check out the Exylo from Alan ViSTA. You can grab it from Plugins4Free, or from AudioPluginsForFree and then install it using my guide.
How To Use The Exylo from Alan ViSTa
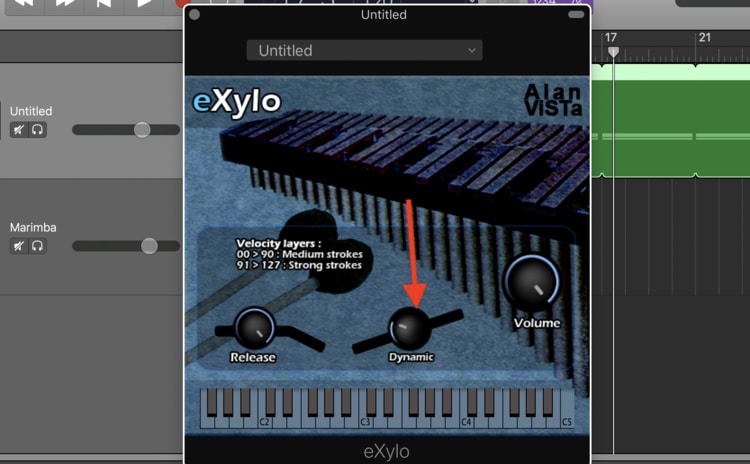
The Exylo from Alan ViSTa comes with just three parameters, the release knob, dynamics, and volume.
Release Knob
The release knob essentially controls by how much the note sustains itself after you’ve played the note on your MIDI keyboard. Go ahead and crank it all the way to the max and play a note, and you’ll notice that it sustains itself naturally after you’ve played it.

However, if you turn the Release knob all the way until the left, the note stops playing immediately as soon as you take your fingers off the key. Personally, I would err on the side of just having the Release cranked all the way to the maximum at all times.
Dynamics Knob
The Dynamics knob, however, controls the volume of the extraneous sounds that are produced when you press on the MIDI Keyboard. In other words, it increases or decreases the volume of the actual sticks hitting the xylophone keys.

For instance, if you go ahead and press every note on the xylophone by swiping your fingers quickly across the MIDI keyboard or Garageband’s musical typing, you can hear the sound of the stick actually hitting the key a lot more. It sounds more dynamic and realistic, in my opinion.
If I were to use this VST, I would probably have both the Dynamics and the Release knob cranked all the way to the right at all times.
Volume Knob
The volume knob, however, is more self-explanatory. If you increase the volume of the xylophone, you’re essentially increasing the total output gain of the instrument. In other words, you’re increasing the total volume of the instrument.

Tips and Tricks for the eXylo
Thankfully, Garageband’s arpeggiator functions are compatible with the Xylophone, so you can actually create interesting patterns right off the bat. In other words, there are a ton of different MIDI note presets available in Garageband’s interface.
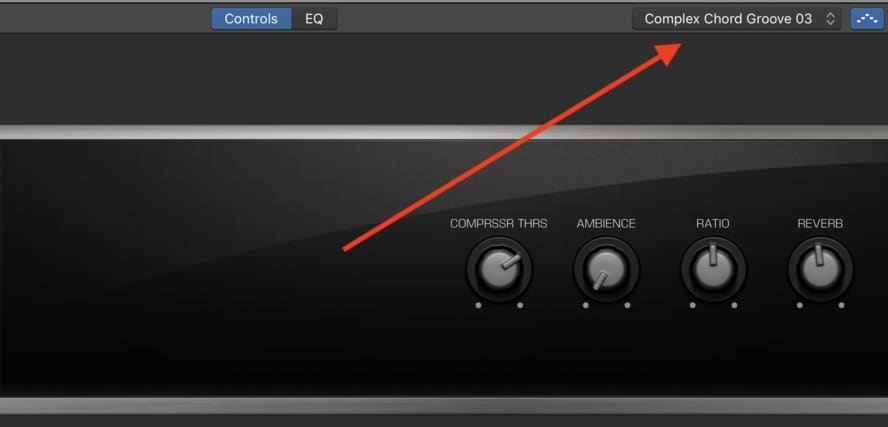
For example, you could use the ‘Complex Chord Groove 3’ pre-set, and then play the chords of your choice.

A Dm7 and CMaj7 chord progression sounds great with this pre-set.
The Dm7 and Cmaj7 look like the following patterns on Garageband’s Musical Typing feature.
Try out the chords below:
Dmin7
A D Minor7th chord is the following notes: D, F, A, C

C Major 7
A C Major 7th chord is the following notes: C, E, G, B

The musical typing feature in GarageBand imitates the keys of a piano, similar to MIDI keyboards which do the same thing. Because 99% of VSTs are triggered by a keyboard instrument including a xylophone, understanding piano keys is crucial, which is just one reason why I recommend PianoForAll.
Actually having a handle on the instrument itself is the best way to optimize the sound, however, I’ll show you how to improve it with plugins too. There are just a few dynamics processors and effects that’ll make a big difference on the sound.
How To Optimize The Sound Of The Xylophone
In order to make the Xylophone sound a little bit better, there are a number of things that you can do. This section is similar to my article on increasing the sound quality of the harmonica, in the sense that a lot of the tips and tricks are similar.
Ultimately, I would add just a few different effects and dynamics processors to the plug-in, just to make it sound a little bit better. For one, I would do what I mentioned above and actually increase the release and the dynamics option all the way to the maximum.
I would add the following plug-ins to the Xylophone: reverb, ambience, compressor, EQ, and perhaps a bit of delay.
Reverb
For the reverb, I would argue that it’s best to increase it to around 3/4 the way to the maximum.
This is going to push the xylophone further back in the mix, and make it sound a lot less upfront and dry. Moreover, it’s going to give it a particular emotional vibe, otherwise, it’s just going to sound too bland.
You can see what this looks like in the image below:

Ambience
The same thing could be said for the Ambience knob, which I would also increase to around 1/2-3/4 of the way to the maximum. Remember, the ambience and the reverb are different in one crucial way.
If you can recall my article on the differences between reverb and ambience, I stated that the ambience function creates a much wider, thicker, and atmospheric sound through the use of a short reverb, which also has the effect of making it sound more three-dimensional.

Compressor
For the compressor, it depends on for what purpose you’re using the xylophone.
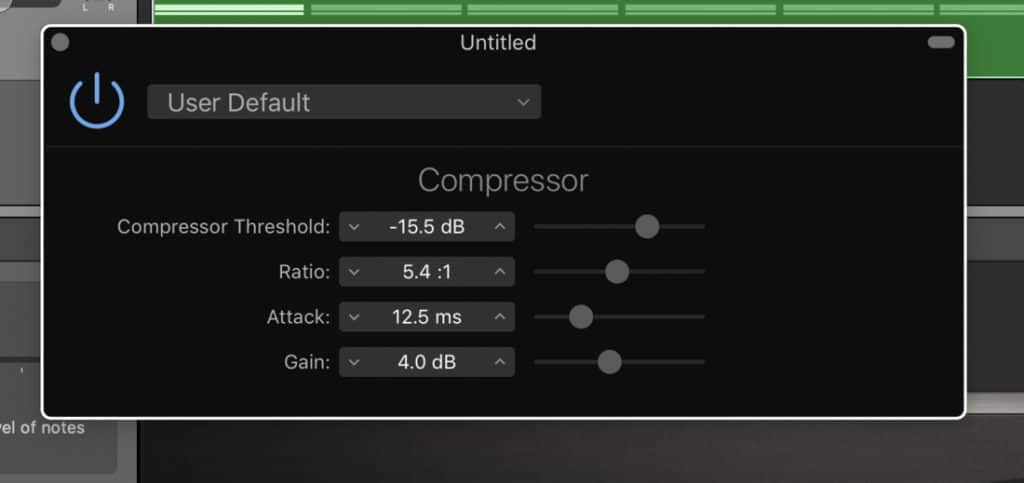
However, I would use the following settings for the compressor to really make it sound more realistic and interesting:
Compressor Threshold: -15.5dB
Ratio: 5:4:1
Attack: 12.5ms
Gain: +4.0dB
You can see what this looks like in the image below:

Channel EQ
For the channel EQ, you could probably go ahead and cut out all of the sub-frequencies, due to the fact that this instrument doesn’t have many of those anyway (you can test this out for yourself with Fab Filter’s Pro-Q 3 which allows you to solo certain frequencies).
For whatever reason, when you play the xylophone, those frequencies shine through the mix a little bit, despite the fact that a xylophone doesn’t really have those frequencies.
Just cut them out, and then you can attenuate the highest frequencies by just a little bit as well, and then boost the area between 750Hz and 1000kHz, and then also the area around 2100kHz.
This looks like the image you can see below:

Stereo Delay
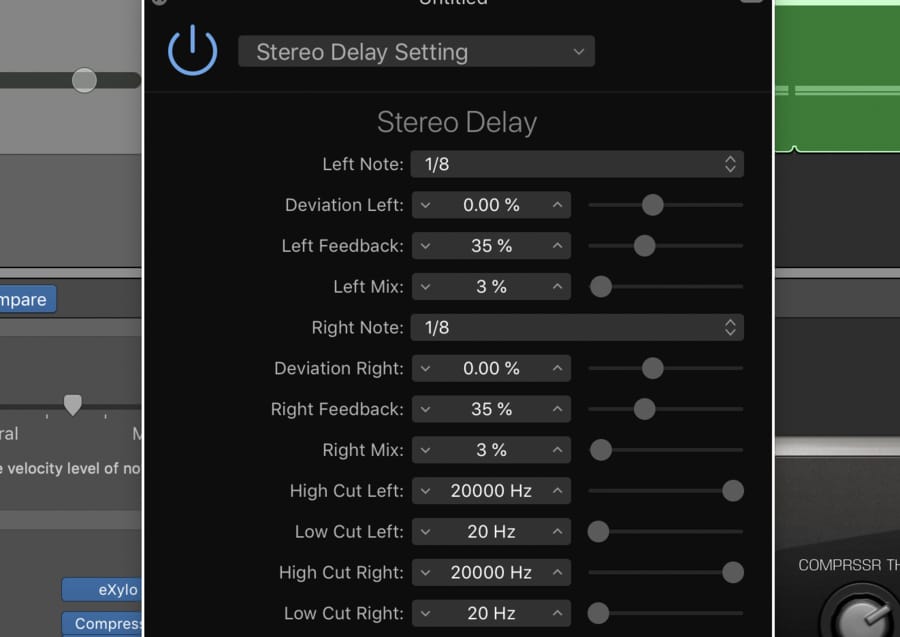
And finally, we’ve arrived at the delay. For the delay, I would say that it’s a good move to just increase the left and right mix to around 3% and then keep the Delay time to the 1/8 note.
That’s going to just add enough delay so that it shines through the mix a little bit. You’ll notice, however, that when you play the xylophone solo with this stereo-delay setting on its own, it won’t sound that great.
The purpose of adding Stereo Delay at this level is to actually make it cut through the mix, in combination with all of the other instruments together, rather than make it sound good on its own.
You can see what this looks like in the image below:

And that’s pretty much it for the xylophone. You can go ahead and experiment with what you think sounds best.
YouTube Video Tutorial
Important Things to Note About the Xylophone
The xylophone is a peculiar instrument to work with due to the relative rarity of it in popular music. I can’t even tell you one popular song that uses it in the mainstream music scene.
However, I think it’s entirely possible to make it one of the more commonly used instruments, kind of like the way the flute has been used in the last few years due to trap music.
I hope this tutorial was helpful to you. Make sure to share this on your social media with your producer friends. That would be really helpful.

 Written By :