Digital Audio Workstations are incredibly versatile, especially Garageband and its Amp Designer software, however, I think there are just a few steps for getting it set up and ready to go.
To use the Amp Designer in Garageband
1) Connect your guitar via a Scarlett 2i2 audio interface
2) Open an Audio track
3) click the Amp icon on the top-right of the Smart Controls to bring up the Amp Designer
4) Choose a preset like “Custom Studio Clean” from the drop-down menu.
The best thing about the Amp Designer is all of the included presets. They are a great way of becoming accustomed to what the Amp Designer has to offer. Each preset has its own amplifier, cabinet, and microphone combination and you can clearly see how they have changed when you switch through each one. If you get tired of the Amp Designer, however, I couldn’t recommend Blue Cat Audio’s Axe Pack from Plugin Boutique enough.
What The Amp Designer in Garageband Includes
- Amp Heads (Fender, Marshall, Mesa Boogie, Vox, Randall, Orange, and more)
- Cabinets (Same brands as well as different sizes, 4×12, 1×12, 2×12)
- An adjustable Pedal Effects Board – Delay, Reverb, Chorus, Flange etc.
- Hundreds of presets
- Ability to move microphone positioning on the virtual amplifier cabinet.
- Dynamic, Condenser, and Ribbon microphones modeled after the most famous microphones.
- Noise Gate (eliminates feedback and other unwanted noises)
- Guitar Tuner
A lot of people are surprised to see that Garageband comes with a plethora of amplifier combinations and pre-sets for both the guitar and the bass guitar.
I’ve counted approximately 7 collections of pre-sets.
In this order, they are Clean Guitar, Crunch Guitar, Distorted Guitar, Experimental Guitar, Clean Bass, Crunch Bass, and Experimental Bass.

There’s also settings for the Acoustic Guitar as well. There are 5 of them, Echo Strum, Natural Flat Pick, Natural Stereo, Natural Strum, and Natural Chorus.
Each one can be either used with a bass guitar or electric guitar, but the titles suggest for which instrument they’re designed specifically.
Under each category, there are approximately 21 presets (with a few exceptons), and many of them are quite good. My personal favorite is the Dublin Delay and Dyna-Trem which are found underneath Clean Guitar.
Now, all of these presets are basically pre-determined settings with Amplifier Models, Cabinets, Microphone positioning, and effects units running on them.
For that reason, they are a great jumping off point for getting started.
Some of my favorites right from the start were Cool Jazz Combo, Clean Echoes, Dyna-Trem, and Dublin Delay, which are all under the Clean Guitar pre-set.
After you get sick of messing around with the innumerable amount of presets, you can go into the Amp Designer to begin making things sound exactly as you want.
Before you’ve even entered the actual Amp Designer, you’ll notice there are some settings to adjust in the Smart Controls. In the image you can see below, I’m on the “Clean Echoes” setting.

What You Need To Use The Amp Designer In Garageband
Before we begin talking about all of the tips, tricks, and secrets of using Garageband’s Amp Designer, let’s talk about what you actually need to get started (my guide on how to connect your guitar to Garageband).
The article mentioned above shows you what you need to connect your guitar to the DAW, however, for the sake of this tutorial. I’ll also include a brief list of necessities here as well.
In order to play guitar in Garageband, you need a couple of different tools.
I’m going to go ahead and assume that you have a Mac Laptop – (although, if you don’t already have one, I suggest this one from Amazon).
Due to the port changes made by Apple in recent years, I’ll also include necessary adapters/connectors.
***Moreover, the gear I’ve recommended is all of the gear that I USE; it’s not necessarily the best in the world, additionally, each link shown down below will take you to my Product Page.
- Audio Interface (Scarlett 2i2 from Focusrite)
- Guitar Cable (Ernie Ball Right-Angled Jack)
- USB-C to USB-Female Adaptor (You don’t need this if your laptop isn’t the brand new one with the new USB-Type C Port)
- Monitors or Studio Headphones (I recommend Audio-Technica ATH-M50x)
And that’s pretty much it.
Once you’ve got your guitar hooked up to your computer and playing directly through your monitors/headphones, we can start talking about using the Amp Designer at its full potential.
***As I wrote about in my article on latency, it’s important you don’t have your computer connected to a Bluetooth speaker, because then there will be a significant delay between what you’re playing and what you’re hearing.
Obviously, we don’t want this.
How To Use The Amp Designer
First things first.
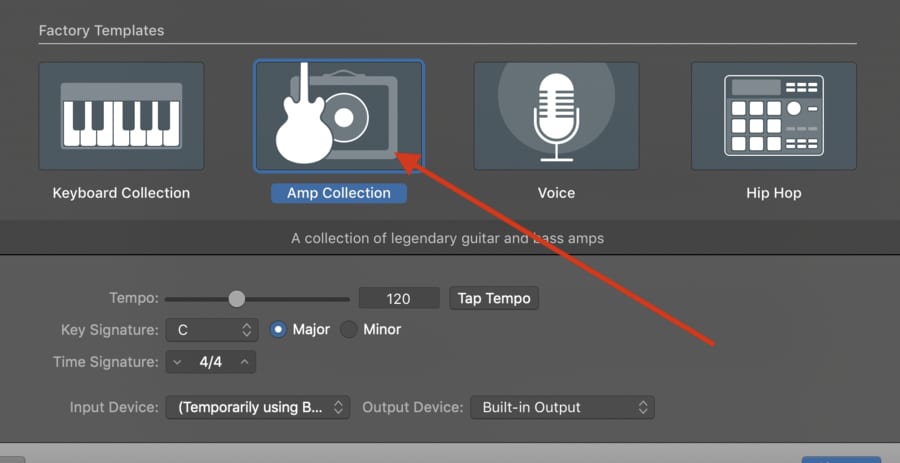
If you’re a beginner to using the Amp Designer, the first thing you can do is select the “Amp Collection” option when you’ve first opened a new project.

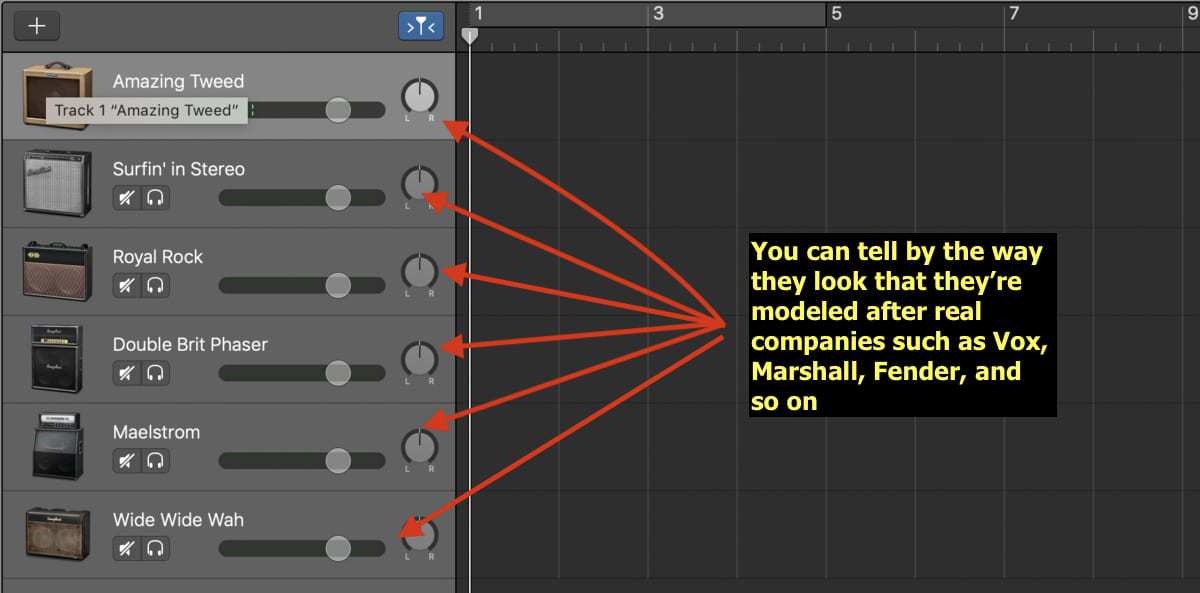
If you choose the “Amp Collection,” it’ll bring up a 6 different amplifiers and pre-sets, Dublin Delay, Surfin’ Stereo, Royal Rock, Double Brit Phaser, Maelstrom, as well as Wide Wide Wah.

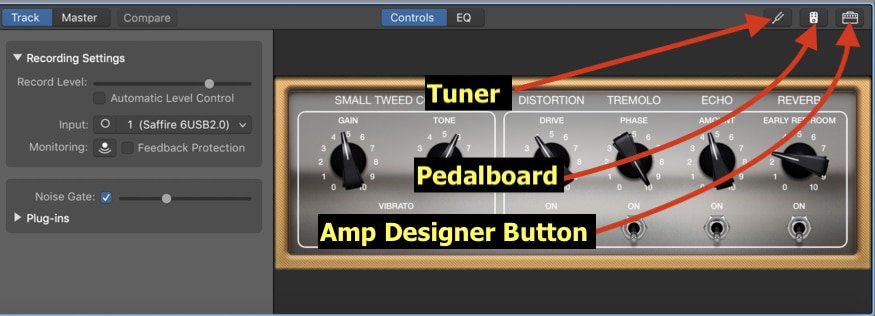
To bring up the Garageband Amp Designer, hit the little icon in the bottom right of the Smart Controls that looks like an Amplifier (at least it’s supposed to look like an Amp/Cab combination anyway).

The Amp Designer comes with a plethora of different cabinets, amplifiers, models, and Microphones.
If you want, you can also change not only the style of the microphone but where it’s located on the cabinet speaker.
I can’t lie, this is one of the Amp Designer’s coolest features, and it’s impressive Apple managed to get it right.
As a general rule, moving the microphone toward the center of the speaker will add more “brightness” and “crunch.” Essentially, we’re getting a boost of higher frequencies by centering the microphone on the speaker.

As we move the microphone further out to the left and right of the center, we’re getting more mid and low frequencies, essentially “darkening” the sound.
Also, there is an option for adjusting how much of the screen the Amp Designer actually takes up. Looking up at the top right-hand side of the Amp Designer, notice the button that says, “View.”
You can choose from the options, 50% up until 200%, depending on how much of the screen you want the Amp Designer to take up. I normally keep it at 100% or 125%.

If you click on the “Manual” drop-down menu on the right side of the “On” button in the Amp Designer, you’ll have access to even more presets.
If I had to make a guess, I’d say there are around an additional 100 presets to choose from, within the categories of Clean, Crunch, and Distortion.

As I said before, for the most part, all of the amplifiers and cabinets are modeled after a few different companies, including Fender, Vox, Marshall, Mesa Boogie, and Orange.
Moreover, all of the knobs, are exactly how they’d be on a real guitar amplifier, including the Gain, Bass, Treble, Mids, Reverb, Master, and Presence.
There’s no reason to go into the details on each one of these, but I’ll give you a brief rundown on all of the knobs in case you’re not too familiar.
Gain – Increases the power of the signal.
Bass – Increases the lowest frequencies
Treble – Increases higher frequencies
Reverb – Increases the virtual size of the room (That’s what it sounds like. I’m not sure precisely how reverb really works).
Master – Increases the total volume.
Presence – Boosts frequencies that are even higher than the regular treble frequencies.
Now, there are additional EQ controls, notably if you click on the button that says “EQ” above the Gain, Mids, Bass, and Treble options.
If you click on the EQ button, you’ll get several 5 different options, including Modern, Vintage, US Classic, British Bright, and Boutique.

Also, there are a number of different Reverb options as well if you just click on the Reverb Dropdown menu where it says “Reverb.”

It’s worth noting that you can actually crank the Master Volume on the Amp Designer without actually turning the volume up on the actual track of your Guitar Track Region.
***In other words, you can push your virtual amplifier to its potential without worrying about the correlated increase in volume.
There’s also an “output level” slider on the bottom right-hand side that just turns up the total strength of the signal.

The microphone options are based on the three main microphones, the Dynamic, Condenser and Ribbon Microphone.
We’re not going to get into the many differences between Dynamic, Condenser, and Ribbon microphones because they are numerous and people in Audio Engineering debate this topic all of the time.
The primary difference, however, between the Dynamic and Condenser microphone is the Dynamic is far more common than the condenser, and the Dynamic doesn’t need an additional power source like the condenser.

The condenser is normally associated with more power. I’m likely wrong about the main differences between the microphones, so you’ll have to go somewhere else for that information.
Apparently, a ribbon microphone apparently is a microphone where thin pieces of metal are “suspended between permanent magnets.”
Maybe someone in the comments could discuss the differences between these three microphones in regular person language.
Moving on…
Most of the microphones in Garageband’s Amp Designer are modeled after actual microphones, like the Shure 57 – a classic microphone.
Now that we’ve discussed all of the relevant parameters of the Amp Designer, let’s get into actually how to set one up and use it.
How To Actually Use the Amp Designer in Garageband
For this section, I’m going to run through a set-up that I’ve created.
And if you mimic what I’ve done here in your own Amp Designer, you’ll get a feel for all of the ways in which we can adjust the Amp Designer to our choosing.

Compare the Blackface 4×10, for example, with the Sunshine Stack 4×12, and the difference is quite noticable.
The three big changes you can make in the amp designer are the Microphone positioning, the Amp/Cabinet combination, as well as the type of microphone you want, whether it’s Dynamic, Ribbon, or a Condenser.
Of course, the Gain/Mids/Bass options are important as well, but their importance goes without saying.
It’s really up to you to decide what you want to use. It’s a matter of messing around with the controls.
I used the Dyna-Trem preset, and then fine-tuned it to my preferences afterward.
Match it to the dials I’ve used in the images, and you’ll get a feel for how things sound.
In this case, I used the neck pick-up, obviously, with the tone and gain cranked all the way up. The gain is always the best when it’s near maxed in my opinion. Maybe around 8 or 9.
You can check out the settings within the Smart Controls as well. There are a few differences between the settings in the Smart Controls as well as in the actual Amp Designer.

The settings in the Smart Control essentially control the actual effect of the preset, in the case, the “Chorus” or the “Dyna-Trem” as Garageband calls it.
The Gain knob is the same as the Gain knob in the Amp Designer, but the Tone knob is different.
Explained in another way, if you turn up the Gain in the Smart Controls, it’ll also turn up the gain in the Amp Designer at the same level.
As I said before, it’s really up to you and your ear. You can figure out how you want to go about it.
How To Adjust the Pedals In The Amp Designer
The order of the pedals in the Amp Designer is actually pretty important, and shouldn’t be ignored. This is the case in real life as well (when using actual analog pedals and amp/cabs).
How you organize the order of effects matters a lot, but it’s best to experiment with this on your own.
Normally, it’s common practice to use the dynamics pedals first, ie, EQ, Compressor, etc, and then the effects pedals afterward.
If you want to access the pedalboard, click on the icon that looks like a pedal beside the Amp Designer button.

This is how I approach it anyway. Obviously, there are other ways of doing things.
My thinking is that it’s best to EQ the sound to the way you like it and then add the effects after.
By the way, if you’re wondering if you can use our actual effects pedals for Garageband, then yes you can.
The order of the signal chain is as follows for me, Guitar > Effects > Audio Interface > Computer.
Important things to Remember
1) Make sure that you only have the “Monitoring” button turned on the track you intend on recording and listening through.
The “Monitoring” button is the little button that looks like an upside Wi-Fi symbol. When it’s turned on, it’s the color orange. It looks like this.

If you have the monitoring button turned on every single channel, you’ll likely run into some problems, including latency, lagging, and probably even feedback at times.
2) Make sure that you have either Headphones plugged in or actual speak monitors, otherwise, you’ll likely run into some seriously annoying feedback or other problems.
3) Ensure the “Count-In” button is either turned on or off. It can be somewhat of a nuisance depending on whether it’s on or off. Personally, I prefer having it on, because then I can literally count in as the name for it suggests. Others may find it annoying though.
It’s notable that the guitar doesn’t record during the count-in period, so keep that in mind. You may also want to learn to play with a metronome like what’s taught in PianoForAll (also on my product page) – one of the better ways to learn piano for music production. A lot of the principles taught in it apply to other instruments as well.
4) Your Audio Interface signal has to be dialed in at the appropriate amount. What I mean by that, is that if you’ve turned it up too much, the signal will be coming in hot, and thus, you’ll get some distortion.
5) The Noise Gate is actually pretty dope.
The Noise Gate option is in Garageband’s Smart Controls, which you can bring up using the “B”-key on your keyboard. In my opinion, the Noise Gate setting is usually good to dial in around (-45) – (-50dB).
Around that area. Maybe a little less. The Noise Gate eliminates all of the undesirable sounds, like hissing and so on.
6) Turn off the Master Echo and Master Reverb if you don’t want it turned on. Recording guitar parts are different from MIDI because if you’ve recorded with a ton of delay or reverb, it’ll stay on the track.
7) Garageband also comes with a tuner (this is my guide on it). Personally, I don’t like it that much because it’s not of the greatest quality, but it’s there. It’s the symbol that looks like a tuning fork.

 Written By :
I don’t know why, but when I select a bass preset, a generic looking set of controls appears in the lower pane of GB. I have to click on the Amp Designer to make any changes. When I select a guitar, however, all the settings for that particular amp setup show up as expected in the lower pane. Is this normal? It the interface for bass settings different from guitar settings, or is my GB app corrupted somehow?
The bass and guitar interface is the same in Garageband. You have the settings down in the Smart Controls, and also the Amp Designer, which is what comes up when you click on the little icon on the top-right-hand side of the smart controls.