To make a metal song in Garageband, record several guitar riffs along to a click-track, and then load up the Drummer track with either the Hard Rock (Anders) or Punk drummer (Max).
Fill out the rest of the track with your choice of instruments, including a bass guitar, synth, or soundscape.
If you want to make a metal song with Garageband, there are several ways to do it.
I would say first and foremost, you need to have an electric guitar at least because this is arguably the defining characteristic of most metal songs. The genre tends to focus on it more than other instruments, and thankfully, it’s fairly straightforward to connect to Garageband.
Much of the drums can be done with Garageband’s drummer track, and then you can use a bass guitar VST to fill out the low-end frequencies.
Making A Metal Song With Garageband – First Steps
For this tutorial, I’m going to run through how I would make a metal song in Garageband, which would be to connect my guitar into the program with an audio interface, and then use either a third-party amp modeler or Garageband’s amp designer.
Garageband’s amp designer is actually pretty good – I have a guide on how to use it as well. A lot can be done with it to make your tone sound great, however, I like to use Blue Cat Audio’s Axiom from Plugin Boutique these days, which I find has a better tone.
How I would make a metal song in Garageband, is I would load up the guitar riffs into the DAW one-by-one, and then create a drum and rhythm section for each part, in addition to the accompanying instruments.
After that, I would move on to the next part of the song and then complete the same process.
The following section discusses the type of gear you need to make a metal song in Garageband, including plug-ins (how to install plugins in my tutorial).
If you want to skip to the part of the tutorial where I dive into how to actually make a metal track, click the link here.
What Gear You Need To Make A Metal Song
1) Audio Interface
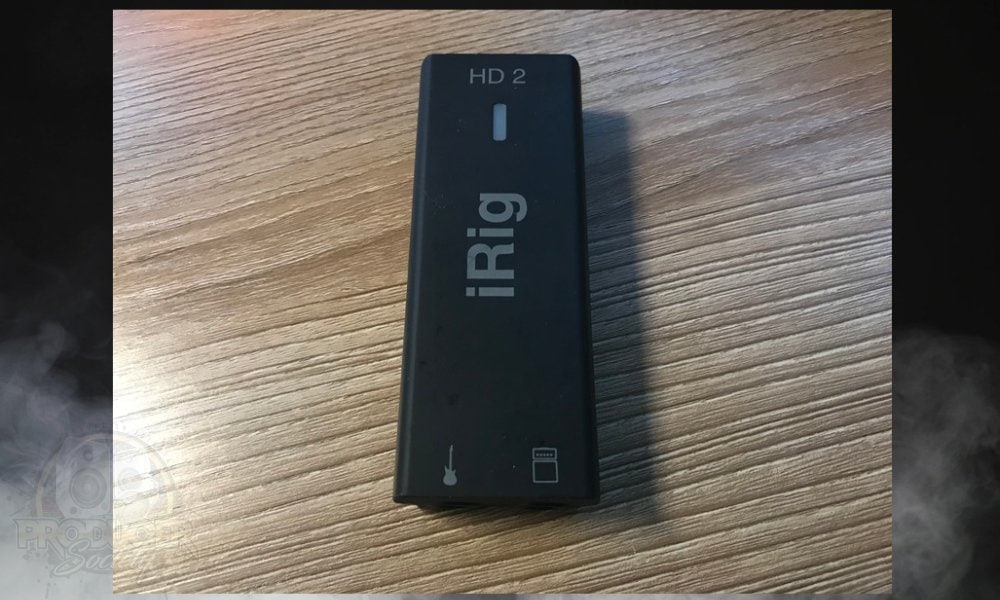
iRig HD 2
Focusrite Scarlett 2i2
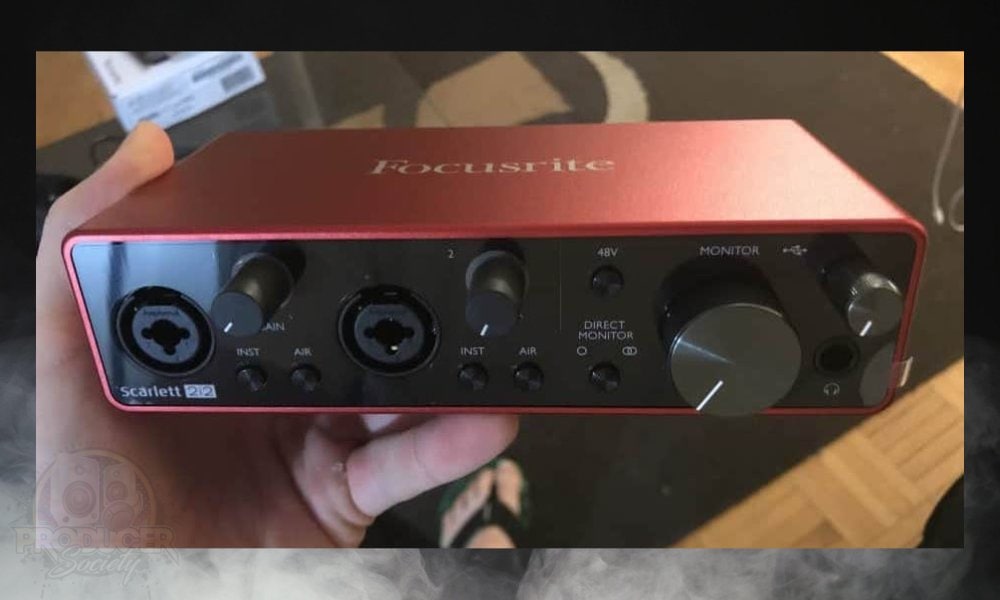
For the audio interface, I would recommend getting either the iRig HD 2 if you care more about portability or the more stationary Focusrite Scarlett 2i2 (both links take you to my product page).
Which one you want really depends on your needs.
As I’ve explained before in my definitive guide to audio interfaces, do you plan on singing? If that’s the case, I would definitely recommend the Focusrite Scarlett 2i2, but if you only want to record guitar parts, the iRig HD 2 is a great option.
The iRig HD 2 only has 1 compared to the Scarlett which has 2, moreover, the iRig HD 2 doesn’t have an XLR input for a microphone (by the way, Singorama has a great guide on how to sing if you’d like to learn).
2) Electric Guitar
ESP Eclipse II
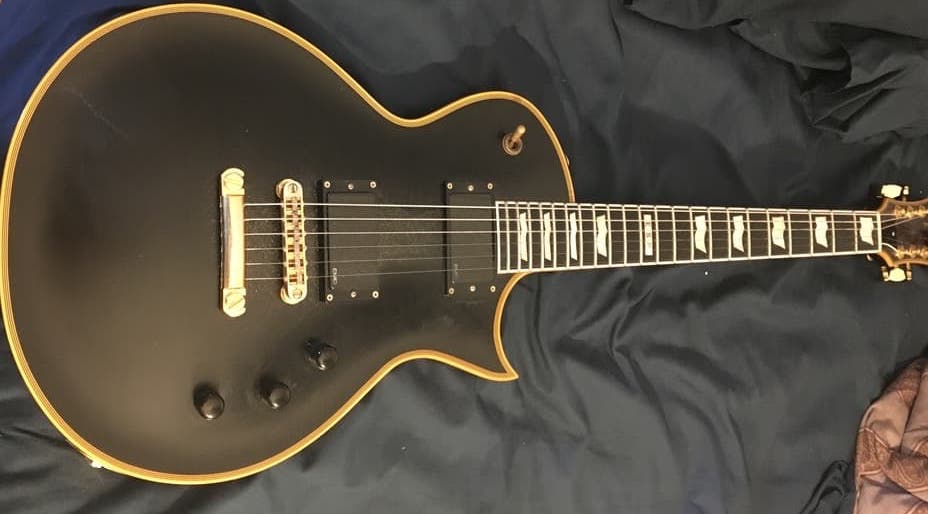
Every guitarist knows there are literally thousands of models to choose from.
However, when it comes to metal, I use an ESP Eclipse II. It has active pick-ups and the guitar is built for the genre.
Check the price of a similar one off of ZZounds.
PRS SE Custom 24
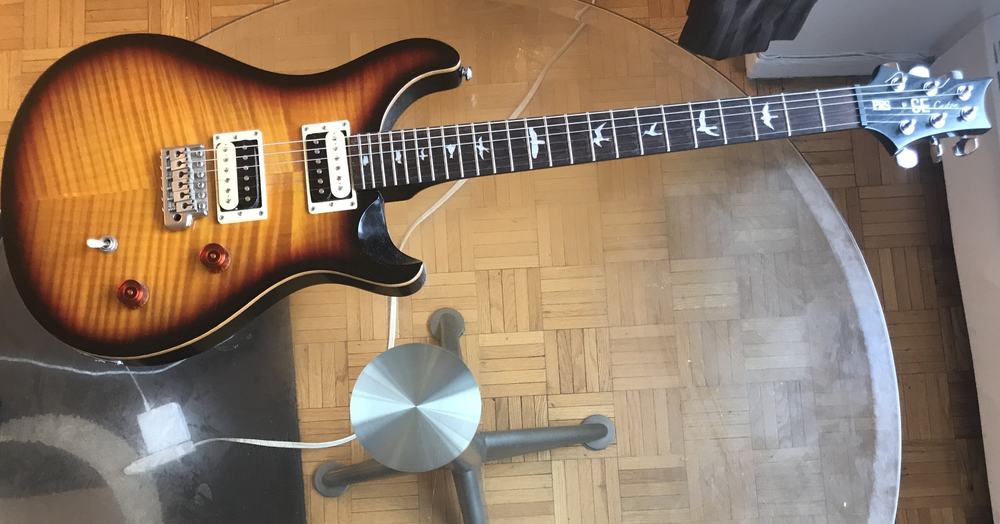
If you’re in the market for a guitar that’s a jack of all trades and a master of none, I’d recommend getting the PRS SE Custom 24 from ZZounds.
It’s an incredibly versatile instrument that can do pretty much everything sufficiently.
As I’ve said before on the site and I’ll say again, I would say that the PRS SE Custom 24 is the most amount of value for the price.
3) Guitar Pedals
Line 6 POD
For guitar pedals, I find that the multi-effects pedals and the amp modelers are a great choice, due to their versatility and value for the price.

I use the Line 6 POD which is over 10 years old at this point. It might even be 20 years old. It still works and it sounds pretty awesome.
Line 6 POD HD500x
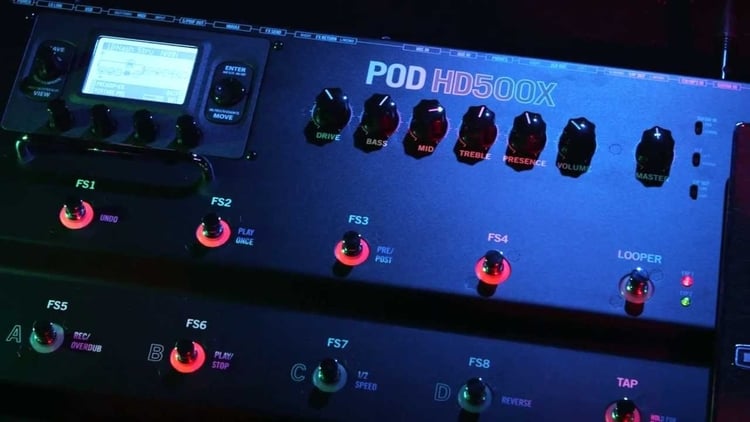
The Line 6 POD HD500x – which you can read more about here – is an updated version of the POD, and it has a lot more options, however, as I said above, I’m privy to Blue Cat’s amp simulators these days if I’m not simply micing my amp with a Shure SM57.
If you’re wondering about whether guitar pedals work with Garageband, know that they do, in fact, I’ve written an entire article about the topic.
4) Monitors
For monitors, you can either use speaker monitors or headphones.
Etymotic ER3SE
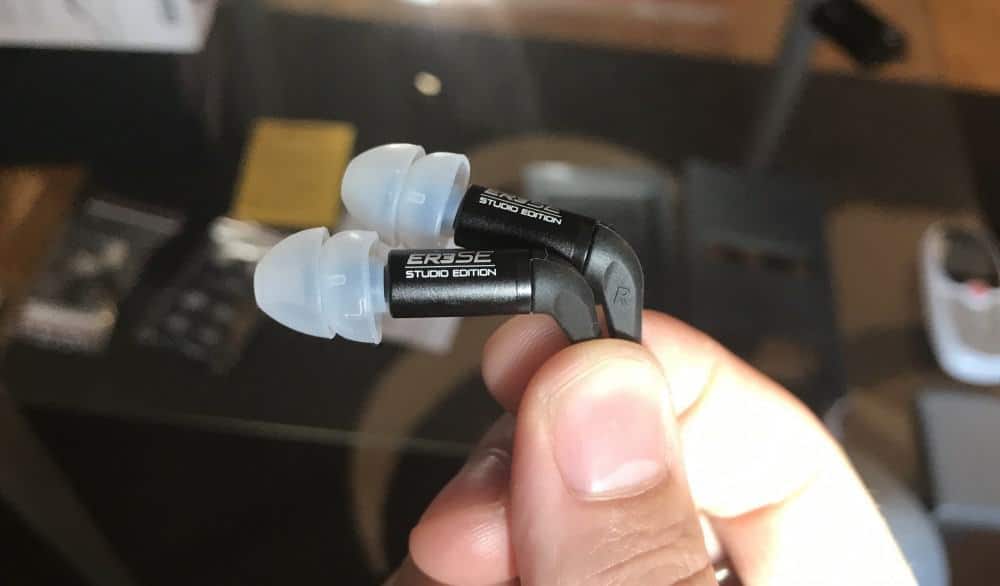
I’d recommend using the Etymotic ER4SR from Amazon if you want to use earbuds (these are the updated version of the ER3SE). They’re unobtrusive, high-quality, precise, and accurate, which is exactly what we want for recording and producing as I’ve explained before.
Audio Technica ATH-M50x
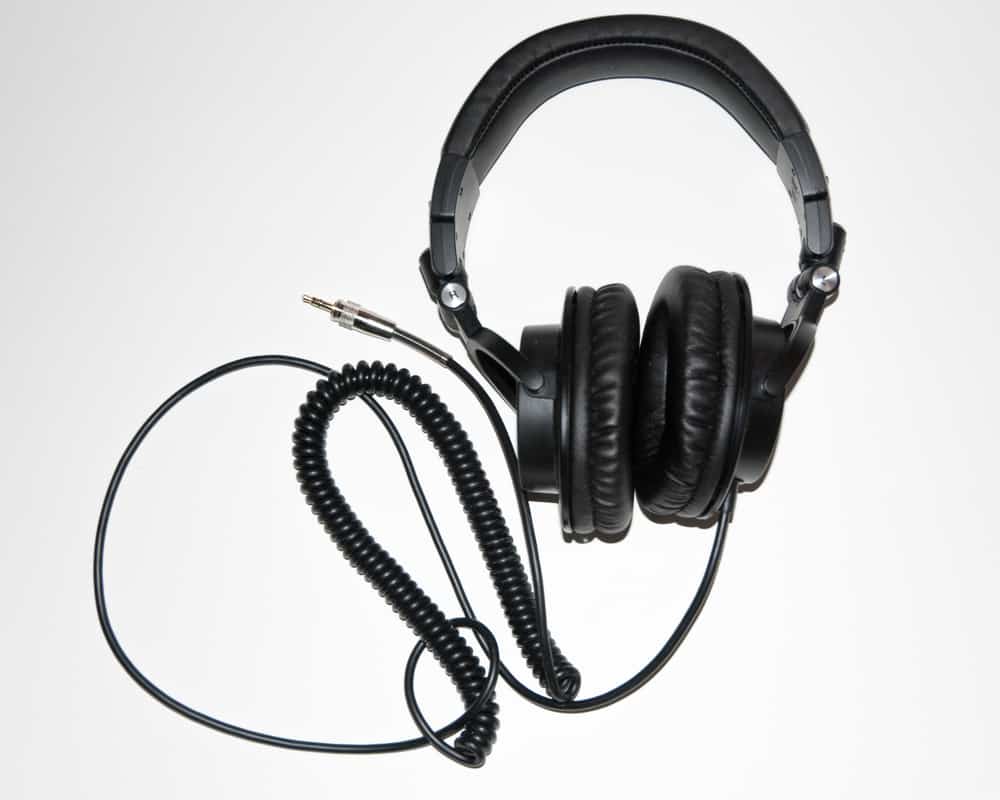
If you’re in the market for over-the-ear monitors, check out Audio Technica’s ATH-M50x on Amazon.
I would say these are the most versatile headphones for monitoring due to the fact they can be used both in and outside of the studio. In other words, they can be used for casual listening as well as mixing and recording (more on this my guide).
My personal favorite is Beyerdynamic’s DT990 PROs, however, they require a DAC to power them because they’re 250 ohms and for actual computer speakers, I use the iLoud Micro Monitors (my review).
Plug-Ins To Use For Metal Songs in Garageband
1) BlueCat Audio Destructor (Not Free)
This is a plug-in that seems like it’s designed specifically for making dope guitar riffs with a lot of distortion.
I recommend checking this one out from Plugin Boutique as part of their Axe Pack if you want to get your hands on a distortion plug-in.

You have to pay for this plug-in, however, if you don’t want too, that’s fine. Your guitar pedals or the amp designer and Garageband will work just fine (you can also try the Destructor’s free trial from Blue Cat’s website).
2) LePou Amps (Free)
LePou amps are a commonly suggested free plug-in that a lot of guitar players like to use.
They’re not my favorite, personally, however, many people do like them.

There are many other amp modelers out there, including Guitar Rig from Native Instruments as well as IK Multimedia’s Amplitube 5.
I would recommend checking out the trial versions that way you can figure out what you like the most.
3) 4Front Bass / Ample Pass P Lite II
I tried finding a really good bass guitar plug-in, and I what I came upon was the Ample Bass P Lite II from Plugins4Free, however, for whatever reason, I can’t get it to work in Garageband because it says that the files are missing whenever you download it (Update: I actually figured out how to fix this which I showed in my YouTube video).
The 4Front Bass from Plugins4Free is a great alternative to the Ample Bass, however, as I said, if you use my tutorial linked above, you should be able to get the P Bass to work which is far superior to the 4Front bass.
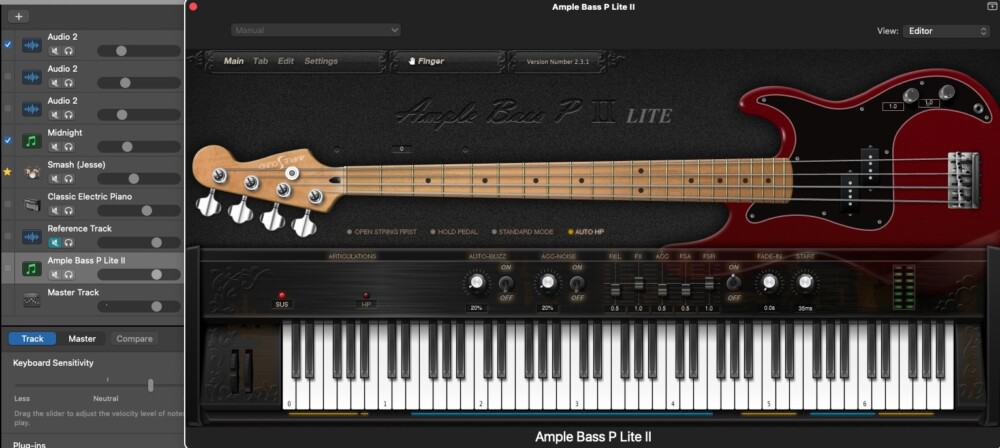
The 4Front bass and the stock bass guitars that come with Garageband are enough to do the job, but they don’t sound the best. Their shortcomings are obvious once you start trying to play fast notes in succession.
4) Komplete Start (Free)
I already wrote an entire article on Komplete Start which is at this link here.
Komplete Start is a software bundle that comes with a ton of free instruments courtesy of Native Instruments.
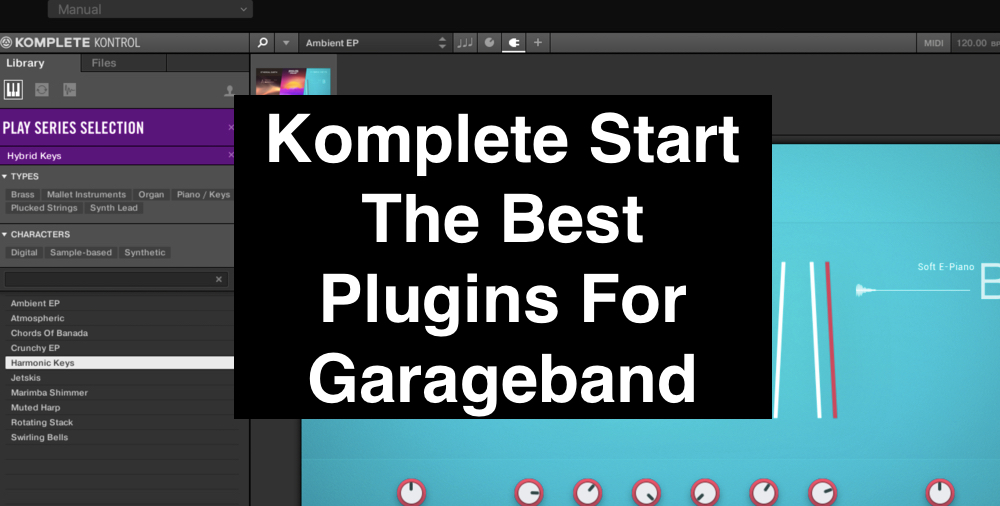
The amount of plug-ins you can get from Native Instruments for free is pretty amazing.
It’s really worth taking the time out of your day to download them because there is a lot that comes with it, and you can use these instruments as a way of filling out your mixes.
5) Melodyne 5 (Trial Version Is Free)
Melodyne 5 (this is the Editor version I recommend) is an audio-editing tool that allows you to do some really amazing things with your recordings, including changing the pitch of your recordings without affecting the human quality of the sound, and also eliminating background noise which I’ve explored before.
I highly recommend getting your hands on Melodyne 5, which you can access for free at this link here, but keep in mind that this is only the trial version.
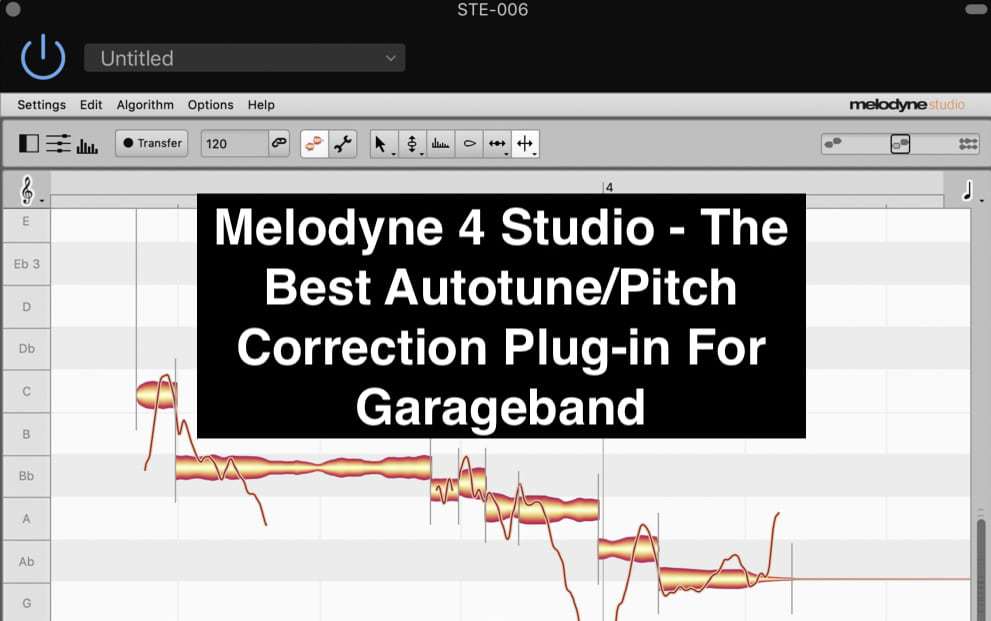
If you really want to get serious about recording, then I would definitely pick up the editor version at least which I already linked above for reasons that I’ve previously explained elsewhere on the site.
6) Bob Perry Noise Gate (Free)
This is a noise gate that’s a lot more advanced and detailed than what Garageband has to offer.
If you’ve ever used Garageband’s stock Noise Gate plug-in, you’ll notice that it’s parameters are quite limited in terms of what it can do.
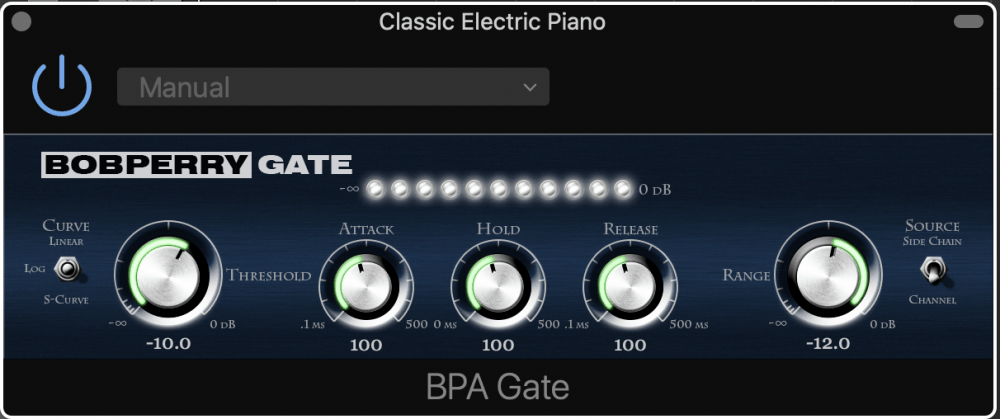
It’s as simple as using the meter to change the noise gate level in dB, whereas the Bob Perry Noise Gate (from Plugins4Free) has additional parameters for you to control the audio recording, including Attack, Hold, Release, Curve, and Range. It also has the ability to do side-chaining as well.
7) Superior Drummer from ToonTrack (Not Free)
Admittedly, I’ve never actually used Superior Drummer 3, but I know that many people swear by it.

As I said in my tutorial on how to make drums in Garageband, I used to use Steven Slate Drums 5, however, I can’t get it to work in GarageBand anymore.
8) Ignite Emissary and Ignite Nadir (Free)
The Ignite Emissary is an amplifier simulation that’s built especially for metal tones.
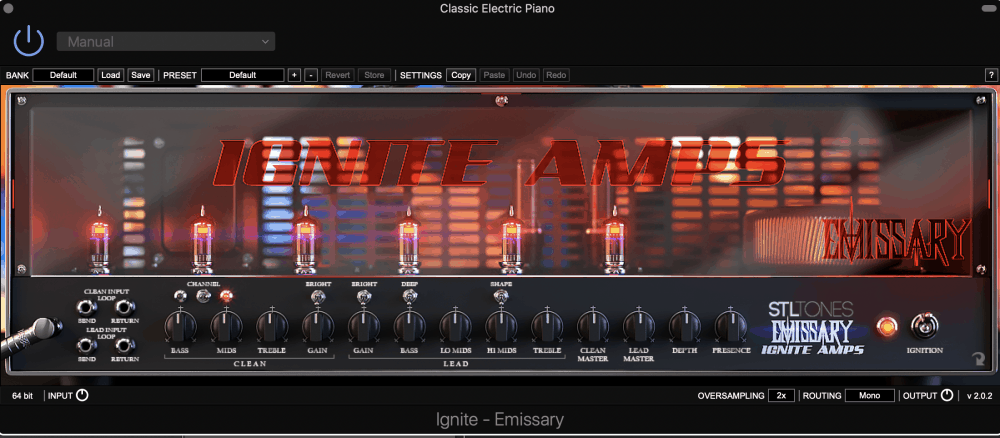
The Ignite Nadir, on the other hand, is an impulse response loader, which is a plug-in that imitates different microphone positions.

I would recommend downloading these two plug-ins as well if you’re interested in another amp simulation that sounds pretty great for metal.
You can grab the Ignite products here from STL Tones website.
9) Logic Remote (Free)
Do yourself a favor and go into the app store and download the Logic Remote for your iPhone, assuming you own one. You’ll find the Logic Remote by searching the same phrase in the iPhone App store.
It’s a very useful device for hitting play, record, and rewind. For the longest time, I searched for a control surface that worked with Garageband perfectly, but as it turns out, the Logic Remote does a lot for you already.

To make it work with Garageband, you have to make sure the software is turned on, otherwise, it won’t recognize it.
In terms of setting it up, it should work almost automatically.
One of the better features of the Logic Remote is the ability to turn an iPad into a control surface, which is pretty useful, I must say.
Other Plug-Ins
Glenn Flicker has a great list of plug-ins on his YouTube channel which you can find here.
Gear Set Up For Making A Metal Song in Garageband
I use the following gear for making a metal song in Garageband.
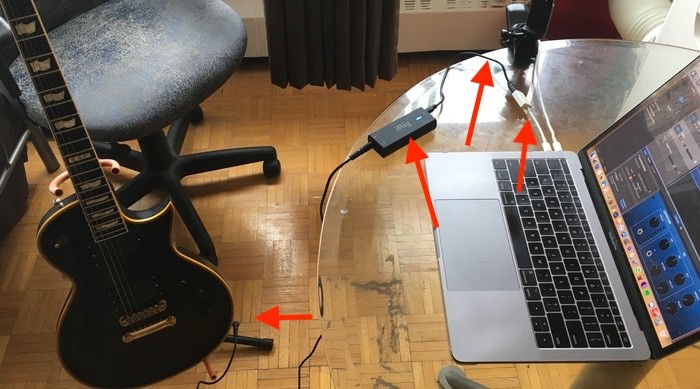
- iRig HD 2
- Etymotic ER3SE and iLoud Micro Monitors
- Line 6 POD
- Komplete Start
- Bob Perry Noise Gate
- Melodyne 5
- Logic Remote
- ESP Eclipse II
If I’m sick of using the Line 6 POD, I’ll swap it out with the Blue Cat Audio Axiom, or I’ll just use my Hughes and Kettner 100w Switchblade/Mesa 2×12 mic’d with a Shure SM57. You can see how I normally set this gear up in my video here:
Without further ado, let’s talk about how we’ll use some of this equipment to make a metal song in Garageband.
Basic Music Theory Of Metal
Metal, like hip-hop, is an incredibly diverse genre.
In fact, I would argue that heavy metal is easily one of the most diverse styles of music out there, even more so than any other style.
However, I’m a huge metal head, so obviously I’m biased.
This section is by no means a comprehensive list of the music theory principles on which metal music is based, but it will give you an idea on how to proceed with creating your own songs, by the way, Guitar Pro 8 from Plugin Fox will help a lot with this.
Let’s move on to what is the most defining characteristic of metal music.
Natural Minor Scale
There’s simply no doubt that the natural minor scale is easily the foundational scale of metal music.
Yes, there are many, many other tonalities and scales that are used in the genre, however, the natural minor scale is definitely the most commonly used tonality in this style of music.
The Natural Minor Scale is based off the 6th degree of the Major Scale.
The image below is the A Natural Minor Scale.

The natural minor scale is what gives metal its sombre, dark, and sometimes even sad tonality.
It’s the bread and butter of most metal songs, especially when used in conjunction with power chords.
Power Chords
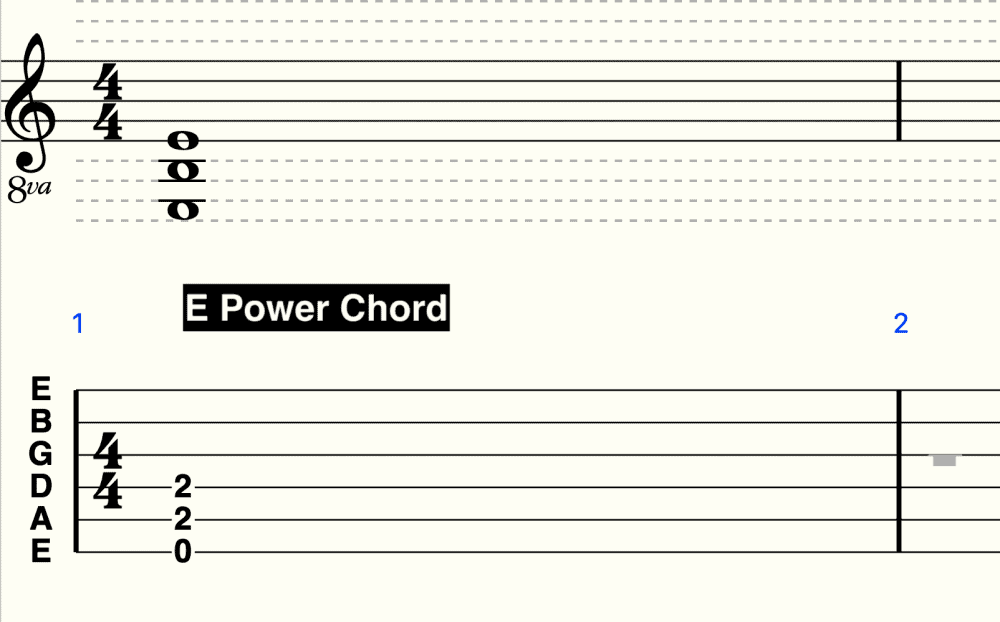
In the next section, I’ve included a riff that utilizes power chords, but the following image shows you how you would actually build power chords from the minor scale.
It’s really quite simple. A power chord is basically just three notes of a regular chord, for example, E-B-E is an E Power Chord.
Notice that it omits the G#, which would make it an E Major chord.
The great thing about a power chord is that it’s just the root and the fifth of a chord.
This means that it’s versatile because you could play a major or minor scale over it due to a lack of the major third interval.
The major third interval, E-G#, would give it a major, or happy sounding tonality, and playing an E Minor scale over an E Major chord would sound dissonant to most people.
To get a nice little toolbox of power chords using the minor scale, you would just use the same principle to create power chords from certain parts of the minor scale.
Because a power chord is the root, and the fifth of the scale, you would just take a degree of the minor scale and then count up from 5 (get PianoForAll if you want to simply learn and then apply these concepts to your songs).
The notes of the A Minor Scale are the following:
A, B, C, D, E, F, G, A
To create power chords from the scale, you just take the note and then count 5 letters up from it.
However, only certain notes of the scale are conducive to creating the power chord.
Those are: A, C, D, E, F, G, A
Essentially, every note from the minor scale can be the foundation for a power chord, with the exception of the second degree of the scale.
In this case, it’s the B note.

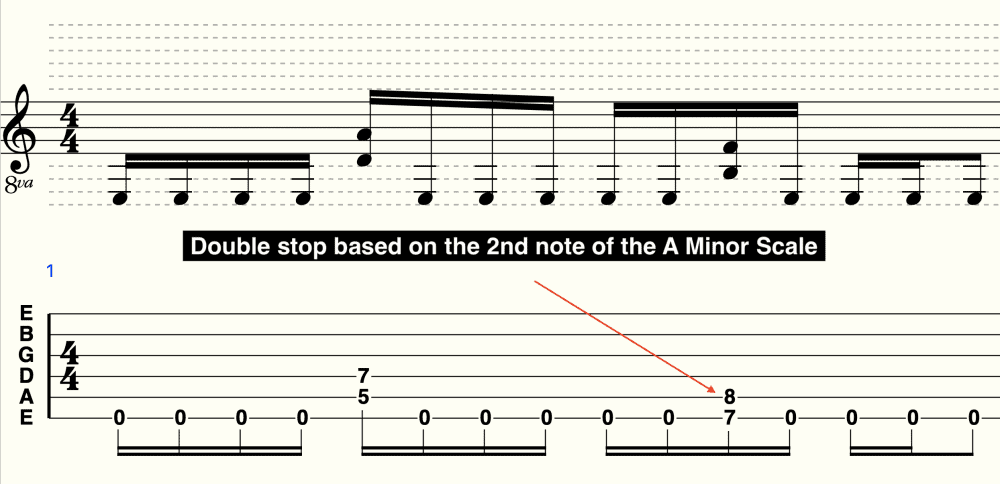
However, you can use double-stop riffs which technically aren’t a power chord in the traditional sense, but they’ll work the same way. They just look a bit different.
Double stop chords can be used on the minor scale on the second degree, but other parts of the scale as well.
More specifically, in A Minor, the double stop chord will be wherever there is a B note.

Another commonly used scale in metal is the Harmonic Minor Scale
Harmonic Minor Scale
The Harmonic Minor scale is just the minor scale with a raised 7th degree. So that means in the case of the A Harmonic Minor scale, it’s an A Minor Scale with a raised G: G#
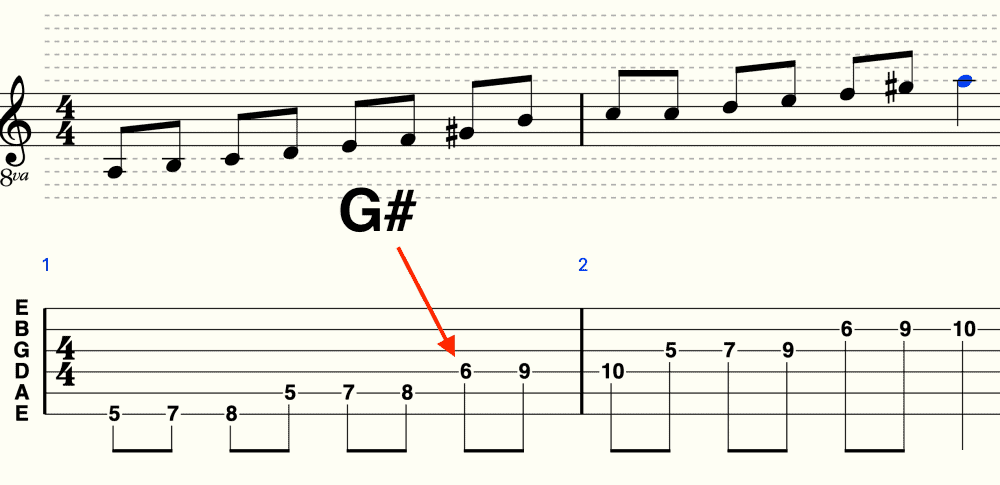
All scales can be used in the same way, essentially.
For instance, if you want to build chords from any scale, you just take the root note and then add the 3rd and the 5th.
The following diagram shows all the chords belonging to A Harmonic Minor.
All I did was add the third and fifth note on top of each part of the scale, as I just explained.

Let’s move on to the next commonly used scale in metal, the Diminished Scale.
Diminished Scale
***Also called the Whole-Half Diminished.
The diminished scale is created through a sequence of steps: whole step, half-step, whole step, half step, etc.
It’s a repeating pattern.
Because of its structure, it tends to sound disorganized, because the notes aren’t resolving in a way that’s expected.

The diminished scale is commonly used to create dissonance or an uneasy feeling.
It’s commonly used in a arpeggiated format. For instance, Diminished 7th arpeggios.
Minor Blues Scale
It’s not uncommon to use the blues scale either.
For instance, Kirk Hammett from Metallica pretty much only uses the Minor Pentatonic Scale in his solos, although, on And Justice For All… and on The Black Album, he switched it up quite a bit.
The Minor Blues Scale is based off of the regular Minor Pentatonic Scale, which is also based off of the Natural Minor Scale.
The Pentatonic scale is just 5 notes of the Natural Minor scale, and then the Minor Blues Scale is a Minor Pentatonic Scale with an added “Blue Note,” which is the flat-five, (5b).

Of course, these are just four scales that are commonly found in metal. Really, you can use any scale to make a metal song, and that’s part of what makes music creative.
However, these are the most common.
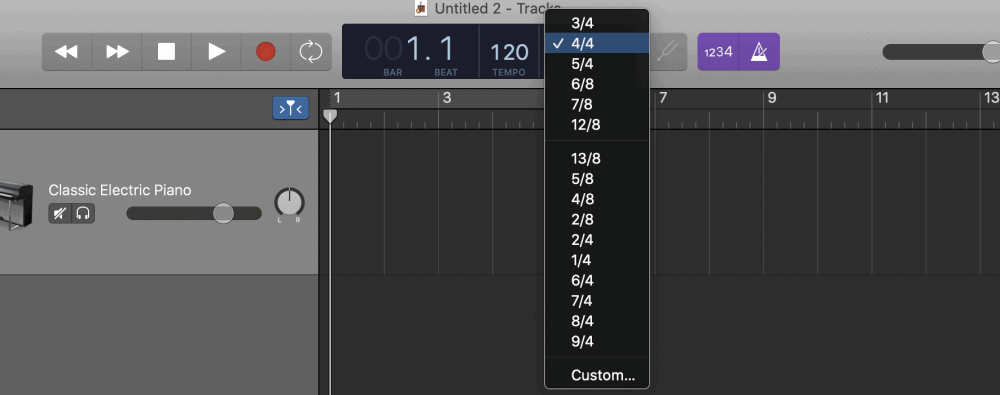
Changing Time Signatures
Metal, especially progressive metal, commonly utilizes time signature changes.
For instance, the song might switch from 4/4, to 5/8, to 7/8, to 5/4, to 5/18.
To change the time signature in Garageband, you just have to go up in the top center of the DAW and adjust it there.
Emphasis on Minor Second Interval
Another technique that’s common in metal is to emphasize the minor second of the minor scale.
That’s going to really darken up the riffs and the overall tonality of the song.
For instance, you could make a riff that looks something like this:
This has just brushed the surface of what’s possible when creating a metal song.
These are merely techniques and scales that have been commonly used in the genre, and are not meant to be “rules” at all.
Experiment with your own scales and ideas.
How To Make A Metal Song
1) Create your riffs
If you’re reading this tutorial, chances are you already have a collection of guitar riffs you want to use.
A good rule of thumb for creating riffs that go together is to make sure they’re in the same key signature or at least following some kind of theme.
On the other hand, if you’re creating a metal song that’s more on the progressive end, you could simply attach the riffs together with different interludes, which is done a lot in progressive metal.
Using Melodyne 5, you can actually eliminate unwanted noises in your recording as well, including things like headphone bleed.
In the case that you don’t know how to make a metal guitar riff, know the options are pretty endless, however, there are definitely some common themes and patterns.
I’ll give you a few options in case you’re not entirely familiar with the genre.
Palm Muted Power Chords
A palm-muted power chord riff is when you chug on the open E string (which is commonly tuned to Drop D), and then finger the chord changes.
I have the tablature and sheet music down here for you.

What you would do is palm-mute the open E notes, and then actually strum the power chords.
The above riff is more of a modern metal riff.
In the much older thrash metal scene, triplets or galloping-style guitar riffs were less common.
Breakdown Style Riff
For the riff shown below, assume that it’s in drop D tuning, (the low E string tuned to a D note).
This is an extremely common style of riff in the metalcore/progressive scene, including bands like Parkway Drive, August Burns Red, Periphery, After The Burial, Veil of Maya, etc.

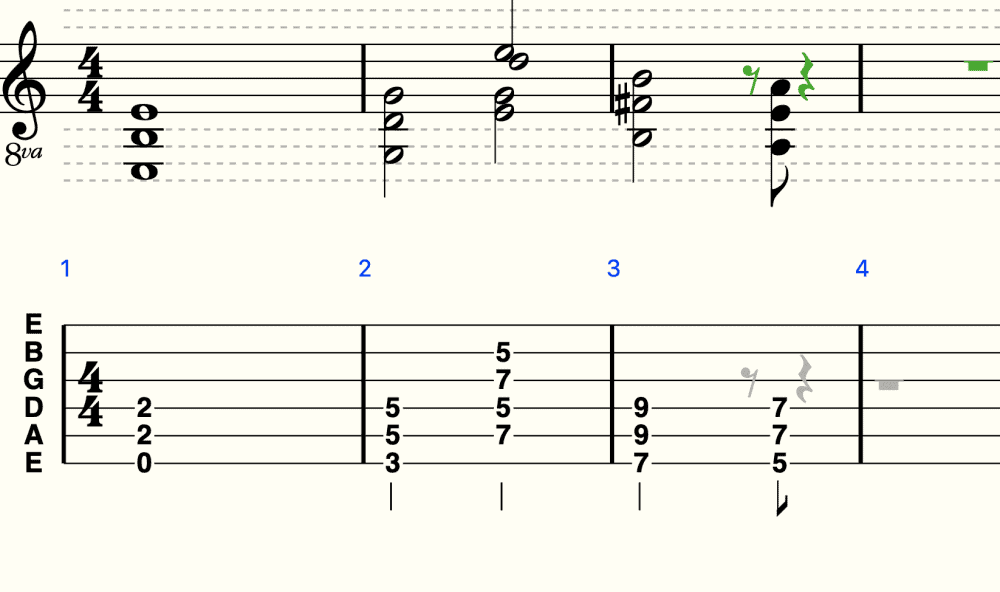
Rhythm Section For Underneath A Lead Section
For this riff, it’s mostly a series of chords that are meant to serve as the foundation over which another guitar is soloing.
In some cases, it could even be a keyboard or a synthesizer, or maybe it’s a break for the vocals or another instrument to shine.
Lead Section Over The Chord Changes
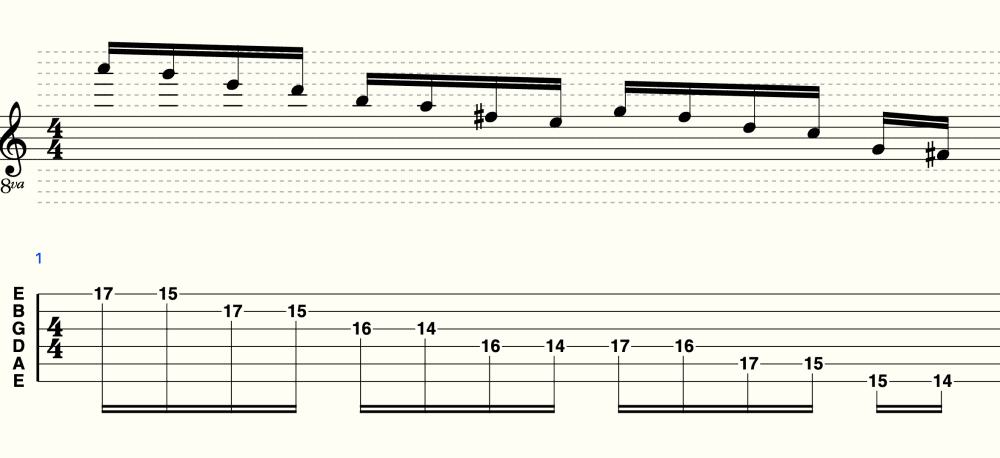
The above guitar riff in E Minor is an example of what you might play over the chord changes that I outlined in the previous example.
In Summary
Consider the riffs above as merely a guideline.
If you’re serious about seeing what kind of metal songs there are out there, there are a number of bands you could check out, including Metallica, Pantera, August Burns Red, Dream Theater, Suicide Silence, Megadeth, Periphery, Veil of Maya, Slayer, etc.
Check out Ultimate Guitar’s website to see what some of these riffs look like in tablature form.
2) Record your guitar riffs
Tune Your Guitar
Make sure to tune your guitar perfectly first, that way when you add other instruments and fills, all of the music is in tune.
I’m assuming you already know how to connect your guitar into Garageband, however, if you don’t, check the link at the top of the article.
Once the guitar riffs have been created, and you know how to play them by heart, you can record them in the DAW through a number of ways, including through an amp modeler with your guitar connected to an audio interface, or you could use a microphone on your amplifier and run it into your DAW in that way.
The image below shows how I would set up my gear. I added the Digitech Whammy pedal just for good measure, but it’s not necessary to make a metal song.
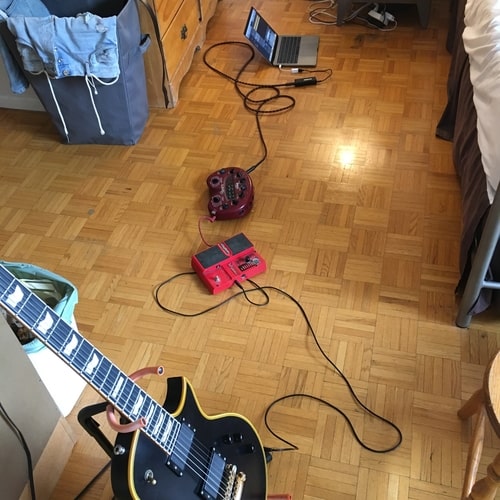
In my case, I just plug the Line 6 POD into the iRig HD 2 and then record directly into GarageBand.
1) Figure out your riff’s BPM by playing it along to a click track. Adjust the BPM until it keeps the time of your riff.
2) Hit the red “Record” button, with the count-in button turned on (if you want).

3) And then start playing your riff.
4) Keep re-recording multiple takes if you need too.
If you turn on the “Cycle” button which looks like two looping arrows pointing back to each other, you can select the region in which you want to record.
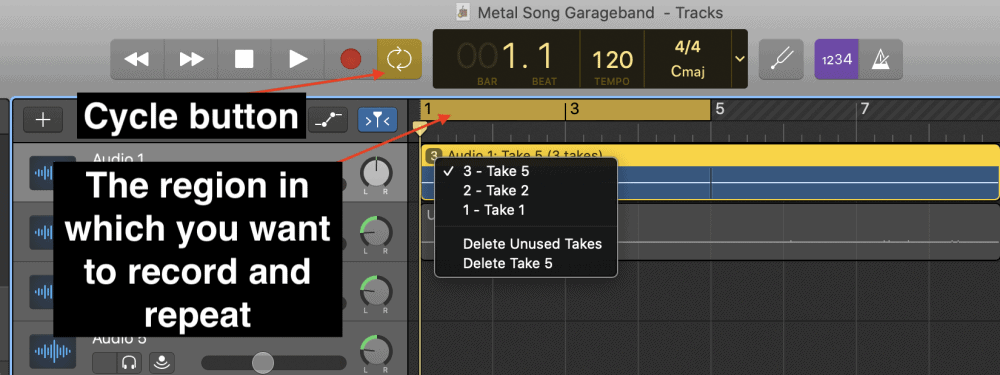
Put simply, you can re-record the same part over and over again as many times as you need to, and Garageband will recognize that you’ve recorded multiple takes. From there, you can choose which one you want.
A good way to ensure that your riffs sound good in the end is to use a metronome to make sure you’re on-time as much as possible. Either a metronome or a click-track.
To do this, you want to know how to calculate the BPM of the riff, which can be done in a number of ways.
Grab your metronome, whether it’s a real one or the one installed on Garageband, and figure out at which BPM your riff is by adjusting the BPM of the metronome setting-by-setting, through trial and error.
Repeat this step until you’ve finally figured out BPM the song is in, and then use that as your guide.
3) Use the Time Quantizer
Once the recordings have been created, you can go ahead and use the time quantizer (my guide on it) to ensure that all of the notes you’ve played fall on the grid-line or are at least somewhat on-time.
When you hit the “Enable Flex” option, it gives you the ability to manually shift around the waveforms wherever you choose.
For instance, you can isolate a certain part of the guitar riff and then shift it over until it sits on the grid line.

You can do this by using the Time Flex option, or you could use Celemony’s Melodyne 5.
I would recommend getting your hands on Melodyne at some point because it’s easily the best audio-editing tool that’s available for Garageband.
Just make sure your riffs are on time because it’s going to make it a lot easier to create a drummer track later.
4) Load Up The Drummer Track
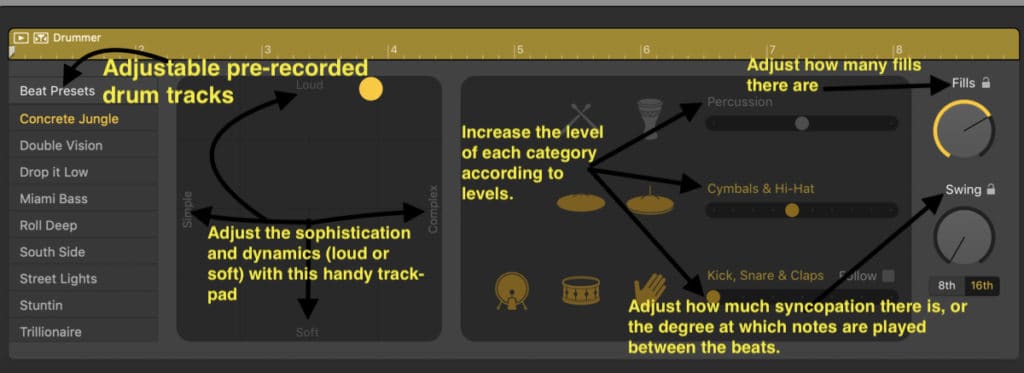
One of the great features of the drummer track – (among the various ones that I’ve explored before) – is to customize the drummer to meet your needs depending on the style in which you’re creating music.
On a more creative level, you can apply Garageband Drummers to the song in a way that mixes genres.
For instance, if you find that the Punk Rock drummer sounds better on a song, you can go ahead and use that instead, or even the Funk Drummer over a metal riff.
For the sake of this tutorial, I’ll say that it’s best to use either the Punk Rock Drummer or the Hard Rock Drummer, whose names are Max and Anders, respectively.
Getting the drummer track right is one of the more important parts of creating a metal song in Garageband.
There are a number of things that you can do to make the drummer track more cohesive with the rest of your song.
For instance, you can separate the drummer track into different regions which ultimately serve different purposes.

Put simply, you can customize one drum section to form a different purpose for that particular part of the song.
And you do this just by selecting the settings you want to use, and then you cut the region so that it goes along with the guitar riff.
Additionally, you have the ability to make the drummer track follow certain instruments more than others.
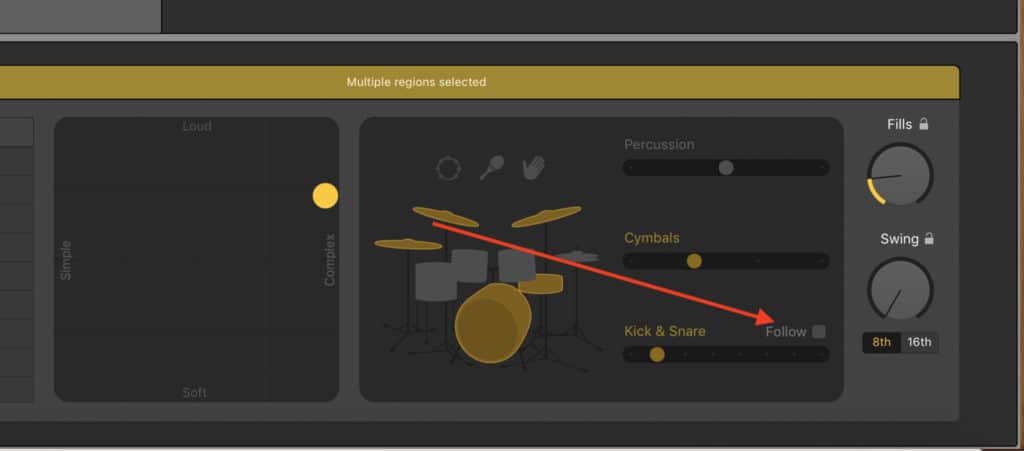
The “Follow” button will set-up the drummer’s artificial intelligence in such a way where it will literally follow your instrument of choice.
For instance, it can follow the bass guitar or the recorded guitar part, or even the synth, although that would be quite odd.
5) Add The Bass Guitar
Now that you have the main guitar riff created as well as the drummer track, you can start filling out the other instruments.
For instance, you probably want to get a bass guitar like the Ample Sound P Bass which sounds pretty great.
It’s arguably the best sounding bass guitar that you can use for Garageband and it doesn’t cost any money.
With that said, there are a number of stock bass guitar plug-ins that sound pretty good in Garageband.
Create your bass riff, depending on what purpose you want the instrument to fulfill.
Personally, I like to make the bass guitar do something entirely different from the guitar, which is quite different from how it’s traditionally done.

For instance, on Metallica’s And Justice For All, much of Jason Newstead’s bass-parts followed James Hetfield and Kirk Hammet’s playing down to a T, and thus, the bass can’t be heard very well on the album (admittedly, it was also mixed in this way as well).
If you want to know how to EQ a bass guitar, I recommend checking out my article here, in addition to my article on how to set up a compressor on the bass guitar as well.
If you do want to create a simple bass line for your metal song, just pay attention to the notes of your guitar riff, and outline the guitar riff with the bass guitar.
Put simply, if you’re palm-muting a lot of open notes on your metal riff, you could create a bass guitar track that essentially does the same thing.
6) Add A Synthesizer
- Soundscapes like String Movements and Event Horizon
- Pads like Boarding Area
- Airways
- Breathy Vox
The type of metal I listen to the most is progressive metal, which is a genre that uses a lot of ambient sounds that create a very introspective vibe.
Additional synthesizers and other instruments can really fill out the rest of your track and make it sound “complete,” so to speak.
Experiment with the ones that you think sound the best, however, I find that the String Movements soundscape is my favorite.
It’s incredibly versatile in terms of how you can make it sound good.
For instance, you could play entire chords on it that outline the song, or you could simply use it for one single note, one at a time.

For this section, try out Komplete Start to find additional instruments to use for your recordings, because at some point, you’re going to get sick of what Garageband has to offer.
7) Separate The Drums For Mixing
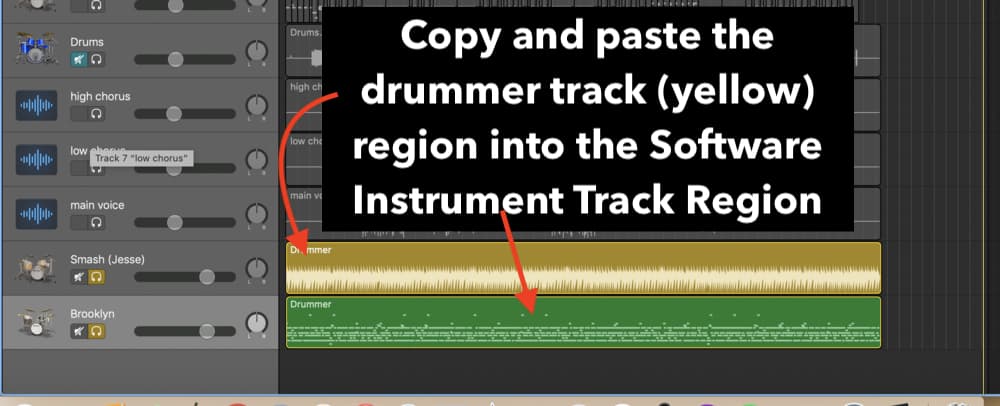
For this section, what you can do is actually turn the drummer track into a MIDI file just by copying and pasting the drummer track region into a software instrument track.
From here, you can actually pull the drums apart into separate instrument tracks for panning and mixing.
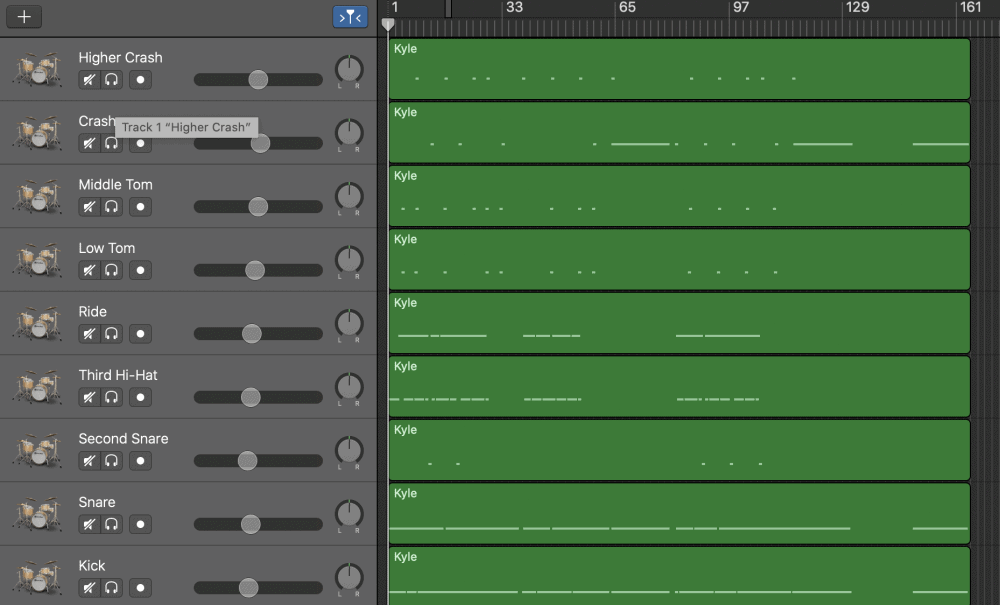
At the end of my Drummer Track article which I’ve already linked in here in one of the sections above, I show you how to do this.
This allows you to do a number of things:
- Add EQ, Compression, and other dynamics processors and effects to individual parts of the kit, like the kick, snare, hi-hats, etc.
- Customize the drummer track to add fills or extra kick patterns.
- Pan each part of the drum kit accordingly, so rather than the drummer track being mixed front and center in the stereo image, you can have the snare slightly to the right and the kick slightly to the left, etc.
Mix The Metal Song
This is an entirely different article that I’ll have to write sometime in the future, otherwise, this tutorial would be 10,000 words long. But for now, you’ll have to check out my article on How To Mix Music in Garageband.
Much of the same principles apply to rock and other music as it does to metal, although, of course, there are some major differences between genres.
With that said, however, the article that I’ve linked above covers the fundamentals of mixing, so it’s worth checking out.
Important Things To Note/Trouble Shooting
Tune Your Guitar
Make sure to tune your guitar before you start recording because you want all of the instruments to sound good together.
Change Your Input/Out In Preferences
You’ll probably have to go into the Preferences in Garageband and change the output and input accordingly when hooking up your guitar.
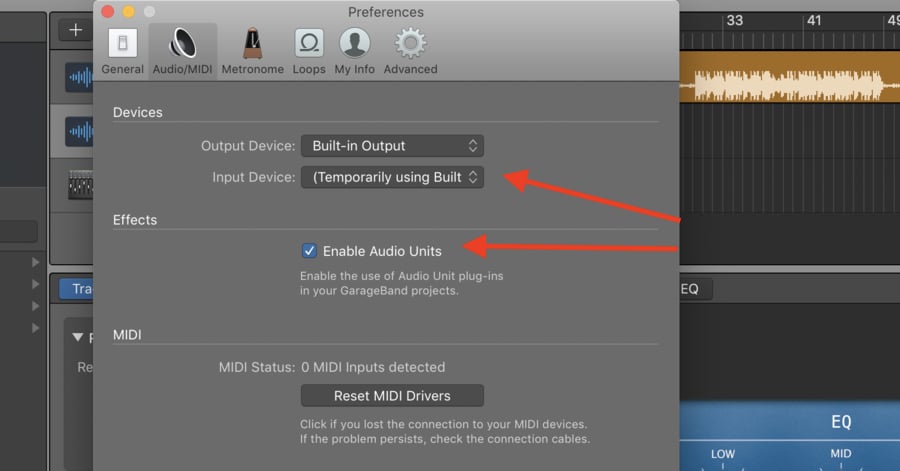
For instance, I use the Built-In Output as my external output with my iLoud Micro Monitors connected. For the input, I select the iRig HD 2.
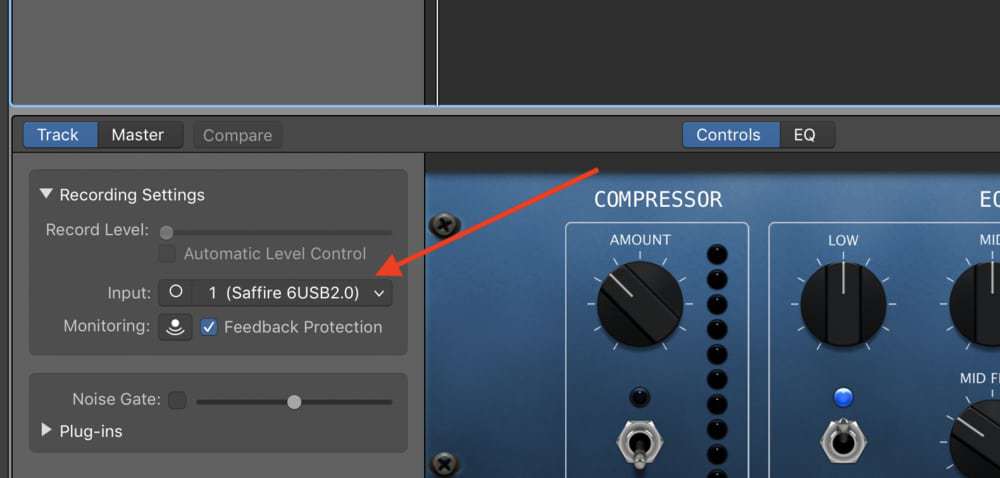
You might also have to do make this change down in the smart controls. In the image below, it says Saffire 6USB because that’s the other audio interface that I use.
Garageband will recognize the name of most devices.
Eliminate Feedback Protection
It might be worth your time to eliminate the Feedback Protection because I find that it gets too annoying.

Garageband will sometimes pick up on feedback when there isn’t any, and it disrupts your workflow.
Use this advice at your own peril though, because I think that it can cause your computer to crash if the feedback becomes too much for the computer to handle.
YouTube Video Tutorial
Conclusion
I hope this article was helpful to you. As my own songs improve, I’ll make sure to show you every step of the way.

 Written By :