GarageBand is one of the easiest music production and recording applications to start with because of the Apple Loops database, simple interface, automated drummer, time-quantizer, MIDI editor, piano roll, easy recording capability, as well as its ability to simply download 3rd party plugins.
Most of the features in Garageband are quite easy to use and even simpler to figure out which is one of the reasons why I argue that it’s great for making music. With the help of all the YouTube tutorials and guides on the internet, learning the ins and outs of the software isn’t a daunting task.
Additionally, Garageband comes in two different formats, iOS, and Mac, so regardless of where you are, you can make music or at least practice your chops.
1) Apple Loops
As I’ve shown before in my guide all about them, Apple Loops are accessed on the top-right corner of the DAW. You just have to click on the symbol that looks like a hose being wrapped around something.
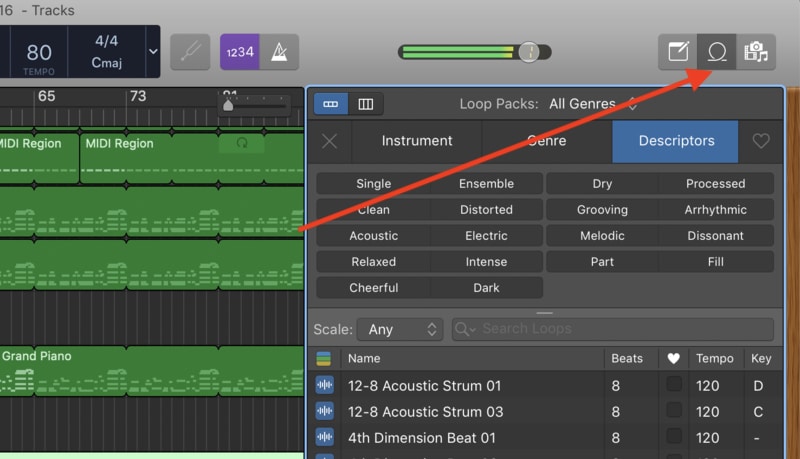
All of the loops are organized in a very easy-to-navigate way, including genre, instrument, descriptor, and you can set up additional parameters such as scales, or whether they’re in a major or minor key.
These are great for making rap beats or any other genre really – which is one of the reasons why I argued that Garageband is awesome for beat-making.
Additionally, each loop is categorized by the key signature as well as the tempo, so it’s easy to match different loops together to get the desired sound.
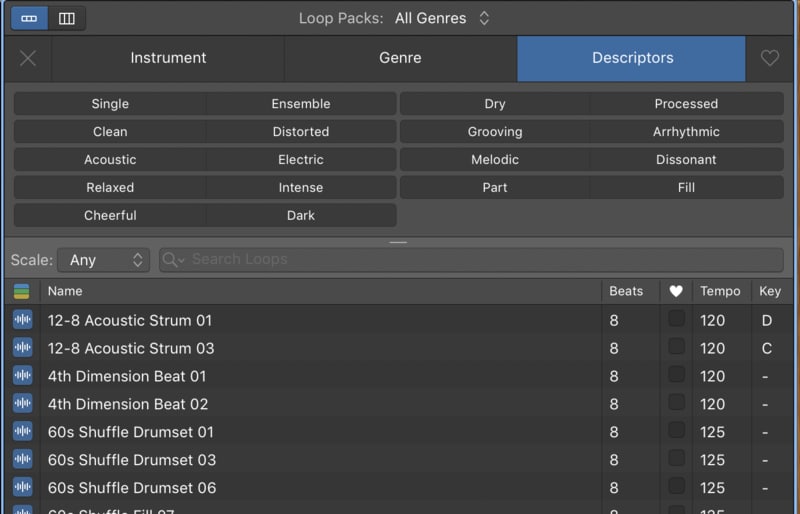
It’s also worth mentioning that the names the designers chose for each loop respectively are simple and not confusing.
The loops are also categorized by the audio format as well, whether it’s audio (blue), MIDI (green), or the drummer track (yellow).
2) The Simple Interface
Quick-Help Button
Garageband’s interface is incredibly well-designed in my opinion, and it also comes with a Smart Help option at the top-left corner of the interface, that looks like the question mark.

The purpose of using this is that it actually acts as a guide for when you first start out.
If you click on the Question mark icon that I just mentioned, anytime you hover your cursor over something in the interface, you’ll get a convenient and simple-to-read description of what that function is and how to go about using it.
There’s no guessing game, Garageband will tell you exactly what it is.
Colored Identification
Garageband files come in a number of different formats, notably, the Drummer Track (yellow), Audio (blue), and MIDI (green), that way you know what kind of file you’re working with.
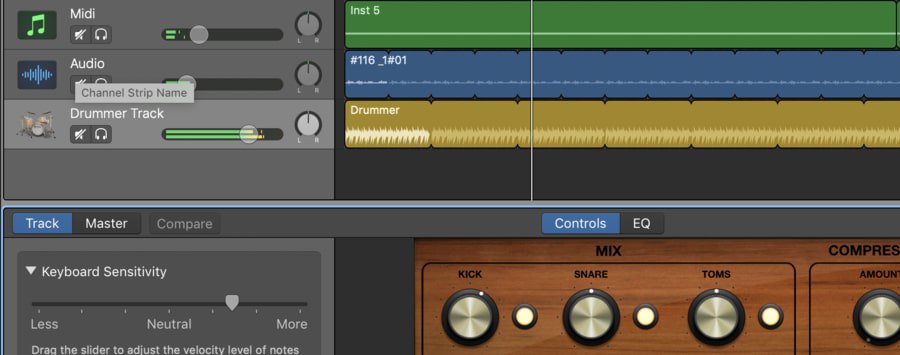
The idea behind this is that it informs your decision on how to go about working with the audio file.
Additionally, something I just discovered recently is the fact that you can actually convert a Drummer Track into a MIDI region, for the sake of customization but not only education.
In other words, if you’re wondering what the drummer track looks like in MIDI, you can convert it and study what it is about it that makes it sound the way it does (my guide on converting drummer’s to MIDI).
Looping, Size Pointer, and Commands
Understanding how to loop MIDI, Drummer Track, and Audio regions takes literal seconds to figure out in the interface. For instance, to loop a region, you just have to select the re-size pointer and drag the region to wherever you want it to go.
It also comes with a ton of different commands that streamline the process. You can check out what some of these are now:
(Command + T) – This is arguably the function you’ll use most, as it’s the command responsible for slicing up tracks and moving them around.
(Command + K) – Opens Musical Typing (GarageBand’s built-in keyboard)
(Command + J) – Merges track regions together. Using your cursor, select the desired regions and then hit the aforementioned function to join them as one.
(Command + Option + S) – Opens up a new software instrument track.
(Command + D) – To duplicate the track with all the same settings, including plug-ins, use this function.
(Command + Option + A) – This creates a new Audio Track.
(Command + C) – This will copy any piece of music.
(Command + Option + U) – This will bring up a brand new drummer track.
(Command + V) – This will paste that very same music into a brand new track.
(Y) – Brings up the Library of instruments.
(B) – This command brings up the Smart Controls or hides it.
(P) – Opens up the Piano Roll, the place where you can edit the MIDI notes.
(E) – Brings up or hides the Piano Roll or the Editor.
(Command – Z) – Undoes a recently completed action. You’ll come to love this function because if you make a mistake, you can go back to where you were.
There are even more functions for Garageband, however, these are some of the ones I use on a regular basis.
3) The Drummer Track
If you’ve perused the Garageband side of YouTube at all, you’ll notice the particular praise for the drummer track, which is 100% warranted.
The Drummer Track comes with a plethora of options and customizable features that are very intelligent and easy to use.
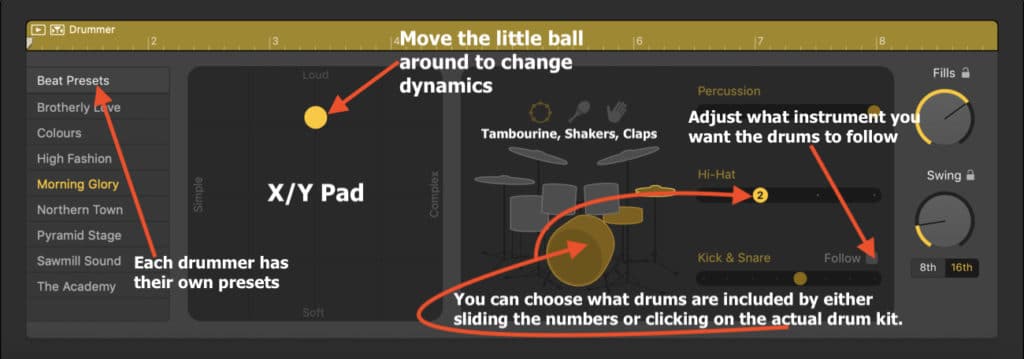
You can customize the drummer track in a number of ways, including by the genre, the tempo, the style of kit, the actual drum pieces, or even the person drumming.

As I wrote about in my article specifically on the Drummer Track, the three main parameters of the drummer track are the individual drummer, the genre, and then the sub-genre. Of course, those settings are then divided up into other options.
Once you’ve selected the actual drummer and the genre he/she falls into, you then have at your disposal an additional interface that explores the parameters of its sounds, for instance, the complexity, loudness, softness, in addition to syncopation and fills.
What makes all of this stuff easy to use is the effective use of labeling and controls that don’t take a lot of thinking to understand.
For instance, if you just want to increase the complexity of the drummer track, all you have to do is drag the little ball around the trackpad.
4) Time Quantizer and Note Editor
In my article on the most common errors Garageband users make, I revealed that one of the big mistakes I made when I first started using the software was not using the Time Quantizer, which is very easy to use and streamlines the editing process.
To use the time quantizer, you only have two options, notably, the strength of the time quantizer in addition to the type of note. For instance, you have 1/16 notes, 1/4 notes, 1/2 notes, and so on and so forth (more on the time quantizer in my tutorial).
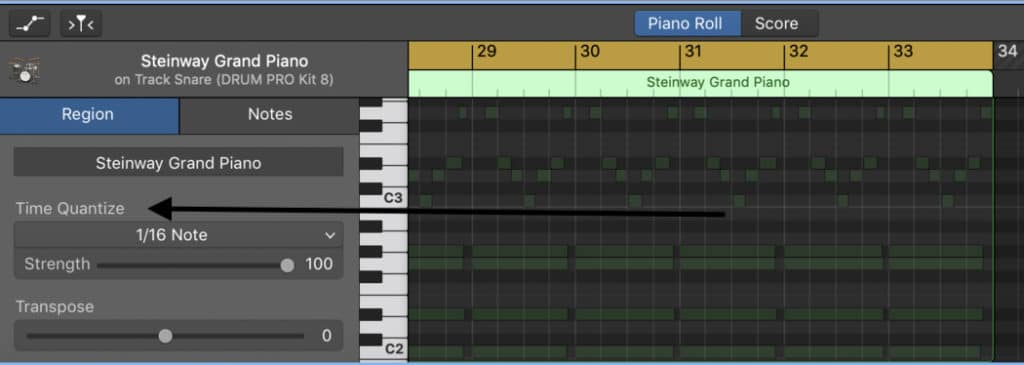
Once you’ve used the Time Quantizer a few times, you’ll already have an idea of how to go about using it, due to the fact it’s not that sophisticated in its parameters. And this is also one of the reasons why Garageband is so easy to use.
Most of the settings and features are not sophisticated in their options, and if they are, everything is labeled in a comprehensible way.
However, the lack of sophistication is also the same reason why it’s just a beginner music production software, and it’s not necessarily the most “professional” software to use.
For instance, the Logic Pro X compressor versus the Garageband compressor is just one example of the differences between the two. The Logic Pro X compressor has way more options, whereas the Garageband compressor just has four.
With that said, you can download more sophisticated plug-ins to use.
The Note Editor, or the Workspace, is another aspect of the DAW that I’m a big fan of, however, the way that Garageband does it is pretty much the same as other more popular DAWs, for instance, Logic Pro X and FL Studio do it in the same way.
You can select the notes and drag them out to the desired point. You can delete them or bring them back to the way they were.
It’s worth mentioning that Apple’s (Command + Z) function is a real time-saver as well. If you’ve made a mistake and quickly want to undo it, it’s as simple as just using the command, and the computer’s memory of nearly everything you’ve done goes back very far.
The only way Garageband forgets what you have done is if you open a new file.
5) The Piano Roll
As I just mentioned here and in my piano roll guide, Garageband’s Piano Roll/Note Editor functions in the same way as other DAWs like FL Studio. You have your piano keyboard on the side, and then the grid-lines beside it so you can see whether or your notes are on the grid or “in-time” or not.

A less popular option, but extremely useful nonetheless, is that you can actually switch the Piano Roll to be a score editor, so you can actually look at the standard notation version of the music (I have a guide on this too).
This is a less popular option because there are fewer people out there who can actually read music. But if you know how to read music, you have this option at your disposal, which is what makes it so great.
6) The Factory Templates
The factory templates are what comes up when you first open Garageband. You have a number of options, including Songwriting options, hip-hop, electronic music, rock, and so on and so forth.
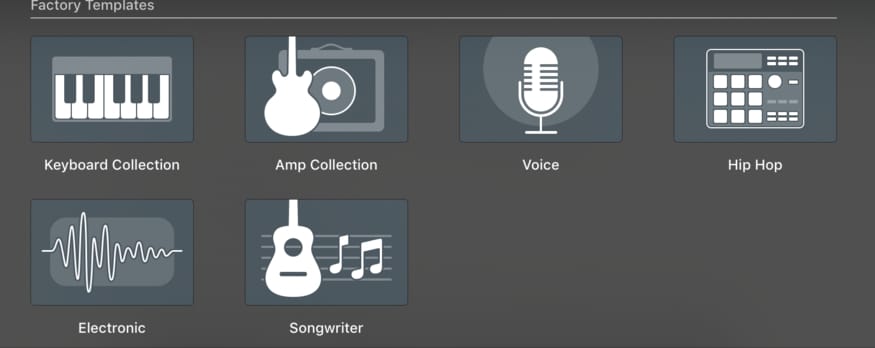
What this does is that it gives you a set-up of instruments and amp modelers to use, whether it be an actual amplifier simulator or a synth, drum machine, or what have you.
In other words, through the factory templates, you can get to making music right away if you don’t know how to use the software because the software gives you options for what to do right from the get-go.
Moreover, the factory templates come with vocal settings as well, for instance, you can choose from a Studio Vocal or a Compressed Vocal, or a Natural Vocal, and so on and so forth.
7) The Plug-Ins
An explanation of how useful a DAW is can’t be finished without mentioning plug-ins and how to install them. It’s really just as simple as downloading the AU version of the plug-in, and then dragging and dropping it into the components file, however, if you can’t figure it out, just check out my guide.
On the actual settings of the plug-ins, and I mentioned this already, what makes Garageband a bit easier to use than Logic Pro X and other DAWs is that the stock plug-ins are less sophisticated in their parameters and settings.
In other words, there are fewer settings to be confused about, so once you’ve grasped the purpose of each parameter, you can then move on to more sophisticated plug-ins like Melodyne 5 or the incredible mastering suite from FabFilter (both are on my product page).
YouTube Video Tutorial
Conclusion
All-in-all, I can honestly say that Garageband is very simple to use which is the primary reason why it’s a great software for beginners to music production. Personally, I think it’s perfect for the beginner, not only for its easy to use interface but for another important reason: Logic Pro X.
Once you’ve stepped into the world of music production and audio engineering, and you’ve really familiarized yourself with some of these concepts and tools, it’s quite easy to then transition into a more complicated and “professional” DAW such as Logic Pro X.
Garageband is basically a much simpler version of Logic Pro X, so whenever you start to feel limited in its use, you can then move on to Logic Pro X.

 Written By :